
This Solar House
Many people think to have a zero-energy* solar home, you need
to start with new construction, spend a small fortune, and/or
lose comfort or convenience. But we found that was not the
case. In just over a year, we transformed our 1960s tract
house in southern California into a solar-powered,
energy-efficient home. While the initial investment was
substantial, we funded it through an affordable home-equity
loan. The makeover will pay for itself in seven years, after
which the energy for our home (and our electric car) will be
entirely free. And with these changes, we annually offset at
least 21,000 pounds of carbon dioxide—a key pollutant in
global warming—that our pre-upgrade home and car would
otherwise have added to the atmosphere. In this feature, let
us show you in detail how we went about our zero-energy
retrofit, which saves money, energy, and the global
climate.—Norma and Alan Williamson


|
|
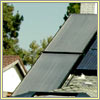
Solar, Part 1 (Dec 2003)
We moved into our
2,300-square-foot house around Thanksgiving 2003. Within
a month, in order to make use of state rebates that
would decrease after the first of the year, we purchased
a 6-kilowatt photovoltaic (PV) system. Installation
occurred in two phases. First, in December, we installed
the 4-kW array of 35 sapphire-blue PV panels that you
can see on the south-facing side of our main roof; eight
months later we added the 2-kW set over the garage (see
"Solar, Part 2" below). This 6-kW PV system supplies all
our energy needs, from our home's heating and air
conditioning to the "fuel" for our electric car. (To
learn how PV panels work, see
Inside a Solar Cell.) Cost: $36,000 (6-kW system; after rebates and
tax incentives totaling $17,500, our out-of-pocket
expenditures came to $18,500)
|

|
|
Insulation (Jan–Feb 2004)
As part of
our goal to make our home net-zero-energy—that is,
generating more energy than is consumed—we set
about improving our home's insulation. In January, we
contracted a company to inject cellulose (recycled
paper) insulation into the walls, bringing them up to an
R15 level. (The R-value indicates the resistance of a
material to the passage of heat and cold.) The following
month, we replaced our leaky, single-glaze aluminum
windows with dual-pane thermal windows. These are
so-called "low-emissivity" windows, which keep winter
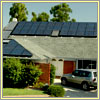
heat in and summer heat out. We left our front picture
window (behind car in main image and at left)
intentionally non-low-emissivity, so the winter sun
could warm our living room—a passive solar
technique. Cost: $1,300 (insulation), $10,000
(dual-pane windows)
|

|
|
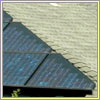
Roof (Mar–Jul 2004)
To further
increase thermal resistance, we decided to replace the
roof and upgrade our attic insulation. In March, we
removed the 4-kW solar array as well as the existing,
substandard roof tiles. The following month, we brought
the attic insulation up to an R30 level. Then, in June,
we installed aluminized solar sheathing on the roof.
This is a thermal reflective plywood that keeps external
heat out and reflects interior heat back in. We also
installed roof jacks (to hold up the solar array) and
then a new composite shingle roof. Finally, in July, we
put in a whole-house cooling fan and whole-house
heat-recirculating system (as well as two skylights, one
seen in the center of the roof). The fan cools the attic
and ceilings when outside temperatures are high, while
the heat fan shuttles warm air from the attic to the
ground floor when outside temperatures are low.
Cost: $300 (attic insulation), $23 per 4' x 8'
board (solar sheathing), $4,000 (new roof), $600
(whole-house fan), $570 (whole-house heater), $1,450
(two skylights)
|
|
|
Solar, Part 2 (Aug 2004)
This month we
reinstalled the 4-kW solar array over our main roof and
put in place the 2-kW, triangle-shaped array of 14
panels over our garage. Our now 6-kW solar system
includes a 4-kW inverter to convert the DC electricity
coming from the solar panels into AC to power our
appliances. Most homes wouldn't require a 6-kW system;
we added the extra 2-kW solely to power up the 24 nickel
metal hydride batteries in our Toyota RAV4 all-electric
vehicle (seen in main image). In fact, because we now
generate more solar energy than we can use, we welcome
friends who own electric vehicles over to charge their
car batteries for free. Cost: included in costs
noted in "Solar, Part 1"
|
|
|
Battery Backup (Sep 2004)
To be prepared in
case of blackouts, we installed an 8-kW battery reserve
system. This includes an inverter and charge controller
that regulate energy flow to and from the batteries. If
the utility grid goes down and we have a string of very
overcast days, our batteries will give us about three
days worth of conservative electric use. If the sun is
shining, we have unlimited energy, of course.
Cost: included in costs noted in "Solar, Part 1"
|
|
|
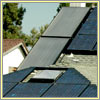
Solar, Part 3 (Oct 2004)
This month we
replaced our natural gas-fired water heater with an
active, closed-loop solar hot water system (see the two
gray solar panels visible on the left side of the roof)
and a new 220-volt electric hot-water heater.
Cost: $2,500
|

|
|
New Heating/Cooling (Jan 2005)
The final
step in making our house comfortable involved replacing
the old, five-ton heating, ventilation, and air
conditioning (HVAC) system with a split-ductless heat
pump/HVAC system. This is a three-zone system, with
small units in the den, dining room, and upstairs master
bedroom. The system has an outside central operating
unit and a compressor-heat exchanger that is about half
the size of a typical air conditioner.
Cost: $4,200
|
|
|
Costs & Benefits
After $18,500 in
rebates and tax incentives, the total cost for all our
energy-efficient improvements and our solar system,
including labor, came to $43,000. We calculated that, if
we had not made the retrofit, our energy bills for 2004,
including fuel and oil for a gas-powered car, would have
come to $6,000. With the upgrades, we have no energy
costs (except for $5 a month for the one therm of
natural gas we use, mostly for cooking). Thus, our
entire energy makeover will pay for itself in just over
seven years ($43,000/$6,000 = 7.2). And because our loan
for these improvements is based on home equity, the
interest payments are tax-deductible.
Since we remain connected to the utility grid, Southern
California Edison's time-of-use billing program measures
our overall electricity consumption and production.
Rates vary depending on season and peak versus off-peak
hours. With normal sunshine, we can actually see our
meter "feeding the grid." Our electricity production
earns us "use-it-or-lose-it" credit from the utility. In
summer peak hours (10 a.m. to 6 p.m.), we can earn over
40 cents per kilowatt-hour; even during off-peak summer
hours and in winter, we can earn credit. Each year, our
credit amounts to between $200 and $300.
It's true that we live in warm, sunny California, which
has some of the best rebates and tax incentives for
going solar in the nation. But wherever you live, you
can benefit from energy-efficiency and renewable-energy
upgrades to your existing home and become part of the
solution to global warming. See
Resources
for more general information. For more specifics on the
Williamsons' retrofit, see this
article
published in Solar Today Magazine, from which our
feature was drawn.

*Note: "Zero-energy" here refers to energy purchased,
not energy used.
|
|
|


