Focaccia for Dessert with Craig Kominiak
Season 1 Episode 1 | 24m 8sVideo has Closed Captions
Chef Kominiak of New York City's Ecce Panis Bakery makes focaccia, a flat Italian bread.
Executive chef Craig Kominiak at Ecce Panis Bakery in New York City visits Julia Child in her kitchen. Kominiak bakes focaccia, testing the elasticity of the dough by stretching it to see the "window." He creates a sandwich with the baked focaccia. Baked with fruit and topped with sugar, focaccia can be also used as a dessert or a breakfast item.
Problems playing video? | Closed Captioning Feedback
Problems playing video? | Closed Captioning Feedback
Focaccia for Dessert with Craig Kominiak
Season 1 Episode 1 | 24m 8sVideo has Closed Captions
Executive chef Craig Kominiak at Ecce Panis Bakery in New York City visits Julia Child in her kitchen. Kominiak bakes focaccia, testing the elasticity of the dough by stretching it to see the "window." He creates a sandwich with the baked focaccia. Baked with fruit and topped with sugar, focaccia can be also used as a dessert or a breakfast item.
Problems playing video? | Closed Captioning Feedback
Where to Watch Baking With Julia
Baking With Julia is available to stream on pbs.org and the PBS app.

Visit the Julia Child Experience
Get recipes, read tributes from celebrity chefs, and more. Bon appetit!Providing Support for PBS.org
Learn Moreabout PBS online sponsorshipBoom!
Hello, I'm Julia Child.
Welcome to my house.
What fun we're going to have What fun we're going to have baking all kinds of incredible cakes, pies and breads right here in my own kitchen.
Craig Kominiak, executive chef at New York City's renowned Ecce Panis Bakery never got to make focaccia like these when he was a Navy cook.
Today, Chef Craig will teach us his secrets.
Join us, on...
Behold the bread!
Or, I should say, behold the focaccia.
And these all are focaccia of one type or another and they're going to be made for us by Craig Kominiak of the Ecce Panis, or "Behold the Bread," Company in New York.
Right, exactly.
And are we going to start the dough?
Let's start it.
We want to take a half cup of water-- which you already have measured out there-- and put it in here.
And then we 're going to take two tablespoons of yeast.
Dry, active yeast.
Dry, active yeast.
You can use fr esh yeast also.
Do you ever use that instant yeast?
I haven't, no.
Probably not at the bakery.
No, we use a lot of fresh yeast when we're making ou r large batches.
And what you want to do here is just whisk it in a little bit to activate it.
It just kind of helps it out a little bit just to get the yeast going.
Let it sit there and bubble on the side a little bit.
We're going to take ou r water-- and we need a cup and th ree-quarters of water-- and what we're going to do to it is add some oil.
That'll add some elasticity to the dough.
We're going to fill that up ab out a quarter of a cup.
What kind of oil?
We use olive oil.
Now, what we 're going to do is take some of the flour.
And, uh, right here we have some flour already measured out and it's two pounds-- so there are seven cups.
What... what kind of flour?
This is all-purpose.
It's a very nice, soft... Is it bleached, unbleached?
It's unbleached.
Unbleached, all-purpose .
So we'll just take some of the liquid and put it in here.
And we're going to take a little bit of the flour.
We'll put that in here.
And I like putting so me of it in a small bowl li ke this.
And then we'll pu t it on the dough hook and on the machine an d just combine it a little bit.
So, what we're going to do is just put it in here a little bit-- get it activated, st art mixing it around.
So, we have it going there a little bit... coming together.
And then we'll just dr op it down and, on side here we can add th e rest of the flour.
And that's just sort of started to mix Right.
And then what we'll do is add the rest of the water.
And I always like to hold back a little bit on that.
How much water in all, about?
With the oil and all, yo u have two full cups.
We'll bring this up here.
Okay... You can see by the way it's mixing we're going to probably to need it all.
It's coming together nicely.
What you're looking for is the dough to come away from the sides-- to come into a ball.
And that's coming together ve ry good.
There's a nice ball now.
Okay, wh en the dough comes to a ball like this ar ound the hook a lot of times it just stays to the middle of the hook on there.
So what we want to do is just... you might ha ve to do this one or two, th ree times possibly and you're just mo ving it down.
I like using the food processor.
That's another way of doing it, sure.
You don't have all this trouble with it.
Right, it's just a nice, st raight mix there.
Bring this back up.
Okay, when it co mes to this point we're going to be testing the dough and... it seems like it 's really nice.
And basically what we want to look for is a window in the dough-- it's just wh at they call... and that will actually sh ow you the elasticity of the dough.
So, basically wh at you have to do is take it out.
And you want to bring it out a little bit so you can almost... se e right through the dough.
Huh...
If it wasn't ready, it would just rip on you.
I see, so it's really fully elastic.
...create your ni ce elasticity so you can see th rough the window.
And that looks re ally nice.
It isn't too sticky.
No, not at all-- it's not a very st icky dough at all.
Yes, I see, you can pull it way out.
Right, almost like a strudel dough-- you can really pu t it out.
And then what you might want to do is just finish it on the table a little bit just to bring it to a nice ball.
The more time you can le t it rest and relax...
The first time, we'll let it rise in a bowl-- in an oiled bowl-- for maybe about an hour an d a half to two hours to come and double in size.
And then, what we can do is we'll just take a little oil here, oi l the bowl... so it doesn't stick.
Put that right there.
Well, it certainly looks... it has a nice look.
A nice shine, ri ght, exactly.
Put a little pl astic wrap on there and that'll kind of ke ep it from holding a crust and still keep it ni ce and moist.
Now what we have it in a bowl covered with plastic here we're going to let it ri se twice.
The first rise will be ab out an hour and a half or until double in size.
And just keep it right at room temperature?
Right at room temperature, ex actly.
Then we're going to punch it down again and let it rise a little bit more.
Um, it's going to take an other hour or two or till it comes up a little bit more.
And then what will happen it will ac tually come up... Well, that's the second rise, though.
This is after th e second rise, exactly.
And that looks... that really has doubled, hasn't it?
Yes, it has.
And it's nice and airy.
And you can see th at this is the second rise so, it's still come up re ally nice and it's really nice an d airy and fluffy.
It is, yes.
It's just a great dough.
Okay, and then what we would do from here to give it more time an d to create more character what we'll do is just pu t a little flour on the table here.
This is beautiful, isn't it?
Very nice.
It's sort of billowy and lovely.
And what we're go ing to do here-- you can do it to any de sired shapes or sizes creating whatever yo u would like.
Basically what we 're going to do here is evenly distribute it in to three even pieces.
Well, this is how you punch it down.
Right, just turning it ov er and in and making a round an d then you're just...
I'm just going to tighten it underneath.
With your... Because a lot of times you see "punch it down" they just go plunk, like that.
Right, and they ju st let it go.
But that isn't redistributing the yeast.
No, not at all.
You're doing it the right way.
Right.
Good.
You can hear... you can hear those bubbles deflating.
Oh, exactly, exactly.
You can even see th e little bubbles on top of the dough.
That's what creates the whole focaccia and that's what yo u're trying to get.
You're just turning it...
I'm just turning it to the middle.
Yeah, pressing it.
Put a little flour on there-- you don't need much flour-- an d just press down.
But you're really fully deflating it.
Yes, pretty much on this one.
You can hear that little bubble go... ( imitates popping ) Yes, you can.
So, basically, what we're trying to do is seal the bottom off an d cover it in.
This is really the way you form a boule.
That's way you form a ball, there.
And then, what we're go ing to do here is we're going to take the doughs and let them relax again.
And this is going to be done overnight.
And what we do is just ta ke some plastic bags here and we're just going to take a little oil.
That's so it won't stick to the bag.
Right, and we just mush it around a little bit.
And here, what we'll do is we'll... we'll stick it in the refrigerator and let it come to a very slow rise.
It could be 24 hours, 36 hours.
It's a very durable dough.
That looks so nice...
It is, it's a... A neat, little ball.
Yeah, I like that.
And this will last... You can make the dough an d let it sit for a couple days.
You don't have to worry ab out rushing it.
You can make it one day, us e it the next or whatever you ha ve with that.
And then from there we'll let it sit in the refrigerator for 36 hours until it rises an d you're ready to work it.
Good.
Well, this is that dough that has rested.
Yes, it is.
And it's at room temperature now.
Right, we had it in the refrigerator for about 36 hours an d then we brought it out and we let it come to room temperature for about an hour or so.
So now it's ready to roll.
It's ready to roll.
We have fresh thyme an d rosemary.
And the great part ab out focaccia is there is no one way of doing something.
You can use any herb yo u want, any toppings and we're just going to do a few today-- different shapes an d sizes.
But there's so much yo u can do with focaccia.
What you want to do is , like cooking anything you want to get th e most flavor you can actually get in to anything.
So, what we did wi th the oil here is we infused it a little yesterday there with some virgin olive oils an d some herbs.
Yeah.
It looks like we 're ready here.
This is just great.
So, we'll start wi th the first... the first dough.
We use a little flour here.
Put some on your hands.
Now, this dough is just... very nice.
It looked lovely.
It's a little... Oh, it isn't damp, it's the oil.
It's the oil that wa s put on there, right.
So what we're going to do here is... pat it down a little bit.
And we'll take just a regular razor blade.
And then we... we just let a little of the gas out to flatten it down a little.
And this is just go ing to be a basic item th at you can use for anything you like-- sa ndwiches... You can just cut it up an d have it...
It's a nice ripping bread.
What we'll do is we'll just brush it wi th a little oil.
That's your herbal oil.
That's it.
And we'll take some of the herbs and just... put them down and around.
You press it in a little bit.
Right, just to make sure it sticks.
So what we'll do is we'll just get the peel.
Okay.
A good old pizza peel.
You know what we'll do here is just put a little co rnmeal on.
Oh...
This will keep it ju st from sticking when we slide it in the oven.
This is just plain, ordinary cornmeal.
Right, a little co arse cornmeal.
We want to direct th e flow of the dough so what we're going to do is we're going to cut it a little bit so that when it bakes wh at would happen is... What would happen if we didn't do that it would grow up in to a big pita and it would just make it a hole in the middle.
But you want to have th e bread in there so we're going to cut it th is way to direct it.
And that keeps it from puffing up.
Right, you do that wi th most bread doughs to direct the flow of the dough the way you want to do it.
We'll just put this be hind us.
We're going to let it rest fo r about ten minutes.
Mm-hmm.
And the next item we 're going to make is... We're going to make a traditional fougasse.
That's this thing here.
Exactly.
A big, sort of like a big paw.
Right.
I'm going to do th e same thing-- add a little flour to it, pr ess it down.
And we're going to just let out some of th e initial gases here.
That's very interesting... You can hear it swish out, too.
And what we 're going to do is just try to get it a little... pulled out a little bit.
That's interesting, on your hand.
Right, actually, what I'm doing I'm just, just pulling it and guiding it.
I'm pinching the edges here be cause what I want to try to do is pull the dough out evenly.
Basically what we're doing is just trying to come out to a bit of a teardrop-- a little wider in the bottom.
And we're just going to take ou r little razor blade and just cut it up.
Just push straight down, di vide it a little bit.
And you can put as many cu ts in there as you want.
A little wider, depending on what you... so desire.
You just push th at straight down.
That's nice, kind of a leaf shape.
Exactly.
And what we're go ing to do here is... And this just opens it up?
Yes, you want to keep those gaps in there.
And then what we 're going to do is put it on a sheet pan.
And that's with that plastic paper on.
Right, a little pa rchment paper.
Parchment paper.
And the reason why we do bake it on a sheet pan is so that... it 'd be very hard to slide this off a peel an d keep its shape.
It certainly would.
So, just pick it up gently an d lay it down.
It certainly would.
Oh, isn't that beautiful?
Okay, and then one of the traditional pa rts about it is the oil and the herbs.
And you're...
I see you're pressing them in as you put them in.
What I do is I just gr ab a bunch in my hand and I just put it on there an d it actually sticks to it.
And then what we 'll do there we'll add some of the coarse sea salt and that's the... Is that the same as kosher salt?
No, I think this is ju st actually sea salt that's in the rough.
It will hold and it won't dissolve once it's baked.
You want to see that, like a nice, large-sized pretzel.
We'll do the same thing wi th this.
We'll just put it on th e side and let it rise up... That's fascinating to see that.
Right, and what we're going to do from here is we're going to take ou r last dough...
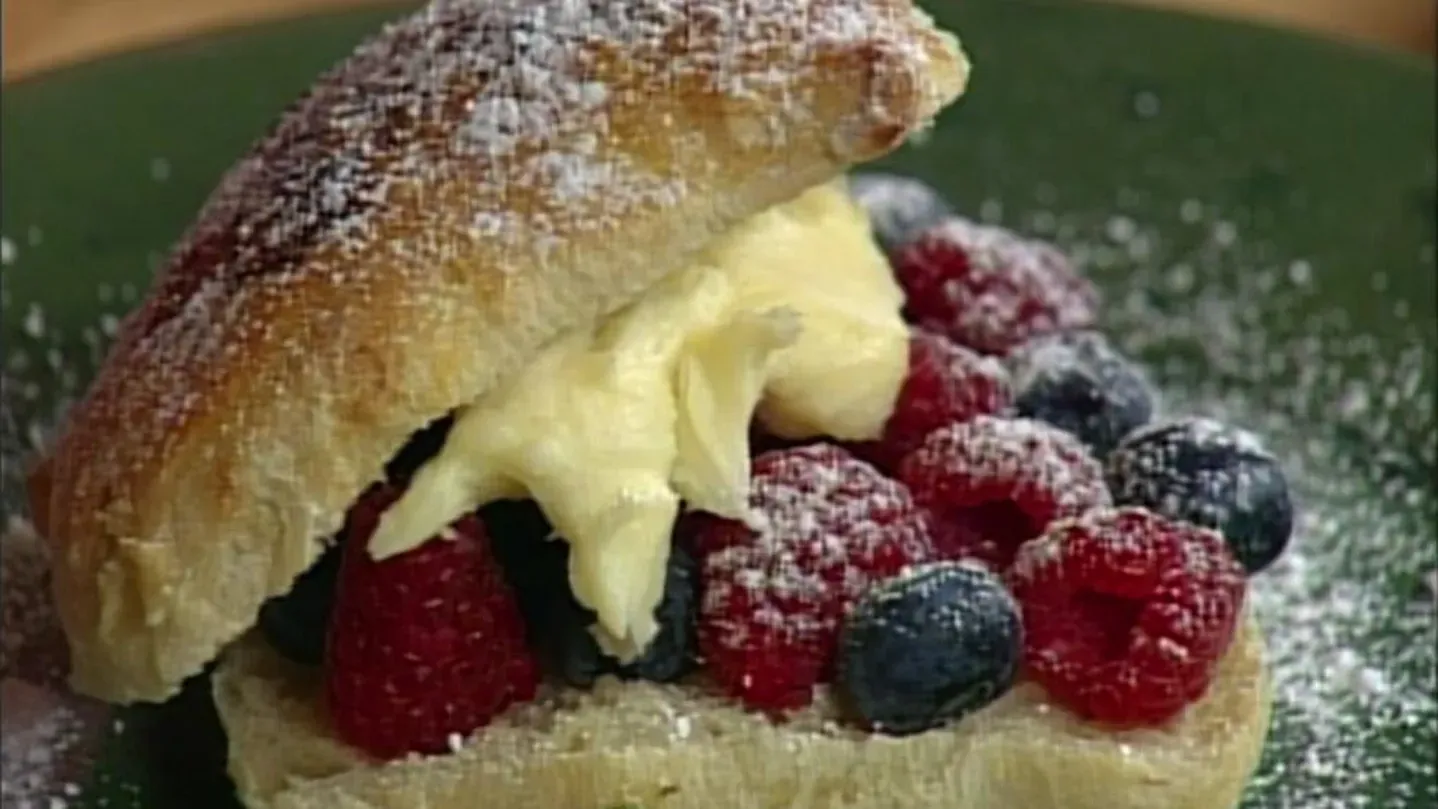
The dough's very good for a dessert or a sweet item, too.
So, what we do here is we just take it pat it out th e same exact way little bit more flour take out some of the gases.
Be gentle with it.
You don't need to o much pushing.
What we're going to do here is we're going to actually...
I'm going to cut it in to four pieces, okay?
Just put it ri ght on here.
Now, what we're going to do with these are... we're going to make fr esh fruit focaccias and then we're ju st going to make just a little ba ked sweet item.
Good.
We'll just brush them ag ain with a little oil because we're ju st dampening it.
The flavor's not going to really have an effect on it.
Some people wo uld rather not have the herb in there, but...
I think a lot of people are using herbs with sweet things.
Sure, it's one of the ne w things people are doing.
Have to keep up to date.
Today's times.
Yes, sir.
What we're going to do is just take some tu rbinado sugar, which is... What's that?
It's basically su gar in the raw.
It hasn't be en processed...
It's not... it's not brown sugar.
Right.
I guess you get that at a health food store.
Health food store, ex actly.
We're just going to ta ke some fresh berries.
Mmm.
These look really, re ally nice, look great.
And with this, what we're going to have to do a little bit is cut the inside and that's so it doesn't bl ow the fruit exactly off because the dough is so strong.
So, we're going to just push that down a little bit, cu t it up.
Now, it looks awful, doesn't it?
It's just very simple fr om there.
Just any kind of berries.
I'll make one of them on blueberries and make one raspberries.
Now, you can use an y fruit you desire.
Strawberries.
Strawberries, peaches ar e very nice-- whatever's in season.
In the wintertime, apples-- Granny Smith apples ar e really, really nice.
That would be nice.
Yes, and now what we like to do here is just add a little streusel to pping on it.
And what's that?
This is just a little br own sugar mixture with some butter, so me cinnamon some regular sugar.
We'll just pu t it on top there.
And this is also go ing to be very nice.
And the real nice thing ab out making this we're not going to fry it.
So, it's just baked and it's going to be lo w-cholesterol and people are worried ab out fats today so we have a little sweet wi th not having to fry it.
You're not going to put whipped cream on it?
Well, maybe afterwards, we can se rve it with something else... People can do what they want.
Exactly-- on ce it comes out you can... ice cream or whipped cream or whatever...
It really looks as though it were starting to rise right now.
It is, it is.
And I think maybe we ca n put it in the oven.
You think right now?
We could start wi th our other ones because they've re sted a little bit.
Okay.
And we'll let these rest for awhile... Fine.
while we pu t those in.
The plain focaccia ri ght here is actually going to be right on the stone.
There-- you have a hot stone there.
What we want to do is just ea sily slide that off.
And that cornmeal really does it.
Right, and then wh at we'll do is put the other on e underneath.
So, what we want to do is put it in a 450-degree oven for about 20 minutes or so.
And then we'll be seeing wh at we have after we come out.
Ooh, that looks... that's good.
Now, how do you know it's done?
By the color an d the time it's in there.
But also, you want to be able to just flip it over and nice brown and hear th at nice solid...
If it ain't brown on the bottom, it ain't done.
Right.
It needs a little bit mo re firmness.
What we'll do now is, I guess we'll just put in the dessert and the sweet fo caccias that we did.
We'll put those in for ab out 20 minutes or thereof.
Here's our square focaccia as we had made prior to that and today we have a nice grilled vegetables th at we had done... We certainly do.
Nice marinade, wh atever you like as far as dressings-- a nice balsamic vi negar and oil.
What we're going to do here is just going to cut it in half.
Very nice holes and pockety...
Smells good.
Right, and that's what we 've been trying to do as far as create all this.
What we can do here is pu t a little olive oil that we were using wi th the thyme for... or you can use a pesto or anything you'd like.
And then we'll ta ke some zucchini.
These are all sort of grilled or broiled vegetables?
Right, exactly.
Zucchini, and then we'll go to a different color here.
Maybe we'll try some red tomatoes in here.
So then we can just maybe grab some eggplant here.
Aren't those wonderful?
Roasted peppers, ve ry nice.
Mmm, love them.
And maybe a little basil here.
Basil certainly smells so good.
It's nice and green.
How about some yellow?
Yellow tomatoes on there.
Those are lovely, aren't they?
We can put some go at cheese on there, th at's always nice.
Break that up an d just crumble it on top.
From here, it 's either finished or what we can do is just put it right in the oven and it's great to just... me lt it all and bring it all up to a nice warm temperature.
Just leave it on open-faced?
You can use it for op en-faced like that or actually put th e top on there.
or actually put th e top on there.
Maybe put it in there an d let it melt a little bit and then you want to put th is in there to crisp back up.
But one of the ways we can do it since we're just going to warm it up a little bit is put the top back on and we have a baking sheet ov er here... put it in there.
Is that a no-stick?
That's a no-stick, th at's fine.
We have a nice crust on the bottom and we can go from there.
Put it right in here to warm.
These are coming up nicely.
These are coming up very nice.
We just have to wait fo r all those to go.
Look what we've done in not very long with these fruit tarts and these, I don't know what you're going to do with.
And this wonderful big sandwich.
And that...
This is a fougasse.
That fougasse.
I think this is very impressive, Craig.
How do we eat them now?
Well, you just cu t into them.
Let's just start wi th the sandwich first.
Okay.
What we'll do is we 'll just push it down.
And that you heated up in a 400-degree oven?
Right, just for a couple of minutes.
It sounds good.
Just to... ni ce and crisp it up.
When you serve it do you have it cut up and then people...?
No, I think... yo u can, if you'd like if you're serving.
I believe one of the ni cest things about this is just putting it on and it's very festive, ju st putting it on the table.
And then letting people eat it themselves.
Let people eat it th emselves, exactly.
That warming it up made the cheese melt.
That looks lovely.
Right, and it also cr isps up the bread nicely.
Yeah, then you just take a big bite.
That's it, and I think yo u just grab it with your hands there.
Mmm.
Nice, very nice, crispy.
And the vegetables were carefully made.
Exactly.
That's delicious.
Now we can take th e sweet items.
This is the focaccia that we had just br ushed with a little oil and put on th e turbinado sugar that caramelizes re ally, really nicely.
It's sweet.
Exactly, and there's a lot of things you can do with this.
Just put it here.
You can take a pl ate like that... you can put fr esh berries.
These make great ic e cream sandwiches.
Well, then you'd put ice cream on the top?
Sure, but what we're go ing to do here today is we're going to put some nice mascarpone ch eese on there.
This makes a nice, si mple dessert.
Put this on here, an d then maybe just take a little po wdered sugar.
Just finish it li ke that.
That looks very nice.
Then you pick it up and eat it.
Right, or you can use a knife and fork and the other ones we made here are just the regular, si mple ones where we just put th e fruit right in there.
You can do th e same thing here by warming them up and putting ice cr eam on them... Little bit of ice cream would be good there.
Sure, and this also is a nice breakfast item in the morning, too.
Yes, that would be.
Other than a fried do ughnut or a Danish.
And that's wh at we have here.
What about your fougasse?
Fougasse-- this is th e fougasse here and it just came ou t of the oven and it's still a little warm.
So what we're go ing to do is brush it wi th a little oil.
And that just ta kes off the excess flour and gives it a nice little shine.
And then it's going to be ready for serving.
It's really not a soaking.
It's just a little...
Exactly, yo u don't want to dampen the nice crust th at you just built.
Cosmetic.
Right, th at's all it is.
It looks lovely.
That's it.
And then how do you eat it?
I find th e best way to do it is just ri pping it apart.
Well, let's see you do that.
Okay, let's break th is in half and rip it.
I think people love doing that, don't they?
Look at that.
That's beautiful.
Nice texture and li ttle bit of airy bubbles that we've worked so hard, in the time, to do it.
Look at all this!
This really is just a wonderful illustration and this is only about half of what you can do, isn't it?
Exactly.
Thank you very much, Craig.
Thank you so much.
I enjoyed my self tremendously being here with you.
I loved being with you.
Thank you.
Bon appétit!


- Food
Christopher Kimball’s Milk Street Television
Transform home cooking with the editors of Christopher Kimball’s Milk Street Magazine.


Support for PBS provided by: