Documentaries & Specials
Grant Goltz: Rethinking Blackduck Pottery
Special | 56m 54sVideo has Closed Captions
Grant Goltz's shares his theory of how precontact indigenous people made Blackduck pottery
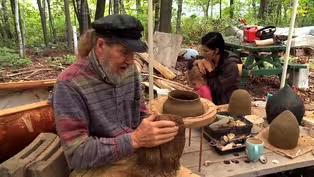
A more in-depth look at experimental archaeologist Grant Goltz. He shares his theory, developed with others, of how pre-contact indigenous people of our area made multi-functional Blackduck pottery, with a group of First Nations Women from Winnipeg, Canada.
Problems playing video? | Closed Captioning Feedback
Problems playing video? | Closed Captioning Feedback
Documentaries & Specials is a local public television program presented by Lakeland PBS
The Minnesota Arts and Cultural Heritage Fund helped support the making of these documentaries.
Documentaries & Specials
Grant Goltz: Rethinking Blackduck Pottery
Special | 56m 54sVideo has Closed Captions
A more in-depth look at experimental archaeologist Grant Goltz. He shares his theory, developed with others, of how pre-contact indigenous people of our area made multi-functional Blackduck pottery, with a group of First Nations Women from Winnipeg, Canada.
Problems playing video? | Closed Captioning Feedback
Where to Watch Documentaries & Specials
Documentaries & Specials is available to stream on pbs.org and the PBS app.
Scott: Re-thinking Blackduck Pottery is made possible by the Minnesota Arts and Cultural Heritage Fund with money by the vote of the people.
Blackduck Pottery is the term for pre-European contact Indigenous ceramics found north-northwest of Lake Superior often recognizable by their textured surface.
For decades academia has taught that Blackduck pottery was made by paddling clay with the cord wrapped paddle, similar to some Asian ceramics.
There is a new idea that challenges the old.
This new idea is practical, hands on and can be clearly demonstrated.
Experimental archaeologist Grant Goltz has developed along with his partner Christy Hohman and their associate Leigh Sims among many others, that Blackduck pottery was not paddled into shape but created inside delicately woven natural fiber bags that have not survived in the archaeological record.
I'm filmmaker Scott Knudson.
I was invited by the Manitoba Craft Council to join a group of First Nations women, including Indigenous artist KC Adams, as they learned this hands on experimental archeology.
And possibly insight into their cultural heritage from Grant at his rural Minnesota home.
Grant: I've been studying pottery for probably since around 1980.
Here they come!
Christy... my partner over there, her main course of studying when she was in the University was centered on ceramics too, so she has been studying them a long time.
But there was a lot of misconceptions as to how this pottery was made.
The problem was no one ever actually tried to do it.
[Right] Looked at the surface and, "Oh it looks like it's got cord marks on it."
So that must be what it is, you know.
And when I started looking at it a little bit more and then we'd take impressions from the pot and then you look at those and then you see what actually made the impressions on the surface.
I said, that doesn't look like a cord, you know?
I said, let's wrap a cord around a paddle and pound on the pot and that makes this.
And I said, well but look I said, there's these little strands that go from one row to the next here every once in awhile you can see those.
And that wouldn't happen.
And if they kept pounding it ...it wouldn't be clear.
It would be superimposed stuff going every which way.
And I....and it's all nice and neat and clear.
And I said, I think it's something else.
And Leigh Sims was onto that, too.
And so we started talking and then we started figuring it out.
And he talked about this one kind of weaving that nowadays has been done in Scandinavia pretty much.
But it probably was all over the world.
And he said, oh yeah there's examples from Peru and all over.
And it's a....it's not a weaving like cloth, you know?
It goes like this.
It's a weaving where all the fibers go the same way and they're just twisted together.
[Oh] And ah, he said I think that's what it is.
And I said, that would make sense.
So, a lot of the archaeologists just laughed at me, you know.
I said, ah, you didn't know what you're doing.
I said, well you have never looked.
At least I'm looking.
[Yeah] Grant: And ah, I did some weaving.
This is the first thing I wove.
Now this is made from natural fibers.
It's made from fibers of the Wood Nettle, which is a native plant.
It's not the Stinging Nettle because that was brought over from Europe, that's not...it's an introduced species.
But there's always been the Wood Nettle which is a native species.
And...the outside of the stem has fibers in it.
And you can peel that off, soak the stems in water and then you can process these fibers.
And that's what I made this out of.
And so here's my first example of that weave.
[Oh yeah] You see how it's twisted?
It's twisted with two strands right there, twisted together.
And then one strand gets connected to a....a strand from the next twisted and then they become a strand.
And the other one from it goes over here so they interlink back and forth.
That's what holds it together.
And these sections of twists can be any length, they can be one twist or twenty, you know.
And when you stretch that out it looks like rows of string.
[Yeah] And see, that's where people were getting the string.
But if you look, there's little things go across every now and then.
So you hook them together in the strings kind of offset now and then.
KC: And the problem with the string on the paddle is that when you're paddling it's really hard to keep it in a straight line.
Grant: Yeah, and also gets plugged up with clay after awhile.
KC: Like with the patterns.
Yeah, that's right.
Grant: And pretty soon you're not making clean KC: Lines anymore.
Grant: Lines anymore.
But anyhow, this is what I did.
And I made a whole bunch of pots in this thing.
See, and what happens you can put this around a pot, it'll stretch with the pot.
So as you make the pot bigger this could stretch out and see what this does, it holds it together.
KC: That totally makes sense.
Grant: And ah... KC: As opposed to the paddling 'cause like we were talking before, the paddling makes it collapse inward, into itself.
[Yeah] And then you get rippling on the inside.
Grant: In.
Well, we're gonna be using natural clays.
This particular clay just came from just a little ways down the road.
We're going to be going over there.
[music playing in background ♪] Here we are out here in this gravel pit and there's a cut bank so we can see how the clay that we're gonna use for pottery how it occurs.
If you look right up on that bank you'll see a gray, kinda grayish tan surface layer with a darker brown layer underneath that and then it's just the yellowish brown underneath that.
The lighter stuff.
What has happened is that light gray surface everything used to look like what's below the lighter yellowish brown, all the way to the top.
But over time the clay particles have been washed out of that surface, that gray layer, and they've accumulated in that brown layer.
So the brown layer has been enriched with clay size particles.
To the point that it is just about ideal for what we need for making pottery.
But that's typically what you'll kind of look for is that enriched layer 'cause most places the natural material doesn't have enough clay.
But this is... how it happens so that it becomes usable.
And that's a typical soil cross section of where you'd get clay.
Now sometimes there's more clay and you don't have to rely on that.
But in most places that's the best thing to look for.
Sometimes it'll be brown sometimes it'll be red sometimes it'll be gray or different shades.
KC: Ok, so this clay is dry deposits.
But when you're at a river bed on the side and you see those layers, you were saying....what do you....how do you prepare or do you use it wet or do you just prefer to dry it out?
Grant: Well... if you can find the clay and you test it and it seems like it's you know, you can roll it out and it's ok, you can...I mean, even this if it's wet enough to make pots just as it is, you can just make pots as it is.
The...if it's not quite wet enough that's where the problem is because when it's partly wet it's hard to add water, it's hard to get water to...it's tough to mix the water into it.
[Yeah] When it's dry, you let it dry out and pound it out and pulverize it, you can mix it with water real easy.
If it's wet enough to use right out of the ground you can use it 'cause it's already got moisture.
If it's somewhere in between it's better to let it dry and pound, pulverize it up 'cause you can...it's easier to do.
KC: It's easier, yeah.
Grant: Ok, lets walk up there.
We may find something before we get that far.
KC: I was gonna say.
Grant: If we do, we'll stop.
I mean if you're in middle of a sand area you won't get any.
But if it's kind of more the mix glacial deposits look around, you'll be able to find something like this.
And it's easiest where there's exposure like...something like this.
[shovel cracking ground] [shovel cracking dry ground] [trucks engines running] KC: Oh look!
Deer hooves!
See the footprints?
Right here?
Right here...and you follow them and you track them.
That's great.
And you eat them.
Grant: We don't want to get out by the edge.
KC: And there's the dark stuff.
Grant: Yeah, there's some dark top soil.
On here, that's been scraped off out there.
[shovel cracking ground] It's a little deeper here [metal slide] ...not quite to it.
Almost.
I'm gonna dig out here.
[shovel cracking into ground] [metal slide] [shovel cracking ground] [shovel cracking ground] [metal slide] [clunking] Don't get too close to that edge, Scott.
Scott: I can definitely feel it kind of resonate under each step and with each hit of your shovel.
Grant: Yeah, see how this stuff is kinda blocky.
Breaks out in these little blocks and there all coated with clay.
This is the good stuff.
[shovel cracking ground] [metal slide] Ok.
I think you see the idea.
That's the main thing.
And see this stuff up above... [shovel sliding] see that isn't...it's the stuff that's below.
KC: That's not good.
Grant: It'll be...it's below this.
And that's what we could see in that bank.
[Yeah] And see that's that's that dark layer.
We're getting this stuff.
KC: Yeah you can immediately feel the difference.
Grant: Right.
And you can see it even in this bank, there's places where it's here and then there it isn't so much.
So it kinda comes and goes some places it's better than others.
KC: And you really have to feel it though.
Grant: Yeah, you gotta feel it to know.
Ok, that's all we gotta do here [Ok, awesome] Ok, this clay... came from the same place where we were this morning.
This stuff has been sitting in this bucket for years and it's all dried out.
So what we're gonna do is we're gonna pulverize this clay up.
And I'm just gotta cement block thing here.
I'm working on now.
You can just....[smashing] Ok and then when we get some smashed up now there's probably still pebbles and stuff in here that we haven't smashed up.
So what I'm gonna do is just run this through a little screen and get the chunks and we'll squash those some more.
[metal scraping] And then we'll smash up a bunch more when we get enough, we'll mix the water with it.
And get it ready for.... to make pots.
KC: So what do you think the percentage is of the clay and sand?
And other matter?
Grant: I'm guessing based on my training as a soil scientist that what I can feel in the mix that we end up using it's gonna be right around 35 percent of actual clay size particles.
And... at least the same amount in...is would be sand.
And anything left would be the in between size particles.
[Ok] And if the sand is 50 percent that isn't a problem.
Because that is still enough clay to bind it together.
The silt particles, the particles besides between clay size and sand size don't do anything positive for the mix.
[Right] And the...actually the less of that there is... KC: The less chances of explosion.
Grant: The less chance...the more workable your clay ends up being.
KC: Oh, ok.
Yeah, we were wondering about that 'cause along the Red River Valley you know, that's farming territory and you've got a lot of rich clay deposits.
But because we're also part of Lake Agassi you know, that's all sand as well.
So there's a lot of sand.... and clay.
Grant: Mmhmm.
It's just like mixing concrete, cement the bags of cement stuff that...sticks it all together.
The fine part of cement.
And then you in that case, you try to have clean sand without a lot of the what would be the silt in here.
And you get a stronger.... finished product.
And even in the pottery.
And I've seen that for some clays that I know don't have a lot of silt, when it's fired it's a lot harder.
The.... fired clay is harder.
And it just rings more when you tap on it.
I mean the other...it still works the other way but... you get a better quality pot [pounding] [pounding and clanking] Ok, I'm gonna...I'm gonna quick try to get this done so we got something to work with.
KC: I feel like we need a second one so we can do it too, beside you.
Grant: There's another brick over there.
KC: Woohoo!
Grant: I can move over.
Just need another rock.
[background voices] [sand shifting, rock clanking] [sand shifting] [rustling and pounding] [rustling and pounding] Grant: Yeah that'll work good for grinding, you got a big flat surface.
Ok, now...what I'm gonna do, I'm gonna go get some water.
And we'll probably mix the clay right on here.
Woman: Feels like Bannock time, you know when you're like... [Yeah] make a flower, add the water.
[laughs] That's very "granny knows" how much water.
Grant: Ok, we'll add some water and we'll just start Child: Can I have a turn?
Woman: You can only do it if you're prepared to get dirty.
Are you prepared to get dirty?
Grant: We'll be in there with our hands pretty soon.
To get the... KC: You betcha.
[wait til we get our hands in ok?]
Grant: Get a little bit of it together here so we KC: So already wet clay is harder to hydrate.
Grant: It is.
'Cause the water won't go into it.
KC: Yeah, but when you have something that's completely bone dry the water is easily able to move around within the material.
Grant: Water just sucks right in, yup.
[inaudible child's voice] KC: Actually funny enough it smells like my childhood.
[laughter] [laughter] [pounding on table] [inaudible voices] [pounding on table] Need a little bit more water.
[pounding] Child: How could it change so big?
Grant: A little more... Woman: There's more...he's working it all together.
To make one...he can make one big piece of it.
KC: I wonder what my ancestors did with like, their hair?
'Cause I get hair in everything.
woman: hair in everything?
[child noises] [laughter] And as I'm working my hair I....you know.
[laughter] [laughter] Grant: Hold it, hold still.
KC: That's right.
Obviously they must have had different hair styles for different jobs you were doing.
[pounding] [pounding] Oh my goodness!
Look at me!
Grant: Oh, beautiful.
[laughter] If I say something rude it isn't intentional.
KC: Oh, are you kidding?
I think it's a prerequisite as being Indigenous to tease.
[mmhmm] [yeah, yeah] I've been the butt end of teasing my whole life.
So I'm ok with it.
Grant: Well, you know.
KC: I'm like the most gullible one in my family so, I'm a good target.
Grant: Well over the years we've worked with a lot of Indigenous people and that's the one thing that's always so nice is you can joke each other and tell jokes on yourself and and it's.... KC: Nobody gets offended.
Grant: Nobody gets offended.
And in fact if you don't do it, you're looked at kinda funny.
Ok, I'll get a bunch of these out.
They all work.
KC: I was told that teasing is like sort of social justice.
[Yeah] That if a person starts getting too arrogant or out of line, too greedy, you tease them.
Grant: Right, exactly.
KC: Sort of group mentality.
If you become the butt of the joke all the time then you're humbled and you understand, oh I gotta back off and [yeah right] change my ways.
Scott: Not me, I just double down.
[laughter] Grant: I'm gonna just get ahead of you a little bit here.
So I can show you what I'm up to.
I'm gonna just roll out a couple funny fat coils.
This is almost a little...not wet enough.
[Yeah] Ok, I'm putting a little bit of moisture with this, just to kind of be slippery on the outside for a minute but it'll be ok.
I just need to get a couple of these to get started.
So what we're gonna do is we're gonna coil up kind of a pot that's almost like one of those cone shaped pots in a way but it won't be quite that pointed.
But we'll be making it upside down.
So it's....the mouth of the pot will be on here and the bottom will be up here.
But see, I just start out like so it's I don't spend a lot of time on this.
You get it started.
And then I'll right away make another one.
To put on top of that.
And it's nothing fancy at this point.
KC: And you're not too worried about the thickness at this point because... Grant: No 'cause I'm gonna even it up in just a minute soon as I put the next layer on.
KC: But I guess technically for the folks back home it's about.... quarter inch thick?
Grant: Yeah probably about a centimeter thick.
3/8 of an inch or so.
It'll get thinner later on.
And then we'll make another quick little coil and that goes on top of here.
Then once I get a little ways ahead you guys can pick up and follow right behind me then.
Now, what I'm gonna do you know, I just [ch} with my thumb and kind of smearing it on and at the same time kind of flattening it.
'Cause see then it stretches and gets longer now, make it all the way around.
And it looks kinda crude now.
But now we'll start cleaning it up.
You gotta have a little something to work with before you really do much to it.
So, you can't let it get too wild full of cracks and stuff but it'll have some.
And then I take one of these shells and....and see when you scrape this way it smooths it.
Later on we'll be scraping this way if we want to thin the inside down 'cause it'll shave off layers.
But for now we use it this way.
[scraping] Think we can just... and the clay will kinda stick on it at first 'cause it's.... 'cause just like I said, that clay is like this...and it comes apart.
As that clay starts flattening down it'll smooth off and it won't stick on here anymore.
So, we'll just work this around and see we're kinda making it a little smoother on the inside this is all... this is also evening out the thickness a little bit.
But we want this right now, we want this thicker than the finished pot's gonna be because we'll be thinning it down later.
'Cause it will stretch this pot out.
KC: So you're, you're kinda going up side but also slightly in the upward motion as well.
Grant: Yeah a little bit.
See now I'll smooth this coil joint on the outside in a minute soon as I get this kinda get the inside kinda roughly leveled out so that you can't see where it joins together.
And.... and then I'll go on the outside.
Kinda go over that.
And then it...looks terrible at first 'cause it's sticking.
[Right] But it'll only do that for awhile.
KC: As it starts getting... [inaudible] Grant: And this clay is real soft and flexible.
And as we work it, it will get more rigid.
So right now it's pretty sloppy.
But at this point you can do that, 'cause I just want to smear this joint together right now and I don't care how rough and ugly it looks on the outside right now 'cause we'll want to....we'll clean that up later.
Ok, now what I'm gonna start is decreasing the diameter just gradually.
We're about at the point we can do that.
So now I'll take this coil and I'll work from the outside.
[slapping sounds] And that automatically makes the side slant in a little bit.
[slapping sounds] At least for me.
The main thing at this point is you want to have things pretty well fused together.
One thing about....and I see people with commercial clay when they want something to stick together they wet the edge and put it in the seams that stick together.
[Yeah] This doesn't do that.
[No] It just will not do that.
In fact, it will it will intentionally not bond just to spite you.
[laughter] This stuff...extra moisture on a joint makes it not stick together.
Like I say, it's a whole 'nother thing Does someone wanna run in and there's two of those fabric bags there, not the really one I was showing you that's the real skinny...things there's one that's got a little bit fatter strands.
That's the one were gonna use.
KC: It's in that box, right?
Grant: It's a little smaller.
[Yeah] It's in there somewhere.
KC: It's in the box, in the porch there.
Grant: It's either in the box or it's right handy there.
Yeah, that's the one.
I'm gonna...I'm gonna soak that in water.
A little bit to wet it up.
Let it hydrate Ok, now... I'm gonna take this, kinda kinda smooth this outside a little bit.
I don't want it too lumpy because...that's why I put that bag on it.
I want a fairly even surface 'cause this makes it easier.
See, if you wanna feel how...just how thick I'm doing it that's probably you want to do that.
[Yeah, ok] You get some idea what...'cause that's what you're gonna have.
KC: Wow, that's become really thin.
Grant: Oh, it's gonna be like this when we get the pot done.
KC: Oooof!!
That's insane!
Grant: But that's what they were.
KC: It goes against everything I've learned so far.
Grant: Well, you weren't in that big pot I got sitting up there, go lift that big...one.
And you'll see how lightweight that is.
[Yeah] Because it's thin, it's not quite that thin.
But for it's size it's thin.
I've seen broken pots that were the size of that actually bigger and rounder on the bottom that were only this thick.
They weren't even 3 millimeters thick.
[Wow] The whole bottom like an egg shell.
KC: That's crazy!
That's crazy.
Grant: But they...yeah they didn't paddle those.
KC: 'Cause they say like the strongest clay is porcelain at a really, really high firing.
[Mmhmm] And like, bone china.
[Yeah] You know?
But... Grant: You see this stuff behaves it's...and I've asked people how this resistance to shock and all this.
[Yeah] And someone said something about what it probably does is when it gets fired it makes these they keep calling them micro cracks.
He said it gets...it gets thousands and thousands of tiny fractures that aren't quite broken but they work like little hinges within the walls of the pot.
And it can just handle so much abuse.
[Wow] But I don't know.
Scott: That's an interesting hypothesis.
[Yeah] You know that's what I been....one guy said.
Whether that's really true, I have no idea.
So this is what I call a kinda rough, rough shape...roughly shaped pot.
It's.... it's in one piece.
It's not gonna look anything like this when we get it done.
It's gonna be that shape of the shoulders and everything in it.
When we get all done.
But this is how it's gonna start.
KC: Because that's what an upside down pot looks like, the coned one.
Grant: Yeah.
KC: You're gonna have to teach this at University.
Grant: Rough spots here.
[Yeah] KC: Yeah, show Grace.
Grant: MmmK.
I'm gonna just kinda... KC: It's the ingenuity that was... Grant: Now, now comes the fun part.
I'm gonna set this down and I'm gonna go get my other device.
Now, I'm gonna set this up.
KC: Hey, that's a gorgeous object, hey?
Grant: Let's just moisten this up a little bit so it's more flexible.
And then what I've done we're gonna wring out some of the water out of this.
Yeah, get it all over myself.
I'm trying to make a fashion statement here.
[Oh, yes] [laughter] Ok, there's kind of an inside and outside to this but I'm not sure... yeah because see.
KC: Right, cause the edges.
Grant: Cause this shows this a little bit more.
KC: It pops out.
Grant: And the other side doesn't, it's more straighter.
KC: Right.
Grant: That's the side that goes next to the pot.
Ok, now we'll put this over that pot.
Now this is big enough we could make a much bigger pot in this but see what happens is I'll stretch it down and it'll get these ridges that will come out of it cause it stretches it.
Make it into a longer skinnier fabric bag.
So I want to... KC: That looks like an art piece.
Well, it is an art piece what am I saying?
[laughs] Grant: I'm gonna pick this up.
It's small enough I can do it.
I'm gonna set it right side up in here.
Ok?
Now we're gonna make sure we got this kind of squashed into it.
And I got a little extra here.
So now, what I'm gonna do is I'm gonna start out in the bottom because I want to get that bottom.
And I'll work my way up the sides.
KC: So you're hands at the bottom supporting it so?
Grant: Yeah, my hands outside of the um..that.
Now see, my hands up against it when I... KC: Right, down there.
Grant: When I'm working it.
KC: Right, so you're still cradling it even though it's got that hoop and the hide.
Grant: Yeah.
As I work my way up this bag will stick on it a little bit more.
KC: And you're always pushing it back onto the bag, right?
Grant: Yeah.
Now when I get up here, higher, than I can do it more directly.
KC: And you're using like aggressive or firm movements?
Grant: I'm intentionally trying to push it enough so it stretches the pot.
KC: Ok.
It's gorgeous.
Grant: Now I'm gonna just do a little bit here but see the inside is getting smooth and it's....totally different shape now.
KC: Yeah, it looks like butter now.
Like it looks so beautiful and smooth.
[Yeah] Grant: Let me just get this...we'll hold it up and see....you can see what the shape is starting to move.
[Yeah] See how wide it's getting now?
KC: Yeah.
Like it was like this...now it's like this.
[Yeah] It's so beautiful.
Grant: Considerably different.
And see we're getting this surface texture in a little bit.
KC: Oh yeah, cool.
Grant: It's coming in.
It's not really a lot, we'll get more of that in it as we... get this thing a little stretched out.
KC: Ah, ok.
So now you're starting to go in to create... Grant: See now we got that shoulder forming on the pot.
KC: Right the shoulder.
Grant: Now what I'm gonna do...I'm just gonna move this instead of moving the pot in there.
As we develop the shape we'll have the bag more adhered.
Yeah put your hand inside and out right here.
KC: Oh, yes.
See I could not do that when I was holding it in my lap.
As I was working.
Cause it was just cracking like crazy.
So it's really important to like make sure that the baskets attached on there.
So it can hold the shape.
Grant: Yeah, see and right at the beginning there's no way you can [No] 'cause the pots way too small to even do it.
[Yeah] But now as you start developing more toward the final size and shape some places I can see the shoulder is a little bigger so I'm pushing it in.
[Yeah] Bringing it up maybe a little bit cause it's lower.
[Yeah] And we keep adjusting that as we go.
Yeah see now we're gonna see that's the kind of texture we're working for.
KC: Yeah, that is so cool!
[laughs] That's so great!
I've got kind of a draw string on here I should pull that together a little bit.
I've got to find the other end of it.
Here it is.
KC: I'm wondering if the bags were used for other purposes?
Grant: Oh, I'm sure it was.
KC: Yeah.
Grant: I can see someone picking blueberries in one of these.
I can see people having these for a lot of use.
They're a container that it's not rigid so it's easy to carry around.
[Yeah] You can stuff it into something a whole bunch of them and it doesn't become anything of a burden unless til it has it's contents in it.
And then it's got a purpose.
[Yeah] See if it wasn't for that bag this pot would've just fallen apart because of that.
[Oh yeah, yeah] But see it...supports it even though there are little problems like that.
KC: It probably has a lot to do with the fact that it hasn't dried out.
Grant: Yeah.
The clay is actually at this point, we should be hoping it dried out a little bit more than what it has.
[Yeah] 'Cause it's on a rainy crappy day, this is probably they didn't make pots on days like today.
KC: No.
[loud laughter] [child in background] [child in background] [child in background] Grant: Well this is one of those smooth surface cone shaped pots.
KC: Yeah.
Grant: I don't know if we'll be able to have everybody do their pot in that thing and that other one might not work.
So if someone wants to make their pot into one of these instead here's an example of one.
This is by the way remember I was talking about that one that froze full of water?
This is it.
KC: Can I see?
Grant: And it's....and that was in the winter of 1990.
You can see that ones been cooked in a lot of times.
too.
And that's actually a replica of one that was found up by Thunder Bay, Ontario.
KC: Oh, ok.
Grant: Cause I went up there to their archeology lab and looked through all the broken pots and stuff that they had and made a bunch of drawings and measurements and that was one of them.
KC: And did they think....did they know what these things were?
Grant: I do.
KC: What are they?
Grant: They're cockle shell that's from the north Atlantic.
KC: Like this one?
Grant: Yup.
That's the edge of this.
[Oh] And see... [Yeah] what archaeologists have said, because that's a real common kind of design, on these particular kind of pots and they said, oh that was a carved carved stick edge that they put notches on both sides and people used that.
To make these designs.
Well... the only thing is we see these designs on hundreds and hundreds and hundreds of pots and the little wiggly things are always exactly the same.
KC: It's so precise.
Grant: And there's a pattern to them they get a little finer at one end and then they get bigger toward the other end.
Now if you had a hundred people carving wooden tools they're not all gonna look identical.
KC: They're not.
Grant: There gonna be a lot of variability.
And yet there isn't so I thought, that has to be a natural object.
It has to be.
And it bothered me.
[laughs] And ah... they called it a pseudo scallop shell.
A scallop is an ocean type shell.
That has a wavy edge like that.
KC: Yeah they.... it's... Grant: It's a big... they got an edge like this.
KC: Yeah, but they're bigger.
Grant: They're usually kinda like...like the ?
shell oil symbol logo and they got these ridges and then it gets that edge.
KC: Oh yeah, yeah, yeah!
Yup.
Grant: But they called it a pseudo scallop shell 'cause it was not a real shell.
Well a scallop shell has slightly different undulations than this and it won't match that if you would try to use one of those shells.
But so anyhow, at the Grand Mound Visitor Center west of International Falls where the big mounds are and all that [Yeah] and that kind of pottery is pretty common.
It washes all the lake shore and river bank when it erodes and stuff.
And a guy that managed that site you know, he'd go along the river and pick up the stuff that was eroding out so that the tourists wouldn't haul it away.
ah...One day when he was out there he found one of these shells.
along the Rainy River between Canada and Minnesota.
[Yeah] Now that's not the north Atlantic Ocean where these things live.
These are ocean shells, these are.
[Right] Gulf of St.
Lawrence is the closest place you would find them.
KC: Ok.
Grant: Ok, there's pottery like this out there.
There's pottery like this all the way from there to here.
And then it goes on up into Canada.
And the older potteries out east and the...then it gets more recent as you come west.
[Right] So it shows probably those people moving from that area.
But bringing these shells with them.
Cause that was something that was significant.
[Yeah] To their culture for one reason or another.
KC: Right, yeah.
At one point in time.
Grant: And they used it to decorate their pottery.
I mean, it's not the only decoration they put on.
KC: No.
Grant: But it was one of the real common ones.
Yeah I was up there one day and he said, "Grant" he said, "I gotta show you something."
And he went in the back cabinet and he pulled out one of these shells.
He said, "I found this in the riverbank, what do you think?"
I said, "I think it confirms what we've been thinking all along.
That this is not a carved tool."
KC: That's something natural.
Grant: It's something natural.
KC: Ah, so cool!
Nice, nice.
Grant: And ah... yeah and....so even a simple little thing like finding this right away it tells us something about people.
[Yeah] It tells us something that these people had connections to the Atlantic oceans.
[Yeah] And here we are, you know, this stuff was brought in.
And I'm going to go around and kinda dry this out, outside of it a little bit.
Don't feel bad if you have problems getting that pot to do this without it kind of falling apart.
Cause that's something that does take....you gotta do it a bunch of times.
[Yeah] If the pot kinda starts really falling apart it's not your fault.
[laughs] It's part of learning.
[Right] Ok....here's our rough pot and you can see it's a little not real even but we can straighten that out as we go.
I'm gonna set it in here and then I'm just gonna leave it for maybe about an hour to just kinda let the air get at it.
This is still pretty wet.
KC: Oh yeah.
Grant: But it's not as wet as when we put it on there yesterday.
[No] It needs to be damp cause it needs to be flexible and when it's dry it's kinda stiff and you can't make it form to the pot.
But ah, this is ready to go if somebody wants to... KC: Me, me, me!
[laughs] I would like to.
Grant: Ok, you can see where the center is that should go on the center part of your pot.
[Ok] And I'm gonna go around from the other side so I can kinda reach across and help you out a little bit from that side.
KC: There's the center.... right here.
And... do I start pushing it...?
Grant: Well... KC: Onto it a little bit?
Grant: Yeah you should kinda let start stretching it, the long way cause then it makes it skinnier.
So then if it's bunching up on one side more than move it around to the side that it's not.
And so you should be able to get your tool like this and kinda rub it...rub it down into the clay a little bit so it will start sticking to the clay, a little bit, get it smashed down.
And set it right side up right center it right in the middle there.
Ok now what we're gonna do is what I forgot to do with mine.
Is we're gonna...we're gonna tighten this top.
KC: Tighten it.
Ok.
Grant: And see there's a drawstring that's through this.
And for now we're gonna try to make it more the size of.... of the top of this pot instead of having it so big.
KC: So willy nilly and...yeah.
Grant: Yeah so it won't fall off so much.
Tie this up with a big bow in it.
So we don't have... KC: Easy to pull apart.
Grant: Now... you can take this shell and what you want to do is hold your hand on the outside of this if you can kinda lean it toward and go way down to the bottom and just start gently at first you know, shaping it and to try stretch that pointed bottom out so it gets round.
KC: Ok.
Grant: And you don't have to be in a hurry.
You can take... KC: Take my time?
Grant: Take your time.
KC: Ok.
Grant: And the main thing is to work gradually and work all the way around.
And then as you get the way at the bottom done then gradually work around and work farther up.
And you can lean it towards the side that you're working on right now because it's not gonna contact KC: Now, I'm kinda going like this around right?
Grant: Yeah, you can go...you can go that way and go every which way whatever seems like is making the form of the pot.
What I'm gonna do is I'm going to finish off this rim of this vessel and put the decorations on right now I'm just kinda evening up some of the high spots.
Leveling it down.
It's not bad to start with so it's not gonna take me too much to do this.
Now, this type of pottery was most commonly decorated with what we call cord wrapped objects or cord wrapped sticks or what have you.
In other words it's a tool that has had a cord wrapped around it.
It's a piece of deer bone and we've made a fine twisted cord out of natural fibers.
There's a hole drilled to the end of the bone here and we tied a knot in the end of the cord.
Ran it through so the knot goes up against the hole.
And then we just wrapped this cord around and around and around and around and around til we got to this end and then we had another hole we put the cord through.
Tied it around, tied the knot off.
So we end up with this tool that has rows and rows of cords.
And what's...how this is used by pressing it into the damp clay to leave an impression.
Usually the decoration is confined to this upper rim part.
It doesn't go down onto the body.
What I'm going to do tilt this up a little bit and then I'm gonna apply this.... tool pushing it into the clay.... and see how it's making that row of decoration.
Then I'm gonna move down a little bit... and do it again.
So we got two rows.
And then I'll turn the pot a little farther And we'll just continue til we get all the way around the pot.
Try to keep...keep these lines as straight as we can.
This clay is just about the right hardness to do this.
If it's too soft this tends to get plugged up with clay and it makes kind of a messy decoration.
If it's too dry it won't push into the clay.
So....just keep going.
Until we've got two rows of this all the way around the pot.
Yeah....and Ok, just a little bit left and we've completely gone around the pot.
Ok so now we got two rows like that all the way around the pot.
Now what we're going to do is we're going to take this and use just a short end of this and we're going to put some designs.
Now I'm right handed so if I do this right handed they're gonna slant this way.
If I was left handed they would slant this way.
So...usually they do slant this way so we know they were mostly right handed potters.
But once in awhile, they slant the other way [laughs] and it was probably a left handed potter.
KC: Probably a lefty.
Grant: Yeah.
So now what we're gonna do is support it on the inside with our finger.
KC: And what...like a centimeter apart?
Grant: I'm putting them fairly close.
In this combination of design is fairly common.
I mean, they're not all like this, obviously.
There, now we got that.
Now usually there's... a decoration on the top of the rim and sometimes there's a decoration on the inside.
What's common on the inside when there is something is another slanted row of these... marks.
Although they're generally longer and they're not done very deep.
And they're usually kind of more widely spaced.
And so they just kind of look like that.
I'll be patching those as things go on.
Sometimes when the clay starts stiffening up it's actually easier to [patch them] patch those because right now they just don't want to move [yeah] when you fix them.
But you know as long as they don't get [once it stiffens up] too carried away on you, you're still okay.
I'm getting some nasty cracks but that's not gonna actually in the end affect that spot.
I know it doesn't seem like that can be possible but it's true.
[wow] Yeah, this stuff is strange.
KC: Strange but good strange.
Grant: But it's really cool stuff.
On this particular style of pottery, a lot of times what you see is the very edge of the lip looks wider.
And that happens when you do this.
You don't push this straight down.
You tilt it a little bit and you don't go level you have a little outward bevel to it, yeah.
[yeah] And see what's it's doing.
It's widening this.
[yeah] And it's kind of distorting the top edges of these things a little bit.
And this also kind of squashes some of the cracks full at the very lip.
Whoop.
[whoa] [Oh no] Yeah, I'll fix it.
I'll fix it.
I just grabbed it wrong.
Let me get this kind of taken care of.
What I'm going to do is I'm going to just roll out a long little skinny thing of clay.
I kind of squash that crack in.
And I'll put this last, this long skinny thing of clay in there.
I'm going to smear it down.
Then I'm going to take this which has the same twisted stuff like that bag has got.
But I can just going to go over the patch and blend it into the rest of the pot.
Getting around here... KC: Yeah it's beautiful isn't it?
Grant: Yes, I got another patch to do over there but we'll get that.
[laughing] It happens.
[inaudible] There.
There's that part done.
Now the last thing I'm going to add is I'm going to put a little design down lower on the pot.
And again that's going to be made just with the end of this tool.
The last few little wraps.
Okay.
Now I'll get a different tool.
I got a variety of little sticks and things that... I can use this one.
This will be put between those two rows of horizontal decorations.
And we'll just push it straight in.
KC: This would've been by a sticker twig [yeah] that's been whittled to a circle?
Grant: Yeah.
It's usually pretty circular and pretty [inaudible] round.
Now what this does it makes the little dents in the outside.
And as we get this around you'll be able to see what it does on the inside.
It makes little bumps on the inside.
Grant: Let's head over to ... Johns.
[laughing] KC: Wow.
I could wake up to this every morning.
Grant: Yeah.
See this is the end of the bay.
There's a ... that's full of wild rice but it's dying down now.
[Oh, really?]
Okay I'm going to get some stuff to start a fire.
[rustling noise] KC: Oh, I guess I should help with the [laughing] logs.
Do you want me to grab some stuff?
[crackling fire] Grant: Here's the pot we're going to fire.
It's been drying for about a week.
So it should be...have most of the moisture gone.
But before just to make doubly sure we'll set it here and let it let it warm up a little bit as we're getting the fire going.
And then we'll need enough of these size sticks to cover it over it.
I'll cut these up a little bit.
[chopping] [chopping] [chopping] [chopping] [fire crackling] [fire crackling] [fire crackling] [fire crackling] [wood snapping] KC: That's true.
She can't get into too much trouble at the shoreline.
[fire crackling] Grant: And see there's a certain amount of moisture that never will dry out on it's own because it's just bound too tightly to the clay molecules themselves.
And we want to get rid of as much as that as we can.
Just to minimize possibility of it flashing into steam and trying to get out and taking the wall of the pot with it.
KC: I never would've thought that we would stick to smaller... Grant: That what?
KC: That we'd stick to smaller pieces.
Grant: Yeah, because we don't need a fire to last very long.
The little bit of residual moisture that's in the clay is gone to the point it's just not going to cause us problems.
Now watch, this one will break all apart, right?
[laughing] Okay.
We've let this pot heat up now.
So there shouldn't be any moisture in it.
So we shouldn't have any problems with it disintegrating from steam letting out.
So I'm rearranging these bottom logs here.
We're going to set the pot on those in the fire and there's a little space so air can get in.
So now we're going to start stacking wood around the pot.
And what we want to do is put enough wood in here that we can't really see the pot.
We aren't using big wood because we want it to burn up fairly rapidly.
[clanking] [shuffling] [tapping] KC: Can someone grab a little bit of birch bark?
Grant: Yeah, there's a lot of humidity today.
It's kind of got this wood KC: Wood.
It's not willing to... Grant: The wood is not taking off like it's supposed to.
[yeah] [tearing bark] Yeah.
Here we go.
It's starting to... move now.
[crackling] Grant: Really got to get something going on that side to get that started.
[crackling][inaudible voices] [crackling] Grant: Yeah, that's what we want to get going.
I've got a big roaring blaze here... It'll take off.
There's... going to make it now.
[laughing] [woman talking] [background voices] Grant: That'll probably be okay.
KC: The bottom is better Nicki.
[woman talking] [crackling fire] [child crying] [rustling] [woman's voice] [beeping] [woman laughing] [crackling fire] Grant: Yeah, the fire's is going good now.
It'll gradually... it'll still... a lotta wood there.
It'll keep going but as soon as that fire burns down so the wood falls kind of away from the pot, it'll be all done, fired.
We should start seeing some orange glowing in between.
If we...especially if you look down in the bottom.
It should be getting about that hot.
It's kind of hard to see in there.
KC: Yeah, right now all I can see is the... [is the flame] it's not quite there yet.
Grant: Nope.
But it'll get the whole pot won't because the part on the top doesn't usually get quite that hot.
But I guess hot enough to fire the clay.
See and if the pot was going to break and pieces blow off it would've done it by now.
[right] So we didn't hear a popcorn popper sound so we know we're good to go.
See a lot of times by now the wood is burned up enough it's starting to fall off.
KC: Wow that's wicked.
Grant: So it's probably inside that fire it's probably in the neighborhood of about 950 degrees centigrade.
KC: Yeah.
The wind's helping?
Grant: Yeah and the wind's coming good so the fire's getting lots of oxygen.
And so it can burn.
KC: Did you know with our training in school [yup] everything's about slow... not shocking the pots.
Grant: This shouldn't even be possible.
KC: No.
Everything's slow, warm it up slowly.
[yeah, mmhmm] [Yeah, so this...] You have to fire on a like a non windy day so you can control how hot it gets.
Grant: I've fired pots in a snowstorm in Brandon, Manitoba.
Or was that Saskatoon?
[really?]
One of those places.
But one day we were all firing and Kathy Flynn was there.
The pots were to the point they were...the fire was falling away and they were kind of pretty much almost orange.
And every time those snowflakes would hit a tiny little speck of clay would you know go pop and fly out.
[inaudible] this microscopic little and make a little pit in the surface when the snowflake hit it.
[wow] But and then not enough that you... when it was all done you hardly could tell.
It is kind of a dull glow in the bottom down there.
[yeah] It's plenty hot enough.
KC: Yeah.
You can see it's starting to kind of take on that sort of "ghosty" quality.
Grant: Yeah.
It does.
It gets kind of almost like a grayish orange.
[yeah] Yeah it's almost done.
If the fire would fall away now it would be fired well enough.
KC: I'm just so impressed.
That's just amazing.
Never would have thought that these small sticks, basically [yeah,yeah] would create such a phenomenon.
Grant: Yeah.
See it's starting to fall away now.
KC: Oh yeah.
Yeah.
But yeah you're right it has that kind of glow.
Grant: It's so bright.
You can't really see it.
Well, yeah and through the fire.
And it doesn't get quite to that stage all over.
It's mainly the lower part where the [the bottom] and actually that's probably better because that's where it's thickest around the rim.
[mmhmm, mmhmm] So it really needs a little more firing to get all the way through to the interior of the clay.
KC: Plus it gets more wear and tear, too right?
Grant: Yeah, and yeah, that's got to be the strong part of the pot.
Because if it's going to break, that's where it starts.
KC: And I've always fired everything like from the bottom up.
But you can't do it that way.
Grant: See sometimes when I've got a big pot and the wood falls off the top fairly soon.
When it gets about like this I'll reach in with a stick and turn the pot the other way around so it's right side up so the bottom gets more in the heat.
But see around that rim that is... glowing.
[yeah, yeah] You just you can see it mostly in the holes.
KC: Yeah, it's really settled but... [but it's there] like if have you ever been part of a raku firing, you like you know that look.
Grant: For all practical purposes it's done.
We can kind of knock the fire down a little bit.
KC: Why are you taking it off?
Grant: Just get the fire away so it starts we can get a different stick and I'm going to tip it over.
[child's voice] [rustling noise] [rustling noise] [rustling voice] KC: Oh it's tinging.
[tapping] [tapping] Grant: Here that sound?
[mmhmm] That's good.
KC: That's what we want.
Grant: It's good.
[ting, ting] [laughing] [yeah, ting, tings] Grant: Yeah, this side it didn't get any... air at it.
[Mmhmm] So that... turned black.
KC: That's cool.
I like that.
Grant: But that's... you know... all those different colors that come in and are kind of interesting.
KC: Mmhmm.
Oh look at that inside.
Beautiful.
Grant: Yeah.
See you can see it's shiniest where I burnished it.
See the inside, we kind of burnished the inside when the clay was [yeah] almost dry.
What you'd call leather hard.
Where the smooth stone... and so you can see some of it's kind of got a shiny finish on it.
KC: What it does is it just really makes the molecules tight together.
[yeah] So you're just really pushing onto the clay and the molecules are getting tighter and tighter and tighter and so you get that shiny surface.
When and the water disappears the shineness goes away but then when you fire it when it doesn't get enough oxygen as you were talking about.
The shine comes back.
Grant: And see now what we could do we could have like 3 rocks in there and we could lift that pot on there.
We could start cooking in it right now.
[laughing] Yup.
Yeah, there it is.
A fired pot.
[woo hoo][clapping] And we wouldn't have needed necessarily as long as long as it gets warm so it's not comfortable to touch before you put it in the fire.
That's more than adequate.
And sometimes that only takes 5 or 10 minutes.
And especially if you're pretty confident that your pot is nice and dry.
If it sat for about a week.
And this hasn't been the best drying conditions.
Although up up until the last couple days it was pretty you know sun shiny and descent.
And the humidity was down.
And this one is scraped down to where it's relatively thin.
That helps.
KC: Right.
Too thick and you might get explosions.
Grant: Yeah.
So we can gradually move it out and it's probably cool enough.
It's not going to start cracking from the rim.
It's not going to be... it's going to stay hot a long time because ceramic like that really retains heat.
And you can tell that when you're cooking in them because once you get it up to temperature of cooking you don't really need much of a... little bitty, few pieces of wood to keep the heat there.
But it does not cool off fast.
I've had big pots you know and I put water in them and got it boiling.
And then I scrape all the fire away and it just keeps boiling for a long time.
And it's 10, 15 minutes later you can still see that it's simmering and moving.
[yeah] There's no fire under it at all.
KC: I'm seriously going to have to make some pots and like take it camping with me.
Grant: Yeah.
It's... really fun and it's interesting and you know pay attention [yeah] to what's happening and you learn things.
KC: I can't wait to tell my Cree friends.
[crackling fire] Rethinking Blackduck Pottery was made possible by the Minnesota Arts & Cultural Heritage Fund.
Grant Goltz: Rethinking Blackduck Pottery
Preview: Special | 20s | Grant Goltz's shares his theory of how precontact indigenous people made Blackduck pottery (20s)
Providing Support for PBS.org
Learn Moreabout PBS online sponsorship


Support for PBS provided by:
Documentaries & Specials is a local public television program presented by Lakeland PBS
The Minnesota Arts and Cultural Heritage Fund helped support the making of these documentaries.