Virginia Home Grown
Bringing the garden inside
Season 22 Episode 8 | 56m 46sVideo has Closed Captions
Get some tips on indoor growing.
Bring the garden inside this winter! Explore indoor cannabis cultivation with a homegrower, then see how the Sweet Briar College greenhouse produces fresh vegetables for their dining hall during the winter. Randy Battle and Serome Hamlin share gardening tips you can use at home. Engage with us or watch full episodes at Facebook.com/VirginiaHomeGrown or vpm.org/vhg. VHG 2208 October 2022.
Problems playing video? | Closed Captioning Feedback
Problems playing video? | Closed Captioning Feedback
Virginia Home Grown is a local public television program presented by VPM
Virginia Home Grown
Bringing the garden inside
Season 22 Episode 8 | 56m 46sVideo has Closed Captions
Bring the garden inside this winter! Explore indoor cannabis cultivation with a homegrower, then see how the Sweet Briar College greenhouse produces fresh vegetables for their dining hall during the winter. Randy Battle and Serome Hamlin share gardening tips you can use at home. Engage with us or watch full episodes at Facebook.com/VirginiaHomeGrown or vpm.org/vhg. VHG 2208 October 2022.
Problems playing video? | Closed Captioning Feedback
How to Watch Virginia Home Grown
Virginia Home Grown is available to stream on pbs.org and the free PBS App, available on iPhone, Apple TV, Android TV, Android smartphones, Amazon Fire TV, Amazon Fire Tablet, Roku, Samsung Smart TV, and Vizio.
Providing Support for PBS.org
Learn Moreabout PBS online sponsorship>>We really enjoy using the bamboo that grows on our campus.
It has to be cut back for management anyway And our students designed different types of trellising systems for our vining crops using that bamboo.
>>The only bad thing with the fan leaves in an indoor growing environment is they block light.
What we'll do is we will pluck this off and from there, more airflow, more light will come down inside, and that way all of these can get the same amount of light that the top is getting.
>>Production funding for Virginia Home Grown is made possible by.
(animals squawking) (bird chirping) (lively music begins) (lively music continues) (lively music continues) (lively music ends) >>Welcome to "Virginia Home Grown."
October is almost over and the outdoor gardens are slowing down.
This may be the last show of our season, but as we will show you, cold weather does not end the growing season.
There are all kinds of methods and plants to grow inside.
But before we get started, I wanna remind you to send in your gardening questions on our website, at vpm.org/vhg.
A little later, we'll visit Sweet Briar College and tour their new 26,000 square foot greenhouse to learn about the technology used to grow produce year round.
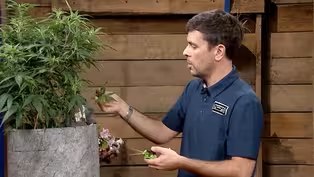
But first, I visited Mark Tavares, a horticulturalist passionate about educating home growers on the best practices for legal cannabis cultivation.
Let's get going.
>>Mark, growing cannabis is becoming very popular.
And this is a really impressive setup.
Can you tell me about this whole project?
>>Well, it's been a lot of fun.
We moved it out into the greenhouse today.
So you, we could actually get a full view of the tent instead of just inside of a room of our house.
>>Right.
>>But the first thing we really want to make sure of is that we're adhering to all the laws in Virginia.
>>Absolutely.
>>So one really good thing that we have is Virginians can grow four plants per residence, that is four plants per household address, not four plants per person per residence.
So although we can grow four, I have three inside of this area, just so that as they grow and mature, they still have the right airflow, the right light, and everything they need to be happy when we go to harvest them.
>>Well, how do you initiate this?
Where do you start?
>>Well, first, we start by choosing the right area for it.
And this is why we use a grow tent like this so that we can close it up, we can have it maintain its own environment inside of here.
So we can basically mimic mother nature inside of this little area.
>>Well, I noticed you've got felt pots here.
And I've always enjoyed growing and felt pots, what are the positives versus using maybe plastic pots?
>>Fabric pots are great because A: plant can breathe from all sides.
So air can be taken in through the actual fabric.
Also, it actually really helps with over watering too.
So if you water too much, it is fabric, so it can just expel and leave from all sides of the bag.
So the fabric pots have been really, really nice.
>>What's your suggestion for soil media, though?
>>There's a lot of different ways you can grow.
And if you go to a store and ask them, you know, they can always say, "Oh, do you want to grow in this?
Or do you want to grow in a hydroponic setup or coco?"
I personally like soil.
I like soil because it is forgiving.
It does maintain moisture fairly well.
And it will buffer what we do.
So soil pH is very important for the cannabis plants, they do like a slightly more acidic, so our soil is at about a six on the pH scale.
>>Okay, that's perfect.
>>And with county water or well water, sometimes our pH ranges can vary, and also with nutrients we add in.
So if you put in a little bit too much fertilizer or if your city or county water is a little bit off, the soil can actually buffer that pH and still make sure the nutrients are available to the plants.
About a gallon every three days is what these plants are taking now; based on your environment or the soil medium you're using, just make sure you check it every few days when you start growing.
And then from there, you can basically bring a guideline out and with a lot of city growing and people watering with just their tap water, a lot of times I will recommend they fill up a gallon jug and leave it overnight, just in case there's any chlorine or chloramine in your water, it will actually gas off and leave if you set it up overnight.
I know everyone says, "Oh, it's a weed.
It's supposed to grow like a weed," but it does like a stable environment in order to get the right type of quality harvest you want.
So you know with a normal setup, there's a few things that are very important, the soil medium that you use is very important.
So make sure you do your research and choose the right type of soil for yourself.
A good light is very important.
>>Definitely.
>>So these are photo period plants.
So they are basically in their vegetative state of life.
As long as the light cycle is 18 hours of daylight and six hours of darkness.
So a good LED light, which is newer to the market, it's actually very cost effective, it's energy efficient.
And they don't put out a lot of heat that the older style lights used to put out.
>>Exactly.
And for each light, how do you determine the height off of the top of the plant because that's key too.
>>And every manufacturer is different.
So what I always tell people is make sure you keep the booklet that comes with your light, read through it.
>>Read the directions.
>>And actually at different stages, it will want to be different heights.
So you might start at 18 inches over the plant and then you will start raising raising it up as that plant grows or as it changes its lifecycle.
>>And people need to realize plants need the red spectrum and the blue spectrum.
>>Yes, they they do and they like it in different times.
So this is a full spectrum led, and it actually can be adjusted.
So we can actually mimic the blue and red cycles of the plant with our with our bar style lights.
>>Excellent.
But lighting also air circulation.
>>Air circulation is very important.
These plants don't like a lot of direct wind, so they like indirect airflow.
So what I always do is if I have a small fan, a lot of times, they'll have little clip fans you can clip to these tent poles, which will then move air throughout.
If you have a stationary fan, I always recommend you just point it at the back or the back corner of the tent so that the fan will blow into the back and then it will circulate it throughout the tent.
But then after we have just regular airflow, we do need air to be moved out of the tent so that way fresh air is being pulled in, old air is being expelled.
And that is why we have a nice inline fan.
So at the bottom, there's actually a charcoal filter.
So what that's going to do is it's going to pull in all of that smell, and it's going to clean that smell.
And then this fan is actually going to pipe all of that out of the tent.
So if you have a carbon filter inside the tent, you're fine, if you are making a grow room inside of your house or in a closet, that would need to be vented out.
So that's the big difference, where this is more of a closed, contained unit.
And if you're in a room of your house, that's where things get a little bit more difficult.
>>Well, how do you get it from vegetative to flowering stage, what changes?
Because I know that's manipulated.
>>So that's where the fun part really begins.
We start by just moving the light down to 12 hours on and 12 hours off.
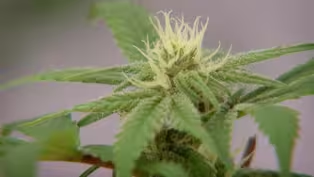
And over the course of that first week, it sends a message to the plant to start flowering.
As you can see here, there's starting to form their little buds on the top of each plant and their sugar leaves are actually starting to produce some some resin and trichomes on there.
So we move into the flower state.
We've actually pruned off some of the fan leaves, as we call it.
The fan leaves are the larger leaves coming off of the stem.
And what they're doing really is they're taking in sunlight, they're creating photosynthesis and food for the plant.
We haven't defoliated this very much just because we wanted to be able to show you guys what it looks like.
And what I do is I just pinch them off close to the branch.
And we can go around the plant and just start to remove these fan leaves.
And as the plant is growing with more sunlight and more airflow, it really makes the final result or your harvest more uniform.
If I can see a shadow on one of these buds underneath, I'm going to remove a fan leaf, and then watch that shadow go away.
The only thing I don't want to do is I don't want to remove any leaves that have trichomes or any type of resin on them, because those ultimately form into the bud, but also allow for better THC and CBD content.
>>How or when do we know to harvest?
>>So every plant is a little bit different on how long it's going to grow for.
And also it depends on your environment as well.
But most flowering cycles for a photo period plant are anywhere from seven to 10 weeks.
So as we get into that seven, eight week timeframe, you'll notice that all of these are going to be thickening up quite a bit.
From there, I always use a jeweler's loupe or a magnifying glass and you can zoom in on those trichomes; they look like a clear mushroom.
So like a little glass mushroom with a with a cap on it.
>>Okay.
>>You're gonna look for that little cap.
And if it's clear, it's actually still producing, it's still growing, it's still developing.
Once it starts to turn into a milky or cloudy color, what that means is the plant is getting ready for harvest.
So that little mushroom cap as it starts to turn milky, you need to start thinking about its time to, you know, develop an area where I can dry my plant and cure my plant.
And then from that stage, it goes from a cloudy to almost an amber color.
And once it starts to turn into the amber color, it's time.
The plant has started to actually get to the end of its life cycle.
Time to cut it down and and hang it up.
>>Mark, this has been very helpful.
You are just a wealth of information and I truly thank you for sharing it with us so that people can feel empowered to grow their own.
>>Well, thank you for having me.
It's a lot of fun to grow.
I recommend everyone give it a try.
>>Wow!
It's always fun to learn about new plants.
And to try to grow different things.
And now Mark is here with me again, to talk about plant propagation.
But before we get started, to remember to send in your gardening questions on our website at vpm.org/vhg Well Mark, we're going to be talking about plant cloning.
But before we get started.
I wanna mention the legal requirements for growing cannabis.
And because this is still pretty new, and everyone needs to make sure that they're following the law.
And just to remind everybody, there's four plants per household.
It's for personal use only.
And plants cannot be visible to the public, which means from the street.
And precautions are required to prevent access from people under 21.
And each plant must be tagged, so.
Well Mark, this is really exciting.
Do you have anything else to add, by the way?
>>Well, I will say you can read a lot online about it.
But we have a private club called The Home Grower's Club of Virginia.
We meet once a month.
We go over education topic, we actually physically show you the education topic.
Like pruning, propagation, seed starting, things like that.
I would highly recommend it.
It's a great place for everyone to come together and learn about growing.
>>Exactly, and to stay up on all the legislation.
So, wonderful.
>>Mm-hm.
>>So, speaking of plant propagation, you've got quite an array of equipment here.
Very simple, but mighty and powerful.
>>Very simple, but effective.
So, we get a lot of questions about cloning.
So, if you find a plant you really, really like, there is a very easy way to keep it going.
So if you wanna flower it, but then you also wanna keep it growing in a vegetative state, and then flower that one at a later date, this is a great way to keep the exact genetics going.
So in order to do it, what we wanna do first, is sanitize everything.
>>Yes.
>>So, we have a lot of materials here, and we've washed everything before we came in.
>>Okay.
>>An alcohol wipe, or just scrubbing with some dish soap works really, really well.
>>Okay.
>>So, your basic cloning, or propagation tools, would be a small, little greenhouse, or humidity dome.
You can also use a solo cup and Saran Wrap if you don't have something like this.
>>Yes.
>>We have these little cubes, are made of peat and coco.
And so, they are natural and they will break down.
But this is a great way to start a clone.
A great medium to start it in.
From there we have our rooting hormone.
And from here we have just a very easy bucket of fresh water, and some insect control.
>>Okay.
>>So very important when we're getting started to make sure we take the cut, we will dip it in our insect control, so as it goes into a high humidity environment, we can make sure it has some protection against insects, molds, mildews, things like that.
>>Exactly, it's not introducing something.
>>Exactly.
It's clean when it goes in.
And that way we know we're gonna have the best start possible.
>>Excellent.
And, we have a plant.
>>And here we have a nice, beautiful plant that does need some pruning.
>>(chuckling) It's very full!
But we're gonna take a few cuts off of it today.
So its been a great plant.
And we wanna keep it.
So, you can take cuts from the top of the plant if you wanna bring the canopy down some.
Or, you can take cuts from the bottom of the plant.
But, what I generally do, is I'm gonna reach in here.
And I'm gonna take a small clipping here.
And what we'll end up doing, is we see we have a few different nodes.
I'm going to go ahead and remove all of this leaf material.
So what we'll do, is we'll end up removing all of this.
And then, I'm gonna make a cut right below this node.
>>And remind people, nodes are where leafs are along the stem, okay?
>>Yes, so right where a leaf or a stem is coming off, we're gonna make that.
And I try to make a cut around 45 degrees.
Now, it doesn't have to be perfect.
>>That's close enough.
>>I'll do the best I can.
So what I'll end up doing first, is I'll make that cut right below.
And so now we still have a few fan leaves, which are these nice, larger leaves.
And what I'll end up doing is cutting the edges off of them.
>>And why are you doing that?
>>So this kind of mimics an animal eating, or nibbling on the plant in mother nature.
So this is a really easy way for a message to get sent down of, "Okay, something's eating me, "it's time to grow some root system."
So that way, it helps the root start.
>>So, we've got a defense going.
Yes.
>>We do, yes.
>>So what's our next step?
>>Well from here, what I'm gonna end up doing is dipping it into my rooting hormone.
So what we'll do is we have that fresh cut.
Generally, I will scratch the edge of the stem just to open up some more plant tissue.
>>Yes, because we're trying to get down to that cambium layer, which is right under that bark there, that cutting (indistinct).
>>And you can do it with your scissor, or I just do it with my fingernails.
>>It's a lot more fun with your finger.
>>Yeah.
>>It's easy.
>>We're working with plants here.
>>Right.
>>Let's have some fun with it.
So it's very simple.
I'll go ahead and dip it in here.
And once we have that rooting hormone dipped, from there we'll grab this small little medium here.
And there is a nice hole at the very top.
We'll go ahead and stick that right down in.
>>Okay.
>>And so from here, we have our clone.
The last thing that I will do, is I will open this up.
>>The water?
>>The water.
I do have some insect control here.
So what I'll end up doing is pouring some in.
That way we have our insect control mixed in.
>>And it is organic, you had mentioned that early.
>>It's a nice organic, it's made from sucrose.
It's basically a natural sugar product.
And what I'm gonna do, is I'm just gonna dip the entire plant down into it for a second.
I'm gonna bring it out.
And that way all the leaves are covered.
So everything's been coated really well.
So that way we don't have any mold, mildew potential.
>>And from there, I have this wonderful little humidity dome here.
Where, I'll open this up.
I will go ahead and drop my plant in.
And I have a card already filled out.
>>Excellent.
>>Which means I am completely legal here.
So, I will just leave that inside of this little dome.
And that way, if anyone comes looking, I'm abiding by the law.
>>Typically, how many plants would you put into the dome?
>>We're only gonna do three cuttings.
Because we have one plant, and we'll take three cuttings.
>>Stay within our legal limit.
>>Technically, as soon as you take that cutting, put it into a medium, it- >>Becomes another plant.
>>It is a plant.
>>Yes.
>>So from there, I will use some lukewarm water.
I will moisten that, and I'll put a small amount of water at the bottom of the tray.
I'll put this dome over it.
And I'll give it fresh water every day.
And after about 10 days, we should see some roots.
>>There's a little humidity control at the top.
This is so simple.
But, do you leave that open so the air can get through, or do you leave it closed, or is there a timeframe where you change it from one to the next?
>>So, I leave it closed.
And then basically every day when I come to give it fresh water, I'm gonna open it up, and I'm gonna give it fresh oxygen.
So this works really, really well.
And after I start to see some roots, I will open it up to allow air flow to move throughout the day.
>>All right, you see the roots.
And at what point do you then remove it from, how long do you leave it in the container?
>>So generally, it's about 10 days.
Now, based off of the temperature and the air temperature, it can be a little bit longer.
Generally, what I will do, which I really like about this, is it has a small little tray that you can pull out.
So you can actually see the root- >>Oh, that's great.
>>Starting to form.
And at that point you know, okay, it's time to remove it.
And I can put it right into my soil.
And this cube basically breaks down.
So you don't have to try to maneuver it, or move it out of there.
>>And what's the cube made of?
>>It is coco and peat, pretty much.
>>So it treats them pretty well?
>>It does, yes ma'am.
>>Now Mark, can I use this for just about any plant, this method?
>>So that's the great thing.
You can pretty much use this method throughout most plants.
It's not just for cannabis.
>>And we all know to take that cutting, it has to be pliable without breaking.
And then, it's at the perfect level to be able to be propagated pretty easily.
>>Yes.
Mm-hm.
>>Thank you.
Well Mark, this is fantastic.
And I thank you so much for coming in, and showing folks how to clone plants, or propagate, however, whatever term you wanna use.
And be able, so they could do it at home with some simple equipment, and some simple steps.
>>Absolutely.
Propagation when it's not necessarily in the cannabis state.
But in the cannabis industry, it's usually just cloning.
>>Yes, understandable.
Well, thank you.
>>Yeah, thank you very much.
>>And now, we're going to get ready to answer your questions.
But first, Randy Battle has more indoor growing tips for a simple vegetable setup that you can try this winter.
(light percussion music) >>Fall is here and winter is just around the corner.
You may think the gardening season is over.
No, no, no.
There are many things that you can grow indoors during the fall and winter months to feed your friends and your family.
So, I'm gonna give you a few tips on how you can get started very easy.
A simple mixture of peat moss and perlite works great for me.
Two simple ingredients.
What I like to do is take my seeds and gently sprinkle them on top of the soil surface.
You don't wanna bury your seeds too deep and then, take you either a little stick or your finger and mix it in.
These are lettuce and we're gonna do some spinach, as well.
A couple of seeds per cell should do just fine, if we can get 'em out.
That's all right.
If you over plant, you guys, you can always thin out later.
That's the fun part of gardening and just mix it all in, just like so.
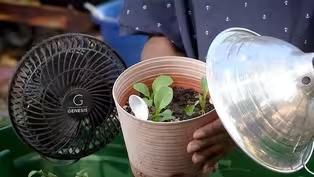
So, in a few days, your seeds will start to germinate and what you want to do is make sure they have sufficient lighting.
We're not outdoors, so we have to mimic the sunlight and the way you do that is using a grow light.
Now, your regular light bulb in your home probably won't work, but you wanna get you a light that says it's specifically a grow light.
There are several types of grow lights.
There are LEDs, there are fluorescent.
You get what you can afford and what you have space for.
Once you get your grow lights going, you wanna leave 'em on for at least 8 to 12 hours every day.
Once your plants are growing and flourishing, they may even reach the lid of the container.
You can go ahead and remove the light a little bit.
You don't want it too close, 'cause you could possibly burn the leaves of your plant.
So, just pull it back just a little bit.
Also, add your small fan for circulation.
This is gonna mimic the wind that mother nature normally provides and it's gonna provide your plants with a strong root and stem system.
Things that you can grow indoors, just have fun with it.
Tomatoes.
Look, you guys.
Grown indoors.
I recommend cherry.
Don't try to grow the beef steaks, unless you have a huge greenhouse.
Otherwise, do your leafy greens.
Kale, mustards, they will grow the size of the container that you grow them in.
Larger container, larger plants.
Smaller container, smaller plants.
So, take what you have, make it work.
Remember live, love, laugh, grow stuff and eat it.
>>On Facebook right now, members of our team are answering your questions, so please send them in via Facebook or through our website.
We always enjoy hearing from you.
So Serome Hamlin is here with us too and to take your questions.
So welcome, Serome.
>>Hello, how are you doing tonight?
>>I'm doing great.
So what do we have up first tonight?
>>Tonight, first question, does plants grown in a tent get enough oxygen?
>>So airflow is extremely important.
Cannabis plant really likes to breathe a lot, so I do recommend having an inline filter inside of the tent that's gonna pull air or stale air out of the tent.
And then I always do like a filter and fan that's gonna push air into the tent as well.
So usually depending on the size of tent, I would say if you have like a four by four area you really want two fans inside of it.
Smaller fans that will move air flow throughout the tent it'll pull it out of those bottom vents, it'll pull it in, it'll circulate it around.
And then the inline filter will then move it out of the tent.
>>Do you want those fans blowing heavily on the plants, like a wind outside?
>>So you don't want it to be directly on the plant.
You don't want the plant just sitting there being pushed to one side.
So you really do want indirect airflow.
So if it's an oscillating fan, awesome that will, you know, move air throughout in different directions.
If you only have a stationary fan, I would say point it at the back or maybe at the corner of the tent.
That way as the air shoots in, it will then, you know, move throughout the tent, and then your filtering fan can take it out.
>>Okay, awesome.
Bobby has asked, "What is the difference in growing cannabis outside in Central Virginia, and how late of a season you have?"
>>Well, growing indoors in a tent, you are creating mother nature, right?
You have your light, you have your air flow, you have everything including your temperature settings and humidity settings.
Outside in Central Virginia, mother nature can be a little brutal.
So if we're going outside around Mother's Day, and we're growing into September, October, we have a lot of humidity, we have a lot of heat, and then we also have those wonderful nighttime thunderstorms.
And when the leaf tissue is wet overnight, there's a lot of chance for disease.
Then once that plant sometimes gets some disease insects can say, "Oh hey".
It's just an open door for them too.
So there's a lot of IPM or pest management you really need to take if you're growing outside, that if you're growing indoors you don't have to take care of 'cause you're mimicking all of that perfect environment.
>>More control.
>>A lot more controlled.
>>Could you build a structure to sort of buffer the wind?
You know, like a lattice structure or something I'll say similar to a grow tent outside just to calm the wind down.
>>You can, you could create a buffer, you know with a lattice or some type of trees or you know, evergreens, something like that.
But you're still gonna get that, you know, humidity and rainfall.
So it you just have to make sure you have everything in place if you're growing outdoors.
You need to have a good disease control or an insect control.
It needs to be all natural because cannabis plants are bioaccumulators.
So we just need to be careful what we put on them.
>>Yeah, I had a question too.
For all new growers, the mentioning of tagging everything, what type of information is needed on the tag to make their plants legal?
>>So by law you need to have your name and then they basically do want your driver's license number on it.
You can put your social, but I really wouldn't recommend that.
So those two things are really important.
I always put the genetics of the plant because if you're growing four different types you really want to remember which one is which.
I also put the date I plant it or the date the clone is taken, just so I can keep track of how old that plant is.
So the two things are your name and your driver's license number.
The extra things like the date you planted it and the genetics I do feel are really important too.
>>Right, and someone has asked, Jeff has asked, so how did it get involved in the Home Grower's Club?
>>So the Home Grower's Club has been awesome.
We started in July of last year right when it became legal to grow four plants.
And really what you can do is you can look on at us on Instagram.
We are the Home Growers Club VA we're also the Home Growers Club of VA on Facebook as well.
So you can always message us through either of those platforms.
We also do have a website as well and you can email us through there.
We will then, you know, give you the next date where we're doing a class and a get together.
But I highly recommend it because we have a great group of people.
We basically get together, we do an educational topic, and then we can, you know, share get together, talk.
And it's just a wonderful group of people all surrounded by a plant we enjoy growing.
>>And speaking of different types of plants, I heard you mention photo period.
Now again, a lot of new growers may be watching.
There's photo period and then there is-- >>There's autoflower.
So the photo period plant grows based off of a light cycle and pretty much when the plant is in 18 hours of daylight it is in the vegetative state of life.
And then you trigger flowering by changing the light cycle to 12 hours on and 12 hours off.
And that makes the plant flower.
An autoflower you can leave the light on for 18 hours or honestly for 24 hours at a time, and that plant will germinate, it will grow and it will automatically transfer into flower.
So basically you can leave the light on the same setting and it's gonna go through that life cycle at a very quick pace.
So generally you're thinking, you know, 90 days in an autoflower.
There are ranges, but you can read the the packaging and see what the days are.
>>And photo period, that varies?
>>And photo period, it's all about you.
So basically I usually say grow it till, you know, the tent is roughly halfway full then you can trigger it into flower because the plant will stretch as it goes into flower.
So that way you don't outgrow your tent or your space.
But with the autoflower it's basically predestined from the moment it comes out of the seed coating.
>>Do you think a new grower should go with autoflower?
>>So autoflowers are great and the genetics have come a long way in the last few years.
So I really do like autoflowers because you can watch it grow quickly and they can see the process, you know, within a three to four month time span.
With a photo period plant, you know it's gonna grow and you trigger it.
So you can grow it as big or as small as you like.
So I like photo periods because when you prune them and you, you know, train them and you take clones off of them, they come back very quickly.
And sometimes an autoflower doesn't like to be pruned or it doesn't like a lot of manipulating.
>>I had another question and we only have a few seconds left but is there a certain amount that you can grow legally?
I mean can you grow them eight feet tall?
Or is there a certain amount of mass of the plant that you can grow?
>>So outdoors is gonna usually produce larger plants.
So four is the plant count but generally everything is for personal use.
So that can be a little tough sometimes, just depending on how much you're gonna yield at the end of each plant.
>>Okay, well thank you.
Well that's all the time we have right now, but we look forward to answering more questions later in the show.
Thank you, Mark.
>>Thank you.
>>Next up, Amyrose Foll visited Sweet Briar College to learn more about greenhouse technology.
She met with Dr. Lisa Powell to tour their state-of-the-art facility that produces food for the campus dining hall through all four seasons.
So let's take a look.
>>Before I came to Sweet Briar, my experience with agriculture was not a lot.
Most of it back home was ranching and cattle and not really produce and growing.
We give a lot of produce to our dining hall.
So in the morning, if everything's not already harvested from the day before, I'll finish that, and then I take it up to them, and then when I come back down, I usually start harvesting for the next day.
>>Being able to harvest from the greenhouse, and then you'll be eating it for lunch that day or something is very cool and a rewarding kind of experience.
I like to plant things like when they're, you know, putting the babies in the channels or putting seeds in the ground, preparing a new row for a different kind of crop.
I prefer that process.
>>Our greenhouse is primarily staffed by our students.
They grow the plants you see here from seed to harvest.
Our main place that we take our produce is just a short distance up our hill to our campus dining hall.
Students can sit in the dining hall and see the greenhouse where we're growing the delicious lettuce, basil, other vegetables that they're eating.
We supply throughout the year over 30 different types of produce items to our campus dining hall.
>>That's really, really impressive, and I love that you're doing it here on campus with the students so they're learning and being nourished from what they're learning from, and it keeps those gas miles really tight on where the food's coming from.
So do you have, do you grow year round?
>>We do grow year round.
That's the exciting thing about our greenhouse.
Sweet Briar has a long agricultural history, and we've long had some outdoor growing and various other activities.
But this greenhouse is really allowing us to provide food throughout the year for our students who are on campus during the school year, in addition to our students who stay on campus over the summer doing research and continuing their learning.
>>I love that you are bringing women into the future of agriculture and really changing how we see the traditional farmer.
That's really impressive.
Now is it a horticulture program or is it biology students?
What do you mainly do as far as the learning aspect of this goes?
>>That's a fantastic question.
So there's a lot of different ways that students are involved in learning here in the greenhouse.
So we have a new leadership and sustainable agriculture and food systems certificate program.
Students can do that certificate on top of their other studies really to show that they are learning about agriculture and food systems and that they are gonna bring that perspective and understanding to whatever post-graduation career or studies they do.
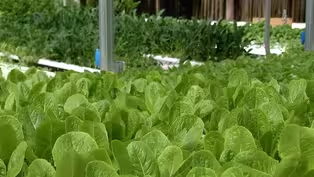
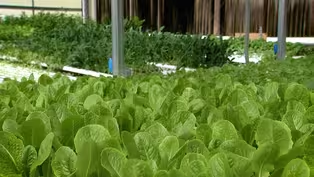
>>That's beautiful, and this lettuce is beautiful.
Can you tell me about the technology we're looking at here in what we're growing?
>>Yeah, so this is what's called a nutrient film technique or NFT hydroponic system.
Water is basically flowing down each one of these channels and delivering the nutrients the plants need to grow in the soil.
>>And so as far as the technology goes, what controls it?
>>Yeah, so we have a centralized control system for our greenhouse and sort of ground zero for our data collection.
Our sensors that hang down in each bay, they're constantly monitoring the temperature, the light and the humidity within the greenhouse.
So we get a ton of data on that.
We have settings in our automated control system.
We can adjust those as we need to.
But once we put in those settings for how much light, what we want our growing temperatures to be, then the sensors are taking in that data and adjusting things like the shades, opening and closing them, turning on our cooling system, turning fans on and off, in the cooler months, maybe turning on our heaters.
>>I'm a little jealous.
My hoop house is not as technologically advanced with the shade cover.
Can you show me what controls that?
>>For sure, yeah, let's head over there.
>>Okay, sounds good.
We're going into this other bay, and I see that you've got some indoor growing going on.
Can you tell me a little bit about that too?
>>Yeah, so we have four bays of soil-based growing in our greenhouse, and we use these areas to produce a really diverse range of crops for our dining and our markets and CSA.
One really fun part is that our students use bamboo to make trellises.
Bamboo is a plant that grows readily on this campus.
It grows a little too well.
We have to cut it down to keep it from taking over, and this is a great way that we can reuse the bamboo, and it really works for our growing system.
>>It's a really great way to use a pest plant to give it another sustainable use.
>>Yes, yes.
>>You know?
Wow, so you're controlling all of this from a laptop?
>>Well, we have a few different control centers for our automated systems.
We have a screen touchpad interface on the back wall of the greenhouse.
We can actually control from our phones.
We get notifications when things are a little outta whack on our phones, but most of us who work here in the greenhouse and with the system do the controlling from our laptop.
So you can see a little bit about the kind of things we can see.
We can always be monitoring our readings for our temperature, humidity, light levels, and then we can go in and make adjustments from home as well or from wherever we are on our off campus.
>>That's really impressive.
Now I see you've got many different bays, and where we were just coming from is hydroponic, but this is in ground growing.
>>Yes.
>>How does that differ in your software and what you're controlling?
>>So in terms of measuring the temperature, humidity and light, it's exactly the same.
In our hydroponic section, we also use this automated system to help control the pH and the nutrient levels of the water.
And then of course, our students are doing the extra level of manual monitoring as well, just to make extra sure that things are just right for our plants.
>>So the technology has really come a long way.
Do you still have hands-on work that you need to do on a daily basis here?
>>Oh, for sure.
Our students are very involved in keeping the greenhouse running on a day-to-day basis.
They are using integrated pest management techniques to help make sure that the little critters aren't getting on our crops.
And then up here in our soil-based section, they do spend quite a bit of time weeding because even inside (laughs), we still have to take care of those weeds.
>>Oh my goodness.
I love that you're preparing these amazing young women for what's really gonna be the future of agriculture in Virginia.
How do you see this benefiting them in the future in their own lives when they go out and make their careers for themselves?
>>We love that we are specifically training our young women who are students here to really be leaders in that greenhouse controlled environment, indoor agriculture industry, but also to be able to understand that industry.
So if they're working in something adjacent, be it business, be it policy, that they are really understanding the both opportunities and challenges that come with the greenhouse and indoor agriculture business.
>>This has really been beautiful.
Thank you so much for having me today.
>>Sustainability is is a huge part of Sweet Briar as well.
In almost every single class I've taken, I don't know if it's just 'cause I'm an environmental science major, but every single class has had a focus on sustainability and good practices to make sure that, you know, it's gonna be better after we leave it.
>>When it comes to climate change and sustainability efforts I think my generation is more concerned about the effects that we have on the planet and corporations have on the planet and just being able to, you know, start being aware of that and then moving to start creating change.
>>It's great to see the college's commitment to sustainability.
The students there are gaining valuable hands-on experience growing a crop using technology plus project management skills.
Now Lisa joins us here to share a compost system that minimizes maintenance in the garden using the lasagna method.
But before we begin, I wanna remind you to send in your gardening questions through our website at vpm.org/vhg or through our Facebook page.
Well, Lisa, we've got some pretty unique things here to talk about.
Some of them, well actually all of them I recognize, but only one pile I want to eat.
So tell me about this wonderful pile of produce that you have here.
>>Yeah, so at Sweet Briar College we have an amazing 26,000 square foot greenhouse that allows us to grow beautiful produce basically year round.
So these are all crops that I've harvested from the greenhouse just in the last few days.
>>And then we've got this jar of honey right here.
>>Yes, so we, in addition to our greenhouse and our outdoor growing areas at Sweet Briar.
We also have a 25 Apiary.
>>20, oh my.
>>25.
That's a lot of bees.
They're very busy.
Although right now they're really settling in for the winter.
>>I bet you they are.
But we, with our students harvest the honey each summer.
We then sell it in our bookshop on campus.
And in addition to honey, we also make some body care products like lotions and soaps and lip balms.
Which is a really fun way to share our honey harvest with a lot of people.
>>And besides the vegetables and the apiary, what else is at Sweet Briar?
>>So we also have about 17, 18 acres of wine grapes on Sweet Briar's campus.
>>Now there's something we can talk about.
>>So we grow Merlot, Chardonnay, Cabernet Sauvignon, and Cabernet Franc.
And we sell those grapes to Virginia wineries so that they can have more Virginia grapes in their total wine composition.
>>Absolutely, let's support our professionals.
Yes.
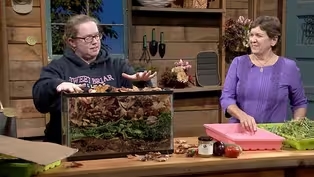
But you also have a fish tank filled with turf.
And that kind of intrigues me.
I've had many things in a fish tank, but never turf.
So let's get started on talking about lasagna gardening and composting.
>>So lasagna gardening gets its name because we're basically going to be making layers like the kinds of layers you would see in a lasagna that you would eat.
This process is also often called sheet mulching or sheet composting.
And some people also call this the lazy gardening method because it is a way that you can really start a new garden bed or a whole new garden.
Or you can refresh an old gardening area with really not a whole lot of those things that gardeners find so frustrating.
The digging, sometimes not even too much weeding.
>>The hauling, everything.
>>The hauling, yes.
>>Well you have a pile of cardboard over there, pardon me, is that our first layer?
>>That's going to be our first layer.
So let's say this is our little sample of the area the new garden bed we're going to start.
And so our first step is typically going to be to mow if you have a lot of vegetation, you technically could just smoosh it down, but mowing will help the process along.
If you do have some of that pesky wiregrass or you have a lot of crabgrass in there, you may want to do a little weeding in that case because those are pretty persistent even with a lot of stuff on top.
But if we've had a dry year, like we have had a really dry fall, that we're gonna give it just a little bitty sprinkle.
>>Needs some moisture.
>>And then we are going to start our cardboard layer, which is going to help us with our weed suppression.
Now lasagna gardening is something that one person can do on their own easy peasy.
But it also can be a really fun activity for friends or family to get together.
>>Sounds fun.
>>Yeah, at Sweet Briar College in my classes, I often will have one group of students working on collecting the leaves, one on maybe chopping up the green material, and then some of them on cleaning up the cardboard.
So this is actually cardboard from some of the supplies that come into our greenhouse.
>>I know that logo very well.
>>Yes, but we need to get any plastic tape or other labels off of our cardboard before we start to use it in our composting process.
>>Okay.
Moving right along.
>>Yes.
So that one's not ripping too easily.
I conveniently have some already ripped up over here.
So we are going to add in a double layer of cardboard.
>>And this really suppresses a lot of those weeds very quickly.
>>This is going to suppress a lot of those weeds.
And then we are going to water in, give a good water into that cardboard.
>>It starts breaking down.
>>Yeah, and underneath this cardboard, in addition to suppressing the weeds, it's creating a really nice environment for earthworms and other microbes to start to grow in there.
>>Oh, wonderful.
So what's our next layer?
>>So our next layer, and there's a little bit of debate about this in the lasagna gardening world, you could either do green or brown.
But I think we're gonna start with green.
>>Green our nitrogen.
>>Our nitrogen adding layer, which really helps to build the cells of our microbes that are down in the soil.
And so we're gonna put about one inch or two inches of-- >>And what people don't know is you have basil in in here, so this smells wonderful.
>>Of the green layer.
And then we are going to add in our brown layer, and we want about three times as much.
And this is our carbon layer.
So we want about three times as deep leaves as we have green layer.
>>And then we put in more green?
>>Then we could put in more green.
You could either leave it with just one set, but if you have plenty of green and brown, you can just keep layering and layering till you use up all the materials that you have.
Tell me real quickly, because we just have a few seconds left.
How often do we water this?
>>So we're gonna water it in when we first start it over the winter.
This is one reason it's so great to do this in the fall for the winter, hopefully we're getting lots of snow and rain.
And that is providing the moisture.
If it's really drying out, it would be helpful to water it every now and then.
>>That sounds great.
So easy peasy.
And I'll call this the lazy man's compost.
Thank you so much, Lisa.
This has been great.
>>Thank you.
>>And now we're going to get ready to answer more of your questions, but first, Serome has a tip to share to remind us of some of the fall tasks that we need to take care of before heading indoors.
(soft music) >>We're finally starting to get some cooler temperatures after a long hot summer, we know that fall is here.
We have so many projects out in the garden to do before we can move into our indoor gardening.
And it can be stressful and overwhelming.
Best thing I have found is make a checklist.
We can go down the checklists and start checking things off.
That's very rewarding.
But you won't feel overwhelmed, you can prioritize what you need done, I have a couple projects in my garden that I need to get done, so let's start.
One thing is division.
Fall is a great time to divide many plants, such as this hosta here, which is not in a happy spot.
So I've decided to dig him up and he's going to get moved to a better area.
But I can make more plants out of this one clump, and it's so easy.
And you can see where the different plants are.
Take a flat shovel, just go in between the plants and just chop through.
Hostas and things like day lilies are very good candidates for division and the fall is the best time to do it.
And it can save you a lot of money.
Now let's go on to the next project.
Here we are in my front garden and next thing that is on my checklist is to cut back some of these garlic chives.
I love garlic chives.
It's a late summer bloomer, but it's a prolific seeder.
So I would like to try to get some of the seed heads chopped off before they start settling and making new plants.
And if you like, you can take these inside to dry and they make nice decorations in a flower arrangement.
And now that this is done, we can mark this off of our checklist.
So the easiest thing to do, everyone, is to get your checklist.
Get everything checked off before you move into your indoor gardening.
Enjoy the season and go out and get your hands dirty.
>>Serome, thanks for those reminders about us getting out and taking care of that list.
And now we have some more questions to answer.
So Lisa, we've got some good ones here.
Keely from Facebook has asked, "Are there insect problems in the greenhouse?
And if so, what do you do?
And are they different for each of the two systems you have?"
>>So that's a great question.
A really common misconception is that greenhouses don't have pest problems.
The reality is where there are tasty plants, the insects are going to find them, yes.
So our first step is to scout for the pest, right?
We want to see if they're there.
So we always have our students looking out for the little critters.
Once we find them, we assess the problem.
Often, we are able to remove some leaves, maybe remove entire plants sometimes, as a first step before we do any treatments.
Whenever we do need to do some pesticide treatments, we really focus on and we only use things that are approved for organic production, so certified by the Organic Materials Research Institute, things like neem oil, BT, beneficial bacteria, beneficial fungi, and we only really use as much of those as we absolutely have to, to get that past problem under control.
>>So it's very targeted.
>>Very targeted, yes.
>>Okay.
Same for diseases, though.
I mean, greenhouses, if, gosh, one of those wonderful fans break down and you've got some stagnant air... >>Yes, so keeping the airflow going is really important in the greenhouse.
It's why we have 18 giant fans in ours (chuckles) (Peggy chuckles) and a bunch of small ones.
But even so, we have to be really careful.
So we start managing for disease before the plant even starts growing because we choose seeds that basically have been bred using traditional plant breeding methods to be resistant to the common diseases that greenhouse plants suffer from.
>>Yes, immediately.
Serome, do you have any problems with your indoor plants?
'Cause I know greenhouses are still an indoor crop.
>>Oh, yeah, you still have problems with indoor plants, just like a greenhouse.
It just happens.
Again, you have plants as a natural growing thing, you're going to have some sort of pest.
>>Do you put a small fan up in your growing area for your indoor plants, your house plants and such?
>>I do keep a fan around, but I'm actually really horrible with house plants.
(Peggy laughs) (Serome chuckles) But I try to think that way to keep airflow.
Airflow is a very important thing, especially with fungal problems and things like that.
So the airflow is very important.
In thinking about being inside, most of the air inside now, and it's very dry, too, so we've got to keep flow.
>>Gotta keep it moving along.
Well, speaking of inside and dry, the heating, we've got a question here about a small greenhouse.
What would you suggest that people use to heat a small greenhouse, or even a cold frame, outdoors in the winter?
>>Yeah, well, I think, first of all, the sun is going to do a lot of work for you, right?
>>Yes.
(Lisa laughs) >>If you have a nice poly material as the top of your cold frame or surrounding your greenhouse, that gives you a great start.
There are now a lot of solar heating options out there that you can look into, building your own solar heating structure.
Another option really could be to just have a space heater on a timer in your greenhouse, and that could help you out a whole lot as well.
>>Yes, it doesn't take a lot, you're right.
And do you have experience with that at all, Serome?
>>I have built cold frames and everything, and I just let the sun do its thing.
>>And sometimes that's easiest.
>>Yes.
(Peggy chuckles) >>Well, Lisa, Cheryl from Ashland has asked, "If the students are working in the greenhouse during the school year, who takes care of it during the summer?"
(all laugh) >>Wonderful question.
So, of course plants keep growing year round, whether the students are there or not, but we have an awesome program, called the Willits Summer Food Systems Fellows, in which six to eight of our Sweet Briar students stay on campus for the entire summer, and they work in our greenhouse, they work in our outdoor growing areas, they learn beekeeping and take care of the bees in our aviary.
>>Wonderful.
>>That's awesome.
>>And they're also involved in our vineyard.
So both of the students who are in the video today, Lily and Nikki, have been Willits Fellows in the past.
It's a wonderful program.
>>That's a fantastic program.
>>So how does somebody can get involved and check out different programs that you guys provide?
>>Yeah, so visiting our website, sbc.edu/sustainability really outlines both our school year programs, the ways that students can study and be involved in agriculture during the school year at Sweet Briar, and also the Willits Summer Fellows Program as well.
>>It's interesting.
That's a great opportunity for many people.
I wish I had something like that.
>>Oh, I know, and start 'em off young.
>>You and I would be right there.
>>Oh, I know.
(Peggy laughs) Y'all see it.
>>Well, we have one quick question, and it's about hydrangeas.
Many, many people wanna know, this is the season of "Do I cut it, do I not cut it?"
And so, real quickly.
>>Know what hydrangea you have is the first start.
I would say, mainly just cut blooms and clean up the plant.
Just start with that.
>>Get rid of the dead.
>>Yes, dead is dead.
>>Dead is dead.
>>Just get rid of that.
Any of your blooms that, if you find it offensive, I personally leave mine because, to me, I find it's interesting.
But know what you have, 'cause if you go and whack the whole plant down, then you may not have any blooms next season.
>>Yes, some bloom.
Some hydrangeas form their buds in the summer, some hydrangeas will form their buds next spring on new growth.
So knowing what you have is very important.
>>It's very important to find the variety that you have and so the research, and then that way you will know for sure.
>>And to learn that, you could have an expert come as a consultant, or you can take a piece to your local garden center, and there'll be somebody there to help you.
Well, we're out of time.
And, Lisa, I wanna thank you for joining us today.
>>Thank you.
>>Remember to visit our Facebook page, Virginia Home Grown, and we always enjoy hearing from you there.
And if you're not watching on Facebook already, then please switch over to catch Jen Naylor's "Eating Fresh" segment about persimmons.
And Jen, thanks for sharing your passion for food with us this season.
Thanks to our great team, Serome, Randy, Amyrose, and Robyn, for being with us this year.
And thanks again to our guests, Mark and Lisa.
We wanna thank you for watching.
On November 3rd, I'm providing a program via Zoom through the Prince George Master Gardeners.
And registration is free via their website, so check it out.
We hope you can join us for "Virginia Home Grown Clippings" on Saturday mornings this winter.
And I look forward to being with you again next spring.
Until then, remember, gardening is for everyone.
We are all growing and learning together.
Happy gardening.
(joyful music crescendos) >>Production funding for "Virginia Home Grown" is made possible by... (birds chirping) (lively acoustic music) (lively acoustic music continues) (lively acoustic music continues) (guitar strums) (bright music)
Cannabis seeding and propagation
Video has Closed Captions
Clip: S22 Ep8 | 8m 17s | Learn how to clone cannabis plants from cuttings. (8m 17s)
How to create a no-dig lasagna garden
Video has Closed Captions
Clip: S22 Ep8 | 6m 38s | Learn how to create a lasagna garden with no digging, tilling or weeding. (6m 38s)
How to make a homemade grow chamber
Video has Closed Captions
Clip: S22 Ep8 | 2m 43s | Learn how to create a homemade grow chamber. (2m 43s)
Learn how grow tents are used to cultivate cannabis
Video has Closed Captions
Clip: S22 Ep8 | 8m 40s | Learn how indoor grow tents are used for growing cannabis. (8m 40s)
Organize your fall gardening tasks
Video has Closed Captions
Clip: S22 Ep8 | 2m 24s | Organize your fall gardening tasks with a checklist. (2m 24s)
VHG Clippings: Growing Indoors
Video has Closed Captions
Clip: S22 Ep8 | 26m 46s | There are many ways to bring the garden inside. (26m 46s)
Visit the Sweet Briar College greenhouse
Video has Closed Captions
Clip: S22 Ep8 | 8m 23s | Explore the technology behind a state-of-the-art greenhouse. (8m 23s)
Providing Support for PBS.org
Learn Moreabout PBS online sponsorship

- Home and How To

Hit the road in a classic car for a tour through Great Britain with two antiques experts.


Support for PBS provided by:
Virginia Home Grown is a local public television program presented by VPM