E10 | Lexington Modern | Seven Layer Floors
Season 45 Episode 10 | 23m 42sVideo has Closed Captions
Insulation and tile prep is in progress. A motorized multi-slide door is installed.
Mid-century modern details are taking shape on the exterior. On the interior, rigid foam is installed on the subfloor to meet strict energy codes. The homeowner goes shopping for door hardware with accessible considerations. A single tile prep and waterproofing system is used to create a watertight bathroom for zero threshold entry to the shower. A motorized multi-slide door is installed.
Problems playing video? | Closed Captioning Feedback
Problems playing video? | Closed Captioning Feedback
Funding for THIS OLD HOUSE is provided by The Home Depot and Renewal By Andersen.
Support provided by:

E10 | Lexington Modern | Seven Layer Floors
Season 45 Episode 10 | 23m 42sVideo has Closed Captions
Mid-century modern details are taking shape on the exterior. On the interior, rigid foam is installed on the subfloor to meet strict energy codes. The homeowner goes shopping for door hardware with accessible considerations. A single tile prep and waterproofing system is used to create a watertight bathroom for zero threshold entry to the shower. A motorized multi-slide door is installed.
Problems playing video? | Closed Captioning Feedback
How to Watch This Old House
This Old House is available to stream on pbs.org and the free PBS App, available on iPhone, Apple TV, Android TV, Android smartphones, Amazon Fire TV, Amazon Fire Tablet, Roku, Samsung Smart TV, and Vizio.
Keep Exploring

This Old House Insider Newsletter
Get This Old House exclusive stories, tips, and behind-the-scenes information delivered right to your inbox every month.Providing Support for PBS.org
Learn Moreabout PBS online sponsorshipKevin: Today on "This Old House"... Richard: Before the tile goes in, we'll make this bathroom waterproof with an all-in-one system.
Kevin: ...we'll discover some smart solutions to make our project house more accessible.
Billy: Might narrow it down to this one here and that one there.
Charlie: And we'll install the final glass slider and show you how this door is different than any other door in the house.
♪ Man: Ahh.
That's it.
♪ ♪ Kevin: Hi, there.
I'm Kevin O'Connor.
And welcome back to "This Old House" and to our project here in Lexington, Massachusetts, where we're working on this beautiful 1960s mid-century modern home.
And you can see how those mid-century modern details are coming together -- the intersecting, low-sloping roofs right up there, so it gives those nice angles.
And then we just had a double glass sliding door go in that works right into the dining room.
And then on the facade, well, the details continue to come together.
So, in the front yard, we've got two retaining walls.
We've got an upper and a lower holding the front yard back.
And the homeowners have chosen to veneer it in a granite stone.
So that's real granite.
It is sawn smooth on the back.
And part of the reason it was chosen is because of these horizontal striations.
It'll go on both retaining walls, as well as the facade of the house's foundation right here.
Check out that look.
How beautiful is that?
Then we've got bluestone, then we've got the nickel gap siding and a painter who's working on the colors.
Hey, Mauro.
Mauro: Here we go.
How are you?
Kevin: I'm doing alright.
What are you doing up there?
Mauro: Well, as you can see, we have four different samples here -- two shades of black for the panels here, two different colors, and two different colors for the vertical siding, which is going to be an off-white.
Kevin: So two of each, meaning the homeowners have not chosen yet?
Mauro: Not yet.
Once they choose the one they like the best, Mauro's ready to go to work.
Kevin: Mauro's getting to work.
I love it, brother.
Okay.
Thank you.
Mauro: Thank you, Kev.
Kevin: Check out the big opening for the front door, so glass on either side four plate-glass windows that are sloped to match the slope of the roof and the big overhang that's being held up here by our steel column.
And then over here we've got the garage, which is still very much a work in progress.
But one thing of note is that the door openings, well, Charlie has framed these about six inches taller than normal, and that's so that they'll work with a wheelchair-accessible van because the homeowners' middle son has a disability, and making the house accessible for him is pretty much driving the entire renovation.
You may recall that Charlie has broken this project into phases.
It's a lot of house and not a lot of time to finish it.
So, for example, in the back of the house, we've got the insulation in, the board up, and the plaster is already on, but you can literally see the progress as you move from back to front.
So here in the middle, board is up, it's been taped.
And right now the plasterers are putting on the top coat.
But as you come here to the front of the house and you look up, well, we've just got rough mechanicals, and the ceiling has been strapped, but pretty soon we're going to get a lot of insulation in the ceiling, which is also the roof, and then board.
Now, this house is getting a ton of insulation 'cause we've got very strict energy codes.
So we're getting it in the roof, the exterior walls, as well as the floor.
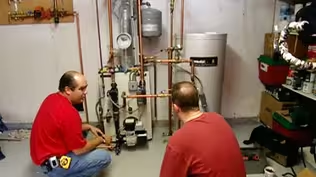
And that's what Charlie and Richard are working on over in the kitchen.
Richard: So, Charlie, you guys have been busy doing a lot of stuff here, mostly for that HERS rating, Home Energy Rating System.
That takes into account the building's performance, you know, windows and doors and insulation, HVAC, and really the R-value of the building.
In the old days, like '70s, right, that rating system was 140 where you were trying to get to.
Then in '06, we get down to 100.
Now here in Lexington, you have to get to 52.
And so that -- you know, you start looking for places where you can make the building tighter and raise the R-value.
So one thing that fought us was this existing wall.
You can see it's brick on both sides, a little bit of insulation right there.
So we lost a fair amount of R-value here.
The way you make it up with this HERS rating is to find a place to make it up in.
One place was in the floor.
So this existing slab was concrete with a little bit of wood on the top.
And that was R-0.
We got to get to 20, R-20.
Charlie: Right, and to meet our HERS rating of 52, we had to remove the entire concrete slab.
So when we did that, they gave us the opportunity to run all new ductwork, and if you remember, we dug trenches all where our supplies had to go, running them back to the mechanical space.
Richard: Right.
Now, there was no basement and no attic.
So that was a great solution to hide the ductwork down there.
Charlie: That's right, and once all the ductwork was in place, we encased it with closed-cell foam.
Richard: Keep it tight.
Charlie: And then we graded it.
And once it was all graded, we even took another layer, about 2 1/2 inches of closed-cell foam, and put it over the entire grade and wrapped it up the walls.
That's a really good starting point.
Richard: Okay, so good insulation, and then?
Charlie: And then we poured a concrete slab over that.
Richard: How thick is that slab?
Charlie: That's probably four or five inches thick.
Richard: Okay, great.
Charlie: And now we're going to put our two-inch sleepers.
And then we're going to infill every single bay with two inches of foam.
Richard: Okay.
Charlie: And then on top of that, we're going to put our subflooring, which is 3/4.
Richard: Great.
Is that going to give us an R-20?
Charlie: Oh, we're going to be at least that.
Richard: Alright.
Good.
Let's get rolling.
Let's finish it up.
♪ ♪ ♪ Charlie: I'm putting a bead of this spray foam polyurethane on top of our sleepers so our subflooring will bond to it.
♪ ♪ 2 1/2.
42 and 47.
Richard: 18.
♪ ♪ Hey, it fits.
♪ ♪ Next layer of the sandwich is our radiant floor-heating system.
Aluminum's on the back, and the tubing will serpentine through the room with a beautiful, comfortable heat.
Charlie: That's right, and these are pieces of the white oak flooring that we're going to be using for our final layer.
Richard: That looks really smart.
You can see where you're nailing the floor in, too, which is great and safe.
Alright, let's get these plumbers going, get that radiant so we're not holding anybody up.
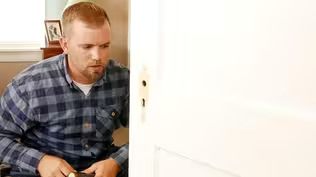
♪ Charlie: Look at this.
They have one of everything here.
Billy: There are a lot of options.
Charlie: Now it's time to order the interior doors, so we need hardware selection.
And I've been coming here for years working with Kris.
Kris, how are you?
Kristopher: Good to see you, Charlie.
Charlie: This is Billy.
I told you about him, he'd be coming in.
Kristopher: Hi.
Pleasure to meet you, Billy.
Billy: Nice to meet you.
Kristopher: What brings you in today?
Billy: We're looking for door hardware.
I've got a project that I'm working with Charlie on.
It's a mid-century modern home.
And a big consideration for us is accessibility.
Kristopher: Okay, well, let's look at some of the interior options here.
We've got knobs and levers.
When you talk a little bit of accessibility, think about when you touch the knob, you actually have to have a grip on it.
You have to turn and rotate your wrist in order to retract the latch.
But with lever handles, you actually don't have to grip as heavily as you do on a knob.
The lever allows you to just put downward force on it in order to retract that latch.
Billy: Yeah, that's exactly right.
It's all about, you know, using as little dexterity as possible to get the job done.
And I think the lever's gonna do that for us.
Kristopher: Oh, excellent.
Well, great.
Let's take a look at this display right here.
If we take a look at these lever handles here, they come standard with a 60-degree rotation latch.
And it takes a lot of rotation in order to retract that latch.
But if you take a look at this one in the middle here, this is a 28-degree latch.
This allows you to retract that latch with very little range of motion.
Billy: I think the 28-degree rotation will be a lot easier for us now and in the future.
Kristopher: Yeah, great.
The 28-degree latch is a great upgrade.
Now, one other additional feature that I'd like to show you here is you can see these fasteners that are exposed on these bottom two displays here that come standard.
The upgrade up here is a concealed fastener upgrade which allows you to kind of remove those screws for that more modern and sleek look.
Billy: That looks really nice.
I think it'll be great for the mid-century modern aspect of the house.
Is there any question about, you know, maintenance or being able to access that unit?
Kristopher: No, there's actually a little set screw right here that you can use to remove the lever handles if you need to do any maintenance or if you want to change different styles in the future.
Billy: Great.
Kristopher: Let's take a look at one more option here on the latch itself.
This particular brand we might be looking at today actually has this little nylon insert in this latch.
And this allows you to close the door a little bit more forcefully.
But there's no metal-on-metal contact.
So when you close the latch, the metal doesn't strike the strike plate.
Deadens the sound a little bit.
Little bit nicer look and feel to it, as well as makes it last a little bit longer so you don't scrape up all of your metal.
Billy: Definitely will make for a more livable situation, keep the noise down with the kids.
Charlie: I like it.
Kristopher: Let's take a look at the different options we have here.
So with this particular brand, we can mix and match any style, any finish.
We can even do a split finish or a split style if you'd like.
So some people in a bathroom will do a polished chrome or a polished nickel and on the outside might have a different finish.
We can accommodate no problem.
Charlie: Great.
So one thing to keep in mind is a typical door is inch and 3/8.
We're going with an inch and 3/4 in this case.
And I just want to make sure that's not going to affect any of our decision here.
Kristopher: With this particular brand, it comes standard out of the box.
It'll work with both the 1 3/8-inch-thick door or a 1 3/4-inch door.
Charlie: Lot to pick from.
What do you think?
Billy: I think that some of them are automatic noes because of their style -- things like this with a little bit of detail or even more, you know, curved lines.
I think we're looking definitely for more of a straight line, something very sleek-looking.
But I think if I was going to narrow it down again, sticking with a little bit more of a sleek option, something to match the aesthetic of the whole house, might narrow it down to this one here and that one there.
Charlie: Well, one thing I noticed between both of these, these are -- have a smaller rosette, and a rosette is this piece right here, which means it's a smaller bore in the slab of the door.
Here's a typical-sized rosette here.
And with this size, I can actually get the doors pre-bored from the factory.
But with the smaller rosette, I can't.
Not a big deal.
It just comes down to ordering the doors.
I will get them without a bore.
Billy: Okay, great.
Charlie: So what about finishes?
Billy: I think we're going to go with this one in black.
Kristopher: Yeah, sure, we can accommodate that no problem.
Charlie: I will get you a count on how many we need and get back to you.
Kristopher: Absolutely.
Charlie: Thank you.
Kristopher: Always a pleasure, Charlie.
Billy: Nice to meet you.
Kristopher: You as well.
Thank you.
Charlie: Back to the site.
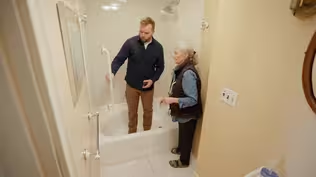
Richard: We're here in Caffrey's bathroom, where over the last months, we've been adding the features we need to make an accessible bathroom that's fully functional.
So Tommy and Kevin have added this blocking right here, and that'll be good for our grab bar that's going to be attached, but also in case in the future we add any additional grab bars, we'll know where the blocking is.
Now, the lavatory is going to be in a countertop right here that's going to have full access underneath, but also it'll be slightly lower than a normal sink.
Now, in all cases, we need to make sure that this is a fully accessible bathroom, which means from the bedroom floor right through the bathroom floor and into the shower, it has to be flush, no threshold.
And what Charlie did was actually to frame this lower so that we can add a shower tray, and the net will be -- it'll be perfectly flush, curbless.
Now, most important is to make all of this waterproof.
And that falls onto Mike O'Neil, our tile installer.
So, Mike, this is a tile system.
Mike: Yeah, it's an all-in-one waterproofed tile system.
Richard: Alright, and I've done my share of bathroom remodels, and we always relied on the copper pan.
You know, you'd measure, and it would be a custom-made pan.
It would take a week to get it.
Mike: Right.
Richard: The tile man would then mix up mud and pitch that mud -- it was like cement -- pitch it towards the drain, add the tile afterwards.
But people didn't realize that the water could actually -- could get down through the tile and the mud.
And the waterproof piece was the pan.
Mike: That's right.
It would collect water.
Richard: Right.
Mike: And hopefully make it to the weep holes.
Richard: This is different, though.
Mike: It is.
This actually replaces a copper pan.
It has a 1/4-inch pitch already built into the foam.
Richard: Yeah, and then this is the waterproof membrane right here on the top?
Mike: Correct.
It's a different theory.
There is no collection of water.
Everything is waterproof topside.
Richard: Yeah, all the water will work its way towards the drain right here.
Mike: Correct, and then we have the wallboard, which is also a lightweight foam.
Richard: It's a lot different than cement board.
Mike: Oh, easy to carry.
Richard: Okay, so that goes like that.
Mike: It does, and then you have to flash it with this five-inch band.
Richard: And that would be -- Mike: Cemented down.
Correct.
And they also make inside-outside premade corners to do the flashing up to the band in the actual corners of the pan.
Richard: So that'll all be buttered and cemented in.
So once you do that, you're going to be watertight here, here, and up on all the walls.
The only way that water can leave is through the drain right there.
Mike: Correct.
You can actually take a shower in this when it's all waterproofed and done without any tile.
Richard: Not that pretty, though.
Mike: No, it's not.
Not as pretty as tile.
Richard: Alright, what's that?
Mike: This is an anti-fracture membrane for the bathroom floors.
Richard: Wait a minute.
Anti-fracture, what does that mean?
Mike: It means that this replaces the cement board.
In this case, we have a lot of heat and different underlayment and subfloor.
So there's going to be a lot of movement.
And what this does is it allows for this to move underneath the tile so the tile does not crack.
Richard: It sounds so counterintuitive with the movement, but it actually acts almost like a shock absorber between the floors.
Mike: It does.
It does.
Richard: Cool.
So how do you get started?
Mike: Let me show you how to work backwards from this point.
Richard: Okay.
Mike: Basically, this strapping piece represents the top point of our hardwood floor and our porcelain floor to flush out.
Richard: That's finished grade.
Everything's going to be right at that point.
That's sort of zero point.
Mike: Correct.
We got to transfer this line over to where the tile's going to end right here on the wall.
Richard: So you use the laser level to put it onto the wall.
But then our subfloor is way down lower.
Mike: Correct.
It is.
So what we did in this case is we had to do a mud set and bring the floor up level to receive the pan.
In this case, we did the mud because there is a radiant heat under the floor and that's a great conductor.
Richard: Absolutely.
But you actually could use wood, too, right?
Mike: You could, yes.
Richard: Okay.
The important thing is, though, that this surface has to be absolutely dead flat because your system already has the pitch built in.
Mike: It does.
Richard: Right.
Mike: And this piece here is gonna have its mold here for it to receive the linear drain at the 3/4 height for the tile.
Richard: It's already part of the system, okay.
Mike: It is, and then it's going to pitch back.
This is that pan we talked about earlier with the pre-pitch already.
And that will fit in perfectly.
Richard: Okay, so now that'll work perfectly that way.
I see you've got the underlayment already installed here.
Is that a big deal to put that in?
Mike: That's easy.
We just roll that out, cut it with a razor blade, and cement it down.
Richard: Yeah.
Perfect.
Alright.
Well, I'm gonna get out of your way and leave it to the pros, let you finish it up.
Mike: Excellent.
Thank you.
♪ Richard: We're attaching the waterproof wallboard to the studs with fasteners and screws.
♪ ♪ Using thinset base, they apply the five-inch fabric band over all the seams and fasteners.
♪ There's a two-inch section of PVC that connects the linear drain to the house's plumbing system.
Next, they cut the sloped shower base to size.
♪ ♪ Now I really see the system.
You got all the bands in.
Everything's tied together, outside corners, inside corners.
It's one continuous watertight membrane.
Now you're ready for the hard part, the tile, right?
Mike: Absolutely.
Richard: Great job.
Good job, Mike and Xander.
Xander: Thanks.
Mike: Thank you.
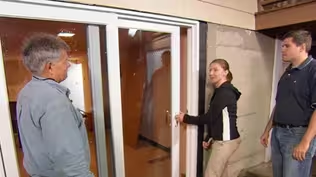
♪ ♪ Kevin: This patio, which is going to be awesome.
It's got two walls of glass and three operable doors, so one out of Caffrey's bedroom, one that's a slider right here behind me, and the third one's going into this opening.
This wire right here, Charlie, tells me that we got something different going on with that door.
Charlie: Yeah, this door is different than the rest of them.
This one's motorized.
Kevin: Motorized door.
How are you?
Charlie: This is Michael Roy, professional window and door installer.
Kevin: Nice to meet you, Michael.
So what are you putting in for us?
Michael: So we are putting in a multi-slide that'll open up from the middle.
So there'll be two panels that open up to the patio on the outside.
Kevin: Cool.
And done by motor?
Michael: Done by motor, yes.
Charlie: Push of a button.
Michael: Push of a button.
So the first thing we had to do is we had to prep the opening and put a motor in, so we have a motor prepped here inside the wall cavity that'll be covered by a panel.
And then that'll operate this door.
Kevin: That is very cool.
Obviously we're doing it for Caffrey so it's nice and accessible.
He can easily come and go inside and out.
Charlie: That's right, so let me remind you of our goal here -- to have really zero threshold from the inside wood floor to the bluestone outside.
Kevin: So on the concrete, the bluestone goes down inside on the sheathing.
You've got panels for radiant and then our finished floor?
Charlie: That's right.
Look at that.
Kevin: Wow.
Can roll right out, no problem at all.
Charlie: Be perfect.
Because our exterior and our interior is flush, we have to create a waterproof pan with a back dam, and the pan actually has a pitch built into it, which you can see right here.
And on reverse, there are shims.
That way, when the sill goes on, it sits nice and level, and any water that might come into this sill, it will drip onto our waterproofing and pitch out to this notch, which also has a drainage mat that goes down to crushed stone.
Kevin: Michael, where do we go from here?
Michael: Yeah, well, we have the frame built on the ground.
So I'm going to ask you two to give a hand and we're going to lift it and put it in place.
Kevin: Let's get to work.
Michael: Going to stand it up vertically.
Kevin: Okay.
Michael: Okay, Sven, want to head inside with that?
Okay, just going to lift the frame up onto the sill.
Excellent.
Push it back against the back now.
Charlie: There you go.
Michael: Alright.
Next step, we're going to get this jamb nice and plumb.
Kevin: Tell me when you're ready.
Michael: We're good to go right there, Kevin.
Excellent.
Kevin: You got a shim behind there, which is nice.
Michael: Excellent.
Now we're going to come up to the top and do the same thing.
Kevin: Tell me when.
Charlie: How's that?
Michael: That is good to go right there.
Excellent.
Alright, let's get the other side put in.
Kevin: Tell me when.
Michael: Yes.
You're good to go.
Michael: Great.
With a frame of this size, we run a string across the header as we'll typically get a sag in it.
So as you can see, a little bit of red string on this end and a little bit on this end, but you can't see it in the middle.
So we're going to run a screw up to get it even.
Kevin: Okay.
So that's level?
Michael: Yes, that's level.
So we're going to run the rest of the screws across the header.
And then we're going to load the panels.
♪ You guys are going to bring the panel over.
Kevin: Okay.
Michael: Spin around.
Yep.
That's good right there.
When you're ready to lift, go ahead, lift.
And slide it to the outside track.
We're going to slide it into the opening.
Okay, come back a little bit.
Now give it a good shove.
Excellent.
Alright, let's go grab the other panel.
Kevin: One, two.
Michael: Into that slot.
There you go.
Drop it onto that outside track.
That's it.
Yep.
Excellent.
Slide that in.
Perfect.
Charlie: Oh, nice.
Michael: Alright, now that all the panels are in, we're going to run the belt on the top to the motor to the top of the panels and make this operable.
Charlie: I can't wait to see it.
Kevin: So, Michael, just a single belt all the way across the top?
Michael: Yeah, single belt, and we've got it all fastened, so we're ready to give it a test run.
Kevin: Hit it up, Sven.
Let's see what we got.
[ Laughs ] That's awesome.
Charlie: That is smooth.
Kevin: So Sven's got a keypad here.
Michael: Yeah, there'll be a keypad on the inside.
There'll be a security keypad on the outside, and then there'll be an app that you can use on your phone for it.
Kevin: Very cool.
I presume it's got some safety features 'cause it's mechanized.
Michael: Yes, sure does.
It has a safety feature right here.
It'll have a sensor, so if anybody's coming in or out as the door's operating, it will not close on them.
Kevin: Beautiful, and since it's got a motor, if the power goes out, we locked in or -- Michael: Power fails, the motor clicks off.
You can open it manually to get in and out of the house.
Kevin: Nice job.
Thank you, boys.
Really appreciate it.
Charlie: Thank you.
Kevin: Charlie, this is a first for me.
Never seen one before.
Charlie: It's pretty nice.
Kevin: How about that, guys?
Richard: I want one of them.
Kevin: Or two.
Alright, so a lot of progress so far but a lot more to do.
What's on the list?
Charlie: Well, we have the ramp in the front that connects the driveway to the front door.
And we're ready to pour the concrete.
Kevin: Very nice.
Mauro: And I will get going on painting the exterior.
Kevin: You better.
Richard: Tile begins in Caffrey's bathroom and also the other bathrooms and the laundry.
Kevin: Nice, and I heard there was a rumor that our therapy pool is on its way.
So until then, I'm Kevin O'Connor.
Charlie: I'm Charlie Silva.
Mauro: I'm Mauro Henrique.
Richard: I'm Rich Trethewey.
Kevin: For "This Old House here in Lexington, Massachusetts.
Alright, check this out.
Ready?
Richard: What?
Kevin: [ Claps ] Richard: No!
Mauro: Come on!
Richard: You lost -- Kevin: Hey!
Richard: You lost the touch.
Mauro: There we go.
Kevin: Next time on "This Old House"... Tom: Work on the jobsite is ramping up.
Charlie: Alright, let it go.
Woman: In the original house, there was this flooring called terrazzo, which when the house was demo'd, we had to take it out.
Kevin: We'll show you one of the ways that we're honoring this home's mid-century modern roots.
Charlie: And look up in the sky.
It's a bird.
It's a plane.
It's 4,000-pound therapy pool.
Alright, that looks good.
Kevin: That's next time.


- Home and How To

Hit the road in a classic car for a tour through Great Britain with two antiques experts.


Support for PBS provided by:
Funding for THIS OLD HOUSE is provided by The Home Depot and Renewal By Andersen.