E12 | Lexington Modern | Upcycled
Season 45 Episode 12 | 23m 42sVideo has Closed Captions
The elevator cab is built, and audio-visual technologies are explored for accessibility.
Progress continues on the mid-century modern house in Lexington. Exterior painting and interior flooring installation are underway. The elevator cab is built and is operable. The kitchen island gets a decorative finish using some of the white oak hardwood flooring. Audio-visual technologies are explored for accessibility for the home, and solar panels are installed on the roof.
Problems playing video? | Closed Captioning Feedback
Problems playing video? | Closed Captioning Feedback
Funding for THIS OLD HOUSE is provided by The Home Depot and Renewal By Andersen.
Support provided by:

E12 | Lexington Modern | Upcycled
Season 45 Episode 12 | 23m 42sVideo has Closed Captions
Progress continues on the mid-century modern house in Lexington. Exterior painting and interior flooring installation are underway. The elevator cab is built and is operable. The kitchen island gets a decorative finish using some of the white oak hardwood flooring. Audio-visual technologies are explored for accessibility for the home, and solar panels are installed on the roof.
Problems playing video? | Closed Captioning Feedback
How to Watch This Old House
This Old House is available to stream on pbs.org and the free PBS App, available on iPhone, Apple TV, Android TV, Android smartphones, Amazon Fire TV, Amazon Fire Tablet, Roku, Samsung Smart TV, and Vizio.
Keep Exploring

This Old House Insider Newsletter
Get This Old House exclusive stories, tips, and behind-the-scenes information delivered right to your inbox every month.Providing Support for PBS.org
Learn Moreabout PBS online sponsorshipKevin: Today on "This Old House"... it's time to take this renovation to the next level with the installation of a residential elevator.
Tom: I'm using these leftover floorboards to put some modern detail on the back of the kitchen island.
Charlie: And here comes the sun and the solar panels.
♪♪ ♪♪ Man: Ahh.
That's it.
♪♪ ♪♪ Kevin: Hey, there.
I'm Kevin O'Connor, and welcome back to "This Old House", where progress continues on our mid-century modern house here in Lexington.
Check out this dramatic front entryway.
A big overhang going up to the garage, and you can see the homeowners have chosen a frosted-glass window for the three garage doors, in keeping with the modern look, and up top nickel-gap siding.
Hey, Marlowe.
Marlowe: Kevin!
Kevin: Did we get a decision on the paint color yet?
Marlowe: We do.
They select this white -- this actually is an off-white -- for the nickel-gap siding, and primer's on.
It's time for the first of two coats.
Kevin: Love to hear it.
All right, you look good up there.
Marlowe: We gotta do it.
Kevin: Well, as you come through to the garage, this door is temporary, but the garage door is actually installed right there.
Three bays, as I said.
And what's of note in here is that along this wall, there is going to be a ramp going up to the door.
Now, remember, the family's middle son has Duchenne muscular dystrophy, so he will be in a wheelchair at some point.
So they'll be able to get out of maybe an accessible van and then use this ramp so that they can all get into the house easily.
Right here, this will eventually be a fire door separating the garage from the living space, taking you into a mudroom, closet back here.
Built-ins gonna go on this side.
And then when this is complete, there's gonna be a floating staircase going up to an office space and coming down to the front entryway.
Here's that temporary door that I said is gonna be replaced by a tall glass door.
And this exterior ramp, this is gonna get a bluestone detail.
We'll take it right to the threshold.
And then on the inside, we're gonna have a panel for the radiant heat and on top of that, the wood floors.
So this is one continuous level going through the entryway into the dining room and eventually right here into the living room.
Hey, Charlie, Michelle, how are you?
Michelle: Hey, good to see you.
Kevin: Wow.
It's toasty in here, Charlie.
Charlie: A little dry, also.
I don't know if you can tell.
Kevin: [ Coughs ] It's warm and dry.
What's going on?
Charlie: Well, we have three commercial-grade dehumidifiers running because we want to put our floor in around 8% humidity, including the subflooring or the panels for the heat.
Kevin: Okay, so get everything down to nice and dry so we don't get that movement after installation?
Charlie: That's right.
Kevin: I love it.
That's why you hire Charlie Silva, right there.
Michelle: Exactly.
Kevin: So what'd you pick here?
It looks like white oak.
Is that 6 inches wide?
Michelle: Yep.
That's right.
And it's fumed, too.
Kevin: Fumed?
Michelle: Yeah.
Charlie: It's an ammonia process.
And it's actually pretty simple.
So they do about several thousand feet at a time in a sealed room.
And they put ammonia in it, and absorbs into the wood.
And what it does is it really just darkens the wood.
Kevin: This is fumed right here?
Michelle: Yeah.
Kevin: And then what is this?
Michelle: So this is an unfinished board, and these are all finished planks.
Kevin: Boy, that is beautiful.
So it darkens up even more with the finish on it, a little sheen right there.
Michelle: Yeah.
Kevin: So what did you guys pick for a finish?
Michelle: So we picked a water-based natural finish for the planks, and we've wanted something that was low sheen and also not slippery, right?
Because that's really important from an accessibility perspective.
Kevin: Right.
Michelle: So we just wanted them to look natural and beautiful.
Kevin: Cool.
Charlie: And we already have four coats on this, which we will have at the finish.
Kevin: Wow!
Four coats of the water-based finish?
Michelle: Yeah.
Kevin: That is awesome.
All right, well, another beautiful thing is that we have an elevator going in.
I hear it's being built, so if can I excuse myself, I'm gonna go check that out.
Michelle: Yeah.
Good seeing you.
Kevin: See you guys.
Charlie: Is a good comparison, though, right?
Michelle: Yeah.
Kevin: This is the other side of Charlie's dehumidification zone, down a couple steps, which you may be wondering, how do those work with accessibility?
But everything on the other side of those two steps right there, that's all mechanical space.
So the kids never have to go in there.
In here, however, they'll get a lot of use because this lower level is primarily a play space, a hangout space, as well as one bedroom, and also where we've got the business end of our elevator.
Jonathan, how are you?
Jonathan: Morning, Kevin.
Kevin: Good to see you again.
Jonathan: Good morning.
Kevin: So last time we were here, our electrician, Heath, was putting in the electric panels for you.
Looks like you've made some progress since.
Jonathan: Yeah, we made a bunch of progress in here.
We took the power that the electrician supplied us.
We ran it into our controller here, and we took the 220 that he also supplied us, ran it into our pump unit.
Kevin: Gotcha.
So we've got a hydraulic unit here.
This is where the fluid is?
Jonathan: Correct.
There's a submersible pump inside this tank attached to a pump that's on this side of it that pumps it up into this valve here, then in turn through this pipe, into your hoistway right where the piston is.
Kevin: Which is on the other side of that wall.
And I saw it coming down.
I think I saw you got Chris in there.
Hey, Chris, how are you?
Chris: Hey, Kevin.
What's going on?
Kevin: Not much.
You guys made some progress in here, too, huh?
Jonathan: Yeah.
We've made a bunch of progress.
We got our main rail up here, nice and plumb.
We got our piston installed.
Kevin: That'll lift the cab.
Jonathan: Correct.
Kevin: Right.
Jonathan: You got your hydraulic line coming out of the machine room into the piston there.
And we're finishing up our stabilizing rail here, and also our tape selector.
Kevin: Nice.
Complicated setup you got right here.
And then eventually this is the platform that we ride up on.
Jonathan: Yeah.
This is what we call a running platform.
We're about to build the cab, actually.
The cab will sit on top of this platform here.
Kevin: And how long do you think that's gonna take for you guys to put the cab together?
Jonathan: It takes us about an hour or so to get the cab completely together.
Kevin: All right, well, I want to come back and check that out.
Jonathan: Alrighty.
Kevin: Cool.
Thank you, guys.
Jonathan: Thank you.
Let's get this first wall in place.
Perfect.
Going up, Chris.
Hold on to that wall there.
Chris: Gotcha.
[ Elevator whirring ] Jonathan: Let's get this wall lined up here so we can get this first screw in.
♪♪ ♪♪ All right, Chris, ready for the back wall.
♪♪ Let's get the last wall ready.
♪♪ Let's get the roof ready to put on.
All right, Chris, here you go.
Set it on that back corner there.
Okay, let's bring it down.
Lined up.
♪♪ Kevin: All right.
Starting to get operational.
Yeah, look at that.
The cab's built.
That looks nice, huh?
Jonathan: Yeah.
This was a really nice cab.
Kevin: So what's next for you guys?
Chris: We're gonna do the door frames next.
Jonathan: Yeah, we'll start with the upper door, and then we'll work, get the doors lined up with the cab door and the hoistway doors.
Kevin: Very good.
Like to see the progress.
Thank you, fellas.
Jonathan: Have a good one.
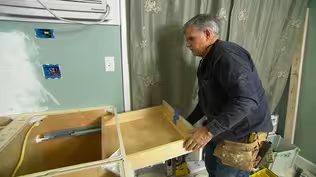
♪♪ ♪♪ Kevin: The oak floors are down here in the kitchen.
You can see Charlie has actually protected them with the cardboard.
But the good news is, because they're down, we can start with the kitchen cabinets.
The installers have made great progress.
Homeowners have chosen two different looks here.
So everything is a high-density MDF box with a melamine skin, but you can see here it's a high-gloss white.
There'll be an oven there, a microwave there, a refrigerator here.
The white is continued over here where the range will be.
But then up top, we've got a matte green, which is also on our big island out front.
You can see that beautiful color right there.
On top of this is gonna be natural stone, so quartzite coming over, as well as a waterfall edge down there.
And Tommy, you've got a couple overhangs?
Tom: Right.
So the cabinet's gonna run all the way, overhang here, overhang here, so they'll be able to put a seat on the end also.
Kevin: But you've got this exposed.
Tom: Yeah.
This is the back of the island cabinet.
So we're gonna dress that up with some of that leftover flooring.
Kevin: Right.
And then one twist is we're gonna actually have to dress up more of that wall because the thought is this cabinet right here, I guess it stays for now, but eventually, Caffrey will be in a wheelchair.
And we'd like him now to just be able to wheel underneath the countertop and be next to all the business, so the oven, the microwave, the refrigerator and such.
And so the idea is that this stays for now, and when the day comes, it can be removed.
Tom: Right, so we're prepped for that because this is on wheels.
We can take this right out of the way.
You just slide it right out and then we can finish all of this wall so when this cabinets out of the way, it'll look beautiful.
Kevin: Okay.
So what -- Oh, I see.
It looks like you got some base cut?
Tom: Yeah, we got some base.
Again, this is the same material that the flooring is done.
We put a rabbet on the top, and we've mitered this corner because it's gonna return on this end.
We're gonna drop this in place just like that and so it wraps right around.
It'll go just like that.
Kevin: Get some tools and start the installation.
Tom: Sounds good.
That end grain will suck that glue right in there, so we want to get plenty on it.
Okay, so now let's push it together tight.
All right, so we get the miter.
That looks good there.
I'm gonna tack it back here.
All right, now I'm gonna tack this way in the front.
I want to toenail the nail in slightly.
♪♪ All right.
Now we can just nail that off all the way down.
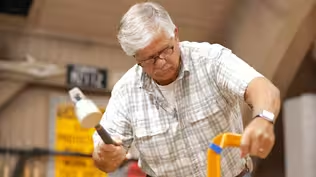
♪♪ All right, let me show you what we're gonna make out of the flooring.
Now, this is a piece of the flooring right here.
It's oak.
First thing we need to do is remove this tongue and the groove.
And once we do that, we'll end up with two square edges and the right width that we need.
Kevin: Beautiful stuff.
Tom: Yeah, it is beautiful.
Now we have to dress it up.
So if you look at the face, we're gonna end up with grooves, one inch, groove, one inch, another one inch with a groove, and a rabbet on the other side.
And to make that, I've simply taken a router and I put a base plate on it so that I could put this guide right here that will fit in the groove.
So to make it, take the router.
I put it against the edge and I slide it down, making my first groove.
I take it up, put the router in the groove -- the guide right there -- slide it down, make my next groove, put it in the next one, slide it down.
To do the rabbet...
...I would put it in the groove here, and then I would just pull it down, cutting the rabbet.
Kevin: When are you gonna write the Book of Jigs, Tommy?
Because you got plenty of them.
Tom: You gotta have a jig, speed up the process.
♪♪ ♪♪ Kevin: Boy, that's pretty sweet.
Tom: Yep.
Now we only have about 27 more to do.
♪♪ ♪♪ Kevin: The first of the pile coming in.
Tom: Now I'm gonna try to nail them right in the groove.
♪♪ ♪♪ There you go.
Kevin: All right.
Tommy, I love white oak, but that -- I mean, that takes it to a whole new level.
That's a great look.
Tom: It is a great look.
And the nice thing is we're gonna put the same finish on here that matches the floor.
Kevin: Awesome.
♪♪ ♪♪ This us here?
Billy: Mm-hmm.
[ Doorbell rings ] James: Hello, Kevin and Billy.
I'm gonna unlock the door.
Come on in.
[ Lock whirs and clicks ] Hello.
Billy: How you doing?
James: Nice to see you again, Billy.
Billy: Nice to see you.
Kevin: Hey.
Nice to meet you.
James: Nice to meet you.
Kevin: Pleasure.
Billy: Kevin, we've been working with Jim to explore all the smart technologies that can go into a house, make it as accessible as possible for our family.
Kevin: Okay.
You got the house ready for us?
James: Yeah, yeah, yeah, so we already pre-wired the home.
So let's talk about all the technologies we have.
Kevin: Let's see what you got.
James: Absolutely.
Okay, so we're gonna come over to our shading area.
Some of them are wired.
Some of them are wireless.
For your home, we actually wired to do wired shades everywhere.
Billy: Yeah, Jim and I have been talking about doing shades for all the bedrooms, a lot of control for the accessibility aspect of it, and some blackout stuff.
How does this one work?
James: So this one is battery-powered.
So the good thing about a battery-powered shade is that it's easily retrofittable for anybody.
Even though they're battery-powered, the batteries almost last a year and a half without even changing them, so you don't have to worry about it.
Like, and it will actually send you an e-mail or a text when they need to be changed.
Billy: Nice.
Kevin: Okay.
Billy: Can I try it out?
James: Please.
Take the remote control.
You get to drive.
And if you do battery-powered and you have multiple windows in a room, even when the batteries are -- some of them aren't fully charged or some are weaker, they're all gonna be able to align together.
Kevin: So this is a wired version?
James: Yes, so since we just looked at a very simple shade that just goes up and down, this shade has multiple options that you can do.
One is the vanes are open right now so you can kind of see what's going on outside.
Kevin: Oh, yeah.
James: Vanes are closed, so it gives you privacy but still allow light in, about 5% light in.
Kevin: So essentially translucent louvers that will open or close, but even when closed, you're still letting some light in.
Oh, look at that.
There's a blackout as well, huh?
James: So this shade's pretty special.
It has multi-functions to it.
And this has a blackout function.
So if you want that darker room situation, that blackout just comes straight down.
Billy: That'll be perfect for a couple of people in the house.
Kevin: Same functionality.
If you got multiple windows, you could push one button.
All the windows would either go to translucent or to blackout.
James: All of the vanes can open at the same time, and the blackouts can lower all at the same time.
Come on over to our smart lighting section here.
And I know this doesn't look great, but I know you've seen this before in a home -- you know, that six-game box that has all of the older dimmers and switches and things.
And what we're trying to do is get rid of that.
Now with smart lighting technology, the dimmers and the switches can be controlled by a remote control, can be controlled by your phone, so they can be controlled different ways.
Also, they can be grouped.
So now instead of getting rid of all of those light switches, now we can actually group them together and make it a scene.
Kevin: So you guys will actually group them together?
James: We program them, and then also there's some applications that the homeowner will be able to program.
So now that we went over the individual lighting devices, now let's talk about how we group them together.
So here we wanted to simulate what it would be maybe in your home for your kitchen or your pathway.
And we put these buttons together that are laser-engraved.
So if I hit this top button that says "morning," it actually turns on your task lighting, your overhead lighting, things that you would actually do for, you know, waking up in the morning and getting things together.
And then also, if you wanted to at nighttime, you go for your evening scene.
Kevin: Ooh.
What's going on in your house at night, Billy?
[ Laughter ] Billy: Not this, exactly.
James: So your evening scene can be anything, any color.
It can turn on music.
It can bring things all together.
You can also control it by a touch panel.
I'm gonna bring it back into that -- that morning scene.
Billy: That's nice.
I think Michelle would really like the morning routine.
And we've also -- Jim and I have spoken a little bit about voice control.
Kevin: Oh.
James: Yeah, so voice control is pretty special.
It brings all of the things that we talked about.
Everything will be in the voice, but we don't have to worry about using a touch panel or a wall plate or any buttons.
We can just be able to speak.
Kevin: So for Caffrey, voice is the ultimate accessibility.
Billy: It is.
James: I think it's gonna work well.
Yes, this is our conference room, and we're actually controlled by voice command.
Nikola, meeting time.
Nikola: Done.
Kevin: Oh, look at that.
That's a-- Wait, so what did you control?
Which fixtures by voice?
James: So with the voice control, it's actually controlling the pendant lighting, the recessed lighting, the shading, like we spoke before, and the TV control.
It brings it all together as a scene.
Kevin: So for Billy's house, you could have it so that Caffrey can say "bedroom on" or "hallway on," "kitchen on" as he moves from one space to the next?
James: Yes, you can actually customize anything that you want.
Kevin: And so who does that program?
Do you guys have to come back, or can Billy do it, or...?
James: All of the commands are in the system.
Kevin: All right, well, Jim, I appreciate you showing us around.
James: Thank you very much.
Billy: Thanks, Jim.
James: I really appreciate the time.
Kevin: So, what is it?
Nikola, lights off.
♪♪ Hey, Charlie.
Charlie: Hey, Kevin.
Kevin: Dying to check out this solar system.
Charlie: Let me hook you in.
Kevin: Thank you, sir.
Charlie: You are all set.
Kevin: Probably got that tight enough.
Charlie: Oh, trust me.
Kevin: [ Laughs ] Look at the size of this system.
Charlie: Not bad.
Above the garage, they're all on, all the panels.
Kevin: Yep.
Charlie: Right in front of you, all the kitchen area, living room, family room, all done.
Kevin: How many panels in total?
Charlie: Well over 60.
Kevin: Wow.
And so, how did Billy and Michelle decide that they wanted solar?
Charlie: Well, they wanted to go with geothermal, and that's a tremendous load on the electric.
So our geothermal load is about 22,000 kilowatt hours, and our solar will produce about 24,000 kilowatt hours.
Kevin: Oh, so we'll cover that whole -- Charlie: About 8% extra.
Kevin: And geo is using so much electricity because we're -- I mean, the circulation, right?
Charlie: Yeah.
We have two big pumps in the basement, and sometimes they're pumping 24/7, depending on, you know, what time of year it is, how cold or how hot it is.
Kevin: All right, big system.
But, like you said, you got the roofs for it here.
Charlie: Yeah, let me introduce you to our project manager, Christina.
Kevin: Christina, how are you?
Christina: Good.
Kevin: Very nice to meet you.
Christina: Nice to meet you.
Kevin: Thanks for your help.
Christina: Sure.
So I noticed you guys are installing right now... Christina: That's right.
Kevin: ...through a rubber roof, nearly flat.
What -- How do you affix?
Christina: So we're working on the last bit of our attachments right now before we finish paneling.
We have these power grips that we use.
These ensure that the roof is watertight after we make our penetrations.
Kevin: So we've got a little gasket right here.
Christina: That's right.
Kevin: And you're putting this down on the roof and you're going through?
Christina: So first we install the base plate.
Kevin: Oh, okay.
Christina: We lag those through with a couple screws.
Those go through the decking, spreads the load evenly.
Then the cover plate goes on top with a little bit of sealant around.
We'll ensure that that's waterproof.
Kevin: beautiful.
And then what goes onto the threaded rod coming out?
Christina: So we have these called L-feet.
Kevin: I presume like this?
Christina: Yep.
We'll bolt that through.
And then this tool sits on top like this so that the racking can slide through.
Kevin: Cool.
All right.
The panels themselves.
This is -- wow.
You know, we don't often see the back of a panel.
Christina: That's right.
Kevin: Obviously the dark side is here on the front, but on the back here, this is where our production comes out and we tie this in.
Christina: Yeah.
This is where we tie into the system and the microinverter.
Kevin: So tell me about the panels, because everything I read is that you guys just make more improvements in efficiency year after year.
How does today's panel compare to, I don't know, 5, 10 years ago?
Christina: That's right.
I'd say about 10 years ago, we were 10%, 11% efficient.
This one right here boasts a 21% efficiency.
Kevin: So when you say that number, you're talking about the 10% or 11% conversion of sunlight to electricity?
Christina: That's right.
Kevin: We left a lot sort of on the floor there, but now we're twice as much?
Christina: About twice as much.
Kevin: Very nice.
Christina: Yeah, and in terms of wattage, we have a 405-watt panel right now.
Back 10 years ago, you might have seen a 200- to 220-watt.
So that's about doubled as well.
Kevin: Same size panel?
Christina: Same size panel.
Kevin: Twice the electrical output.
Christina: Yeah, that's right Kevin: Big improvements.
Charlie: Pretty good.
Kevin: It is very good.
Okay.
Well, can we step up there and have a look at your folks putting these things on?
Christina: Sure.
Kevin: Guys are starting to finish the installation up on this here, Christina.
Give me general lay of the land here.
So the first step we always do is chalk out where the array is going on the roof.
You can see our chalk lines here.
Kevin: I do, yeah.
Christina: Then we'll pinpoint where our attachments are going and install the attachments.
So after that, we can install the railing.
And then from there on, we plug in the panels to the microinverters and the system.
And then we can panel.
Kevin: Gotcha.
So I see them fastening the panel down right there, just sort of tightening it in place.
What do they do, reach under and then just connect it to the system and the microinverter?
Christina: Typically, they'll connect those first.
So they'll connect microinverter and the system first.
Then they'll lay the panel down and torque it up.
Kevin: Gotcha.
And why do you like those versus the big inverter inside the house?
What's the improvement?
Christina: So the microinverters are great because you aren't relying on the entire group.
They work as individuals instead.
So if you have a damaged panel or it's shaded at a certain point in the day, the other panels will operate as usual.
Kevin: I love it.
So, Charlie, it looks awesome.
Charlie: It does.
Kevin: It's not free.
Charlie: No, it's not.
Kevin: How do you do the calculation to determine whether or not this makes sense for...?
Charlie: Well, believe it or not, the engineer said this is about an eight-year payback.
And in my book, that's pretty good.
Kevin: So basically, in year nine, you are paid for the entire system, and that's kind of free electricity at that point.
Charlie: Not bad.
Kevin: Not bad at all.
Christina, awesome.
Appreciate the help right there.
Christina: Yeah.
Thanks so much for coming out.
Kevin: So, Charlie, a lot going on this week.
But we also got more going on next week.
What's on your list?
Charlie: Well, we have the geothermal equipment on site, and it's going to be going into our new boiler room.
Kevin: Very nice.
And have you ever gone glass blowing?
Charlie: I have not.
Kevin: I'm about to.
We're gonna do that next time as well.
Charlie: Let me know how it goes.
Kevin: Okay.
So until then, I'm Kevin O'Connor... Charlie: I'm Charlie Silva.
Kevin: ...for "This Old House," up on the roof here in Lexington.
Charlie: Not bad, right?
Kevin: This is 60-plus panels?
Charlie: Yeah.
Not bad.
♪♪ Kevin: Next time on "This Old House"... Heath: Now that the front ramp is in, it's time for me to light it up.
Richard: Our fixtures and our grab bars have arrived, so now we'll finally get to see how our accessible bathroom will come together.
Kevin: And we're playing with fire to create a custom light fixture for our front entry.
Man: Just like taffy.
Kevin: Whoa!
That's next time.


- Home and How To

Hit the road in a classic car for a tour through Great Britain with two antiques experts.


Support for PBS provided by:
Funding for THIS OLD HOUSE is provided by The Home Depot and Renewal By Andersen.