E13 | Lathe Turned Segmented Bowl | Ask This Old House
Season 22 Episode 13 | 23m 42sVideo has Closed Captions
Heath labels a circuit breaker; Tom shares his hobby of lathe turning and turns a bowl.
Heath Eastman shares his tips and tools homeowners can use to identify and label home circuit breakers; Tom Silva discusses his hobby of lathe turning, why he enjoys it, and shares some of his favorite pieces he's created. Then, in Build It, he shows how to turn a segmented bowl, which is comprised of multiple pieces of wood glued together and turned, creating a unique visual effect.
Problems playing video? | Closed Captioning Feedback
Problems playing video? | Closed Captioning Feedback
Funding for Ask This Old House is provided by The Home Depot, Renewal By Andersen, and ChipDrop.
Support provided by:


E13 | Lathe Turned Segmented Bowl | Ask This Old House
Season 22 Episode 13 | 23m 42sVideo has Closed Captions
Heath Eastman shares his tips and tools homeowners can use to identify and label home circuit breakers; Tom Silva discusses his hobby of lathe turning, why he enjoys it, and shares some of his favorite pieces he's created. Then, in Build It, he shows how to turn a segmented bowl, which is comprised of multiple pieces of wood glued together and turned, creating a unique visual effect.
Problems playing video? | Closed Captioning Feedback
How to Watch Ask This Old House
Ask This Old House is available to stream on pbs.org and the free PBS App, available on iPhone, Apple TV, Android TV, Android smartphones, Amazon Fire TV, Amazon Fire Tablet, Roku, Samsung Smart TV, and Vizio.
Keep Exploring


This Old House Insider Newsletter
Get This Old House exclusive stories, tips, and behind-the-scenes information delivered right to your inbox every month.Providing Support for PBS.org
Learn Moreabout PBS online sponsorship♪♪ Kevin: On "Ask This Old House," our experts travel across the country to answer questions about your house.
♪♪ Today we learn it's never too late to learn new things as Tommy takes a turn on the lathe.
Tom: I do most of my turning late at night.
I'm up.
And why not turn a bowl?
[ Chuckles ] Kevin: Then later he shows us how to build a segmented bowl using the lathe.
Plus Heath gives us a review on how to identify breakers.
Coming up next on "Ask This Old House."
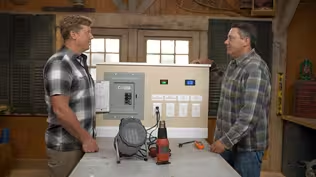
Kevin: Heath, I always knew it was going to come to this.
Heath: [ Laughs ] Kevin: You and your obsession with labeling and order.
Heath: And my label maker.
Kevin: And your label, which I've heard actually drives around with you?
Heath: It is under the driver's seat.
Yes, a little drawer that's the easiest place to keep it.
Kevin: Alright.
Listen.
Respect, brother.
I get it because I love it, you know.
My thing's a mess, and it drives me crazy.
Heath: Yeah.
You want to know where everything goes.
Just makes it better and safer.
Kevin: Absolutely.
So what is your protocol?
What's your process?
Heath: So the easiest way to go about labeling a panel is two people.
You want to have two people.
If you can have a couple of telephones going or radios of some kind going on because chances are you have multiple floors, you're not going to hear each other yelling across the house or up and down the stairs.
Kevin: And two people because I'm up in the room with everything on and you're down at the panel, "I just turned it off!"
or "Turned it off, what went out?"
Heath: Exactly.
Notepad.
Someone downstairs at the panel, someone walking through the house and go ahead and start from step one.
Pick the first room with lights, pick first receptacles, whatever you want to do.
Just start going through.
The easiest way I found to start though, if you're going for the breakers, pick the big ones first.
Anything that's a double pole breaker like this, double pole 20, double pole 30.
It might be a well if it's a 20.
If it's a 30, it might be your electric dryer or an oven or an outdoor air-conditioning unit.
So those are the easy ones to pick off first, then work on the small ones.
Kevin: Um, you don't always have a second person.
Heath: You don't.
Kevin: Running around up and down, back and forth.
Heath: I mean, it's good exercise, but it takes a while.
Kevin: It does.
Got an alternative?
Heath: I do.
So of course they make a tool for that like everything else.
So we start off what looks like our usual little plug-in tester, where we can tell what's going on in the receptacle.
Kevin: Mm-hmm.
Heath: But it comes as a kit with this piece.
Kevin: Oh, nice.
Heath: So what it does is it sends a tone to the breaker panel, and you can actually find out which breaker that goes to.
[ Beeping ] So you turn it on, just give it a once-over.
[ Beeping ] And then it comes back.
Kevin: And there you go.
Heath: And that's it.
Kevin: That's beautiful.
I like that.
That's going to save a lot -- Although this obviously, you know, in a bedroom, a lot of them, all of the receptacles are on one circuit.
Heath: Right.
Kevin: And overhead lights are on another.
Like, what do you do?
Like, "Ahhhh"?
Heath: You can if you want, but I don't recommend it.
Kevin: Doesn't work?
Heath: No.
Simple.
Adapters.
Kevin: Oh, look at that.
Heath: So we can just -- Even if you had a two-prong receptacle, that three-prong is not going to fit.
But you can plug that in.
Kevin: But how does this help me with the l-- Oh, so this unscrew the light bulb in the overhead... Heath: Screw that in.
Turn it on.
You can do the same thing.
Kevin: Very clever.
I like that one.
Okay.
So you get them all figured out.
Heath: Yeah.
Once you're comfortable with what you have in your notepad, everything made sense, it's labeled the way you want, you're going to know what's what, again, label maker if you can.
Nice clean labels to the side.
But sometimes you don't always have that space.
Like here, we can't fit this and our legend here is pretty small.
I've tried to do the best I can, but you still can't get everything in there.
Kevin: Right.
Heath: So there are enough templates available online that you can type whatever is going to be comfortable and based on your panel size, and print it up, but print it up on a self-adhesive page.
Kevin: You went to the stationery store.
Heath: I did.
Kevin: And you made a grid.
Heath: I did.
You can size it to whatever size will actually fit in a space inside the panel, whether it's above the breakers, below, on the door.
Cut it, stick it.
Done.
Kevin: Could I stick that on the door if I've got a sticker on there already telling me who knows what?
Heath: Don't cover this up.
This is all the important information for the panel.
It tells you what breakers, how big they are, how many breakers this can actually take, everything else that goes along with it.
So don't cover up any of the labeling.
Look for an open space.
I mean, if you had to, worst case, on the front of the door, but usually in a larger panel, you're going to find a spot above this or above the breakers or below that you can fit that.
Kevin: Gotcha.
So what are you doing tomorrow?
Heath: Are we labeling a panel?
Kevin: Either that or you're letting me borrow this.
♪♪ Tommy, look at you.
A new tool for us, huh?
Tom: A new tool for up here, a lathe.
Kevin: Although I've never really thought of you as a lathe guy.
Tom: I don't consider myself a "lathe guy" by any means.
♪♪ ♪♪ Kevin: So you get a piece glued to another piece, and then you got a spline between the pieces?
Tom: Right.
And that spline is made out of hard pine.
It's just an accent piece.
That's all it is.
Kevin: So not a lathe guy, huh?
Tom: I still don't consider myself a "lathe guy."
You see some of these people out there that are turners.
I mean, they're amazing, what they do.
And I just play on the lathe a little bit and turn a bowl or a pen or a box or whatever.
Just something that I feel like doing.
2:00 in the morning when I can't sleep, I get up and I turn.
It relaxes me.
It gets stuff off my mind.
I can think and I can focus on what I'm doing too.
So sometimes if I've got something I don't want to think about, I go down and focus on this little thing turning around.
♪♪ It's my Zen, yeah.
Yeah.
♪♪ My wife Susan says every now and then, "You really like doing this, don't you?"
Uh, yeah.
Keeps me out of trouble.
My dad had an old Craftsman lathe and I used to play with that when I was young.
My brother Dickie also turned a little bit.
So, you know, I wanted to be like Dickie.
If he could turn a lamp, I can make a lamp.
So I made a lamp.
And then every now and then if my dad had a project or we were doing something, and I had to turn something silly, maybe a column base molding, little detail, it would take me a while to do it, but I didn't really do a lot of turning.
And then I didn't really start to get into it until a couple of years ago, when I started having more time at night.
You're basically working around the clock when you own a company.
There is no six-, seven-hour day.
It's 20 hours a day is really what you're working, six, seven days a week.
But now I don't have that part of my life that I have to be concerned about.
So now I still -- I'm up and why not turn a bowl?
[ Chuckles ] I've gotten into all kinds of silly things.
Turning some burls.
Kevin: Look at that.
Tom: I made a cookie jar for one of our homeowners out of an old beam.
Woman: Thank you so much.
Tom: Baby rattle, yeah.
I made a couple of those.
A few of those.
Baseball bats.
I made a cabriole leg just because I wanted to try it.
Christmas ornaments.
They started out -- they didn't start out as Christmas ornaments.
Basically, I would just pick up scrap pieces of wood and I would cut them into pieces.
And it's basically a way for me to practice my five different cuts with my tools.
I had like 20 of them on a table all standing up and ended up showing it on social.
And then somebody had said, "Oh, my gosh, are those Christmas ornaments?"
And next thing I know, I'm making Christmas ornaments.
Kevin: [ Laughs ] Tom: Merry Christmas!
Right?
♪♪ Kevin and I, We got a note on social.
Man: Kevin, Tommy, you're my only hope.
Tom: He wanted to know if I would teach him how to turn a ring.
Alright?
And I really don't have time to teach somebody how to do a ring.
So basically, what I did is what I'll do is I'll just make him a ring and we'll send it to him.
So Kevin worked on getting the size, and then we made a little skit out of it where Kevin went in the woods and he got a big log like this to make a ring like this.
And we just made it funny, dropped it down onto a table, and I was like, "I got it, sonny," and we started turning it.
And so I turned the ring.
And then I said to myself, "Hmm.
I should make a little box for the ring to go in."
So when he asked her to marry her, he can give her the box, take the cover off, and there's the ring.
And so that's what we did.
And it was fun.
They appreciated it.
♪♪ I think everybody should have a hobby because when you retire...
I know I've had friends that have retired and they're going crazy.
And unfortunately it's sad because some people become lonely.
There's nothing to do.
They did -- They never -- They never tried anything.
You know, it doesn't matter what it is, but you got to stay busy.
You got to stay focused.
You got to keep your mind on things and you got to challenge yourself.
Challenging yourself is the is the drive that keeps you going and you want to do it more.
And that's the beauty of turning, I think.
To see something that you built in a little bit of time...
I can turn a silly little bowl in 40 minutes, half an hour, or I can spend 14, 20 hours on building a bowl.
Any way you look at it, the gratification is still there.
It's just like I say, fun.
♪♪ Well, I guess I'm a lathe guy, but I -- It's -- I like to turn.
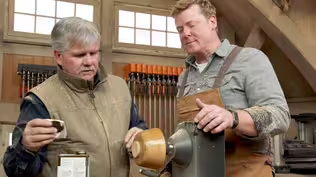
[ Chuckles ] ♪♪ Kevin: Hey, Tommy.
Tom: Hey, Kevin.
How are ya?
Kevin: I'm doing alright.
So bowl turning, huh?
Tom: How'd you guess?
Kevin: I don't know, but it always gets me excited.
I enjoy your bowls.
They're amazing, actually.
Tom: Yeah.
I find it very relaxing.
And a simple bowl like that, you can turn quick and it's gratifying.
Kevin: It is your happy place, right?
I mean, after hanging out with me.
Tom: [ Laughs ] That's my second happy place.
Yeah.
Turning a bowl out of a solid piece of wood is always fun, but I thought we would do something different today.
I want to do a segmented bowl.
Kevin: Segmented bowl.
Tom: A little more work.
Kevin: Yeah?
Tom: But a lot of times I turn a segmented bowl out of scrap pieces or leftover pieces of wood.
When I say scrap, think of the cutting board that we made, the octagon-shaped?
Kevin: Yeah.
Tom: Alright.
So I had some of the pieces left over.
Kevin: No kidding.
So we had that kind of three-dimensional trick that we played with the different colored woods.
This is just from the scraps?
Tom: That's the scraps, the leftover, yeah.
I mean, that's not my taste really, the kind of bowl, but I say why waste the wood?
Kevin: Yeah, it's busy, but the idea is, I guess, little pieces glued together.
But then you smooth and shape with a lathe?
Tom: Yep.
Exactly.
Like I say, very gratifying.
Kevin: Okay, well, those are beautiful examples.
No surprise.
I presume this is the base stock we're using?
Tom: Yeah, I was down where I buy a lot of my wood and this place had this wood right there.
And I looked at it, I said, "That's interesting.
What is it?
It's awesome."
He says it's orange osage.
Kevin: That's kind of like my nickname.
Orange.
Tom: Matches your hair perfect.
Kevin: Hardwood, I presume?
What is that?
Tom: It's a leafy, so it's got to be hardwood.
I never saw it before.
I guess it's grown in another part of Texas.
It develops a fruit, orange, but it's not edible for humans.
Kevin: Okay.
Tom: And this is a small piece of walnut that I had left over.
So I figured we'd do a segmented bowl with orange osage and walnut.
Kevin: So how do we get started?
Tom: We get started by ripping some wood down.
Kevin: Let's do it.
[ Saw buzzing ] Tom: Okay, so now I want to rip a strip wide enough for the bottom.
Kevin: And those are going to be little wedges?
Little triangles?
Tom: Exactly.
Because I don't want that expansion contraction all one way.
Okay, so the next thing we need to do is make triangular pieces.
And we're going to do that on the miter saw.
Okay, so the next thing I want to do is I want to make the sides for the bowl.
So I'm just going to make some strips.
Now I want to rip one thin strip to accent the bottom.
Alright, now we're ready to cut our sides for the bowl.
We're going to cut pieces that will go like this.
Little pieces like that.
And they all have to be the same size and the same angle on each end to give me the diameter and the size of the bowl that I need.
Kevin: And then when you cut them, you're going to end up putting them together, and you're going to have enough of these to go around and roughly create your circle?
Tom: Right.
And this bowl is going to take 16 of these pieces.
And it's about 2 3/16 or 2 1/4 inches long.
Kevin: And then what about this angle here?
Tom: That angle is going to be 11 1/4.
Kevin: Hmm.
Tom: Alright?
Now, to do that I made a sled.
And on the sled I have two pieces because of the different bowls that I make.
And I set these at 11 1/4 degrees.
That gives me my angle.
And I take this piece here because I cut the strip off of it.
So now I take and I put a stop, and this is just glued, basically going to give me my length.
So I've already cut one 11 1/4.
I'm going to use this as a gauge.
And I'll set it down here so that this edge is parallel with the sled right there.
Kevin: Long to long.
Tom: Long to long right there.
Lock it in.
Now, I also took a piece of wood that does not touch the blade, and it's cut on an angle.
And what happens is, when I cut this piece of wood, the piece of wood will go through and fall off and come away from the blade and won't come back at me.
Kevin: Clever.
Something tells me there's more here in this jig than there is in the bowl.
But we're going to do it all.
Alright.
Tom: It's a lot of work, I'm gonna tell you.
It's very, very time-consuming.
Alright, so we have enough pieces cut for the top, the accent piece, and also two rows for the long pieces.
So let's show you what we have here.
These will be our top three rows.
Kevin: So you got layers like this?
Tom: Layers like that.
Now I want to make -- because the bottom is going to -- the sides are going to come in and taper.
So the next row down, each piece has to be a little bit shorter.
Kevin: Because you want to pull that diameter in just a touch?
Tom: Exactly.
So now we'll cut 16 pieces a little bit smaller.
And the diameter of that circle will be a little bit smaller also.
Alright.
So now we're ready to glue up the bottom here.
Kevin: It does start make you appreciate that when you look at a bowl that's one species, and then you look at a segmented bowl and you're like, "Ooh, a lot more work..." Tom: Yeah.
Kevin: "...goes into a segmented bowl."
Tom: So I figure that some of the bowls that I've built takes me anywhere between 8 to 14 hours.
Kevin: So a zip tie for a clamp, huh?
Tom: I use them for a long time, and I've used these same zip ties.
I've had them for many years.
People always say, "Well, why do you go through a lot of zip ties?"
I said, "Well, actually I don't.
I sand them or clean them, whatever I have to when they get a little gunky."
Clamp it together.
Kevin: And you have a zip tie tightener.
Tom: Yeah.
Kevin: Of course.
Tom: So now technically we have to go -- put this aside.
We have to clean off our plastic, and then we have to glue up another one.
We have three more pieces to glue up.
Kevin: And then we got to wait for it to set up.
Tom: Yeah.
Aright.
So now I want to get a bowl made today.
Alright?
So I know how long it takes.
But I wanted you to appreciate the fact that how long it takes to really put these things together.
Alright, so what I did is I glued up sections already.
Kevin: Very nice.
Tom: Alright?
So I can show you the step.
So let's start with the bottom.
It's glued.
Kevin: That is set up.
Look at that.
Tom: And I sanded it smooth.
Okay?
So the next step would be to take the smaller circle and glue that to the top of that bottom.
Now, the reason I do that is because I need to get a tool in to curve the radius on the bottom and taper the bottom.
Kevin: So are you going to turn this in parts?
Tom: I'm going to turn this section first.
I first have to make a recess on the bottom to mount it to the lathe.
Kevin: Right.
Tom: Once it's on the lathe then I turn the bottom at an angle.
Kevin: So you would turn base and row one first?
Tom: Right.
And then while that is going together, I glue up the three pieces that are then going to sit on the top.
Kevin: Look at that.
And those are all sanded flush.
Tom: Those are all sanded, glue's all off.
Kevin: Very nice.
Tom: Right.
So then what I have is the bottom with a recess to mount it to the lathe.
Kevin: Shaped on the outside.
Tom: That's starting to take the shape of the bowl right there.
I've done the inside and I've turned the radius on the bottom and tapered it slightly.
So now when I put it on the lathe, I marry the rough turn to the smooth turn, both on the outside and the inside.
Kevin: So you can start lathing this?
Tom: Exactly.
Kevin: I'll start clearing.
Tom: I think we might make it a little bit -- a little bit straight and then roll it down gentle, make the top edge and treat it like a salad bowl.
Kevin: Okay.
Tom: Alrighty.
Kevin: I mean, I already have a salad bowl, but you do whatever you want.
Tom: [ Laughs ] You eat salad?
Kevin: [ Laughs ] ♪♪ ♪♪ ♪♪ ♪♪ ♪♪ ♪♪ Tom: So now you're ready to sand the bowl.
Let's go from 100 to 240, inside and out.
This is a sanding paste, and along with the white pad that you're using there, really give a fine finish to that.
Now we're ready for a food-safe finish.
This is an oil and some beeswax in it, I believe.
Once it's on there, heat it up a little bit and just try to spread it.
Kevin: Got it?
Tom: I got it.
Kevin: Don't drop it.
Tom: I got to say, this is my first time working with the osage, and that finish really pops.
Kevin: It's gorgeous.
I mean, look at that.
Orange is fantastic.
And the contrast with the top and that beautiful contrast in the bottom, that is remarkable.
Tom: Walnut really sets it off.
Kevin: That is beautiful.
So, you know, there's an artistry I'm noticing to the lathing part.
But there's really a lot of industry to the segmentation part.
You really got to think it through.
There's some geometry, math, I mean, and patience.
Tom: Yeah.
It's a challenge to get it to where you think you want it.
And it's funny because once you form the bowl, you've got it all built up, the tool allows you to shape it in different directions, and look what you get.
Kevin: Yeah, well, I can see why you enjoy it.
You are a real artist.
Tom: It's very relaxing.
That's why I love it.
Kevin: Nice job, Tommy.
Alright, well, that is it for us.
So until next time, I'm Kevin O'Connor.
Tom: And I'm Tom Silva.
Kevin: For "Ask This Old House."
Beautiful job.
♪♪ Kevin: Next time on "Ask This Old House"... Nathan heads to Portland to help a daycare provider build a mud kitchen for her students.
Woman: Can't wait for them to see it on Monday.
They're going to have so much fun.
Kevin: Then Mauro helps a homeowner update a wood-paneled room.
And are you perplexed when it comes to pruning?
Lee gives a tutorial on the tools and techniques that will have you shearing like a pro.
All that on "Ask This Old House."


- Home and How To

Hit the road in a classic car for a tour through Great Britain with two antiques experts.


Support for PBS provided by:
Funding for Ask This Old House is provided by The Home Depot, Renewal By Andersen, and ChipDrop.