E13 | Lexington Modern | Install with Care
Season 45 Episode 13 | 23m 42sVideo has Closed Captions
The new mechanical room is revealed. In-wall lights are installed at the front ramp.
The new mechanical room is revealed. Heath Eastman installs in-wall lights at the front ramp. Richard Trethewey and plumber Abe Bilo install an offset sink drain. Kevin O'Connor visits a local glass studio where the homeowners' son Wix is assisting glass artists Andrew Iannazzi and Emery Wenger with making a custom piece. Tom Silva begins installing support bars in Caffrey's bathroom.
Problems playing video? | Closed Captioning Feedback
Problems playing video? | Closed Captioning Feedback
Funding for THIS OLD HOUSE is provided by The Home Depot and Renewal By Andersen.
Support provided by:

E13 | Lexington Modern | Install with Care
Season 45 Episode 13 | 23m 42sVideo has Closed Captions
The new mechanical room is revealed. Heath Eastman installs in-wall lights at the front ramp. Richard Trethewey and plumber Abe Bilo install an offset sink drain. Kevin O'Connor visits a local glass studio where the homeowners' son Wix is assisting glass artists Andrew Iannazzi and Emery Wenger with making a custom piece. Tom Silva begins installing support bars in Caffrey's bathroom.
Problems playing video? | Closed Captioning Feedback
How to Watch This Old House
This Old House is available to stream on pbs.org and the free PBS App, available on iPhone, Apple TV, Android TV, Android smartphones, Amazon Fire TV, Amazon Fire Tablet, Roku, Samsung Smart TV, and Vizio.
Keep Exploring

This Old House Insider Newsletter
Get This Old House exclusive stories, tips, and behind-the-scenes information delivered right to your inbox every month.Providing Support for PBS.org
Learn Moreabout PBS online sponsorshipKevin: Today on "This Old House"... Heath: Now that the front ramp is in, it's time for me to light it up.
Richard: Our fixtures and our grab bars have arrived, so now we'll finally get to see how our accessible bathroom will come together.
Kevin: And we're playing with fire to create a custom light fixture for our front entry.
Emery: Just like taffy.
Kevin: Whoa!
♪♪ ♪♪ Man: Ahh.
That's it.
♪♪ ♪♪ ♪♪ Kevin: Hey there.
I'm Kevin O'Connor, and welcome back to "This Old House" and to our project here in Lexington, Massachusetts.
Right now, I am in the new primary suite in the back corner of the house, and from the outside, you can see some of the details that the architect used to give this home that mid-century modern look, the first of which has to be this wall of glass right here, mostly fixed windows, one operable.
And talk about bringing the outside in.
This is awesome.
These windows are a metal-clad frame.
And you can also see that we've got the metal siding on this part of the house, the only part of the house where it exists.
We've also got the nickel gap siding to the side here, and it wraps all the way around the house.
Turning our attention to the inside, this window right here has got another mid-century modern detail -- no trim, just a nice sharp corner there in the plaster.
And then we've got the wood right here that is actually going to be painted white, and it's going to hide a mechanical shade.
As you come out of the bedroom, you can come into a big closet right here, lots of storage with drawers and dressers on that side, even enough room to store the tub.
And that's because on the other side of what's going to be a pocket door right there, we have got the primary bathroom.
So in here there is a toilet closet right here.
That big tub is going to go in this corner with an accent wall of stone, and you can see that the fellas are putting in a double vanity there, as well as the tile for the shower enclosure right there, and then back out into the hallway, we've got a door right here so that you can shut off the primary suite.
And this is interesting.
That is right next to this bedroom right here.
This is Caffrey's bedroom.
He is the middle son.
And a few years ago, he was diagnosed with Duchenne muscular dystrophy.
And when they bought this house, his bedroom was far away from Mom and Dad's.
Theirs was way over there above the garage.
And so one of the primary reasons for this addition out back was to bring these two bedrooms together.
Primary bedroom right there.
Caffrey's bedroom right there.
Off of Caffrey's bedroom in that corner and behind that piece of plywood right there is a door so they'll have access to the patio.
And right here we've got some high registers for the HVAC system.
And in fact, it's a pretty complicated system.
And Richard is down in the mechanical room right now talking to Charlie.
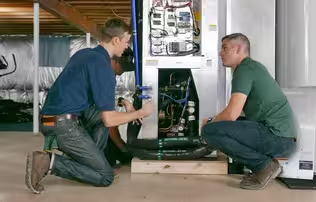
Richard: So, Charlie, this was once our mechanical room.
It seemed big enough at the time.
Charlie: It did.
But a big renovation, you need all the mechanical space you can really get.
Richard: Absolutely.
Charlie: On the other side of the house.
Richard: So you were fighting for this tunnel.
So I remember Mark coming in here with all his beautiful block.
And he did a great job making this sort of chaseway for all of this piping into what is now a brand-new mechanical room.
Charlie: That's right.
And the old foundation was right here.
The foundation for the house is on this wall here also.
Richard: That's right.
And what you did was something that every general contractor should do on a house of this scale.
You called a summit.
You put us all in this room together.
Charlie: That's right.
We had all the key players of the subs -- electrical, plumbing and heating and HVAC.
Richard: The engineer was even here.
Charlie: That's right.
And we didn't even have any framing above us.
All foundation walls.
And it looked huge back then.
Richard: It did.
HVAC guys said, "We want right here."
So there'll be two air handlers right here.
This is that ductwork that we ran underneath that existing kitchen and living room here.
And we sealed that duct.
It'll all come back into here, work off this air handler right here.
So they own this inventory.
And in this corner was a perfect place for our geothermal loops to come in.
There are four -- one, two, three, four -- 500-foot-deep loops that go down into the ground.
It's going to pull energy out of the ground in the winter, and it's going to push energy down into it in the summer.
It'll come up through here, through this distribution piping.
Now, these are our geothermal heat pumps.
They can be staged as necessary.
The piping that's being run here is something different.
They're actually using an interesting product and it's a fused plastic.
So instead of threading it or instead of using a press tool, this will actually fuse it together perfectly.
And that's a forever connection.
So we're only halfway home here.
We still have three more tanks to go here.
Whole bunch more piping that's got to come over here.
We'll have distribution to all the air handlers and they got to -- still got plenty of work to do here.
Charlie: They do.
And then Heath has to come in.
He probably has a week of electrical -- thermostats and wiring everything you see.
Richard: And all the ductwork has to be finished too.
Charlie: That's right too.
Richard: You know what?
This thing seemed really big, but we're going to need every single square inch.
Charlie: It gets small real quick.
Richard: Amen.
Kevin: We have a few different sidings on this house.
You can see that most of it is actually the nickel gap.
But you remember there's some metal siding out back, and then right here at the front entrance, we've got something completely different.
This is sort of a wood veneer on a synthetic product.
So if you take a close look at it, that's a very thin wood veneer.
And then this is all synthetic material back here.
And you see that it comes in a lapped plank right there.
It has been run vertically.
It will go up this entire wall and then it'll actually go on the overhang as well on either side of that steel beam.
Now, check out the way that this has been installed.
So it comes with a clip which gets screwed to the sheathing.
And then you can see the laps fit into that.
And then there's a full inch separation between wall and the back here.
And that allows any water that gets behind it to run down and come out so the air can actually get in so things can dry out behind it.
It's got that sort of mid-century modern wood look, which is nice, and even though it might look a little dull and shabby right there, that's because it's actually got a plastic film on it, which stays on while it's being installed.
And then right at the very end of the project, it gets pulled off.
And that is your finished look right there, maintenance free.
So that's a pretty cool product.
And speaking of cool, check this out.
The blue stone is down on our ramp, which runs from the driveway all the way up to the front entryway.
Heath, how you doing?
Heath: Hey, Kevin.
Kevin: So, you obviously got a lighting plan for us out here.
What is it?
Heath: We do.
So the architects came up with a good idea to do lights in the wall, some kind of step light for the ramp here.
Kevin: So I saw a couple that were installed already.
You've got one in right here.
Heath: Yeah.
Kevin: That's actually going to shine down.
We're going with that black theme that we've seen throughout.
Heath: Exactly.
And part of the reason we waited this long to put them in versus jumping on them ahead of time is they wanted to put these in the courses of the siding.
They didn't want to have any kind of block in here with the siding they had to go around.
They wanted a really, really clean look.
So we had to have this siding on first.
Kevin: Beautiful.
So you've got a layout right there, line snap.
Can I see the fixture there?
Heath: Yeah.
Check it out.
So that's actually going to look great in there.
But I presume it's L.E.D.?
Heath: L.E.D.
Self-contained L.E.D.
Kevin: And what's up with this?
Heath: It's my favorite little things.
Like a little cheater.
Kevin: I could do that.
Heath: Don't need a wire nut.
Just strip it and stuff the wire.
Kevin: Terrific.
Okay.
So how are you going to cut that out?
Heath: Going to use a multi-tool with a special blade.
It should cut right through that.
We'll go through the sheathing and slide the box in.
Kevin: I'll step back and let you do your thing.
Heath: Alright.
[ Tool buzzing ] When we put that in, we turn the screw, it's going to wing open and actually pull forward and clamp.
Kevin: Nice.
Oof!
That's satisfying.
Heath: Alright, now I need your help.
Kevin: Sure.
What do you want?
Heath: You want to jump inside and push that wire out?
I'm gonna have you come through the lower knockout down in this corner of the box.
Kevin: Okay.
Heath: Alright.
Perfect.
Okay.
Alright.
So now we're going to go ahead and actually make these up.
Look at that.
Isn't that nice?
Kevin: It is nice.
Heath: Just take the end off a little bit.
Kevin: So that looks like regular line wire.
This is not low-voltage?
Heath: These are not low-voltage.
These are line voltage.
We're starting to see a lot more fixtures actually come with these on them already.
Kevin: Alright.
Heath: And the last one.
Alright.
So what I'm going to do next is fold these wires to the back of the box.
And that's important when we use our bracket.
That's going to mount to the box with those two holes and the fixture will bolt here.
Kevin: Nice.
Heath: So when it's in place, those wires want to be behind it and out of the way.
Kevin: Got it.
Okay.
Heath: Alright.
Kevin: Any chances these light up?
Heath: They do.
You want to give them a shot?
Kevin: Absolutely.
Let's see what they look like.
Ooh, nice, Heath.
I like it.
Heath: Yeah, I think these do a great job.
It's a nice soft color.
Nice down low on the ramp.
Kevin: Yeah.
Heath: Did a nice job lighting this up.
Kevin: Won't get in your eyes.
Nice, crisp, modern look.
I think it looks great.
Heath: Yeah.
Kevin: Nice job, Heath.
Heath: Thanks.
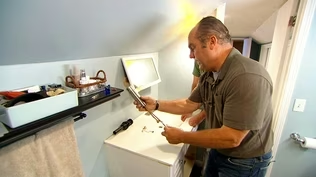
♪♪ Richard: So we're here in Caffrey's bathroom and finishes are well underway.
Tiles all in, the walls and ceiling are painted.
That means it's time for fixtures.
So the toilet is fabulous.
It's a combination toilet and bidet.
It has a wand that'll stick out right here, and that's really terrific.
And that's going to be controlled by this control right here with touch button.
This is really -- For anybody with mobility issues, this is really a way to extend your independence for a longer period of time.
This will be great.
They're terrific for anybody actually.
The shower is also notable.
So, so often you come to a shower and you don't know which control is levers and everything else, but look at this.
This is a combination unit that's so sensible.
Temperature control is right here.
You can see hot and cold.
And there's three buttons.
This button is for the hand shower, this button for the overhead shower head, and this one is for a future hand shower that's going to go on the grab bar that's soon to be installed.
They're doing all of our plumbing work on -- This is Abe Bilo.
Hey, Abe.
Abe: Hey, Richard.
Richard: So you guys have been busy here.
Abe: We have.
Ready to put the faucet on the sink that Charlie has mounted on the wall.
The faucet itself, it's controlled by a sensor and a little adjustment knob here to go from hot to cold.
Richard: Alright, so you ready to go?
Abe: Ready to go if you want to hold this here for me.
Tighten it up.
Nice and straight up there, Richard?
Richard: Darn straight.
Abe: Snug it up.
Alright.
A typical installation, the trap would be hanging directly below the outlet.
Richard: That's right.
And that's a real knee buster.
That's going to stick out too far for wheelchair to get in there.
So it'd really be great if you could get it back against the wall a little bit.
Abe: Well, it can.
So what I did is I went out and picked up an offset drain.
Richard: Alright.
So that's going to thread onto here.
Abe: Right around there.
Richard: Look at that -- way back, inconspicuous but still look good.
Abe: Gets it right out of the way.
Richard: Nice.
♪♪ Abe: A little glue on the trap right here.
On the drain.
Through the wall.
Glue it up.
Now I'm ready to hang the trap.
Flip the trap right up.
Line up the outlet.
♪♪ Richard: So the trap is made.
Now it's time to make the final water connections.
Those escutcheons will cover up the copper.
Beautiful.
Solderless connections, which means it has a nut and a brass ring called a ferrule.
Now they're going to use the pipe dope.
And that's a really good tip on a ferrule like that.
That's going to look so smart.
All the black trim is lovely.
Now your flexible water supplies go on to the nuts.
Abe: Compresses against a rubber washer.
Richard: Alright.
Snug up your hot and your cold.
Perfect.
We'll get the water turned on and test it a little bit.
But there you have it.
A perfect hands-free faucet with temp controls right here and a wall-hung sink at the perfect height for the wheelchair, and all the drain and water piping pushed back perfectly for wheelchair access.
Awesome.
We're getting out of the way because Tommy is ready to get some of these grab bars.
Abe: Let's go.
♪♪ Kevin: I've come to a local glass studio here in Cambridge, Massachusetts, because our homeowners, Michelle and Billy, have commissioned a local glass artist to make them a custom light fixture for the front entryway.
Well, it turns out that their oldest son, Wix, has been taking lessons, and he's going to help create this work of art.
Can't wait to see him in action.
Hey, Wix.
How you doing?
Wix: Hey, Kevin.
How are you?
Kevin: I'm doing alright.
Thank you.
Wix: Welcome to the glass studio.
This is Andrew, one of the people working on the light fixtures in our house, and Emery, one of the teachers here.
Emery: Nice to meet you.
Kevin: Nice to meet you, fellas.
So -- Oh, is that what we're working on today?
Wix: Yeah.
This is going to be one of the accent pieces, so it won't have a light in it.
Kevin: Okay.
Wix: It's just going to be there complementing one of these pieces, which are a bit larger and will have the light in it.
Kevin: Um, alright.
So help me out, fellas.
How do we get to that right there?
Andrew: So these accent spheres, all the pretty linework that you see in there is all based off of Italian cane work.
It's a old technique where they take chunks of color and they continually thin it out into threads.
And depending on how we combine those threads, we can get different visuals on how they look when we blow them up.
Kevin: And I presume that you start with something like this right here?
Andrew: Correct.
Kevin: And end up with something like that because it's got the black in it?
Andrew: Yep.
Kevin: Alright.
Well, how do we get started?
Or I should say, how does Wix get started?
Because you're gonna help us blow, right?
Wix: That's the plan.
Kevin: Alright.
Andrew: So let us show you.
Emery: Let's pick up some color.
Go right for it.
You got it.
And then right over to the furnace.
There you go.
So now we're just going to get that color nice and hot.
And we're going to serve it to Andrew.
Now Andrew grabs that stick and is able to transfer the color.
Once he's got it on there, he can snip it right off.
Wix comes away.
Andrew gets ready to heat up and take another gather of clear there on top of it.
Kevin: And clear doesn't really mix with the color?
It just sort of stays on the outside?
Emery: But it's going to be two different layers of color.
So that's the whole thing with glassblowing is we're building layers of color and clear to create the design that we're making right now.
So Wix is now going to go ahead and get that post ready to stretch that glass out.
Andrew: Alright, Wix, are you ready?
Wix: Ready as I'll ever be.
Andrew: Here we go.
Emery: So, Andrew gets that initial stretch.
Kevin: Whoa!
Emery: Just like taffy.
Kevin: Look at that.
Emery: Then he's going to hand that off to Wix.
Kevin: That's insane.
Emery: And Andrew's just slowly backing up as that glass is cooling off, sort of eyeing the temperature.
And that's telling him how much that glass is going to be able to stretch out.
Because as much as this looks like a really simple just drag it out, the temperature really, really dictates how thick those canes end up being.
And it's very important for all to be consistent in order for the lights to look correct.
Kevin: So he's reading the temperature by the color.
Emery: Exactly.
Kevin: Doing it by sight.
Alright, Wix, I think I'm getting it.
So these canes that you guys showed us at first, you just pulled your first one right there?
Wix: Right.
It went well.
Kevin: Alright.
So that one is setting up.
We go from single cane to... Wix: To something like this lattice cane.
Kevin: So you take a couple of them.
And then basically with the heat you're going to put them together.
You end up with the ones that we're going to be building the fixture off of.
Wix: Correct.
Emery: Alright.
So we're getting this plate ready by getting it nice and hot.
And as I'm doing this, Andrew's getting ready with a gather.
Andrew: Good.
Emery: Andrew's going to come over and he's going to use the pipe and a set of tweezers to squeeze those canes together and make sure they're stuck.
Touches just at the edge to save as much of that pattern as possible, and then rolls that cane right up.
Andrew: So first thing we need to do is make sure that we brush off all the dust that was on that plate, if there's any, so that it doesn't end up in our final product.
And then Emery is going to take a heat on these and we're going to stick them together.
Emery: So right now I'm watching the motion, and I'm using this flipping action to keep the cane from coming together.
Andrew: Alright.
Emery: So Andrew's bringing those canes together, making sure they're all lined up and making sure that they're contacting only on the sides so they don't overlap and mess up the pattern.
Now we've got them all the way together.
Andrew's going to take over the heat.
He's going to close it off, gather on top of it, and then you're going to be ready to blow.
Andrew: A little harder.
Emery: Always communicating with Wix about what he needs as he's shaping that glass.
Andrew: Emery.
Emery: So we're stretching that glass out.
Andrew gives a little tap.
That vibration breaks it right off.
Wix is going to get that annealer door for me.
Keep going.
And we've got that in there to cool off overnight.
Nice job.
Kevin: Awesome.
Well, I can't thank you guys enough.
Really terrific.
High art right here.
Andrew: Hey, thank you.
Emery: Thank you.
Kevin: Thank you.
Wix, we'll pick you up in a week.
Andrew: Yeah.
Kevin: You got a lot of work, pal.
Wix: Thanks.
♪♪ Kevin: Caffrey's bathroom is going to get a whole bunch of grab bars.
You can see that they chose this black matte here for a finish, and that's a pretty sharp look.
It's going to go with the black tile on the floor.
A whole bunch of different functionality.
This one's called a Z-bar, so it helps you work yourself from a seated position up to a standing position.
That'll be right here to the left of the toilet.
To the right of the toilet will be a dropdown bar.
So this will articulate up and down.
And you may recall a couple of months ago, Tommy and I actually put blocking in this entire bathroom.
So there's some 2x stock.
There's some plywood behind all of these walls, gave us perfect flexibility to put this stuff anywhere we want.
This is going to be a straight bar that doubles as a towel rack.
That'll go outside of the wet area of the shower, and in the shower, we've got a straight bar here, we've got a seat that comes down and, Tommy, a second Z-bar on that wall.
Tom: Yep.
This Z-bar will go right here on this wall and the seat will fold down.
It comes up here.
So as Caffrey does the shower, he can actually push down on this, stand up, and then grab and hold on to the bar.
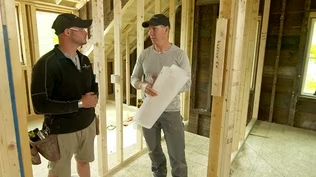
Kevin: So the accessibility expert who we worked with came in recently.
She laid everything out for us.
So you know where stuff's going?
Tom: Located everything height-wise, distance-wise, off the corners and off of the seat and we're ready to start.
Kevin: So that's plaster out there.
But this is porcelain tile in here.
We're going to go right through that, huh?
Tom: So we're going to go through the tile.
We actually have to break through the waterproofing system and get into all of the backing and structure of the wall because this has to be strong.
So when we do that, we're going to drill the tile and the waterproofing system and seal the screw.
And that will lock it in so it doesn't leak.
Kevin: I want to see how we do that.
Alright.
I'll give you a hand.
Tom: Okay.
Alright.
I marked for these three holes right here.
I'm going to use a carbide tip bit.
And this bit is a little bit bigger than the diameter of the screw itself.
I'm only going to drill through the tile right now.
[ Drill whirring ] Alright, through the tile.
Now I want to drill into this wood structure.
This drill size is the same shank size of the screw.
We'll drill a hole through the waterproofing and into the structure.
[ Drill whirring ] Alright.
So now we put the caulking in the hole.
So now when the screw goes into the wet caulking, it'll coat and wrap around the screw, sealing it as it goes through the waterproof membrane.
Kevin: Just tap that in place.
Tom: Good.
Alright.
Now let's do the seat.
It all mounts on this hardware right here.
Okay.
So what we have to do is lay out for all these holes at the right height.
So rather than do any measurements, I actually made a template to mark all of our holes.
Kevin: Oh, very nice.
Tom: Alright.
Now what we want to do is drill a pilot hole in each hole first.
Alright.
This time we're going to coat the screw just a little bit.
The sealant will push itself right up as the screw gets driven in.
Okay.
Oh, boy.
You going to sit there?
Kevin: [ Laughs ] Go ahead.
Say it.
Tom: If it holds you, it'll hold anybody.
Kevin: Oh, predictable, pops.
Look at that.
That's terrific.
Tom: Yeah, it looks good.
Kevin: Hey, Charlie, what do you think of this?
Charlie: It looks good.
It really does.
Kevin: Yeah.
We got one bar up, one seat.
We got a couple more to go.
But speaking of more to go, a lot more to go on this project.
Tom: All hands on deck to make this thing happen.
Charlie: Yeah.
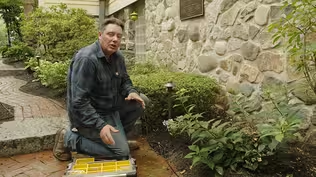
Mauro's painting the interior, Jenn's starting plantings, and I just have to keep the subs on schedule.
Kevin: You do that, and until we get back here next week, I'm Kevin O'Connor.
Tom: I'm Tom Silva.
Charlie: And I'm Charlie Silva.
Kevin: For "This Old House" here in Lexington.
Tom: Alright, you going to push your luck and sit again?
♪♪ Kevin: Next time on "This Old House"... Mauro: I'm calling in some extra help to paint this modern wall.
Whoa!
That looks good.
All right.
Let's take a look from here, guys.
Charlie: And, how do you build a staircase?
Tom: One step at a time.
♪♪ [ Truck beeping ] Jenn: And now it's time to see my landscape plans come to life.
Lee: Great.
So let's get them in the ground.
What do you think?
Woman: Yeah, let's do it.
Man: Okay, let's do it.
Lee: All right.
Kevin: All right.
That is starting to look good.
That's next time.


- Home and How To

Hit the road in a classic car for a tour through Great Britain with two antiques experts.


Support for PBS provided by:
Funding for THIS OLD HOUSE is provided by The Home Depot and Renewal By Andersen.