E14 | Paint Wood Paneling, Play Kitchen | Ask This Old House
Season 22 Episode 14 | 23m 42sVideo has Closed Captions
Mauro paints wood paneling; Lee shears shrubs; Nathan builds a daycare mud kitchen.
Mauro Henrique discusses how he sees color, and shares some of his favorite colors to use for projects; Then, he updates a homeowner's office by painting over dated wood paneling with the perfect dark blue; Lee Gilliam discusses various shrub pruning tools; Nathan Gilbert heads to Portland, Oregon to help a homeowner build a sensory mud kitchen for her at-home daycare.
Problems playing video? | Closed Captioning Feedback
Problems playing video? | Closed Captioning Feedback
Funding for Ask This Old House is provided by The Home Depot, Renewal By Andersen, and ChipDrop.
Support provided by:


E14 | Paint Wood Paneling, Play Kitchen | Ask This Old House
Season 22 Episode 14 | 23m 42sVideo has Closed Captions
Mauro Henrique discusses how he sees color, and shares some of his favorite colors to use for projects; Then, he updates a homeowner's office by painting over dated wood paneling with the perfect dark blue; Lee Gilliam discusses various shrub pruning tools; Nathan Gilbert heads to Portland, Oregon to help a homeowner build a sensory mud kitchen for her at-home daycare.
Problems playing video? | Closed Captioning Feedback
How to Watch Ask This Old House
Ask This Old House is available to stream on pbs.org and the free PBS App, available on iPhone, Apple TV, Android TV, Android smartphones, Amazon Fire TV, Amazon Fire Tablet, Roku, Samsung Smart TV, and Vizio.
Keep Exploring

This Old House Insider Newsletter
Get This Old House exclusive stories, tips, and behind-the-scenes information delivered right to your inbox every month.Providing Support for PBS.org
Learn Moreabout PBS online sponsorship♪♪ Kevin: On "Ask This Old House," our experts travel across the country to answer questions about your house.
♪♪ Today, Nathan heads to Portland to help a daycare provider build a mud kitchen for her students.
Carley: I can't wait for them to see it on Monday.
They're going to have so much fun.
Kevin: Then Mauro helps a homeowner update a wood-paneled room.
And are you perplexed when it comes to pruning?
Lee gives a tutorial on the tools and techniques that will have you shearing like a pro.
That's all coming up next on "Ask This Old House."
Mauro: A lot of people ask me for, you know, "What color do you think will look good in this room?"
Man: What color would you recommend?
Kevin: "What color should I paint my room?"
You must get that all the time.
Mauro: But it all depends on how you see and how you feel about colors.
There's tons of them, millions of different colors out there.
Kevin: I mean, this is insane.
Look at all these choices.
Mauro: This is crazy.
Kevin: This is so many.
Mauro: Pick a color there.
It's not easy to pick colors for someone, but, I mean, colors play very strange sometimes, you know?
Okay, let's say we look into a green color.
A green has so much different greens, but that color, specific color, when I look at it, I can see what undertones are in that color.
Sometimes you can see, like, a little flash of red in there, a little flash of blue in there, or a little flash of yellow.
It's a little complicated to understand, but, you know, the more your eyes look at it, the more you read colors, the more you understand, the more you're going to like it or you don't going to like it.
And the most important thing to me, the first question I ask them is, "So, how do you feel about this color?"
Woman: I think it looks amazing.
It's exactly what I was looking for.
Mauro: That's a good sign.
We have to do a lot of repaint.
[ Chuckling ] Many times, many times.
I could count the projects that we've done that we didn't have to repaint at least something.
You got to feel good about it.
If you don't feel good about it, it's going to be a waste of time and money.
But it's about preference.
Different people likes different colors.
What do you think?
Woman: I love it.
Mauro: It's amazing what a little paint can do, huh?
Woman: Yeah.
Compared to what the house looked like this morning, it really looks incredible.
Mauro: I like the reds for doors, I like greens for doors, and I like black with a little bit of glossy on it.
Kevin: [ Laughs ] Check that out.
Mauro: Unbelievable.
Kevin: It looks awesome.
Mauro: But my number one is the navy blue.
To me, it fits everywhere.
By the way, I like the blue.
Really nice color for a bathroom.
It goes to my truck.
It goes to my living room.
It goes to my TV room.
It goes on my clothing.
And I just love it.
It's a color that -- it makes me feel good.
Your preference is like the one that counts the most.
It's what makes you feel good about.
I like this color anywhere in the house.
And you come in.
You see those nice colors.
"Oh, I'm fine."
What do you think?
Woman: It looks fantastic in here.
It's so much brighter.
Mauro: Makes you feel good?
That's your color.
♪♪ Hi, Courtney.
Courtney: Hi, Mauro.
Mauro: Nice to meet you.
Courtney: Welcome.
Mauro: All right, so I think you wrote in about painting your office?
Courtney: Yes.
Mauro: All right.
Courtney: Let me show you.
Mauro: Let's do.
All right.
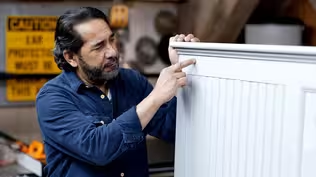
Lots of wood paneling in this room.
Courtney: [ Laughing ] Yes.
This is our home office, and we have done a little work.
Mauro: I can see.
You have the ceiling nice and clean, the walls.
Courtney: But we'd love your help with painting the paneling.
Mauro: The panelings?
All right.
But you want to do everything?
Courtney: No, I would like to keep the crown molding and the cabinets.
Mauro: The cabinets.
Courtney: And also the sash.
Mauro: And the window sash.
All right.
Sounds good to me.
We can help with that, but one question -- most important one.
Do you have any color in mind for this woodwork?
Courtney: We were thinking about a blue.
Mauro: A blue.
Courtney: And we do have some samples.
May I show you?
Mauro: Sure.
Blue is my favorite color.
Aha!
Here we go.
Courtney: Mauro, these are the four samples that I am considering.
Mauro: Okay.
Courtney: And it's important to me that we complement the paint on the walls and the ceiling that we already painted.
Mauro: Okay, one thing to consider.
That office -- when the sun hits the window, there's a lot of light breaking in, in the morning, okay?
So, we're going to make sure that we choose a color that won't change so much with the light in there.
Courtney: Okay.
Mauro: All right?
So, we have four different tones of blue in here.
Courtney: Mm-hmm.
Mauro: When you look at it, is there any color that you would say, "Mauro, I don't think this will work for me there?"
Courtney: I'm not a fan of this one.
Mauro: Not crazy about that one?
Courtney: Mnh-mnh.
Mauro: All right, let's put it that way.
Now we came down to three colors here, right?
A lot of gray in this one, dark gray and blue, and this lighter gray from the other two, right?
Now we have to take another one out.
Which one you don't consider to go into your office?
Courtney: This one seems a little too gray given the size of the room.
Mauro: If you don't like that, we're going to take this one out, right?
Courtney: Take it out.
Mauro: Take it out.
Now we came down to two different undertones of blue.
Courtney, always go with your gut.
Courtney: Okay.
My gut says this is the one.
Mauro: If your gut said that, that's the one.
We go for it.
Let's take this one out.
Now that we know the color, I'm going to step out, get some paint, and you and I will go to work.
Courtney: Sounds good.
Mauro: We'll see you soon.
Courtney: Okay.
♪♪ Mauro: First thing what we're going to do, we're going to roll up the paper to protect the floor.
Make sure you press down all the way down.
I want to cut this right here.
Last, protect the edges of the window casing, okay?
Press it down.
Just make sure you don't cover the panels.
All right?
Okay.
Ready to prime?
Courtney: Yes.
Mauro: All right.
Here's what we're going to use.
We're going to do this water-based bonding primer, excellent for the surface that we're going to be priming, which has this little gloss on the paneling walls.
And this will be perfect for us, okay?
Courtney: Okay.
Mauro: All right.
Let's open this can.
A little here, you're there.
Courtney: It's gray.
It's not -- why isn't it white?
Mauro: Gray primer will give us a good foundation for the paint that we're going to use because it's dark blue.
It comes tinted by the manufacturer.
Courtney: Okay.
Mauro: Okay?
Ready to go?
Courtney: Ready.
Mauro: Okay.
I'll hit the grooves with a brush while you paint the panelings with the roller.
This will ensure we don't end up with any bare spots in between the panels.
♪♪ ♪♪ Well, it's been an hour.
Our primer is dry.
It's time to paint.
Are you ready for that?
Courtney: I'm ready.
Mauro: Okay.
Courtney: On the ceiling, we used a flat paint.
Mauro: Got it.
Yes.
Courtney: What finish are we using here?
Mauro: For the wooden paneling, we're going to do a matte finish.
Courtney: Why matte?
Mauro: Matte finish reflects less light than any other finish.
Courtney: I already like that color.
Mauro: Wait until you see up on the wall.
It's going to be even better.
♪♪ ♪♪ ♪♪ Man, I love this blue.
♪♪ Wow, Courtney.
What about this room?
Courtney: It's incredible.
Mauro: Amazing.
I love your color selection.
And we went with the matte finish for the walls.
Perfect.
The room is, like, beautiful.
Courtney: Is there anything we need to know?
Mauro: Yes.
What I would suggest for you to do, don't bring anything into this room or hang anything into the walls.
Wait at least until tomorrow, because paint is dry, but it's not completely cured.
So, tomorrow on, it's all yours, all right?
If you have any more projects, painting projects, let me know.
We'll come by.
We'll help you out, okay?
Courtney: Thank you so much.
Mauro: Thank you.
♪♪ ♪♪ Kevin: Hey, Lee.
Lee: Hi, Kevin.
How are you doing?
Kevin: I'm doing all right.
So, pruning, or I guess maybe shearing or both?
That's what we're talking about?
Lee: That's what we're talking about today.
Kevin: Ooh, I am jealous.
I do not have any of the gas-powered shears.
Lee: Gas-powered ones work really good, fast, you know, get the job done real quick.
Kevin: Works a lot in your world, I would imagine.
Lee: Yes, they do.
Yes, they do.
Kevin: This guy happens to be gas-powered.
Lee: Yes.
Kevin: And articulating blades.
So, these guys go just back and forth.
Lee: Correct.
Kevin: Short work at it.
Lee: Yes.
And then we also have a battery one, also.
Kevin: Everything's going battery these days.
Lee: Yes.
Everything's going battery.
So, fast.
You know?
Kevin: That does some serious work.
Lee: Do a nice job.
Kevin: Up for heights and, also, does this guy move around?
Lee: Yes.
Yes, it does.
Kevin: So, you can sweep at different angles?
Lee: Pull it down.
It articulates a little bit.
Kevin: Oh, yeah.
Beautiful.
Okay.
But more aggressive than I think we're going to be working with on the small guys behind us.
So, let's get them out of here.
What is your approach?
Which tool for which task?
Lee: This is a boxwood.
Kevin: Love them.
They can be ornamental.
You can shape them.
Lee: Yes.
Really nice plant.
I like the long shears on these.
Kevin: You do?
All right.
Lee: They work really well.
You can shape it the way you want.
See?
Takes a lot of material off.
They work really well.
Kevin: And so, I guess the customer is going to tell you whether they want the natural look, or, if I could, a little bit more groomed... Lee: Yes.
Kevin: ...and geometric.
Lee: Definitely, definitely.
Kevin: They do a quick job of it.
Lee: Okay.
These work really well.
Kevin: I'll get that out of there.
Lee: Okay.
Kevin: So, that's how we would attack a boxwood.
Lee: Yep.
Then, also, a yew.
Okay.
Kevin: Yep.
Lee: These ones here, you can also get in there with small hand pruners, okay?
Those ones there fit the hand.
But if you wanted to get in and do some, you know, single cutting like that.
Correct.
Kevin: Right.
Lee: And then if you want to do multiple cuttings, go back to the long shear ones.
Kevin: Do you enjoy shaping them nice and groomed and straight?
Lee: All depends on the customer.
Kevin: It does?
Lee: Yes.
Kevin: Obviously with the hand pruners, one at a time, a little bit more laborious.
But you guys can go in and thin it out.
Lee: Correct.
With that good airflow in there and stuff like that.
Kevin: What do you like for a cut when you're using those?
Lee: When you say a cut, I like to get down inside and cut just before maybe a branch or a foliage or something like that.
Kevin: Gotcha.
Lee: And that's it.
Kevin: Right.
Okay.
So, that would be the yew.
Lee: Yes.
Kevin: I think of the yew and the boxwoods as sort of similar in a sense that shape them, a hedge.
Lee: Correct.
Yes.
Kevin: Kind of monolithic.
Lee: Then we have a holly.
Kevin: I was going to guess holly.
I was.
I really was.
Lee: I beat you to it.
Kevin: I recognized.
What are you going after this one with?
Lee: This one here, I would just do a little bit of hand-pruning on it, clean it out a little bit in the middle, any dead stuff on it, things like that.
I'd like to do maybe, like, a 45 above some foliage.
Kevin: Yep.
Lee: Something like that.
Kevin: Right.
Lee: Okay?
Then maybe get inside and do some hand-pruning.
Kevin: Got a little couple dead ones there you go after.
Lee: Exactly, exactly.
Kevin: Would you go with the bigger trimmers?
Lee: I wouldn't.
I don't think I would use those.
I'd more shape it by hand... Kevin: Yeah.
Lee: ...with small hand pruners.
Kevin: Okay, okay.
Get this one out.
And we bring you the last one here, which is...
I'll admit I do not know which this one is.
What is that?
Lee: This one's a rose of Sharon.
Kevin: Ah, okay.
Lee: Real pretty flower late in the summer.
Kevin: Yeah.
Lee: So, like, in the springtime, it might not leaf out.
Some people think it might be dead.
But hold off on this and have some patience and it comes out.
Kevin: How are you going to attack that?
Lee: Okay.
This one here, again, maybe do some air flowing, you know, some pruning inside.
Kevin: Mm-hmm.
Lee: And then also like a lot of these get really big.
So, maybe the loppers might work really well.
Kevin: So, these, I mean, much more aggressive.
Lee: Correct.
Kevin: Because you... Lee: Much more torque on it.
Kevin: Yep.
Lee: You know, get a good cut on it.
But I would come in on the small side, on the small side of the cutter.
Kevin: This guy in here.
Lee: Correct.
Exactly.
Kevin: So, get behind... Lee: Exactly.
Kevin: And then I'm so tempted, Lee.
Lee: Easy.
Easy.
Kevin: I just want to because that would make nothing of that, right?
Lee: Exactly.
It'd go right through it.
Kevin: Okay.
So, not in that case.
Lee: Okay.
Kevin: But if you had the small guys... Lee: Yes.
Kevin: ...and you were trying to come in, and you had something, you know, half an inch or bigger, you might struggle to get that.
Lee: Correct, correct.
Kevin: So, loppers is the tool of choice for that one.
Lee: Loppers is the way to go.
Kevin: Beautiful.
All right, I love it.
So, right tool for the right shrub.
Lee: Correct.
Kevin: Looks good.
Lee: Okay.
Kevin: Thank you, man.
Nathan: Today I'm heading to Portland, Oregon, to help a homeowner with an outdoor project.
For a city, Portland is pretty lush and green, so I'm looking forward to spending some time outside.
Hi, Carley.
Carley: Hi, Nathan.
Welcome to Portland.
Nathan: Thanks for having me.
Carley: Yeah.
Nathan: This is an incredible spot.
You would never know that you were in the city.
It's like you guys have your own secret garden here.
Carley: Thank you.
That's exactly how we planned it.
Nathan: So, you wrote me about improving a space?
Carley: Yeah.
So we bought our house a few years ago, and I started in-home daycare.
Nathan: Oh, cool.
Carley: So, we spend a ton of time outside.
The kids love it.
But there's one area that I think we could fix up a bit.
Nathan: All right, let's take a look.
Carley: So, over here we have kind of our adult hangout area.
Nathan: Nice.
Carley: But back here is where the kids play.
Nathan: Oh, I bet they run around like crazy out here.
Carley: They love it.
Nathan: Awesome.
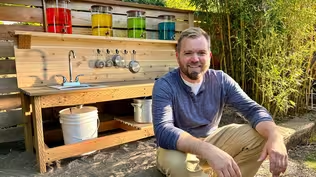
Carley: So, this area is their little kitchen.
But I'd love to build a big mud kitchen so they'd have tons of room to play.
Nathan: Well, you wrote just the right person because I literally just built one for my daughter's daycare, and they love it.
They're using it all the time.
I like how customizable they are.
What kind of features do you want to see?
Carley: They love to play with water, so maybe like a sink?
Nathan: Perfect.
Carley: Lots of counter space with, like, a pretend stove, some hooks to hang up all their pots and pans, and just a lot of room for them to all spread out.
Nathan: All right.
Perfect.
I brought a ton of material with me.
Let's go get started.
Carley: Okay.
Awesome.
♪♪ Nathan: All right, here's the parts that I picked up for your mud kitchen.
I got some pressure-treated 2x4 stock for the frame, some nice cedar tongue-and-groove that we can use for the back, or if we add a shelf, I have some composite decking that we can use for the top.
And the bottom shelf, that is going to age really well.
It's going to be splinter-free, really good for the kids.
We have screws to assemble our frame.
For securing down the composite decking, I picked up these special screws that will lock it down.
These have color-match plugs that'll fit right into the hole and hide these fasteners and blend right in.
I have some hooks that I picked up for pots, pans, measuring cups, and what's cool is we'll do a solid back so you can move these over time if you get new toys to incorporate.
Carley: That's great.
Nathan: I'm going to use some black spray paint.
Maybe we can make some knobs or some stovetop burners.
We'll paint those black.
And then the last thing I picked up was this little, tiny sink.
Carley: It's so cute.
Nathan: It really is cute.
So, when I built my daughter's mud kitchen, I actually incorporated some water into it.
I added a fitting here, added water to the cold side, and I put a "P" trap on the bottom to get the water away from the play area.
Do you guys have a water source out there?
Carley: We don't actually have a hose over there, but maybe we can do some kind of container system that they could pour water out of.
Nathan: Yeah, we can put a 5-gallon bucket below it, and then we can introduce another water source.
It'll be fun.
It's just a play kitchen.
So, they don't have to clean the dishes, but they can make pretend.
All right.
What do you think?
You want to get started?
Carley: Yeah.
Let's go.
Nathan: All right.
So, I thought we'd get started by assembling the frame.
And we're making it for little kids, so we want to keep that in mind.
Maybe about two feet high off the ground so they can reach it and play with anything on top.
About six feet long, and we don't want to make it too deep, maybe about 20 inches deep so they can still reach and play with all the toys on top.
Carley: Okay.
Sounds good.
Nathan: All right.
Now we're going to do a simple layout.
I'm going to add one of these 16-inch pieces on either end.
And then I'm going to find the center.
I'm gonna put one in the middle.
So, we'll do the layout on both.
We'll spread it out, screw everything together, check for square, and then we can add the legs.
Carley: Okay.
Nathan: What's half of 67?
Carley: 33.5.
Nathan: Yes!
Carley: [ Laughs ] Nathan: So, we have our countersink set up.
We're going to do two holes on each end.
Then we'll find that center.
[ Drill whirring ] So, now they're pre-drilled and they're countersunk, so the heads will sit nice and flush with the wood.
So, that's our first one.
Let's do our second one.
[ Drill whirring ] Okay.
It's one.
[ Drill whirring ] Okay.
Work our way down.
All right.
Like it?
Carley: Looks good.
Nathan: All right.
So, the next step is we need to add our legs.
Now, this is our top.
And we want to add a second shelf in this.
We need to find out where that's going to be.
So, we know the first line is a given, 3 1/2 inches down.
And we want to put this second shelf at a decent height that we can still use the space between.
We know that second shelf is going to be kind of thick at just over four inches with the decking on it.
So, maybe about a foot of space would be nice.
So, if I come down to that 3 1/2, come down 12, you know, you have about 4 1/4, 4 inches below, and you'll still have a little bit on the bottom.
Perfect.
Right there.
Carley: There we go.
[ Drill whirring ] Nathan: All right.
This one.
[ Drill whirring ] Nice and square?
Carley: Mm-hmm.
Nathan: All right.
So, now we got to put that second shelf in.
This is a little trickier.
So, maybe if we take this, and we roll this on its side.
Like, roll towards you.
Yeah.
That's gonna work.
All right.
[ Drill whirring ] Carley: Okay.
[ Drill whirring ] Nathan: Now we're ready to cut our decking for our top and our middle shelf.
We'll cut some six-footers first.
[ Drill whirring ] All right.
We got our four pieces.
Three of them are full width.
And what I did is I ripped the last one to 3 inches.
Carley: Mm-hmm.
Nathan: That way it gives us a nice reveal.
So, I have an inch on the ends.
And I have an inch overhang on the front.
And these are essentially like plastic.
So, they like to move around a lot.
So, we'll want to measure quite a few times, double-check ourselves.
But we're looking for that one inch on the ends, one inch on the front, and then down below our 3-footers.
Perfect.
All right.
So, what we can do, we can secure the front and the back one.
And then we'll space the two in the middle evenly.
And we'll screw everything down.
Carley: That'll look good.
[ Drill whirring ] [ Drill whirring ] Nathan: This is that white cedar board that we have for the back.
[ Drill whirring ] So, you said that you wanted to put some water dispensers on top.
So, I got a couple pieces of cedar here that I cut, and then I'm going to throw a little cleat underneath for a little bit of support.
All right.
What do you think of that?
Carley: It looks good.
Nathan: All right.
[ Drill whirring ] All right.
[ Drill whirring ] All right, here's the tongue that we ripped off the front of this board.
We're going to turn it, put it on top, and create a little bit of a lip.
♪♪ Next, we're going to cut a hole through the decking for the sink.
Once I know how big the opening is, I can add blocking underneath to support the decking.
♪♪ ♪♪ Next, we'll cut circles out of some three-quarter PVC, painted black to look like a stovetop.
For our knobs, we'll use some scrap 2x4 stock.
We'll cut it out with a hole saw and paint it black.
♪♪ ♪♪ Carley, I love how you decorated it.
Carley: Thanks for your help.
It turned out better than I could ever imagine.
Nathan: It looks awesome.
Carley: I added some water and some food coloring so they could do some mixing.
Nathan: Perfect.
Carley: I can't wait for them to see it on Monday.
They're going to have so much fun.
Nathan: They're gonna have a blast.
Well, thank you for having me to Portland.
Carley: Thanks for coming out to help.
Nathan: Anytime.
If you've got questions about your house, we'd love to hear from you.
So, keep them coming.
Until next time, I'm Nathan Gilbert for "Ask This Old House."
So, the microwave, is that for snacks?
Carley: For mud pies.
Nathan: Can you guys mail me one?
Carley: I think we can.
Nathan: All right.
Thank you.
Kevin: Next time on "Ask This Old House," Lee helps a homeowner whose yard is being invaded with weeds.
Lee: Bad thing right here -- bittersweet, not good.
Really invasive -- it'll take over everything.
Kevin: Then Richard visits a homeowner looking to include a bidet in their bathroom remodel.
Plus, Mark shares some information on the dos and don'ts of chimney caps.
All that on "Ask This Old House."


Support for PBS provided by:
Funding for Ask This Old House is provided by The Home Depot, Renewal By Andersen, and ChipDrop.