E15 | Invasive Plants, Bidet Toilet | Ask This Old House
Season 22 Episode 15 | 23m 42sVideo has Closed Captions
Lee removes invasive plants; Mark discusses chimney caps; Richard installs a bidet toilet.
Lee Gilliam helps a homeowner clean up his backyard by removing a diseased tree and shows how to remove and maintain invasive plants; Mark McCullough discusses the function of chimney caps, options available, and how homeowners can know if they need to install one; Richard Trethewwey installs a toilet with a built-in bidet for a homeowner and shares the variety of options available.
Problems playing video? | Closed Captioning Feedback
Problems playing video? | Closed Captioning Feedback
Funding for Ask This Old House is provided by The Home Depot, Renewal By Andersen, and ChipDrop.
Support provided by:


E15 | Invasive Plants, Bidet Toilet | Ask This Old House
Season 22 Episode 15 | 23m 42sVideo has Closed Captions
Lee Gilliam helps a homeowner clean up his backyard by removing a diseased tree and shows how to remove and maintain invasive plants; Mark McCullough discusses the function of chimney caps, options available, and how homeowners can know if they need to install one; Richard Trethewwey installs a toilet with a built-in bidet for a homeowner and shares the variety of options available.
Problems playing video? | Closed Captioning Feedback
How to Watch Ask This Old House
Ask This Old House is available to stream on pbs.org and the free PBS App, available on iPhone, Apple TV, Android TV, Android smartphones, Amazon Fire TV, Amazon Fire Tablet, Roku, Samsung Smart TV, and Vizio.
Keep Exploring


This Old House Insider Newsletter
Get This Old House exclusive stories, tips, and behind-the-scenes information delivered right to your inbox every month.Providing Support for PBS.org
Learn Moreabout PBS online sponsorship♪♪ Kevin: On "Ask This Old House," our experts travel across the country to answer questions about your house.
♪♪ Today, Lee helps a homeowner whose yard is being invaded with weeds.
Lee: Bad thing right here -- bittersweet.
Not good.
Really invasive.
It'll take over everything.
Kevin: Then Richard visits a homeowner looking to include a bidet in their bathroom remodel.
Plus, Mark shares some information on the dos and don'ts of chimney caps.
All that on "Ask This Old House."
♪♪ Lee: Hi, Henry.
How are you?
Henry: Hey.
Good.
Lee: Nice to see you.
Henry: Nice to see you, Lee.
Lee: What do you got going on?
You wrote in.
Henry: Yes.
We got a mess in the back corner of the yard.
A lot of weeds and things we just don't know what to do with.
Lee: Alright, let's go take a look at it, see what we got.
Henry: Great.
So this is the spot.
Lee: Okay.
Henry: The house back there, that used to all be woods.
Lee: Okay.
Henry: And so now -- Now it's there.
We want to create some privacy and clean this area up.
Lee: Okay.
Henry: We don't know what to do.
Lee: What I'm looking at is we have some good things and some bad things.
Bad thing right here -- bittersweet.
Not good.
Really invasive.
It'll take over everything.
So let's concentrate on getting rid of this, okay?
And then we have some English ivy down here.
Let's get this under control.
And then we also have some nice juniper right here, which is really pretty.
We'll just maybe prune this up a little bit.
And then also we have some vinca in here.
Really nice ground cover.
Let's keep this and just we'll keep it under control a little bit.
And then we got some ivy growing up on this tree.
And I'm kind of concerned about this.
Let me make a phone call.
Get my arborist in here.
Good friend of mine.
Let him take a look at it, see what he says.
Okay?
Henry: Alright.
That sounds great.
Lee: Alright.
Good.
Henry: Thank you.
♪♪ Lee: Henry, this is Brandon.
Brandon Maltby.
Henry: Hey.
Brandon: Very nice to meet you.
I understand you have a tree that you're concerned about.
Henry: Yeah.
Lee's recommending we take a look at this and is concerned.
Lee: Yeah.
Brandon: Yeah.
You know, the trees really don't benefit much from the ivy.
Lee: Yeah.
Brandon: You know, I think if they had a say in it, they would just say, "Get it away from me."
Okay, so it's a blue spruce tree.
Not in perfect health.
And it looks like that's because of a disease called needle cast.
So it's a fungal disease very common in New England primarily because of our wet springs we have here.
Henry: Is that why all the needles have come off?
Brandon: Yeah, yeah.
Blue spruce trees are highly susceptible.
So we see it a lot on this particular species.
Lee: What can we do about it?
Brandon: There's a couple management strategies.
One is a spray program in the springtime.
And then a cultural practice would be to remove the old needles.
That's where the spores of the fungus kind of overwinter.
But this is pretty far gone.
It would be a really hard tree to kind of get back into shape.
Henry: So you're recommending it come down or...?
Brandon: Yeah, I think the best case here would be to remove the tree and perhaps replace it with something else.
Henry: The one concern we have is privacy.
You know, this is a new house back here.
And, you know, the tree right now blocks some of that view.
So that is a concern of ours is keeping some privacy.
Brandon: Yeah, absolutely.
We're going to come in.
We'll grind the stump which would set up the site nicely for a replacement plant.
Lee: And I think we can have some shrubbery coming in.
We'll figure that out.
Henry: Oh, great.
Lee: Okay?
Brandon: Great.
Well, I can get the crew over here and we can start the removal process.
Henry: Alright.
Lee: Great.
Brandon: So we're going to bring in a aerial lift truck.
It's a 60-foot truck.
Our operator is going to dismantle this using a small chain saw.
He's going to start with the lower limbs, taking off the smaller branches, and process everything through a wood chipper.
♪♪ ♪♪ ♪♪ So once we get the tree removed, we're going to have a stump there.
Stumps can be an eyesore or even a tripping hazard.
In this case, we're going to grind the stump so we have the ability to put new plants in.
♪♪ Lee: Thanks, Brandon.
I appreciate it.
Nice job.
Brandon: Hey, my pleasure.
Henry: Looks great.
Thank you.
Brandon: Good luck with the rest of the project.
Lee: Okay, I'll talk to you soon.
You and me now.
Got to go to work.
So let's get rid of this stump grinding.
What I want to do is put some of this aside so we can use it later on, put around our plantings.
I want it so it can hold water.
I think we're good there.
Alright, so I want to attack the bittersweet.
Okay?
And I think the way to do it is let's cut it and then we'll use these forks.
This is a nice fork.
It's a four-pronged fork.
Okay?
Loosens up the soil and then you can pull the root out.
Because if we just pull the plant out, you're not going to get all the root out.
So I want to get all the root out, okay?
Good root system, huh?
Henry: Yeah.
Lee: How you doing over there?
Henry: Good.
Lee: This one's coming.
Make that work.
Henry: Oh, that's a good one.
Lee: Perfect.
Henry: Oh, that was good.
Lee: I got it.
Henry: A lot came off that one.
Lee: Yeah, that's a lot right there.
That's what we're looking to get out of here.
So, we got to keep an eye on this in the future.
Henry: Yeah.
This is incredible.
Lee: Yeah.
Let's get this ivy.
What I want to do is just pull it hard.
It's like 20 years of overgrowth.
That's perfect.
It'll recover.
Henry: It's a shame to have that rock wall covered up.
Lee: Exactly.
You want to show it off.
It's beautiful, you know.
Just get in here.
So, on this juniper, so I want to just prune it back real lightly.
I mean, just to show the wall off and get some more daylight in there for it and just do some select cutting.
Henry: How often do you have to do this?
Every spring?
Lee: These are slow growers, so you probably wouldn't have to touch this for another two years, three years, really slow grower.
Henry: So you'll be back in two years?
Lee: Yeah, I'll be right back.
[ Both laugh ] Look at that.
See, that looks a lot better.
Okay, so the weeding is all done.
So I think we're ready to put some plants in the ground.
These are called P.J.M.s, rhododendrons.
The reason why I did -- because we have one on the property right there behind us.
So I'd like to use this one and that one and put them up here and stagger them a little bit.
Henry: They'll grow to how big?
Lee: It all depends on if you do some maintenance on them.
You can keep them at the size that you want, but they'll grow big.
They'll grow, you know, 10, 15 feet tall.
Henry: You can cut them back every year?
Lee: Yes, you can.
Correct.
When we dig the holes, we're going to do the same depth as the container but double the width, okay?
Henry: Alright.
You don't have to put any fertilizer or anything like that?
Lee: No, I don't think we need to do that right now.
It's getting kind of late in the season.
Henry: This is great soil.
Lee: It is good soil.
Henry: What would you do if it wasn't?
Lee: I would come in with compost.
A nice compost mix would be great.
It should.
There we go.
Oh, look at that.
It comes right out.
Henry: Looked bigger in the pot.
Lee: Yeah, it does, doesn't it?
So what I want to do is just -- See how it's kind of -- It's not too bad.
This one's not bad.
But they get root-bound.
So I want to just scratch up the whole thing.
Henry: It's a healthy-looking plant.
Lee: Yeah, this one's good.
What I'm going to do is scratch this up and the roots will want to go out.
Here we go.
That's the face.
That looks really good.
Henry, let's grab the hose and let's give it some water first.
Henry: Alright.
Lee: Cut this back end.
Henry: This is the easy part.
Lee: Yeah.
I want to foot it, they call it.
So we get it down in the ground.
Put your foot around it.
Oh, nice.
Good hole.
I think we did pretty good on this one.
That looks great.
I don't think we're gonna have an issue with any ivy, you know, but just keep an eye on the bittersweet.
If you see anything, pull it up.
Bittersweet's really aggressive.
It will choke it out.
[ Water spraying ] So, what I want to do is use these chips that we had from the grinds.
And this will hold the water.
That should be good.
Henry: Yeah, it looks good.
Lee: Okay.
I think we're in good shape.
What do you think?
Henry: I think it looks great.
Lee: Alright.
I need you to do me a favor.
Water.
Okay?
Every day for about 10 days.
Henry: Alright.
How long till it fills out the area?
Lee: This area, probably about maybe two or three years.
Henry: Alright.
Lee: Covering real good.
Henry: Alright.
Lee: I think you'll be happy.
Henry: Alright.
Lee: Thanks a lot.
Henry: Thanks.
Lee: Good to see you.
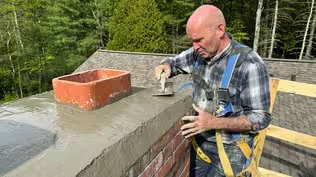
♪♪ ♪♪ Kevin: Hey, Mark.
Mark: Hey, Kevin.
Kevin: Chimney caps, huh?
Mark: Chimney caps.
Kevin: So, I've been on a couple roofs with you.
Mark: Yeah.
Kevin: I remember building a new chimney with you.
No, cap.
You didn't put one on there.
And I remember doing a repair where there was a cap.
Mark: Right.
Kevin: Do we need them?
What's the deal?
Mark: So when we're constructing a chimney, we kind of build it so it doesn't need a cap.
But over the years, things develop that may make you need a cap.
One of those things is, say, branches growing over the roofline and impeding the chimney, which would impede the draft on both a fireplace flue and a mechanical flue.
Kevin: So two different flues.
So the ambience of sitting around the fireplace and then your furnace or your boiler comes out of a different one.
Mark: Correct.
Kevin: Might go up the same chimney but come through the roof at a different spot.
Mark: Well, actually -- Kevin: Or side by side.
Mark: Different flues but side by side, yes.
Kevin: Right.
Gotcha.
So just so I'm clear, what are all the things that a cap is doing for us if we decide to use one?
Mark: Okay.
Kevin: You talk about the branches.
So downdraft is one of them?
Mark: Downdraft is a big one.
That's what the hood will do.
It'll protect you from a downdraft.
The hood is also going to protect you from direct rain going down and hitting the bottom of your fireplace and creating problems that way.
Kevin: Yep.
Mark: And the screen, that's going to protect you against critters, birds.
Kevin: Gotcha.
Mark: And all of that.
Kevin: Okay.
And so this one here just sort of has a flange, the screen, and the hood.
So that will just sit right on top of the clay liner that's poking through the rooftop?
Mark: Exactly.
Kevin: Gotcha.
And you brought, in this case, a black and a silver.
So I'm assuming painted and -- what?
-- stainless?
Mark: Stainless steel right here, which, again, is the premium of the two.
This, as you said, is a black paint, powder-coated.
And it is a galvanized steel, which is a little bit different than the stainless steel.
Kevin: I've also seen you work in copper, which is always acceptable, but that's an upcharge.
Mark: Everything's an upgrade, right?
You can do copper.
And then, again, configuration can be customized as well.
Kevin: So just so I understand, you are representing what's poking through our roof.
Right?
So we've got a brick chimney, which comes up through the house and above the roofline at some point.
Mark: Correct.
Kevin: What's this?
Mark: This is your concrete cap.
Kevin: Right.
Mark: That encases the flue liner.
Kevin: Yep.
And that's what -- This is poking through the roof.
Mark: Exactly.
Kevin: So we've got the liner coming out, and obviously, you know, we've got the screen you're saying with the hood on top and then a little bit of a flange right here so that that sits onto your liner.
And then what?
We just screw it?
Mark: Yep.
Kevin: Push it in.
Mark: The screws, make sure they're tight, one on each corner, and you're good to go.
But this is a typical configuration.
But sometimes... ...when these flues are closer like that and the chimney may be a little bit smaller... ...you'll see that the hoods start to overlap and bump each other.
Kevin: Are these pretty standard sizes?
Mark: Exactly.
This is a standard fireplace size.
That's a standard mechanical size.
Kevin: So hence we have a standard cap for fireplace, cap for mechanical.
They might not fit if they're too close.
Mark: If they're too close, they don't fit.
That's when you have to customize, which is what we have over here.
Kevin: We could do such a thing, huh?
Mark: Yeah.
Kevin: Can I?
Look at this.
Is this all stainless steel?
Mark: So this is all stainless steel, which is what I would recommend.
But as you can see, Kevin, this comes with a flange.
So this flange is actually going to bolt into this concrete cap.
You can glue it.
That's another option.
Kevin: All the way around.
Mark: And of course you have the screen.
But if you notice I have four bolts, one on each corner.
Unscrew those, lift the hood, and then you'll be able to access and clean the flues.
Kevin: Maintenance, cleaning, all that kind of stuff, whereas the screen and the flange more permanent, stays down.
Mark: Exactly.
Kevin: Well, that's actually kind of nice though because now you've just got it over both of those doing a whole trick.
Mark: Right.
And I like this as a better look too, so... Kevin: Of course.
Well, there you go.
Alright, I love it, Mark.
Thank you.
Mark: Alright, Kevin.
Kevin: Hot topic.
Mark: You got it.
Hot topic.
Kevin: [ Laughs ] ♪♪ Richard: Mary Ellen, how are you?
Mary Ellen: Good, Richard, how are you?
Richard: It's my pleasure to be here.
Mary Ellen: Thank you.
Richard: Beautiful house.
Mary Ellen: Thank you.
Richard: Now, you sent me an e-mail and you said, you know, you're in the middle of a bathroom remodel.
Mary Ellen: Yes.
Richard: Okay.
Mary Ellen: Yeah.
Richard: So why am I here?
Mary Ellen: Well, I'll tell you.
We were -- We're remodeling the bathroom and really just got back from Europe and saw bidets, used bidets, loved bidets.
And I'm just wondering if that would be a possibility here.
Richard: So you're in the middle of it right now?
I didn't come a minute too soon.
Let's see what you got.
Mary Ellen: Alright.
Okay.
Right this way.
Richard: Look at this.
This is not a mere bathroom remodel, is it?
Mary Ellen: No, no.
Richard: Big beautiful shower, a couple of sinks, big tub, and a spot for something.
Mary Ellen: Hopefully a toilet.
Richard: Okay, well, that's -- The toilet is -- But, you know, you talked about bidets.
With bidets, it was always the case that you had the toilet, and you would have the bidet close to it, next to it.
That needed separate plumbing to both.
They fell out of favor.
And what we see now in the United States is always these seats that can go on top of an existing toilet, but what they've done recently is they've come out with a unit that combines a conventional bidet and a toilet together into one fixture.
Mary Ellen: Wow.
Yeah.
That's what I saw in Europe.
Richard: Good.
So that could go right here.
So there's a couple of rules we have to make sure we have to follow.
One is it has to be a standard rough-in off the wall.
And that is 12 inches, which is exactly what a standard toilet has.
You do need the water to be in the right location for this unit because it's a little different than a standard toilet, and you need to have electrical.
So somebody was thinking ahead here, your contractor.
Mary Ellen: Yeah.
Well, you know, we weren't sure what we wanted here, what could fit actually.
Richard: Well, I think you would be well-served by having a unit that was a combination unit.
Would you mind if I go shopping for one of these units?
Mary Ellen: I would love that.
Richard: [ Laughs ] Okay.
I'll be back.
Mary Ellen: Okay.
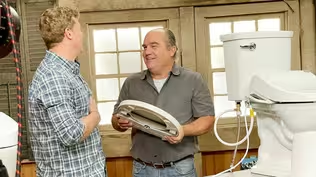
♪♪ Richard: So, Mary Ellen, here is your brand-new combination bidet and toilet.
What do you think?
Mary Ellen: I love it.
It's so nice and sleek and trim.
Richard: Smooth on the front, so it looks like it belongs next to this beautiful tub of yours.
It's got all kinds of features I'll show you once it's hooked up.
But one thing is that it's got a bidet wand that'll stick out right here that comes right out of the unit.
We've got some connections to make in the back.
We've got two water hoses, one for the bidet, one for the toilet flush, and the electrical connection.
But the installation itself is much like connecting the toilet to a flange.
So this unit actually comes as a kit, and that includes a template.
Now, the template is pretty handy.
You would put it over the existing flange and line up where the bolts are, and that lets you double-check that the water is roughed in correctly.
It has to be outside of that footprint.
So in this case we're fine.
It also comes with closet bolts.
These are special bronze or stainless steel bolts that will key right onto the flange right here.
And that'll allow you to attach the toilet down to this closet flange right here.
It also comes with a wax seal.
It also has a special T-fitting you can see right here that will allow the larger size hose to connect right here for the toilet and the smaller one for the bidet.
And this is designed to install onto the top of any conventional plumbing supply connection right here.
And that goes together pretty easy as a kit.
♪♪ You don't want to over-tighten these bolts.
You want to go hand-tight and then another quarter to half turn.
And then cover it up.
♪♪ Alright, Mary Ellen, here is your new baby.
It's all hooked up.
Mary Ellen: Wow!.
It's amazing!
Richard: You get to do the first test.
Oh, hello!
Mary Ellen: [ Laughs ] Richard: So, obviously, the seat goes up.
Mary Ellen: Yep.
Wow.
Richard: Yeah.
Mary Ellen: Okay.
Richard: Simply hit that to flush.
[ Toilet flushes ] Yep.
That's that.
Mary Ellen: Okay.
Richard: Isn't it cool?
You're gonna be busy.
Mary Ellen: Yes.
Richard: Hit stop.
Now you hit the dry and it'll dry some warm air.
Mary Ellen: Okay.
Richard: The bidet function.
So now hit the bidet function.
Mary Ellen: Okay.
Richard: It will not -- It won't have the bidet come on unless -- So hit the bidet function, either one of them.
You have to be seated.
So when I do that... Mary Ellen: Yeah.
Richard: Okay, so here comes the wand.
Mary Ellen: Alright.
Richard: Now I'm going to block it so it doesn't spray.
Okay?
Hit the stop button.
Mary Ellen: Okey doke.
Richard: Okay.
What else you got?
Oh, look at the back.
Mary Ellen: Oh, more functions.
Richard: More buttons.
So now you can set the temperature of the water.
You can set the temperature of the seat in the winter.
And you can set the temperature of the air.
You can also change how strong the bidet is.
Mary Ellen: Okay.
Richard: And you know what you're also going to get a kick out of?
Mary Ellen: What?
Richard: You can flush the toilet with this.
Mary Ellen: Wow.
You can close the lid.
You're done.
Mary Ellen: That's great.
Richard, my gosh.
Richard: Enjoy.
Mary Ellen: Thank you.
Richard: Enjoy.
It's a perfect complement to this beautiful bathroom.
Mary Ellen: Oh, thank you, Richard.
Richard: Thanks.
Mary Ellen: This was awesome.
♪♪ Kevin: Mary Ellen seemed very pleased.
Richard: She was very pleased, and it was a perfect finish to that great bathroom she's got there.
Kevin: So, lucky that she had the outlet, and also lucky that she had you to go shopping.
What did that unit set us back?
Richard: That's about 2,700 bucks plus installation labor.
Kevin: Priceless, priceless.
Richard: I was free, though.
Of course.
A lot of money.
Richard: It was a lot of money.
There are some choices, though, you know.
that's a combination bidet and toilet unit.
There is really a growing trend for people to having these beautiful retrofit toilet seats that give a bidet function to an existing toilet.
Kevin: Can you do it if you don't have power?
Is there a retrofit?
Richard: Well, it breaks into two categories.
One is non-electric.
So in the basic non-electric category, this is where you start right here.
And this thing has a water connection like this that comes to the back of the toilet.
This is how you operate it.
It has two wands that drop down front or back, but it retrofits by taking the existing toilet seat up and away.
Now, this comes down to here and it comes with these covering rosettes right here that will allow you to sort of line up, put the toilet seat back in place, and now you come back down.
Kevin: So this would sit there.
Richard: And then you'd attach it on, and then that's what you end up seeing right there.
Kevin: So you make the water connection right here, which goes down to the back of the supply.
And then this becomes your control for water on and off.
Richard: Simple.
Now, this is great, but it's cold water and none of the features -- doesn't have the automatic lift.
It doesn't have the heated seat and all the other stuff.
Kevin: So what does this cost?
Richard: $60.
Kevin: Ah, okay.
Richard: So it becomes basic and it begins sort of the story about hygiene, sort of using water to clean.
Kevin: Yeah.
Richard: So then in the electric versions, you got to make sure you order it right.
There's two choices for American toilets.
One is round front and elongated.
This is elongated.
This is what we have here.
And this one here has a different adapting method for the unit.
It would go down onto the toilet like this.
And then you'd be able to use these adapters.
To tighten it up so you can adjust for the different toilet.
You know, every toilet tank is going to be slightly different.
You want it to line up just right.
Kevin: Forward, back, left, or right.
Richard: That's right.
And so now you make it up, tighten it all up, and then the toilet seat slides onto here and clicks into place.
Kevin: And this is what you end up getting.
Richard: It is.
Kevin: And what features does this have?
Richard: Okay.
So this has a simple operate, no remote controls.
So it has front or back bidet function, on/off for the dryer.
Kevin: So because it's electric and I'm seeing red here, does that assume that it warms the water as well?
Richard: It warms the water.
It warms the water.
You control that here.
It warms the air and it warms the toilet seat.
Kevin: Oh, very nice.
Okay.
Richard: And that does require electric.
Kevin: And it costs us how much?
Richard: This is 300.
Kevin: That's a pretty nice feature.
Richard: And that's pretty busy.
Now, when you go to here, it gives almost every function that that combination bidet unit has except it doesn't have automatic flush.
It has a couple of things that people are very enamored with.
And that is... [ Beep ] Kevin: Oh.
So when you walk into the bathroom... Richard: It greets you.
Kevin: ...it greets you.
Right.
Richard: Okay.
And so it has all the same functions.
So we can raise the lid or close the lid, and we can also raise the seat.
Okay.
Kevin: Can I see this?
Richard: Yeah.
You bet.
Kevin: I want to just check it out.
So this can just -- It doesn't actually mount onto the wall.
Richard: It can.
It has a place to mount on the wall.
Okay?
What's really brilliant is you can intercede for the water supply.
So you would break into -- turn the water off and you can really do it yourself.
Adapt on to the bottom of the toilet, make your connection to your bidet and reconnect it right here.
Kevin: Right.
And I'm seeing night light here as a button.
Richard: So there's night light.
Kevin: Oh, yeah.
Look at that.
Richard: There's dryer.
Kevin: I can adjust the air temperature.
I can turn the dryer on.
No kidding.
Richard: You know, it seems frivolous.
This is about 900 bucks for this.
Kevin: Wow, that's a lot.
Richard: Well, it's not a lot.
Kevin: I guess not compared to 2,700.
Right.
Richard: And I think there's a story there.
You know, you're using -- it's way better hygiene, using way less toilet paper.
And it's really something once you own one and once you have one, you really start looking at people that don't have one funny.
[ Laughs ] And I mean -- No, it is.
Kevin: How do you know I don't have one?
Richard: I don't know, but there's a story here that is really compelling to keep -- to keep people in good hygiene.
Kevin: Alright.
Good.
I love it.
And that's very fancy.
Thank you, Richard.
Richard: Alright.
Hello.
And it talks to you.
Kevin: I can't help myself.
All of a sudden I have to go to the bathroom.
♪♪ Kevin: Next time on "Ask This Old House," we visit the San Francisco Bay Area and show you how to protect your home from wildfires.
First, Jenn helps a homeowner create a welcoming front yard using native plants in a firewise design.
Plus, Richard brings a hungry crew to help a homeowner's overgrown yard.
Richard: This is a really cool solution.
Kevin: All that on "Ask This Old House."


- Home and How To

Hit the road in a classic car for a tour through Great Britain with two antiques experts.


Support for PBS provided by:
Funding for Ask This Old House is provided by The Home Depot, Renewal By Andersen, and ChipDrop.