E18 | First Period Gambrel | Careful Considerations
Season 44 Episode 18 | 23m 42sVideo has Closed Captions
The timber frame structure is disassembled. The homeowner considers a new house color.
The ell of the house evolved from one story to two. The homeowners want to return it back to a single-story structure. The timber frame is carefully dismantled to be rebuilt later. A Rumford style fireplace is proposed to replace a larger Ben Franklin style. Plans for the landscape design are shared. A clapboard manufacturer in Maine is visited. The homeowner considers a new house color.
Problems playing video? | Closed Captioning Feedback
Problems playing video? | Closed Captioning Feedback
Funding for THIS OLD HOUSE is provided by The Home Depot and Renewal By Andersen.
Support provided by:

E18 | First Period Gambrel | Careful Considerations
Season 44 Episode 18 | 23m 42sVideo has Closed Captions
The ell of the house evolved from one story to two. The homeowners want to return it back to a single-story structure. The timber frame is carefully dismantled to be rebuilt later. A Rumford style fireplace is proposed to replace a larger Ben Franklin style. Plans for the landscape design are shared. A clapboard manufacturer in Maine is visited. The homeowner considers a new house color.
Problems playing video? | Closed Captioning Feedback
How to Watch This Old House
This Old House is available to stream on pbs.org and the free PBS App, available on iPhone, Apple TV, Android TV, Android smartphones, Amazon Fire TV, Amazon Fire Tablet, Roku, Samsung Smart TV, and Vizio.
Keep Exploring


This Old House Insider Newsletter
Get This Old House exclusive stories, tips, and behind-the-scenes information delivered right to your inbox every month.Providing Support for PBS.org
Learn Moreabout PBS online sponsorshipKevin: Today on "This Old House"... Tom: We're saving as many of these old timbers that we can to reuse in this old house.
Mark: I'm investigating whether a revolutionary fireplace design from the 1790s is gonna work on our project.
Jenn: And this backyard is filled with invasives, and we're gonna find out today if there's a plan to get rid of them.
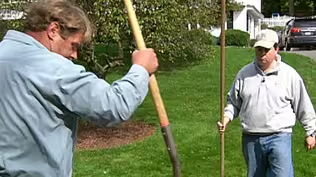
♪♪ [ Grunting ] ♪♪ Man: Ahh.
That's it.
♪♪ ♪♪ Kevin: Hey, there.
I'm Kevin O'Connor.
And welcome back to "This Old House" here in historic Ipswich, Massachusetts, where we are working on this gambrel Colonial.
Now, the front part of the house right here, that was built in 1720.
But then this ell off of the back, well, we think that it was built in stages over the course of the 18th, 19th, and 20th centuries.
Now, when we got here, the ell was two stories -- bedrooms up top, kitchen and living space down below.
But, originally, it was just one story, and that's what the homeowners want to go back to.
So that's gonna require some dismantling.
Arron: That's a beauty.
Kevin: And to preserve those original materials, we have called in an expert.
Arron Sturgis rebuilds timber-frame buildings in Maine.
He did some research with Tommy last week, and then he came back to tag each of the antique timbers.
Some were not good enough to keep, but the good ones were tagged with a brass plate.
They go back to Arron's shop for repairs.
The second story of the ell was removed, and now Arron is back to carefully dismantle the frame.
Cedric, how are ya?
Tommy.
Arron.
How you guys doing?
Arron: Good.
How are you?
Kevin: Boy, this is quite a bit of industry you got going on here.
I hope you know what you're doing.
Arron: Yeah.
Yeah.
I think we do.
So, the main house and the ell was done in an English tradition of joinery called the scribe rule, which means roughly that each element was scribed to its partner.
That's why you have marriage marks.
And only one piece goes in one place within the frame.
So it can't go anywhere else 'cause it was scribed together.
Kevin: Okay.
Arron: So when we take a timber frame apart that's scribed, we have to tag every element so that we know where it goes in the frame when we put it back together.
[ Hammer strikes nail ] So, right here we've exposed the connection of the first ell into the main house.
And there's a tenon there.
I'll show you.
Now, I've got to pull a wedge out from up above.
But you can see that I have movement there.
Kevin: Oh, yeah.
Arron: So, the reason I do is that I've loosened this wedge just the tiniest bit.
But that wedge used to hold this timber frame tight to this timber.
And the reason why that's flexible is there's no pin in this.
Kevin: Mm-hmm.
So, wedged mortise, meaning stick the mortise in the tenon.
It's got a little bit of slop, and then use the wedge to lock it in place?
Arron: That's exactly right.
And this comes out relatively easily because it's been here a long time and it's probably shrunk a little bit.
So, I've added a structural screw in the ingrain.
Then you have a lever.
Kevin: Yes.
Arron: And you can pull it out.
That's an original wedge.
And now I can lift this up.
I can't lift it yet 'cause the tie beams are still on.
Tom: Right.
Kevin: So everything by hand.
A lot of work with these mortise and tenons, although so is making nails, and I suspect they were expensive.
You make them one at a time.
Arron: The nails were the most expensive piece of the build.
Kevin: Yeah.
Arron: Because they were -- You know, they were expensive metal and they had to be hand-done.
Kevin: You've tagged everything, so we've got a layout.
Tommy, I know you've inspected some of these.
Sadly, not everything can be saved, right?
Some of these are sort of beyond that stage?
Tom: Arron and I went over a lot of stuff, and all of the outside beams like this we're gonna save.
These beams here.
But a lot of these joists are in really bad shape.
I mean, look at this one right here.
But we're not gonna throw them out.
The homeowner wants to save a lot of this stuff.
They're just not gonna be used structurally -- maybe decoratively somewhere.
-So maybe just apply to a ceiling or hanging out there.
But I guess the good news is, is that the big ones -- your beams, your posts -- most of them can be saved?
Tom: Yeah.
Absolutely.
Arron: Yeah.
Absolutely.
Kevin: Alright.
So we can get back to dismantling.
Arron: Sounds good.
Tom: Sounds like a plan.
♪♪ ♪♪ Arron: It should pop right out.
Kevin: Oh, yeah.
Arron: See how easy that is?
So that joist is out.
Kevin: I can do that.
Tom: Looks like it comes right up.
Arron: That's one of the bigger posts right there.
That is hardwood.
It's heavy.
♪♪ [ Indistinct conversations ] You got it.
You got it.
Nice.
Tom: Put these in the save pile.
Arron: Yep.
Tom: Nice.
Kevin: Look at that.
It's unbelievable.
Unbelievable.
Arron: Alright.
So we have the half dovetail joint here.
There's no pegs, no nails at all.
Come right out.
Kevin: Alright.
Ahh.
Look at that, huh?
Arron: There's the pocket.
The joint is still really, really good.
Ready?
One, two, three.
Kevin: So, where's all this going?
Arron: This will go up to my shop in New Hampshire.
Kevin: To be done with what?
Arron: And we're gonna do all the repairs that are necessary, and then we have to fabricate some post feet and stuff like that, 'cause we're gonna elevate the height.
Kevin: Very cool.
I'd love to see that.
Can we -- Arron: Come up anytime.
Kevin: Alright.
Well, you let us know when it's ready to go.
We'll be up there.
Arron: I will.
I'll give you a shout.
Kevin: You got a great crew.
Tom: Yeah, you got your work cut out just cleaning this stuff up, that's for sure.
♪♪ Kevin: It is a warm day to be talking about fireplaces, but we do have to get them figured out.
And when we got here, there was a wood-burning stove right there tucked into a chimney, but no signs that that was original because right here behind this staircase there are signs of a chimney, which would have been typical for a house of this era -- a big central chimney going through the ridge.
That is gone, and all we have left right now is the one in here.
Hey, Bill.
Hey, Mark.
Bill: Hey.
Mark: What's up, Kevin?
Kevin: Ahh.
Chimney day.
'Cause, you know, it's chilly outside.
Bill: Yeah, we will need a chimney today.
Kevin: What do you know, Bill?
What do you think?
You guys have had a couple fireplaces.
You had a couple of stoves.
Where are we?
Bill: Well, this is kind of our last resort.
You know, to be honest, we wish the original chimney was still there.
That would have been just so great.
Kevin: And is there something wrong with this?
What are your thoughts on this one?
Bill: Well, um, we actually think it's hideous.
[ Laughter ] Kevin: Alright.
Don't spare us.
It's your house.
Bill: To be completely honest, I mean, it's too big.
It overwhelms this space.
We really would prefer a much smaller fireplace that is more consistent with the size of this room.
Kevin: Well, I mean, Mark, you're the expert, but, I mean, to my eye, this is probably not original, right?
Mark: So, definitely not original.
I see a bunch of things that tell me that right off the bat.
You see that aggregate?
It's much larger in this mortar mix than you would find in the 1700s and 1800s.
Kevin: Okay.
Mark: Back in the day, the aggregate was much smaller, which allowed the brick to get closer.
Another indicator right off the bat.
This right here, this spot, I can tell this mortar is different.
This is a portland-based mortar.
Kevin: Right, and, so, portland came well after the 1700s.
Mark: About the 1900s.
Yep.
Kevin: Gotcha.
Okay.
So you have a date that you think that this was built?
Mark: If I had to guess, this ensemble right in front of us is probably from 1960, 1970.
Kevin: Oh.
Oh.
So just a little bit off 1720.
Mark: Just a little bit off.
Bill: Yeah.
The question is, can it be pushed back?
Because, again, this is jutting too far into the room.
Mark: Right.
So, that would be what we call a Rumford style fireplace.
Kevin: Hm.
Mark: A bunch of different characteristics than what we're looking at right now, which is a Ben Franklin-inspired fireplace... while a Rumford fire box is much shorter in depth, probably 12 to 14 inches.
These sidewalls, they splay a little bit more -- so 3 or 4 inches to your right, 3 or 4 inches to your left.
Bill: Okay.
Mark: But it's gonna be a bigger splay, and that's gonna give us the ability to take this whole thing and move it back.
So, again, giving you more room in this room.
The Rumford styled fireplace, what it does best is it separates the heat and the gas, so it pushes more heat out into the room.
And, again, that's all in the mechanics -- the smoke shelf, the smoke chamber, all the mechanics that we build.
And, again, the production of heat is something we have to worry about because this is a smaller room and we don't want to overheat it.
Kevin: And then in terms of the gas, that's got to go up the flue.
Do you have any idea if we've got a flue that we can use?
Mark: So, again, this is discovery day, so I'm gonna take my hammer, I'm gonna go right through this section of brick right here, and I'm gonna find out what's behind it.
Kevin: I love discovery day.
Mark: Yeah.
Kevin: Let's start whackin'.
Mark: Let's get at it.
Kevin: Oh!
Alright.
Mark: [ Grunts ] Kevin: Going that way.
Ah.
Bill: Oh, wow!
Look at that.
Mark: So, again... Bill: Look at that!
Mark: Another sign.
Kevin: What does that tell you?
Bill: Not very thick.
Mark: So, that's not good.
When we open it up a little more... Kevin: And so do you think that you can actually retrofit a clay liner into this?
Mark: I can.
It's gonna be super-tight because the inside dimensions of the clay flue liner are what are used to dictate code.
Mark: So 8x12" is gonna be a little bigger for the outside... Mark: That's right.
So, again, a little bigger.
We have -- It's 13 1/2".
So we can do it this way.
Bill: Oh, boy.
Mark: And then the 8" goes right across.
You can see that the inside of the brick, I have 10", 10 1/4".
Bill: This would solve a huge problem... Kevin: So does that mean that if you can fit it in, you can keep the chimney through the roof, rebuild this, and give us a Rumford that looks good and performs well?
Mark: There you go.
Yeah.
Bill: Hallelujah.
Kevin: Huh?
Mark: Right.
♪♪ Jenn: This is the Ipswich River.
It's about three miles upstream from the ocean.
And this is the project house.
And, unfortunately, I can't see the project house through these invasive weeds.
So if I can't see the house, the house can't see these beautiful views.
Rue Sherwood is our landscape designer for this project.
And hi, Rue.
Rue: Hi, Jenn.
Jenn: So, I understand there is a lot you had to consider, a lot of moving parts here.
You want -- Can I have a look at your design to see... Rue: Sure.
Jenn: ...what you're thinking?
Alright.
Let's talk about -- Where was the old driveway?
Rue: There was a driveway that was very small right about here... Jenn: Okay.
Rue: ...that drivers had to drive in, back out.
And this is a fairly busy road, even though it doesn't feel it right now.
And so the homeowners liked the idea of creating a semi-circular driveway that would let them go in easily and come out easily.
So we tried to go between the existing trees and not take down trees that didn't need to be taken down.
Jenn: Mm-hmm.
Rue: So, as you enter the driveway, the first thing that you're going to see is the new cottage that they're going to be building here, which will be much smaller than the existing barn that's there now.
And the existing barn that's there will be removed.
Jenn: So that entire barn is gone?
Rue: Yes.
Jenn: Okay.
I like it.
And I really like how you open up the views and you're gonna take advantage of the Ipswich River.
I mean, this is gonna be gorgeous.
Rue: Yeah, yeah.
It's a beautiful property.
So, Jenn, this is where there used to be a walkway to the front door.
Jenn: Okay.
Rue: And we're just going to rebuild this walkway.
It was a brick walkway.
There'll be two steps coming down like this to bring you to grade.
Here's some of the old bricks that were there before.
But there'll be nice, clean bricks put here.
And up to this nice, beautiful piece of granite which will be here.
Jenn: I love that you're leaving that.
Rue: Yeah.
So, this area here in the front of the house will be a very simple planting.
There'll be a couple of shrubs lining the doorway and then, not grass, but a simple groundcover planting, something like wild strawberry or something.
Maybe another shrub over there for some screening.
The most important part of this front yard really is this sugar maple tree here, which is quite a beautiful old tree.
And right next to it is a hedge maple, which is not a native plant.
And so we kept the hedge maple there during construction to protect the sugar maple.
But, in fact, when everything is said and done, we will remove the hedge maple and remove all the stones and steps around the tree, and the area around it will be leveled back off and re-vegetated.
Jenn: Excellent.
What's the plan out back?
Rue: I'll show you.
Jenn: Alright.
This place is definitely neglected and overgrown.
I'm seeing some natives, but predominantly invasives.
Rue: Yeah, this area right here where we're standing, a couple bad guys pop out at me.
One is this multiflora rose.
So, the problem with this and all invasive plants is that they outcompete the native plants which are so important for the local wildlife, which evolved together over millions of years.
And the other especially bad is this Japanese knotweed, one of my least favorite plants.
It grows incredibly fast, and it's really hard to get rid of.
Jenn: Okay, so, since we're within 200 feet from the waterfront, the Conservation Commission has a say.
Rue: They have a very big say over what you can and cannot do within their jurisdictional area of the 200 feet from the riverfront.
And so one of the things that we did to help get this project built was to propose removing the invasive plants that are in this area -- roots and all, roots and soil around those roots -- and replace with native wildflower and grasses.
Jenn: Right.
So that's a great trade-off.
I mean, why wouldn't you want to protect this beautiful area?
So, I mean, overall, your plan is amazing.
It's gonna integrate well into the site, and I can't wait to see it installed.
Rue: Thank you.
Kevin: Our house has got clapboards on it.
Now, these aren't original, but our architect figures that claps is what we had on the house back in 1720.
These are cedar, but he thinks that originally they were probably white pine.
So these are going to stay, but for all of the new space, he's convinced the homeowners to go back to white-pine clapboards.
And Charlie found me a place that should get us exactly what we need.
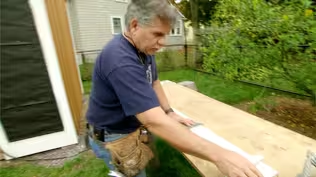
This is what we have come for.
A eastern white-pine clapboard.
Quarter-inch thick.
6 inches wide.
Primed on all six sides.
And we have come to the land of the pine, Maine, where the state tree is the eastern white pine, and to a farm that has been managed by the Robbins family for five generations.
Gentlemen, nice to see you.
Jim: Hey, Kevin, how are ya?
Kevin: Jim, pleasure.
Alden.
Good to see you.
Ethan.
So this is the place, huh?
Jim: Absolutely.
This is where we do white pine right here.
Kevin: This is where you do it.
And you've been doing it for a while, your family?
Jim: Yes, sir.
Kevin: How long?
Jim: Since 1881.
Yeah.
Kevin: Oh, my goodness.
Jim: Yeah, our family bought a mill here in Searsmont, Maine, 1881, and started buying up land and of the forest ever since.
Kevin: So I suspect a lot has changed over those five generations and what you're actually doing, although a lot has probably stayed the same, as well.
Jim: Yeah, that's for sure.
They didn't have power then.
We just had to run the mill on water power, and all the trees were cut by hand with axes and crosscut saws.
And today we have modern machinery doing all that, and we generate our own power burning biomass.
Kevin: How many woods are we talking about?
What's the size of your guys' property?
Alden: So we're talking about a total of 30,000 acres between local land and the township further north of here... Kevin: Yeah.
Alden: ...that we manage.
And we have two sawmills -- one in Searsmont, one at East Baldwin.
Kevin: Mm-hmm.
Alden: About 180 employees.
We have a coatings facility.
So, pretty vertically integrated all the way from stump to finished product.
Kevin: To the mill?
Alden: To the mill.
Kevin: Let's go.
Jim: Yep.
♪♪ Kevin: From the farm, the harvested lumber is trucked to the sawmill where it's staged and wetted down to soften up the bark.
♪♪ When ready, it's transported to the head of the sawmill to begin the milling process.
Alden: So, this is a ring debarker.
And what we're doing here is we have about five tool-tipped arms that are going around and held down by pressure, peeling the bark off the log.
Kevin: Spinning around its circumference there.
Alden: That's right.
So we're trying to get all the bark off, but not tear into that precious fiber, because that's where all the good wood is, on the outside of the logs.
Kevin: And the bark is dropping down below to a conveyor belt?
Alden: That's right.
That's a vibrating conveyor.
And that's gonna be out and get sold for landscaping.
Kevin: Oh, my bark mulch.
That's where it comes from.
Alden: That's right.
We use everything that comes out of this.
Kevin: Will you guys spread it for me, too?
Alden: We'll have to see about that.
This is the heart of the mill.
So.
we call this our primary breakdown.
And this is a carriage.
Alden: So we're actually rolling these logs onto a carriage.
The operator is peeling off boards off the outside, looking at the grade every time, turning that log, trying to get the maximum amount of clear wood like we saw here.
And then once they get out of that clear wood and more to where the limbs were, then they're gonna dump multiples to this system here, which is our secondary breakdown.
It processes it into boards faster.
And those boards will be used more for, like, your interior paneling, something where they don't mind the knots.
But for the clapboards, we like to have that clear wood, and that's coming out of the outside of the log here.
Kevin: So these big, long, thin pieces, that's where our claps are coming from.
Alden: That's correct.
Kevin: And what's going on here?
Alden: So, we have a bank of high-definition cameras taking a picture of one side of the board.
We're flipping that board over, and we're taking that same shot of the back side of the board.
That computer in this other room here is mating the images together, and then it's making all the trimming, sorting, and grading decisions all automatically at about 60 lugs a minute.
So, here we have 80 different sorting bins where we can sort all the lumber coming out of the saw mill by width and grade.
Kevin: Wow.
Alden: In fact, right here we have 6-inch select, which we can make your product out of into clapboards.
Kevin: So this is supposed to be the really clear stuff.
Alden: So, if you can look here.
Kevin: Oh, yeah.
Knot-free.
Alden: Free of defect.
Kevin: Although still soaking wet.
Alden: That's right, so we're gonna have to put it through the dry kiln.
So he's piling this up in the dry kiln, Kevin, and we're going to heat this building using the steam from our biomass boiler.
And there are heat coils upstairs, along with a big bank of fans.
So, we're gonna increase the air velocity, increase the temperature, and control the humidity in this building for seven days as we're drying this lumber from 50% down to that 11% number that we're shooting for.
Kevin: So steam is up top, but it's always separated from this box?
Alden: Until the very end, which we'll actually apply some live steam to condition the lumber, to ease the fibers, to give it a better finish when we're running it through our molders.
Kevin: And all that heat and all that steam is made from all your cut-offs, all your chips, all your sawdust?
Alden: All of our residuals and logging residuals.
So, now we're in the planning mill.
After we've surfaced the lumber and made it smooth through our molder, our graders give it the final grade inspection.
Kevin: So what was once rough and green is now...
I mean, look at that.
Beautifully clear.
No knots.
Square edges.
Smooth.
Alden: And dry.
Kevin: And dry.
Right.
Alden: So nice and light.
Kevin: And that's gonna be our clapboard.
Alden: Yeah, and, so, in order to make that beveled product, we're actually putting the board into this resaw here on an angle and sending it through a saw and cutting it into two pieces... Kevin: Oh, yeah.
Look at that.
Alden: ...to make two pieces of bevel.
And now you have a clean, rough-sawn surface to accept paint.
Kevin: Rough on one.
Smooth on the other.
Alden: That's correct.
Kevin: And is this ready to go to our job site?
Alden: First we'd like to take it over to the coatings plant and put a coat of primer on all six sides first.
So, I wanted to show you, Kevin, how we prime our products here in the coatings facility.
So, for example, we have our 8-inch tongue-and-groove nickel-gap select grade pine with two coats of primer on it right here in the factory.
Kevin: So same process for our claps, in terms of coating, is going through here with the nickel gap?
Alden: Correct.
Kevin: And then that select wood, with your coating, that's a nice durable finish and product for the side of our house?
Alden: Exactly.
Kevin: Awesome.
Alden: It'll last a long time.
Kevin: Well, we look forward to seeing it on the job site, but thanks to you and your dad for the tour.
Thanks for the great product.
Alden: Thanks for coming out.
Kevin: Yeah, absolutely.
Alden: Good luck with your project.
Kevin: Thank you.
♪♪ Everybody in town knows our house, and a lot of them know it as "the red house," although, Helen, maybe that might be changing.
Looks like you're thinking about a new paint color?
Helen: We are.
Kevin: So, you put up a couple samples -- or Mauro did.
Helen: And we've got a historic color here.
Kevin: Green field pumpkin.
Helen: Yeah.
Really like that color.
So we're thinking about that one seriously.
This one, probably not.
Kevin: Not so much this.
I mean, it's not quite a pumpkin, but it's in the same sort of family.
What don't you like about that?
Helen: Too pale, I think.
Kevin: I get that a lot.
[ Laughs ] So not enough sort of depth to it right there?
Just sort of fades away?
Helen: Yeah.
Not enough depth.
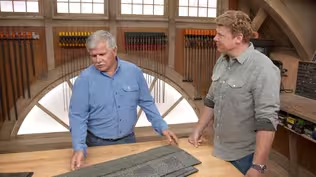
Kevin: Okay, and I suspect it makes a difference, too, with what you do with the roof.
The roof is getting changed out.
Hey, Charlie.
And here's the man who's gonna change it who was kind enough to put some samples up for us.
What'd you put up there, Charlie?
Charlie: The very end here, we have a pewter-gray architectural shingle.
There's a charcoal architectural next to it.
Charcoal in the center, which is a three-tab shingle.
And at the very end, we have a Slateline, and that's in English gray.
Kevin: So different colors, different looks.
What about performance, Charlie?
Charlie: They all have the highest-rated fire protection.
All have algae protection.
All have a very high wind protection, about 130 miles an hour.
But the three-tab is down to about 60 miles per hour.
Kevin: So everything's 130, but this is 60.
Charlie: Right.
Kevin: So we'll handle the performance.
We'll make sure that that happens the way it should.
You need to decide on look.
What are you thinking?
I mean, as you look up here, are you getting thoughts?
Helen: Well, I think with the red, this one just went up today.
Charlie: Yes.
Helen: But I think that looks nice with the red.
The slight gray.
It's not too gray, you know?
And then if we do end up going with this pumpkin "whatever we want to call it" color, I think maybe the charcoal would go better with that.
Kevin: Sounds like architectural is the style, and then the color is probably gonna come down to what you end up with on a side wall.
Helen: I think that's how it's gonna go.
Kevin: Good.
That's actually narrowed it down.
Charlie: It really does, and that's a big help to know which direction to go into.
Kevin: Hey, and listen.
You know, you got to check the neighbors 'cause they're gonna have an opinion.
And your husband might, too.
You got a little bit of time.
Charlie: That's right.
Kevin: Alright.
Thanks, Helen.
Kevin: Next time on "This Old House"... Charlie: We want to demo this fireplace, but first we have to hold up this 2,000-pound chimney.
Tom: We need a big steel beam to carry the roof in the family room, but it still needs a lot of wood.
♪♪ Kevin: And these 300-year-old posts and beams have come to the timber-frame doctor.
Arron: This has quite a bit of rot, and I've chosen to do a different repair here.


- Home and How To

Hit the road in a classic car for a tour through Great Britain with two antiques experts.


Support for PBS provided by:
Funding for THIS OLD HOUSE is provided by The Home Depot and Renewal By Andersen.