E18 | Shade Sod, Rocky Canyon Rustic | Ask This Old House
Season 22 Episode 18 | 23m 42sVideo has Closed Captions
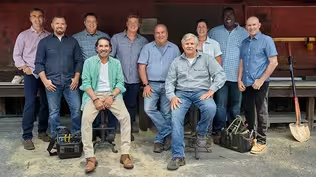
Lee installs shade-tolerant sod; Ross discusses heat pumps; Kevin builds a side table.
Lee Gilliam helps a homeowner figure out why grass doesn't grow in his backyard before installing a shade-tolerant species of sod; Ross Trethewey talks through converting houses' heating and cooling systems to heat pumps; Kevin O'Connor meets maker Sarah Nadarajah, the creator of Rocky Canyon Rustic, to learn about her content before building a replica high-end side table.
Problems playing video? | Closed Captioning Feedback
Problems playing video? | Closed Captioning Feedback
Funding for Ask This Old House is provided by The Home Depot, Renewal By Andersen, and ChipDrop.
Support provided by:


E18 | Shade Sod, Rocky Canyon Rustic | Ask This Old House
Season 22 Episode 18 | 23m 42sVideo has Closed Captions
Lee Gilliam helps a homeowner figure out why grass doesn't grow in his backyard before installing a shade-tolerant species of sod; Ross Trethewey talks through converting houses' heating and cooling systems to heat pumps; Kevin O'Connor meets maker Sarah Nadarajah, the creator of Rocky Canyon Rustic, to learn about her content before building a replica high-end side table.
Problems playing video? | Closed Captioning Feedback
How to Watch Ask This Old House
Ask This Old House is available to stream on pbs.org and the free PBS App, available on iPhone, Apple TV, Android TV, Android smartphones, Amazon Fire TV, Amazon Fire Tablet, Roku, Samsung Smart TV, and Vizio.
Keep Exploring

This Old House Insider Newsletter
Get This Old House exclusive stories, tips, and behind-the-scenes information delivered right to your inbox every month.Providing Support for PBS.org
Learn Moreabout PBS online sponsorship♪♪ Kevin: On "Ask This Old House," our experts travel across the country to answer questions about your house.
♪♪ Today on "Ask This Old House," this homeowner can't get his grass to grow, but Lee has a solution.
Then, Ross walks us through the considerations you need to make before switching to heat pumps, And I team up with maker Sarah Nadarajah of Rocky Canyon Rustic to build a replica high-end side table.
All that on "Ask This Old House."
♪♪ Sam: Thanks so much for coming, Lee.
Really appreciate it.
Lee: Thanks for having me.
Sam: So, we're really pleased with our front garden.
Lee: Sure.
Okay.
Sam: Our side garden is decent.
The problem has always been this backyard.
Lee: Okay.
Sam: And as you can see it's kind of a dirt patch.
There's a lot of moss.
Lee: Sure.
Sam: We do have four sprinkler heads.
And I've tried seed.
I've tried sod.
Lee: Okay.
Sam: Everything's failed.
So we're trying to find a good solution so my kids can play back here, and we don't know what to do.
Lee: So, what I see back here -- not enough sunlight.
Grass needs sunlight and watering.
Conditions are real shady here.
Sam: Right.
Lee: And I think the combination of the watering and the shade -- So, you know, the sunlight needs to come in and burn off the water.
I don't think we had that.
So that's why we have a huge moss issue right now.
So I think what we need to do is see what we can use for a grass type material.
Alright?
What do you think?
Sam: It sounds great.
We're happy to try anything.
Lee: Alright.
We'll try it.
Alright.
Good.
Let's go.
Sam: Let's do it.
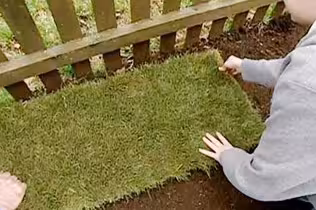
Lee: I want to use this.
Okay?
This is called micro clover sod.
Durable, shade-tolerant.
It's not so fussy where it needs a lot of watering.
Sam: It looks great.
Will it be more resilient than what I did years ago?
Lee: Years ago, you probably put a bluegrass in here, which requires a lot of sun and watering.
And it's more fussy.
This is not as fussy, But also I want to start off with some compost.
Okay?
I love compost.
I want to mix this in the soil.
And this will help our product out, the sod, okay?
Alright?
And then I want to put some some leaf mulch in.
I'm gonna try to talk you into putting some beds around the side.
And this is some leaf mulch here.
This is really good stuff.
That will finish it off.
Sam: So, I think the aesthetics will look much better with these beds.
Do you think there'll still be enough space for the kids to run around?
Lee: Yes, I think so.
Also, the sod won't do well close to the fence, but also I want to keep the theme of your property going with some flowers and plants back here.
Sam: Alright.
Sounds good.
Lee: And then I think, to top it off -- I think we need to do some pruning on some of the trees.
Alright?
Just to give me a little bit more daylight back here.
It will help out a lot.
Sam: That sounds good.
Lee: Alright.
Let's get to work.
What do you think?
Sam: Let's do it.
Lee: Okay.
Sam: So how do we know exactly where to cut without hurting the tree?
Lee: Okay.
What I like to do is wherever the sun's shining on.
So, what I want to do...
I'm gonna cut it back here.
And this is gonna open it up a little bit.
Sam: Okay.
Lee: Okay.
And you just go slow back a little bit.
I'll try this one out here.
See.
See all the light coming in?
Much better.
Gonna cut this back here.
I'm gonna give you this.
Sam: What's the difference between these two tools?
Lee: They're pretty much a little bit, uh, the same.
This is, like, a hand pruner.
Sam: Okay.
Lee: With an extension on it, which works really well.
And this is a pole cutter, where you pull this back on the rope.
Sam: We're putting it up here?
Lee: Yep.
Perfect.
And feel it and then pull it right back.
Let's do one right here.
One more.
Feel it.
Nice.
Nice job, Sam.
Sam: Good?
Lee: Nice job.
Real good.
Okay.
So, what I want to do is just dump a little pile.
Give me a pile right over here.
Just half the wheelbarrow.
Okay?
And we're going to spread this out.
All's we want to do is just lightly move the material like that.
That's all I want to do.
So, what do we got?
A school behind us over here?
Kids on recess?
Sam: We do K through 8.
Lee: Nice.
Well, keep them off my grass.
That's all I care about.
[ Sam chuckles ] Lee: Black gold.
This is nice stuff.
Watch me for a second.
Sam: Yeah.
Mix it up.
[ Whirring ] Keep it moving.
Sam: That's all we're doing?
Lee: That's all you're doing.
♪♪ ♪♪ Lee: Nice.
So, what I want to do now, here, Sam, is drop this down, okay?
Because it's too high around the tree.
Alright?
So let's loosen it up a little bit as best we can with these, and we'll probably come in after and do it by hand, okay?
♪♪ ♪♪ So, Sam, we're all done tilling it all in.
We got the compost in there looking good.
So, let's do some beds.
Let's draw the beds out.
I like to use a spray can.
So, what I want to do is start over here off the fence.
Come about 30 inches out.
So that's our bed right there.
That's where the plant material is gonna go in there.
Sam: Looks good.
Lee: I have, uh, some shade-tolerant plants.
This here is an Annabelle hydrangea.
Sam: Okay.
Lee: Really nice flower on this.
Blooms most of summer.
You'll be really happy with this.
So let's put this one... Let's just try putting this one here up against the fence.
That'll look nice.
And then I have some PJM hydrangeas.
Early spring flower.
Really nice.
And these here are called limelights.
Nice one for shade.
And these will get good size.
Let's add this Annabelle.
Thank you.
Sam: Right between?
Lee: Yes.
Right there.
Yep.
Right -- Deadhead.
That's nice.
Sam: It looks like a nice variety of colors, too, when they bloom.
Lee: Yes.
Variety of colors and textures.
What do you think?
Sam: I think it's good.
Lee: So, I like to dig the hole twice the size of the root ball going in.
Put that in for me.
♪♪ Nice job.
Real nice.
That's pretty good.
♪♪ Sam, what I want to do is dump some piles of sod.
♪♪ What I want to do is now we're gonna put the sod out.
We're gonna run a nice straight line in front of the shrubs that we put in.
Sam: So, how long does it take to start to stick together?
Lee: Probably takes about 10 days.
Sam: Okay.
Lee: You know?
A good two weeks.
The trick is, once you see the seams disappearing, it's rooted in.
♪♪ ♪♪ So, Sam, what I want to do now is, we have little strips on the edge.
So what I want to do is cut back into the lawn so there's no small strips close to the edge.
You know?
It just looks good, too.
There you go.
Take that out.
Throw it off to the side.
And guess what.
Now we're all set.
Put this right back.
Sam: That's a great trick.
Lee: You like that one?
So we're gonna cut it along the cobblestone now, okay?
Throw that out of the way for me.
Perfect.
So, we found the, um, irrigation systems, the heads.
So I'm going to cut this out.
♪♪ So now irrigation goes on, be able to pop up freely.
Sam: Perfect.
Lee: So, Sam, we got some good leaf mulch.
So we're going to put this down all around the plants.
Toss it down.
Sam: Lee, it sounds like the kids are getting out of school, so my kids will be home shortly.
Lee: Perfect.
What do you think?
Sam: I love it.
Thank you so much.
This is a total game-changer.
Lee: Came out pretty good.
Sam: It's amazing.
Lee: You're the best.
Good job.
You did a good job.
Max: Hey, Dad.
Lee: Who's this?
Sam: Oh.
Hey, buddy.
This is Max.
This is my youngest son.
Lee: Hi, Max.
I'm Lee.
Nice to meet you.
Nice to meet you.
Sam: What do you think?
Max: This is insane!
Sam: I know.
It's amazing.
It's going to be such an improvement.
Lee: So, what I need you guys to do -- Max, help me out on this one, alright?
I need you to water the plants every day for me for about 10 days, okay?
And then we're going to do the grass probably, like, once, twice a week.
That's it.
Just enjoy it.
Sam: Incredible.
Thank you so much.
Really, really appreciate it.
Lee: Max, I'll see you soon.
Okay?
Take care.
Bye, guys.
Sam: Should we test it out?
Max: Yeah.
Sam: Okay.
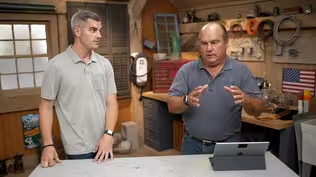
♪♪ ♪♪ ♪♪ Kevin: Hey, Ross.
Ross: Hey, Kev.
Kevin: Going through the mailbag?
Ross: I'm answering Caroline's question.
She's in Arlington, Mass., and she asked about -- She's got an existing gas furnace and she wants to upgrade to heat pumps.
Kevin: Oh, my gosh.
Her and everybody else.
What's going on?
Everyone wants a heat pump now.
Ross: I know.
A lot of questions.
A lot of rebates.
A lot of tax credits.
A lot of people.
It's the craze right now.
Kevin: Okay.
So what are you thinking about when it comes to heat pumps?
Ross: So, the first thing is how a heat pump works, right?
They are super-efficient, and they generate heat, but it's low-temperature heat, meaning that if I'm sending hot air through this with a heat pump, it might be 100 degrees supply air leaving the heat pump.
Kevin: And how does that compare to, say, a furnace or a boiler when there's a big flame in that machine?
Ross: Yeah, we might have 140-, 160-degree air coming off an oil or gas furnace, right?
So, with a heat pump, we have to make sure we do our homework, right, to make sure that this system and all of those that apply to it are sized correctly, right?
Kevin: Okay.
So, how do we go through that process?
Ross: Yeah.
So I'm working on a flow chart that really starts to understand what, you know -- the questions to ask and how to map through it.
Kevin: Of course, you are.
A flow chart.
Ross: The first thing is climate zone, right?
So, if I'm in the southern part of the climate, you know, this is, you know, climate zones 1 through 4, those are warmer climates.
Those are cooling-dominant.
So heating's really not as much of a need.
And then for the colder climates like 5 through 8, like where Caroline is, in 5a, that area, we're doing a little bit more homework to make sure that it's going to work right.
Kevin: So, when you say climate zones, you're referring to...?
Ross: I'm talking about the Energy Conservation Code.
There's a map of all the climate zones across the United States.
Kevin: So what's next on your list?
Ross: Next up is fuel source.
So, if you look at, you know, historically, electric baseboard has been the most expensive system to heat a building and followed up by your propane and oil furnaces would be your next.
And then gas and heat pumps are kind of there in kind of the next category.
Kevin: And even if those prices have moved around, has that order ranking stayed the same over the years?
Ross: Just about, yeah, and so it's always very important to make sure that we are installing these heat pumps to lower the operating cost of that building.
Kevin: So the more expensive, like resistant electric, the easier it is to knock them off and say, "Yes, this is a good idea."
Ross: That's right.
Kevin: Down at nat gas, where it may be cheaper, maybe not so much.
Ross: Maybe not.
That's right.
So it begs the question to go to the next one, which is system type, right?
So, if I'm a forced hot-water system or if I'm a ducted system, two different opportunities there, right?
Kevin: Forced hot water is baseboards or radiators.
Ross: Yep.
Most of those houses are going with mini splits, like your ductless, you know, or ceiling cassette units because there is no ductwork.
Kevin: In that situation, you haven't really replaced the baseboard.
You sort of supplement it.
Ross: That's right.
We call those dual fuel hybrid systems.
So they still have the ability to heat and cool through the heat pump, but they have the ability to use the old existing heating system if they need to when it gets really cold out.
Kevin: So, let's talk about ducted systems like Caroline has.
How do we know if it makes sense to replace a heat pump in a ducted setup?
Ross: The first thing I'd look at would be duct size, meaning, can the heat pump move the right amount of CFM, the right amount of energy, through the existing ductwork?
Kevin: But generally you'd want bigger, if I understand this correctly, because that's a lower-temperature air.
You probably have to deliver more of that air than if it was a 165-degree air or 140-degree air.
Ross: That's right.
We can use tools like this to measure.
Right?
So we can actually measure the static pressure that's in the duct system -- kind of analogous to, like, blood pressure, but for ductwork -- to make sure that, hey, if my fan has to work really hard to move the delivered CFM, the cubic feet per minute, through that duct system, they have to work really hard.
The heat pump might not be able to work to be able to deliver the right amount of energy to that far bedroom at the end of the wing.
Kevin: So size is important, and you can measure for that.
Ross: That's right.
The next one is leakage and making sure that it's insulated, especially if this is running in an unconditioned attic.
Kevin: So if it's big, that's okay.
But if it's leaking air everywhere, not so good.
Ross: That's right.
Kevin: Or if it's a million degrees or zero degrees in the attic and not insulated, it works that much harder.
Ross: Think about all that 100-degree heat that the heat pump efficiently generated, and now it's leaking it to the attic, and nobody wants to go in the attic.
Kevin: Never gets to the room.
Ross: Never gets to the room.
Kevin: Alright.
So you go through all those decision points, you make a recommendation to the homeowner.
Ross: That's right.
Kevin: Is the homeowner ever in a position to do this on their own or just call up who's ever offered the incentives?
Or should they really always be getting somebody to help them with the calculation?
Ross: They really should be leaning on someone that does this every single day, somebody that knows what they're doing, that can do the testing to make sure that these heat pumps are designed and installed appropriately.
Kevin: Alright.
Well, listen, it's a flow chart, so it's a little dorky, but I know it's going to help Caroline and a lot of other people, too, so thank you.
Ross: Cool.
♪♪ Kevin: Today we are doing a guest "Build It."
We're going to be working with a woman who we came across on social media, and some of her projects piqued our interest.
So we have come to her house, where she gets her inspiration and does her work.
Sarah, nice to meet you.
Sarah: Nice to meet you, Kevin.
Thanks for coming.
Kevin: Yeah, thanks for having us.
So this is home, right?
Sarah: This is home.
Yeah.
Kevin: And what inspired you?
Why get into this?
Sarah: Um, so, I honestly got into this when we bought this house about eight, nine years ago because it was in a great location but really just needed a lot of work.
And so I started doing some projects just to get things moving.
And the more I did, the more I wanted to do because I really enjoyed it.
Kevin: Necessity is the mother of invention, right?
Happens a lot with new homeowners.
Sarah: Yeah, yeah, yeah, Kevin: But you enjoy it.
Sarah: I love it.
It's my creative outlet at this point.
Kevin: Right.
Sarah: I really enjoy just watching the projects come to life and being able to make my space exactly how I want it.
So it's great.
Kevin: And you post a lot to social.
And you enjoy that, too?
Sarah: I do post it on social media.
I have a couple of different online channels -- @RockyCanyonRustic -- and there's where I share how I do my projects and how I plan my projects and just trying to teach other women that they can do it, too.
So it's really fun.
Kevin: Cool.
Well, why don't you show us some of the projects you made?
Sarah: Yeah.
Let's go.
Alright.
So, this piece actually was a thrifted find, and I just updated it to make it something more functional.
And it's kind of hiding a little secret here because it is actually a dog feeder station.
Kevin: Oh!
Yeah.
Sarah: Right in here, it holds my dog's food.
And then down here, this drawer stays open, and it's got the water and the food bowl and all that fun stuff, so... Kevin: Super clever.
Sarah: Yeah.
Makes it look pretty.
Kevin: Very popular?
How'd this one go over when you posted it?
Sarah: Really well, actually.
People like this a lot because people like seeing something that you can take, like, one piece and just turn it into something else, which is really cool.
Kevin: So you took something existing and you converted it, but you do build stuff from scratch, as well.
Sarah: I do.
Sometimes I'll build things from scratch just so that I can find something custom for my space.
So I'll typically find something, a piece of inspiration online, and then I'll take that and customize it to my space so that the dimensions are good and it fits exactly what I'm looking for.
Kevin: So give me an example of what you did in that situation.
Sarah: So, I recently redid a bathroom, and it's a relatively small bathroom.
And I just wanted a really cool style vanity, but I could not find anything to fit that space perfectly.
And I found a really cool online inspiration piece, and then I was able to make it myself and do a really good dupe, and it looks very similar, but now it actually fits the space really well.
It was really nice to be able to see the piece that I wanted and be able to duplicate it myself for way less money.
Kevin: Right.
Cool.
Alright.
Good.
Well, I know you want to make something for us today, which is terrific.
And I know you've got a garage workshop, which I saw.
So what do you say we get to it?
Sarah: I do.
Let's go.
Kevin: Alright.
Sarah: Alright.
Welcome to my workshop.
Kevin: It's nice to have a garage that you can turn into one.
Sarah: Absolutely.
Kevin: Alright.
So what are we working on?
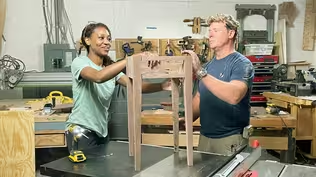
Sarah: So, today we're going to build a modern side table.
And I'm just going to show you the inspiration here.
I'm using 3/4-inch maple plywood.
Kevin: Yeah.
Sarah: And essentially it is a back, a vertical middle, and a curved top and some shelves.
Kevin: Right.
And, so, the top shelf here looks like it's stone.
Sarah: Yeah.
So, in this particular inspiration, it's a marble top, but the beauty of doing it yourself is that you can actually make it whatever you want.
So you can do a faux marble or stain it to match your sides, whatever you really want to do.
Kevin: Okay.
And you said 3/4" ply.
Sarah: 3/4-inch plywood.
And I like to use the 2x4 project panels because they're easier to transport to your home.
Kevin: You don't need a pick-up to get those home.
Sarah: Yep, and, so, I use a cut-list optimizer that I find online that just helps me minimize waste and know exactly how I'm gonna make my cuts.
So I've got it all planned right here.
And we've got four separate pieces -- three from one sheet and one from the second sheet.
Kevin: Alright.
Let's start cutting.
Sarah: Alright.
Great.
[ Buzzing ] So, again, using that cut-list optimizer, I know exactly where I want my cuts to be.
Alright.
So, if you remember, the top and the middle shelves actually have a little arch to them, so now we're going to add that to this top piece here.
And how I'm going to do this because it's a rectangle and not a square is we're going to get the center point of this longest, which is 9".
And I'm actually going to use this as 9", as well, so that if it were a square, we'd be making a circle.
But we really just want an arch.
Kevin: Okay.
Sarah: So now I'm going to pop a nail right here in that point.
And then... Kevin: Oh, yes.
Sarah: It's a cool little trick that you can actually just use your measuring tape instead of a string.
The measuring tape around.
Kevin: Hits the edge right there.
Sarah: Yeah.
Now I'm going to flip it to do the other side.
Kevin: Very cool.
I'm going to cut that out, and then once we have this shape, then I'm just going to trace that onto the shelf so that it matches perfectly.
And then just using this as my template.
Alright.
Then we'll cut that out, too.
Since this is the middle shelf, we actually need to cut a 3/4-inch piece out of the middle so that it can attach to that vertical piece that goes through the middle.
Alright.
All our pieces are cut.
So it's time for assembly.
And I'm going to use pocket holes for this piece.
Kevin: Okay.
Sarah: What I like to do is just mark along the side that I'm going to be doing pocket holes first, just to make sure I don't mess it up along the way.
And then I'm kind of dry-fitting as I go, as well.
So, with these shelves, you can find a good way to make sure that they're going the direction that you want.
And, again, just marking about where I want those pocket holes to go.
♪♪ Kevin: So, tell me about the followers on your social feed.
Do you have any sense as to who they are generally?
Sarah: Um, I would say mostly women.
Kevin: Mostly women.
Sarah: Mostly women.
Most of the women tell me that they think that they can't do it themselves, and so my goal is just to show them that it's really not so hard.
Kevin: There are a lot of people who are already working in the trade that are going to look at this and are going to say, "Oh, I would have done it a different way."
Sarah: There's a lot of different ways to do it, and there's a lot of ways that are more beginner-friendly, which are really nice.
It's a way for people to start in woodworking or home renovation without having all of the tools and all of the skills.
Pocket holes are just one way to do joinery.
Using a circular saw is just one way to rip down wood, but it's a little less intimidating than using some of those bigger power tools.
I'm going to add a little bit of glue into this hole right here.
♪♪ And then you just push it in.
It's going to dry.
And then you trim off the excess.
So, they are made to have a little bit of excess in there so that it covers the hole completely.
♪♪ ♪♪ Now I'm going to use a little bit of this edge banding, which you can get in any species of wood that you're working with, and it just allows you to get a nice finished look for plywood.
It actually has an adhesive bound to the back of it, and you apply it with heat.
So, I'm using a water-based stain and just brushing it on.
And then I'm gonna wipe off any excess so we get a nice, smooth finish.
♪♪ ♪♪ In order to give it the faux marble top, I'm going to use a little faux marble contact paper.
Kevin: Well... Sarah: Need longer arms.
Kevin: It doesn't get any easier than that.
Sarah: I know.
It sure doesn't.
And if you have a little bit of a bubble or something, you can just take a flat tool.
Just work those right out.
Kevin: Did you ever think two years ago you'd be building your own furniture for your living room?
Sarah: Yeah.
[ Chuckles ] I really didn't.
And, um, now I'm just, you know -- I'm excited to keep building and learning new skills and upping my game.
Kevin: Learning and inspiring others to get out there and to give it a try.
Sarah: Yeah.
Kevin: Very nice.
A real pleasure working with you, Sarah.
Thank you.
Sarah: Thank you so much.
♪♪ Kevin: Next time on "Ask This Old House," Richard shares the marvel that is modern plumbing.
Then he helps a homeowner retrofit radiant floor heating underneath his existing bathroom floor.
Plus, Nathan tells us everything we need to know about maintaining and updating cable railing systems.
And Jenn walks us through the next changes to the USDA Hardiness Zone Map.
All that on "Ask This Old House."


- Home and How To

Hit the road in a classic car for a tour through Great Britain with two antiques experts.


Support for PBS provided by:
Funding for Ask This Old House is provided by The Home Depot, Renewal By Andersen, and ChipDrop.