E19 | Attic Insulation, Parking Spot | Ask This Old House
Season 21 Episode 19 | 23m 42sVideo has Closed Captions
Ross insulates an attic; Richard talks irrigation repairs; Mark paves a parking spot.
Ross Trethewey helps a homeowner dealing with ice dams decide whether to insulate from his attic roof rafters or the attic floor. Richard Trethewey shares tips on irrigation repairs and how to choose right parts and tools. Mark McCullough works with an asphalt paver to expand a driveway.
Problems playing video? | Closed Captioning Feedback
Problems playing video? | Closed Captioning Feedback
Funding for Ask This Old House is provided by The Home Depot, Renewal By Andersen, and ChipDrop.
Support provided by:


E19 | Attic Insulation, Parking Spot | Ask This Old House
Season 21 Episode 19 | 23m 42sVideo has Closed Captions
Ross Trethewey helps a homeowner dealing with ice dams decide whether to insulate from his attic roof rafters or the attic floor. Richard Trethewey shares tips on irrigation repairs and how to choose right parts and tools. Mark McCullough works with an asphalt paver to expand a driveway.
Problems playing video? | Closed Captioning Feedback
How to Watch Ask This Old House
Ask This Old House is available to stream on pbs.org and the free PBS App, available on iPhone, Apple TV, Android TV, Android smartphones, Amazon Fire TV, Amazon Fire Tablet, Roku, Samsung Smart TV, and Vizio.
Keep Exploring

This Old House Insider Newsletter
Get This Old House exclusive stories, tips, and behind-the-scenes information delivered right to your inbox every month.Providing Support for PBS.org
Learn Moreabout PBS online sponsorship♪♪ Kevin: On "Ask This Old House," our experts travel across the country to answer questions about your house.
♪♪ Today... Ross: You wrote to us about ice dams.
Dick: If you look up, you'll see the symptom.
Ross: Oh, yeah.
Kevin: Ross suits up to help a homeowner properly insulate his attic.
Then Richard shows how to repair damage to your irrigation system.
And Mark paves the way for a new asphalt parking spot.
That's all coming up next on "Ask This Old House."
♪♪ ♪♪ Ross: Hi, I'm Ross Trethewey, and welcome back to a new episode of "Ask This Old House."
Today I'm headed to a homeowner's house who wrote in about preventing ice dams.
Now, ice dams happen in a lot of cold climates where warm air is making its way through the attic floor and it's getting to the underside of the roof.
And when that roof sheathing gets warm, it's actually going to melt the snow that's on top of that roof surface.
And that meltwater runs right down to the overhang, where it refreezes.
And as that process repeats, eventually the water has nowhere else to go but to back up and go up underneath the shingles.
And that's where the water enters the building.
And that's where you got not only nuisance, but you can have some catastrophic water damage.
So hopefully I'm going to get to this homeowner's house and help him out.
♪♪ Dick: Hi, Ross.
How you doing?
Ross: Dick, nice to meet you.
Dick: Thank you for coming out.
Ross: You wrote to us about ice dams.
Dick: If you look up, you'll see the symptom.
Ross: Oh, yeah.
There it is.
Okay.
Dick: It will not fall on your head.
[ Both laugh ] Ross: Okay.
Dick: But we understand that to fix this, we have to solve the cause.
Ross: That's right.
Dick: And we've been advised that we really should be looking a little higher, at the insulation that's overhead.
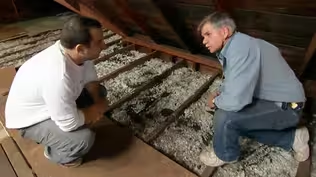
Ross: Usually starts in the attic.
Dick: Let's go take a look.
Ross: Alright.
Sounds good.
Dick: So, the attic is over this way.
And fortunately, you don't have to crawl through a closet, so... Ross: Alright.
Well, that makes it easy.
Got a light right there.
Okay.
Alright.
Yeah.
I can see the gable vent, the ridge vent.
I can see the fiberglass insulation in the attic floor.
And I can see you have an HVAC unit up here as well.
Alrighty.
Dick: So, this all got started because we brought in two independent insulation contractors to give us an opinion of which way -- of which way to do it.
Ross: Sure.
Dick: And one said to do the floor, and the other said to do the underside of the roof deck.
And they both said, don't do the other way.
Ross: That is a common, you know, complaint that we get -- you know, conflicting information.
And they're both partially right, 'cause you can do what's called a vented attic or an unvented attic.
Dick: Mm-hmm.
Ross: So, what you have here is a vented attic.
Dick: Okay.
Ross: Most older houses in this area have insulation and air sealing at the attic floor.
The idea is to keep the heat in the building and then let the attic breathe or vent to the exterior.
There's a bunch of different ways to vent, including soffit vents, ridge vents, and gable vents.
The advantage is that there's less volume of the home that needs to be heated and cooled because the conditioned envelope is from the ceiling down.
But one of the challenges, of course, with that type of system is that we have punched holes in our ceiling plane.
So the HVAC registers, recessed lights, plumbing vents -- they all penetrate through, so there's a lot of places where air can leak from the conditioned space here on the main floor up into the attic space.
Also, vented systems don't work great in cathedral ceilings, when you don't have the actual attic space to work for you for venting.
And it's not great when you have an HVAC unit or when you have storage in those spaces, because you don't -- you know, because they get really, really hot or really, really cold up there depending on the season.
It's actually the worst place for the HVAC unit to be.
The other way to do it is with a unvented roof system, closing off all the vents and applying spray foam insulation to the rafters on either side of the roofline and gable walls.
This puts a hat on the building, therefore putting the triangular attic space inside the conditioned envelope.
So, there are pros and cons to both roof systems.
In your case, you have a vented attic, but because you have ice dams, it's clearly not working properly.
Dick: Okay.
Ross: So, next, we're going to need to run some tests to see what the right system is for your house.
Dick: Sounds like a great idea.
Ross: Alright.
To check the home's air leakage, I'll start with the blower door test.
The blower door test works by depressurizing the home, by putting the house under a negative pressure and sending the interior air outside.
Alright.
Good.
Okay.
While the blower door test is running, I'll do some zonal pressure diagnostics with a manometer.
The manometer will measure the pressure difference in between the attic space and the main floor.
I'll also use a thermal imaging camera to visualize how much air is leaking through ceiling vents and light fixtures.
Finally, I'll perform a smoke test.
The idea is if the attic floor is well air-sealed, smoke shouldn't be able to leak into the attic.
♪♪ Alright, Dick, we finished our testing and we confirmed what we expected, which is that there's a lot of air leakage happening between your main living space and your attic space.
Right?
So air is making its way through registers and around lights and getting up there.
Dick: Alright.
Ross: And you don't have soffit vents, where soffit vents are those -- those vents that are typically in the eave that allow the air to flow up to the ridge vent along the roofline.
Dick: Sure.
Ross: The other thing I notice about your house is that you have gable vents on either end, and those gable events are larger than what I would typically see in a house of this vintage.
Dick: Okay.
Ross: My assumption is that a previous contractor enlarged the gable vents on either end to try to promote better ventilation of the attic space because you don't have soffit vents that lead to the ridge vents.
Dick: Right.
Okay.
Ross: As you know, there's an HVAC unit up there that's in the attic space, which is probably the worst place to have it in a vented attic approach.
With all that being said, my recommendation would be to go with an unvented attic, meaning that we would spray-foam, and encapsulate the entire attic space.
We get multiple benefits from that.
One would be that we put the HVAC unit within the conditioned envelope.
Another benefit is that we have a space for storage that would be somewhat climate controlled.
Another advantage would be that we don't have to add soffit vents and we can seal up those gable vents.
Dick: Okay.
Okay.
Ross: What do you think?
Dick: I think that's the right choice.
I've had a feeling that that air handler ought to be inside of the house envelope for efficiency because of temperature change and all that.
So I agree with you.
Ross: Okay.
Dick: How do we get started?
Ross: Alright.
So, I have an insulating contractor that I can call and see how fast they can get out here.
Alright?
Dick: That's great.
Ross: Alright.
Awesome.
Dick: Thank you.
Ross: Yeah, of course.
♪♪ In this climate, we typically use a closed-cell spray foam.
And the reason we use a closed-cell spray foam is because it has a low vapor and air permeance rate, which means air has a really hard time getting through it and water vapor has a really hard time getting through.
So it keeps the heat and keeps the air inside the building -- it doesn't allow it to get to the back side of the roof sheathing.
That's vitally important in this climate.
And it has to have a low VOC content.
So, meaning we don't want to have any chemical off-gassing concerns like that.
♪♪ The other thing we need to keep in mind is spray foam is not really a DIY project.
We need to make sure that we have a properly licensed and trained contractor who's been doing it a long time to make sure that they're going to a quality job and do it safely.
♪♪ So, a lot of people don't realize that you can actually run quality control checks on spray foam installations.
Okay, so these are samples from your roof.
Dick: Okay.
Ross: Here's one that you can hold on to.
Okay, and the first thing that I'm looking for is a visual inspection.
What I'm looking for is a constant consistency of the spray foam, and not voids or pockets like you would see in bread.
Dick: Okay.
Ross: The second thing is color.
I want to make sure it's uniform.
And the other thing is smell -- an odor test, right?
Shouldn't smell like anything.
Dick: Right.
Okay.
Ross: The next thing, to go a step beyond that, is a density test.
A density test will confirm that the foam is packed tightly and has the correct R-value.
And what we're actually going to do is we're going to weigh it.
3.87 grams.
And now I have this handy-dandy skewer.
Put the sample on the skewer and I push it into the graduated cylinder.
And you can see it's going to go from 800 and it's going to rise as I submerge it.
And you can see that it went up to 890.
-So you're measuring volume.
-Measuring volume.
Yep.
So, mass divided by volume.
That's the -- that's the test that we are doing right here.
So, the difference right there is 90 milliliters.
So, if I do 3.87 divided by 90 times the constant of 62.4 -- this value is based on the conversion of grams per milliliter to pounds per cubic foot.
I get 2.68 pounds per cubic foot.
Okay?
Dick: Okay.
Ross: So, that is a good thing.
We wanted 2 pound per cubic foot density or higher.
Dick: Okay.
Ross: So, we are at 2.6.
That exceeds the manufacturer's standards.
So, this is a great installation and it meets the manufacturer's spec.
Dick: Fantastic.
Ross: Awesome.
Alright, Dick, let me show you upstairs.
Dick: Great.
Ross: So, everything is sealed up now.
All the gable vents, ridge vents are all sealed.
All the roof rafters are insulated.
Shouldn't have any more ice dams.
And you're also going to save on your energy bills because now we've put that hat on the building.
Dick: Fantastic.
Ross: Yeah.
It's really great.
Dick: What about the old insulation that's on the floor here?
Ross: Yeah.
So, good question.
So, you can remove it or you can keep it.
I would recommend removing it, only because it's 15 years old.
There could be animal droppings, et cetera.
And this is all part of the conditioned envelope.
Dick: Okay.
Ross: I do have some homework items for you.
So, let's make sure that you are now running your ventilation system.
So, the bath fans... Dick: Okay.
Ross: ...kitchen fans, et cetera.
Make sure you're running that because we want to get that moisture out of the house.
Dick: Okay.
Ross: Because you're nice and air sealed now, it's going to make the building perform better, but we're going to put more onus on the ventilation of the building.
And we also got to stay out of the house for the next 12 to 24 hours to let it fully ventilate, okay, before coming back, alright?
Dick: Okay.
Thank you.
Ross: Alright.
Thank you, Dick.
Kevin: Hey, Richard.
Richard: Hey there.
Kevin: What are we talking about today?
Richard: I thought we would talk about irrigation.
Not regular plumbing, but irrigation.
Kevin: Oh, fixing the breaks?
Richard: Yeah.
Kevin: Mm.
Guess how many.
Richard: For you?
Kevin: Oh, yeah.
Richard: 100.
Kevin: [ Laughs ] No, no.
Three legit ones.
Richard: Really?
Kevin: Yeah, absolutely.
Richard: How?
A shovel?
Kevin: One was a transplant, on me.
One was a stump grinding, on them.
We knew it was coming.
Couldn't help it.
And then the other one was the tent company, the big spike.
Richard: What are the chances of hitting that?
Kevin: Apparently 100%.
Richard: It always happens.
It happened to me once, too.
So, in my world, normally in the plumbing world, we're dealing with high, high water pressure.
It's 40 or 50 or 60 pounds of pressure inside of a house.
So those connections have to be amazing.
So when we've used copper, we can solder it with a torch.
This is a compression connection -- time proven.
There's a brass ring inside.
You tighten it with two wrenches.
These are those push connections that are the rage now, that you push it on and it's got a lock ring and the O-ring's inside.
And professional plumbers will use that tool that'll compress that thing right here.
In PEX, there are connections that have an inside connection right here and then a stainless steel clamp that goes on here, and it's really an amazing stainless clamp, and then a tool that would make that connection.
And you can live with that, or a connection like this can do a nice job for PEX.
Kevin: So, even though the PEX is flexible, we know, time tested, that is going to hold up just as long as the copper pipe.
Richard: This is a polyethylene pipe, but it's been cross-linked so it doesn't get brittle over time.
It can take this extraordinary pressure.
Kevin: Right.
Richard: Here is what's used in the irrigation world, is simple polyethylene.
Now, if you look at it, a couple things I'm going to show you.
One is the sidewall strength.
You see how thick that is?
That's potable water.
And this is very thin right here.
Kevin: Right.
Richard: Okay.
Kevin: So, stronger in the white, yeah.
Richard: Right, and the other thing I'm going to show you is these are both called 1/2-inch.
Kevin: They don't look like they're the same.
Richard: Okay.
So, lookit.
That is 1/2-inch on the inside diameter.
And because the sidewall is so much less, that's much bigger on the inside.
We want that high sidewall strength to be able to take 50 or 60 pounds of pressure.
Kevin: Yeah.
Richard: Okay.
Kevin: So, is the irrigation not the same pressure?
Richard: No, it's way lower.
Kevin: Oh!
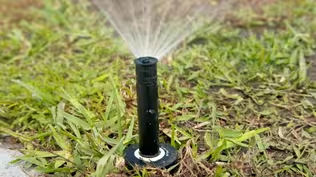
Richard: I mean, you don't need much volume and you don't need much pressure to make some water come out of a sprinkler head, because all it's gonna is go, "Tss tss tss tss tss!"
you know, and just light up... You really want less water to spray.
Kevin: I'm not sure I was aware of that.
So it's a lower pressure.
So they step it down?
Richard: Right.
Kevin: Hm.
Richard: So, these connections couldn't be simpler.
It's a barbed connection.
And you would put on this type of clamp, put it on first, and then it's just a question of getting that down and in.
And what you might do is use a heat gun or a little torch just to soften a little bit if you need to.
Kevin: That'll help you get it on a little further.
Richard: Yep.
Kevin: Yeah.
Richard: And then they make this type of clamp right here that's made to fit right onto that shoulder.
And this would be all the way up to this point, and you squeeze it down shut.
Kevin: And so, you would have gotten it all the way up had we heated this and warmed it up.
Richard: Absolutely.
Kevin: And then when that is made, that crimp right there... Richard: Would be... Kevin: ...shrinks that, tightens it on.
Richard: Yeah.
Okay.
So, that's all there is to it.
The tip I want to give you is when you knock out your... You hit that with a shovel.
Kevin: I did.
Richard: There's always a panic.
Kevin: You have my pipe!
Richard: Right.
There's always a panic.
"What do I do?
What do I do?"
The one thing I will tell you to do is to get a decent cutter.
Dig open the hole.
Take a piece of the pipe.
Kevin: Aah!
You're making it worse!
Richard: [ Chuckling ] No.
Take a piece of the pipe right where the break is.
Take this to the home center.
And you go to that very confusing plumbing aisle and you go, "Too big... Too small... Just right."
Add the matching clamps, and you leave with the right thing, and you put it all back together again.
Kevin: Well, that's good to know 'cause at my pace, I probably got another one coming this spring.
Richard: You take some of this with you.
Kevin: Thank you, Richard.
Richard: Okay.
♪♪ ♪♪ Mark: Kelsey?
Kelsey: Hello.
Mark: Hey.
How you doing?
Kelsey: Good.
How are you?
Mark: Great.
Thank you for the e-mail.
Kelsey: Yeah, so, we live on a very busy road.
Mark: Okay.
Kelsey: And we only have a single-car driveway, so we're looking for some extra parking.
My husband's a mechanic, so having the flat spot for some work space is ideal for us.
Mark: Well, I feel your pain because I used to live on a main street myself, and I think this is a great project.
But a couple things you should know.
You can see the sidewalk over there.
We know that's owned by the town, but in some cases, that line of sidewalk may encroach into the parking area that you're looking to do.
Not a big problem.
All you have to do is do your due diligence, go see the town, get permission.
It might be a permit, which is no big deal, but usually for something like this, shouldn't be a problem.
Kelsey: Okay, awesome.
Mark: Alright.
And in your e-mail, you specifically mentioned asphalt.
Kelsey: Yeah, so, I think that will be best for us.
It'll be a cohesive look and hopefully last a long time for us.
Mark: Okay.
Unfortunately, not my area of expertise, but I do know a guy, so let me go grab him.
We'll meet back here and we'll get going.
Kelsey: Sounds great.
Mark: Alright.
Kelsey: Thanks.
Mark: You got it.
Kelsey, this is Dave, our asphalt expert.
Kelsey: Nice to meet you.
David: Very nice to meet you.
Mark: Dave has actually done a couple things for us already.
The first thing Dave did was he located all his utilities here.
David: Correct.
We reached out to a utility service.
They come out and they make sure there's nothing in the area where we're going to be doing excavation.
They've done that.
They've cleared it.
The only thing I noticed when I showed up this morning, we do have a water head right there, which means there could be a water line passing through this area.
Just because of where the area is, where the excavation is going to take place, we just want to be extra careful digging in this area because even though it says there's nothing in this area, this is typically where the services would enter the property.
Mark: Right.
So super important.
David: Mm-hmm.
Mark: The second thing you did is you went uptown and did all that legwork for us.
David: Correct.
The utility company, location company, They do reach out to the town to let them know there's going to be excavation in town.
But I follow up with them to see if a permit is necessary.
And they told us that a permit was not necessary for this project.
Kelsey: Awesome.
Mark: Now, Dave, through experience, I know that if we get some shovels on this, it's going to take us all day.
David: Yes, it would.
Probably a couple days.
Mark: Right.
David: But we got a special piece of machinery with us to speed up the process.
Kelsey: So, it sounds like we're ready to dig.
David: We are ready.
Mark: Alright.
Let's get going, then.
Kelsey: Sounds good.
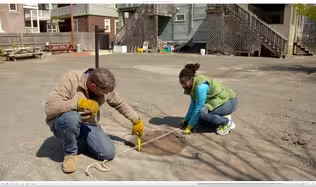
♪♪ Mark: First we need to dig out the parking space, removing any material that would compromise the asphalt surface.
♪♪ In this case, we'll dig down about 15 inches.
♪♪ We will use a plate compactor to compact the soil and ensure a solid base for the space.
♪♪ On top of the base, we will add about 12 inches of crushed stone for drainage... ♪♪ ♪♪ ...compacting it down every few inches at a time.
♪♪ ♪♪ ♪♪ Once the base is prepped, we will saw-cut the perimeter and create clean edges.
♪♪ Alright, so we're just about ready to install this asphalt.
Dave, before we do, why don't you give us a breakdown of what we're looking at in this wheelbarrow and what we're looking at in that wheelbarrow?
David: Okay, sure.
So, the first application is going to be the binder coat asphalt.
That's a 3/4-inch stone, a liquid asphalt, and a little bit of sand.
That gives the driveway its durability.
So we're going to install that first, compact that.
Then after that, we're going to get ready to install the 3/8 top.
That's a smaller stone, a little bit more sand, and aesthetically it's just a tighter finish, a lot more pleasing to the eye than the binder coat asphalt.
Mark: Right.
So, Dave, best application for this stuff?
David: It's used everywhere.
Parking lots, roadways, driveways, sidewalks.
Reasonably inexpensive material, and it holds up well during freeze-thaw cycles.
It stays pliable for a long time.
Mark: Which is a big problem up in the north.
David: Correct.
Mark: Yeah.
Kelsey: Speaking of durability, how long do you think we'll get out of the parking spot?
David: With that application, with the 12 inches of good process gravel in there and all the compaction we did with the heavy equipment, you should get 30-plus years out of that spot.
Kelsey: Awesome.
David: Yeah.
Mark: Alright, well, let's get at it.
David: Sounds good.
♪♪ Mark: We will spread the asphalt by hand, using rakes and lutes.
♪♪ Dave, this stuff gets pretty hot, I see.
David: Yeah, this is probably roughly between 250 and 300 degrees right now.
Mark: Wow.
Okay.
♪♪ ♪♪ ♪♪ David: We got our first lift of asphalt in.
That's the 3/4-inch binder coat of asphalt.
We checked the grade.
All the water runs off beautifully.
It's been compacted.
The topcoat is on-site.
We can get ready to start spreading that.
Kelsey: Sounds great.
♪♪ ♪♪ ♪♪ Mark: A lot of similarities with the way we pour concrete.
But I'm looking at Chuck with the boots.
I mean, that's part of the artistry of the asphalt.
You just don't throw the stuff down and walk away.
If you're off just a little bit, you've got water in a holding place, which is what we don't want, whether it's asphalt, concrete, brick pavers, anything.
♪♪ Once the topcoat has been applied, we will compact it down with a roller, then go over it with a plate compactor.
♪♪ Alright, Kelsey, a lot of moving parts today.
We did a lot of work for one day.
Got it done.
What do you think?
Kelsey: Honestly, it looks amazing.
It's everything we could have imagined.
Mark: Great.
Kelsey: So, when can I drive on the spot?
David: Let it cool off.
Let it harden up a little bit.
In four days, you should be good to go.
Kelsey: Sounds good.
Thank you so much.
David: My pleasure.
Thank you.
Kelsey: Thank you.
Mark: Alright, Kelsey.
♪♪ Kevin: Next time on "Ask This Old House"... Jenn helps save a shed by installing a drip edge, then transforms its surroundings by adding a combination sun and shade garden.
Plus, it's time for Downspouts 101.
Our teacher Tom will school us on why they are critical to the preservation of buildings and homes.
Then Mark will give an old granite post a new life on the farm.
All that on "Ask This Old House."


Support for PBS provided by:
Funding for Ask This Old House is provided by The Home Depot, Renewal By Andersen, and ChipDrop.