E2 | String Lights, Kitchen Painting | Ask This Old House
Season 22 Episode 2 | 23m 42sVideo has Closed Captions
Heath installs patio string lights; Mauro color matches a retro kitchen cabinet.
Heath Eastman helps a homeowner install outdoor-grade remote-controlled patio string lights over their backyard patio; Mauro Henrique color matches a homeowners retro aqua kitchen cabinet and repaints it to match the rest of the vintage kitchen; Mauro takes a sample of the aqua-colored kitchen cabinet and heads to Home Depot to demonstrate the color matching process.
Problems playing video? | Closed Captioning Feedback
Problems playing video? | Closed Captioning Feedback
Funding for Ask This Old House is provided by The Home Depot, Renewal By Andersen, and ChipDrop.
Support provided by:


E2 | String Lights, Kitchen Painting | Ask This Old House
Season 22 Episode 2 | 23m 42sVideo has Closed Captions
Heath Eastman helps a homeowner install outdoor-grade remote-controlled patio string lights over their backyard patio; Mauro Henrique color matches a homeowners retro aqua kitchen cabinet and repaints it to match the rest of the vintage kitchen; Mauro takes a sample of the aqua-colored kitchen cabinet and heads to Home Depot to demonstrate the color matching process.
Problems playing video? | Closed Captioning Feedback
How to Watch Ask This Old House
Ask This Old House is available to stream on pbs.org and the free PBS App, available on iPhone, Apple TV, Android TV, Android smartphones, Amazon Fire TV, Amazon Fire Tablet, Roku, Samsung Smart TV, and Vizio.
Keep Exploring


This Old House Insider Newsletter
Get This Old House exclusive stories, tips, and behind-the-scenes information delivered right to your inbox every month.♪♪ Kevin: On "Ask this Old House," our experts travel across the country to answer questions about your house.
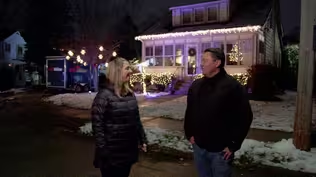
♪♪ Today... have you been trying to brighten up your outdoor space?
Heath installs a set of patio lights.
Sheray: It looks great.
Heath: Wow.
Simple, fun DIY project.
Kevin: And we share some old and new ways to level large spaces.
Then Mauro helps a homeowner paint metal cabinets in her 1950s vintage kitchen.
Molly: It looks like a perfect match.
Kevin: That's all coming up next on "Ask This Old House."
♪♪ ♪♪ Heath: Hi, Sheray.
Sheray: Hi, Heath.
How you doing?
Heath: Good.
Nice to meet you.
Sheray: Nice to meet you.
Thanks for coming out.
Heath: This is a great-looking place.
New neighborhood.
Sheray: It is.
Yeah.
It's just a little over four years old.
We moved in right around phase two.
And as you can see down that way, phase three is still in the works.
Heath: A lot of construction still going on.
Sheray: Yeah.
We moved in two years to the day, actually.
Heath: Congratulations.
Sheray: Thank you.
Heath: One of the things we see a lot of times when we're doing a development like this is, the houses are all done, everything looks great.
You move in.
But one of the things that gets neglected is the landscaping.
Sheray: Yes.
Heath: So I think that might be something you wrote in about.
Sheray: Yes.
I was interested in some string lights on the back porch.
Heath: Let's go take a look.
Sheray: All right.
So as you can see, this is our back deck here.
Heath: Ah, yeah.
Wow.
This is a great yard with a ton of potential.
Sheray: Thank you.
Eventually, my husband and I would like to expand this, maybe move the grill.
But for starters, we'd like to start with some string lights.
Maybe motivate us to be out here a little more.
Heath: Sure.
Well, that's hopefully a pretty simple project to start with.
If we're looking out at the deck, you can see the one light you have now is just that single light by the outside sliding door.
It kind of gives us light for now.
Sheray: Mm-hmm.
Heath: It's really not that comfortable and inviting.
I think the string lights are gonna make this a much more enjoyable place for you, especially in the evenings.
Sheray: Right.
Heath: But the one thing we have to start with is the outdoor receptacle.
That's where we're gonna plug in.
So if you don't have one, you want to call an electrician and have one installed, and then you can start from there.
But where this is a newer home, this is the deck area, we should have one.
So I'm hoping you have one over there?
Sheray: We do have one.
Yep.
It's right over by the grill.
Heath: Great.
So that's the hard part.
And the rest of it really becomes a DIY-friendly project.
So I think I have some mounting hardware, some string lights, and some tools.
So if you want to give me a hand grabbing that out of the truck, we'll get started.
Sheray: All right.
Thank you.
Heath: All right, Sheray.
So I think we have most of what we need here.
And the first and most important part are the lights.
So we have this kit that should be about the right length for what we're looking to do.
It's outdoor-rated.
It's meant to be out here and it's meant to self-support for a certain amount of distance.
So the manufacturer says you can span these for up to 20 feet between hook to hook without any additional support.
If we wanted to go further, if we were going further across your yard to a fence, something else, you want to use a support cable, something like this.
Wrap that around the hook and then attach the lights to this cable.
But in this case, where there are only 10 feet apart, I don't think we really have to worry about that.
Sheray: Okay.
Heath: The next part is how we're gonna support it on the post itself.
So we can put the hooks on the house, but we need something else to attach to on the deck.
What I found was by luck in the plumbing section of all things, they have a modular hardware kit that comes with things that are very similar to plumbing pipe, but you can get all kinds of fittings and make what you want.
So in this case, we're gonna use this black pipe.
Comes with a base, you can get.
A mounting bracket that we can attach right to your deck rail.
And then a hook.
Sheray: Okay.
Heath: So we can make a nice, clean-looking system right there with these pieces and support the cable.
And then finally, the last thing is, you don't want to go out there and plug them in and out every time.
Right?
Sheray: Right.
Heath: You want to be able to control them easily.
So since we have a receptacle that's hardwired, doesn't have a switch on it, we have this.
And what this is gonna let you do is, we're gonna plug this into the receptacle, put the lights in, and then we can control it by either a remote control or an app on your phone.
That way you don't have to worry about them.
Sheray: That's very convenient.
I like that.
Heath: Yeah, it makes it a little easier.
So with all that, I think we're ready to get started.
Sheray: All right.
Heath: All right.
So before we put up the new posts, I'll check the existing deck post to ensure that they're plumb.
And these look pretty good.
So I think we're okay.
Sheray: All right.
Heath: Next, I'll measure, mark, and drill the locations for the brackets.
We'll just carry it over, and I just want to double-check it.
And that looks pretty good.
I'm just gonna take the drill, go right where that was.
And, again, we're not looking for much.
Just want to get us a good starting point.
Just lean right into it.
You're good.
♪♪ ♪♪ Then we'll cut the pipe just to the right height to ensure that it's slightly shorter than the height from the gutter.
This will ensure that if we get any moisture on the cables, it will drain away from the house and not towards the house.
And just let the saw do the work.
You're just gonna watch it fall straight down.
[ Saw whirring ] ♪♪ Perfect.
So we have our brackets.
Gonna come through that one.
Through that one.
In order to secure the bottom bracket to the deck, the first thing I want to do is lift the bracket up, slide a couple of stainless-steel washers underneath to give it a gap so the water can roll out should only collect inside there, drop the post back down.
Then I'll tighten the Allen wrenches in the upper brackets.
And finally, I'll screw the bracket down to the deck.
♪♪ So I'm gonna pre-drill a hole for that hook that we have.
I'm gonna put a little bit of this flexible caulking inside before we thread this in.
♪♪ Sheray: All right.
Heath: Start hanging the lights.
I'm gonna hook this around here temporarily, and then I'm gonna work back through and see where we land.
Sheray: Okay.
Heath: We'll leave the bulbs out for now so that we don't risk breaking them while we move everything around.
So what we've done is, we knew a pattern that you wanted to have out here, and we knew that, chances are, this cabling is gonna be a little long, a little short.
So we got to find some way to make this work that it hides the extra without having a few bulbs hanging down the side of your gutter or somewhere else.
Sheray: Right.
Heath: And this works out great.
So what we're gonna do... is actually just cross this over a little bit and it'll give us a little more of that "X" pattern.
Sheray: Oh.
That looks great.
Heath: Now start putting the bulbs in.
Sheray: All right.
Heath: Time for the last step.
I'm gonna put this remote in.
So we have the remote base that's gonna plug into the receptacle.
Simply plug the lights in.
Then we're gonna press and hold this button for six seconds.
Now it's flashing.
And then we'll do the same on the bottom button of the remote.
And I think that's it.
All right.
So everything's connected.
Remote's programmed.
All we have to do is test it.
Sheray: Yeah, it looks great so far.
Heath: So you want the honors?
Sheray: Yes, please.
Heath: Top button's on.
Bottom button's off.
Sheray: Oh, it looks great.
Heath: Wow.
I think it looks great.
I got to tell you, I'm really happy with the way this turned out.
Simple, fun DIY project.
Sheray: It looks great.
I can't wait to use the space.
Thanks so much for coming out.
Heath: Pleasure to meet you.
Sheray: Nice to meet you.
Heath: Thanks.
♪♪ Kevin: Nice job, Heath.
Heath: Thanks.
Kevin: Always makes a big difference when you light up the patio.
I've got some.
And I love them.
Heath: Yeah, it really looks great at night.
But I got to admit one thing.
Kevin: Uh-oh.
Heath: I did go back.
Kevin: What?
Did you, like, pop a fuse or leave a breaker?
Heath: No popping breakers, no fuses.
I had one thing that was really bothering me.
Even though the manufacturer says it's okay, I didn't like using the lights for the means of support.
I really felt there ought to be something else holding all these up.
Kevin: So they said you could go how far with just the wire here?
Heath: 20 feet.
Kevin: It was well -- way under 20 feet.
Heath: Well, less than half.
But I just didn't like having the additional stress wear on those.
I really wanted something else to carry it.
So it really made more sense to go back and install a cable to carry all that weight.
Kevin: Okay, so what did you use?
Heath: So it's actually a stainless-steel cable with a black coating on it.
Kevin: Huh.
Heath: So you have the option.
You can either feed the cable through the loops that come on the lights, or if you want a cleaner look and you want them side by side, you can use some UV-rated zip ties, or they actually come with these little guys -- little stainless twist ties.
Kevin: You just couldn't sleep, could you?
Heath: I couldn't.
It was bugging me.
I feel a million times better knowing that this cable is now doing all the work for that.
It's better in the weather, better in the wind.
Kevin: And comes as a kit.
Heath: It does.
So you come with all the hardware you need.
It's very DIY-friendly.
Kevin: So one side, you've got... Heath: Carabiner.
Kevin: Right.
And then you can actually just fasten that down to tighten the loop?
Heath: That's it.
It comes with a small wrench.
But if you use a ratchet, it's much easier.
Kevin: And then on the far side, you end up with... Heath: The turnbuckle.
Kevin: So when you put it up, this just allows you to screw it, take out what little slack is left.
Heath: Exactly.
And adjust it where we need.
And as it settles over time, you can adjust.
Kevin: And you're saying that this stuff here, this is actually stainless inside?
Heath: There's actually a stainless cable inside that with the coating.
So it's good to go for outdoors.
And I'll show you.
You can see the difference in the picture that now we're using that cable to take all the weight and there's no stress on the light string at all.
Kevin: You've always said code is the bare minimum, so manufacturer's recommendations -- bare minimum, as well.
You can dress it up.
Heath: And it can always be done better.
Kevin: That's why they call you back.
Nice job, Heath.
Heath: Thanks.
Kevin: Very nice.
Heath: Yeah.
Yeah.
♪♪ Kevin: Hey, Tommy.
Tom: Hey, Kevin.
Kevin: Oh, look at all your toys here.
Levels, huh?
Tom: Talking about levels.
Everybody knows what a level is, right?
Kevin: Yeah, I hope so.
[ Laughs ] Tom: Every garage has a 2-foot level in it.
Or maybe even a torpedo level in it.
Kevin: Yep.
Tom: They're handy and they're good when you got to hang a picture or something like that.
Kevin: Level or plumb.
Pretty easy to use.
Tom: But I want to talk about levels that we use to level out a jobsite or inside a house when you're setting cabinets or windows, all kinds of different things.
Kevin: So over a much longer distance, if you want to get a point from here to there, this is limiting.
Tom: Right.
Exactly.
Kevin: Okay.
Tom: So let's start with a laser level right here.
I think all the trades use a laser level for something.
Sets a beam, and that's a reference that we reference off of.
And it's fantastic in a room.
All right?
Now, if I wanted to know a plumb line, I could just push a button and I got a plumb line to go by.
Kevin: Yep.
There it is.
Tom: Okay?
So I can hang a door or whatever I want.
And that's just 90 degrees to level?
Tom: Right.
And there you go.
90 degrees to level.
Kevin: Both of them right there.
Tom: But these are limited inside a house if you need to use the level from room to room to room.
Kevin: It's basically line of sight.
So anything that blocks that beam... Tom: Like a wall.
Kevin: ...means you're not gonna get it where you want it.
Tom: Exactly.
Exactly.
So this is a level that I've used for many years.
It's actually a water level.
Kevin: So basin of water filled up almost to the top, and you've got the tube going around which comes out.
Tom: So think of water.
You're at the beach and you look at the horizon over the water -- That is exactly level.
Kevin: Always is.
Tom: Water seeks its own level.
So I fill that with water and I fill the tube with water.
And now, because water will seek its own level, wherever that water stops, that's the exact height of that water right there.
Kevin: This point, that point -- identical.
Tom: Right.
So if I wanted to find a level line in a room or put a level line in a room, I would go from one corner of the room to the other corner of the room and I would take my tubing, put it against the wall, and watch the water.
Kevin: Look at that moving towards -- Actually, the water's not moving, is it?
It's the tube that's moving.
Tom: Exactly.
Exactly.
Kevin: Ah.
Tom: So I'm putting the tube down now.
Now it's gonna -- When it stops... Kevin: It's got to settle a little bit.
Tom: Right.
Kevin: That spot is perfectly level with our basin.
Tom: Right.
Put a mark.
There's one mark.
Now, I would go to another part of the room and put another mark, snap a line between those two lines, and that is exactly level.
Kevin: And that mark is identical to this height of the water right there.
Tom: That's the key right there.
Water seeks its own level.
Kevin: Very cool.
Tom: So now I can take this and go to another room.
I can go 50 feet away, around the corner.
As long as we don't move this container, that line will be level all the way through the house.
You can use it outside, too, right?
If you were... Tom: Absolutely.
I used it outside to set a row when we were setting windows, building a house or whatever.
We used it for setting all kinds of things that we want level.
I could take clapboards and stuff like that.
Start in each corner, snap a line.
Boom, I'm level.
Kevin: Okay.
Tom: But here's one right here that works on the idea of pressure, but it's atmospheric pressure.
Kevin: So atmosphere -- So air has weight.
Tom: Yeah.
Kevin: And the sort of volume of air down low is gonna be heavier than up here.
And this knows the difference?
Tom: Right.
And so an airplane, when it flies, it knows how high it's flying by the atmospheric pressure of the air.
Right?
Or the lack of.
Kevin: I hope so.
I hope so.
Tom: All right?
So basically, I would set this at zero and this would be my beginning point.
And then I have a reading right here.
I could go 50 feet, 150 feet away.
And I would read what my measurement is.
If it was zero there, then I knew that it's exactly level here.
Kevin: So it's not just telling you in relation to your set point, but it's also gonna give you a number.
So if you end up sticking it somewhere and it's 8 -- says 8 inches, that means it's 8 inches higher than the zero mark?
Tom: Unless it was negative-8 because it could be -- See, it would tell you that.
But, again, this can't move, just like this.
Kevin: I love it.
Very clever.
Okay.
Tom: Very handy.
Great landscapers.
I think Jenn uses one of these.
Great for doing grades and setting walls and pitches.
All kinds of things.
Kevin: Very good.
Good information.
Thank you.
Tom: Yeah.
♪♪ Molly: Hi, Mauro.
I'm Molly.
Mauro: Hi.
Nice to meet you.
Molly: So nice to meet you, too.
Welcome.
Mauro: Great to be here.
I love this Colonial-style house.
Right?
Molly: Thank you.
Mauro: It's really cool.
Molly: Thank you.
We've been here for about eight years, but wait until you see the kitchen.
Mauro: Kitchen.
Let's go.
Molly: Which is this way.
All right.
This is the original kitchen from 1960.
Mauro: Wow.
It looks like we're "Back to the Future" here.
Look at this color.
It's really cool.
I love it.
Love it.
All right.
Molly: So it's in great shape in general.
But we do have these spots right here that we could use an expert to help us repair.
Mauro: This is not a problem.
We can fix that easily.
Molly: Great.
Mauro: The challenge here for us is to match this color here.
Molly: Okay.
Mauro: I already see two different colors, maybe three.
But this is the one we have to match.
All right?
I have a couple of fan decks that has tons of colors here.
Molly: Yeah.
Mauro: First thing we do... Let's see.
That's too dark there.
Let's see this one here.
This is a little too dark, don't you think?
Molly: Yes.
Mauro: A little too light.
Molly: Yep.
Mauro: The one in the middle looks very close to what we need.
Molly: It does.
Mauro: Okay.
When you go like that, we can see the color better.
Yeah, it looks like we're missing a drop of... Molly: Maybe even orange.
Mauro: A little drop of orange, plus a little bit of red.
I think we're gonna get really close... Molly: Looks really close.
Mauro: ...to the color we need.
All right?
Molly: Looks great.
Mm-hmm.
Mauro: All right.
But since this is not our color yet, I'm gonna have to go to the store.
And there they have a color scanner.
It's connected with a computer, and the computer will give us, like, 2 or 3 different colors, and we can choose the best one.
Molly: Okay.
Mauro: But I need a piece of these cabinets that I can take with me.
Molly: Okay.
Mauro: Do you have a piece for me?
Molly: I do.
I think there's a shelf, actually, that comes out over here.
Mauro: All right.
What is it?
Molly: So in here... Mauro: Great.
Oh, this is perfect.
And it's big enough.
Molly: Oh, good.
Mauro: And I take that, right?
Molly: Sure.
Mauro: All right, let's take this out of here.
All right, I'll take it to the store.
I'll match it and I'll come back.
Molly: Thank you so much.
Mauro: I'll see you in a little bit.
Molly: Okey-doke.
♪♪ Hi, Mauro.
Welcome back.
Mauro: Well, I'm back.
Okay.
You want to hold this paint can?
Molly: Sure.
Mauro: That's the color.
Molly: Great.
Mauro: All right?
I have three different samples to match it right here.
Molly: Okay.
Mauro: First one -- out.
Not good at all.
Molly: Mm-hmm.
Mauro: Then I have two others that I put on the shelf.
I want you to find them in here if you can see it.
Molly: Okay.
Gosh.
Mauro: Right?
Molly: Is that it?
Mauro: That's one of them.
But it's not the perfect one yet.
Molly: Wow, that looks so close.
Mauro: Look well.
Molly: There?
Mauro: That's the one.
See, if I turn it at a little angle like this, you'll see it more.
Molly: Oh, yeah.
It looks like a perfect match.
Mauro: You ready?
We have some prep work to do and some painting.
Molly: Okay.
Sounds great.
Thank you.
Mauro: Yeah.
Okay, Molly.
Molly: Okay.
Mauro: First step of the preparation -- We're gonna use this detergent.
We're gonna degrease the door.
Okay?
I'm gonna just spray a little bit like that on the rag.
Molly: Okay.
Mauro: Yep.
And then we just go like this.
Molly: Okay.
Mauro: This way, we're gonna take any fingerprints or a little grease or oil.
Anything.
How does it feel -- clean?
Molly: It feels really good.
Mauro: Nice.
Look at that.
Let's take about 10 to 15 minutes.
Molly: Okay.
Mauro: Then we're gonna do step two of the preparation.
Molly, take out this plastic and tape in one.
So cool and easy to use.
Let me show you how we do it.
I'm gonna unload it a little bit.
And I'll put my tape right in there.
And what I want you to do, grab this dispenser and go very close at the edge, the bottom edge of the cabinet.
Like that.
Yep.
Molly: Press it along?
Mauro: One.
Yeah.
Keep going.
Molly: Yeah.
Mauro: Yep.
All right.
Molly: Higher.
Sorry.
Mauro: Higher.
A little bit higher.
Yeah, that's good.
All right.
All the way down.
Molly: Whoops.
Mauro: It'll look good.
Look good.
Molly: Okay.
Mauro: At the end, use the cutter to cut the plastic.
Just rip it right off.
Nice.
Molly: Just like that.
Mauro: All right.
Molly: Right.
Mauro: Now, what we're gonna do, we're gonna unfold it just like that.
Let's get at the bottom.
Molly: Oh, that is cool.
Mauro: Right?
Look at that.
Molly: Wow.
Mauro: We're gonna do the edge of this door.
We want to press this tape right at the top of the door.
I want you to hold that.
Molly: Yep.
Mauro: And I want it to go all the way down at the bottom.
At the same time, line up the tape with the cabinet.
Molly: Yep.
Mauro: Okay.
Then I wanted to cut.
Just go like -- Yep, just go right though.
All we need is this.
But we open up a little bit more, just like that.
Molly: Great.
And then we'll press.
Mauro: We press down.
Make sure you get a straight, clean line.
Molly: Okay.
Mauro: Okay.
Right?
Molly: Yep.
Mauro: All right.
Molly: Unfold.
Mauro: Unfold.
All right.
Look at this.
Molly: Great.
Mauro: Now we're gonna give a light sanding with the 220-grit paper.
Molly: Okay.
Mauro: You just want to break the edges a little bit so when we paint it, it'll be nice and smooth.
Well, let's hit those two spots with a metal primer.
Molly: Okay.
Mauro: Just like this.
Nice and easy.
All right?
That's good.
Molly: Okay.
Mauro: It's fast.
Now I want you to do that one there.
Molly: All right.
Mauro: Yeah.
Just press that down.
Yeah.
Just nice and easy.
Yeah.
It's gonna take about 30 minutes for this primer to dry.
Molly: Okay.
Mauro: Then we'll come back.
Now we're gonna sand the cabinets with 180-grit sandpaper just to kind of score the surface a little bit.
Okay?
You can turn the sanding pad, too, if it makes it easier for you.
Yeah.
Molly: Okay.
Mauro: Yeah.
Molly: Like this?
Mauro: Yeah, that's perfect.
Molly: Keep going or... Mauro: Keep going.
Keep going.
Now we're gonna just wipe that off with the rag again.
Molly: Okay.
Okay.
Mauro: Cool.
That's it.
These look really nice.
So what we're using here is called DTM.
It's three letters.
It stands for direct-to-metal.
Molly: Okay.
Mauro: Just dip your roll in there.
Don't load so much paint into it, because we're gonna do, like, multiple times, okay?
Don't start at the bottom.
Very bottom.
Start, like, about 3 to 4 inches up, and then you come right down with the roller and you fill the gaps.
Molly: Okay.
So starting here.
Mauro: Yeah.
We try to avoid dripping paint.
So you start, like, about 4 inches.
You unload the paint, and then you come right down and you notice there's no dripping paint down below.
Molly: Yeah.
Mauro: Overlap by 50% by each pass of the roller.
Molly: So, like, here.
Mauro: Yep.
Right there.
Molly: Okay.
Mauro: And not only we matched the color perfect -- We also matched the same finish.
ml It's like 1960 again in here.
Mauro: Well, look at that.
Molly, you're a pro.
Molly: [ Laughs ] You ready to hire me?
Mauro: Absolutely.
I want you to do the edges.
Okay?
Molly: Okay.
Mauro: Bottom first, and then the side.
All right, cool.
♪♪ Okay, go right down.
Go up and down again.
We're going to wait about 2 to 3 hours for this to dry... Molly: Okay.
Mauro: ...come back, and we'll do the same thing.
Molly: Okay.
♪♪ ♪♪ Mauro: What do you think?
Molly: It's perfect.
I can't believe it.
Mauro: So we got the color matching perfect.
And we also got the finish done right.
Right?
Molly: It's great.
Thank you.
Mauro: All right.
Cool.
I'm gonna leave the painting can.
In future, if you need to do any more painting or touch-ups, you have that there.
And then if you need more paint, there's a formula on that can.
Don't lose that.
Okay?
If you do any large project in this kitchen, just bring that formula into the store.
They will do another painting can exactly the same color as you need.
Molly: Perfect.
Mauro: If you have any question about your house, I would love to hear about it.
Until next time, I'm Mauro Henrique for "Ask This Old House."
♪♪ Kevin: Next time on "Ask This Old House," Richard gives a vintage bathroom a modern upgrade.
Richard: Here's this cover plate, designed to be able to cover over those holes.
And that's the finished look.
Kevin: Plus, we introduce our newest team member, landscaper Lee Gilliam.
We'll hear about his journey as a landscaper, and he and Jenn will help a homeowner with a slope that keeps sliding away.
Man: I'm excited.
Let's see what we can do.
Kevin: All that on "Ask This Old House."


- Home and How To

Hit the road in a classic car for a tour through Great Britain with two antiques experts.


Support for PBS provided by:
Funding for Ask This Old House is provided by The Home Depot, Renewal By Andersen, and ChipDrop.