E20 | First Period Gambrel | Rebuilding Centuries
Season 44 Episode 20 | 23m 42sVideo has Closed Captions
The old ell has been reassembled. A steel beam carries the weight of the new roof.
A few weeks ago, the 300-year-old timber frame ell was dismantled and refurbished. The pieces have been brought back to the site to be reassembled and tied into the house. Construction of the new Rumford style fireplace begins. A 35' long steel ridge beam and posts are carefully craned into place to carry the weight of the roof in the new ell. The homeowner shops for a kitchen countertop.
Problems playing video? | Closed Captioning Feedback
Problems playing video? | Closed Captioning Feedback
Funding for THIS OLD HOUSE is provided by The Home Depot and Renewal By Andersen.
Support provided by:

E20 | First Period Gambrel | Rebuilding Centuries
Season 44 Episode 20 | 23m 42sVideo has Closed Captions
A few weeks ago, the 300-year-old timber frame ell was dismantled and refurbished. The pieces have been brought back to the site to be reassembled and tied into the house. Construction of the new Rumford style fireplace begins. A 35' long steel ridge beam and posts are carefully craned into place to carry the weight of the roof in the new ell. The homeowner shops for a kitchen countertop.
Problems playing video? | Closed Captioning Feedback
How to Watch This Old House
This Old House is available to stream on pbs.org and the free PBS App, available on iPhone, Apple TV, Android TV, Android smartphones, Amazon Fire TV, Amazon Fire Tablet, Roku, Samsung Smart TV, and Vizio.
Keep Exploring

This Old House Insider Newsletter
Get This Old House exclusive stories, tips, and behind-the-scenes information delivered right to your inbox every month.Providing Support for PBS.org
Learn Moreabout PBS online sponsorshipKevin: Today on "This Old House"... Tom: The old post and beams have been refurbished and today we're going to put them back in place.
Great job.
Man: Thank you.
Glad you like it.
Kevin: And we've got a 35-foot, one-ton steel beam coming in that's going to carry our new roof.
[ Whirring ] Tom: Perfect.
♪♪ [ Grunting ] ♪♪ Man: Ahh.
That's it.
♪♪ ♪♪ Kevin: Hey, there.
I'm Kevin O'Connor.
And welcome back to "This Old House" and to our project here in Ipswich, Massachusetts.
Our house, well, it was built in 1720, right here on the banks of the Ipswich River.
And the construction underneath here, well, it's all timber frame.
And so our restoration gave us the opportunity to refurbish many of the parts and pieces of this old timber frame.
So a few weeks ago, Arron Sturgis, our timber frame specialist, and his crew dismantled the ell in the back of the house.
They took all of those 300-year-old parts and pieces, brought it up to a shop in New Hampshire.
What was broken was repaired and everything else was refurbished.
And today it is coming back on site so that Tommy and Arron can start reassembling that ell so it's good for another few centuries.
Tom: All right, Arron, so I see you have all the pieces brought back.
You were up to -- brought them up to your shop.
You showed Kevin what you were doing.
But explain to me what we've done here.
I know we've added some length to the building somehow and somewhere, but these are all the old pieces we're going to reuse and some new ones too.
So what do you got?
Arron: What we're looking at, Tom, are some tie beams here on my left, and the two plates.
These are the two top plates where the two eave walls are.
Tom: Yeah.
You can see the end of that has an under-squinted scarf joint.
That's the little angle.
Tom: Right.
Arron: See how that new wood is fitted into the old.
Tom: Yeah.
Arron: So that doesn't allow it to hinge open.
And it's pinned together, so all that allows us to extend the length of this top plate because we move the entire ell further into the house.
Tom: Yeah, yeah, so you need the length, and obviously you couldn't get it from the old wood.
Arron: Right, right, right.
So we always use new wood with the old.
You can see the difference.
But it works out perfectly.
It all mellows Tom: Adds to the character.
Arron: Yeah.
Yeah, we're not trying to hide the repair.
These tie beams are all different sizes.
That's how they were.
But a couple of them have a couple notes.
One, look how curved this one is.
It's super curved.
Tom: I remember that one being right across the space there.
Arron: And that's going right back in the way it was.
The next one, pretty straight, but going right back.
They're all going back into the original location.
This one was broken.
So we have a fix in that, Tom.
Tom: Oh, I remember that, yeah.
So this is your repair right here.
Arron: That's right.
That's an oak spline.
And it's pinned and it crosses over the break.
It's about 6 inches deep.
Tom: Oh, so you went right down into basically a big slot or a dado.
Did you go all the way through it?
Arron: No, we didn't.
We didn't have to.
And you don't see it from anywhere in the kitchen.
Tom: Perfect.
Arron: You know?
Tom: This one you got a piece of steel in there.
Arron: This one we did steel because it had so much plumber's rot in it that we had to do something a little -- and it's a lot smaller than this one.
Tom: Yeah.
Arron: So we opted for a thin kerf.
This is an angle iron.
Tom: Right.
Arron: It's a quarter-inch angle iron.
So we cut into it, set it in, take the bend out of it because it was really sagged.
It still sags somewhat, but then this structural screw keeps it in place and creates -- Tom: Well, the nice thing about the angle iron, it will straighten it in two directions.
It'll straighten it this way, but it also straightened it a little bit that way.
Arron: As much as we could get out of it.
Tom: Yeah, so you think about the different size of these beams and how long they've been holding this floor up.
Arron: Oh, yeah, they had a floor on it before.
They won't now.
Tom: Crazy.
No, no.
It's basically all for show.
Arron: It's just to keep the ambiance in the kitchen with the original material.
The posts around us.
We've got one post standing already, and the others -- so the original timber frame, ell, has been repaired.
We'll stand it up and put it all together and tie it into the house.
Tom: I love the fact that we're reusing as much of this as we can.
Arron: Yeah, me too.
Tom: So this is our starting point?
Arron: Yep.
♪♪ [ Indistinct conversations ] ♪♪ ♪♪ Arron: Dave, you're gonna stay with that post.
You can see how we come into that mortise.
♪♪ Tom: This old beam went right back where it was, except it's a little higher.
Arron: It's a little bit higher.
You can see it on the post.
Tom: There's a height difference right there.
Arron: Yep.
Set to that mark and then plumb it from there.
♪♪ ♪♪ Kevin: Hey, Mark.
Mark: Hey, Kevin.
How are you doing?
Kevin: All right.
Mark: All right.
Kevin: So I know you didn't like the fireplace that was here, so, obviously, It's gone, but I'm glad to hear we're putting one back.
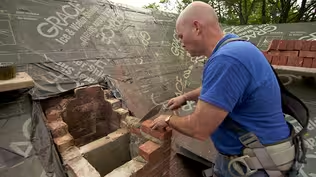
Mark: Yeah, so the previous one, super inefficient.
The homeowners didn't like it at all.
No code compliance.
There were a lot of problems.
We tore that down.
We wanted, obviously, to not keep that fireplace, but put a new one in.
And for that to happen we had to have the right-size flue.
So what we had to do was bang this whole area out right here, throw our tape inside and confirm that we did have the space.
And again, we had a moment of discovery when we found out, yes, in fact, we can fit the flue in there for the new Rumford fireplace.
Bill: Hallelujah.
Mark: Right.
Kevin: All right, so what do you call this piece that you've got in right here?
Mark: This is the bed of the firebox.
Kevin: All right, and I can see that the other pieces are over here.
What do we do?
Drag them in now?
Mark: So we just drag them in.
That's it.
Kevin: All right.
Any particular one?
Mark: This one is -- the back is the shortest.
And that's that.
13 1/2 right there.
Kevin: One, two, three.
Oh, man, that's a -- that's a big piece of... Mark: It's pretty heavy.
Kevin: So this is actually two pieces here, right?
You got a concrete back?
Mark: So what I did first at my shop was I formed out a concrete pad.
It's about 3 inches.
I let that set up overnight, and then I came back and put my firebrick down on top of it.
I used a nice thin-set mortar, which is what they usually use for tile, so there's a lot of strength and a lot of glue in it.
Kevin: Yeah.
Mark: So I took my firebrick.
I kind of glued it to this concrete pad.
Kevin: So you laid that out.
And here's our herringbone pattern.
Mark: Yep.
So the firebrick, of course, looks great.
But what you see in between the firebrick is what we call a refractory cement.
It withstands intense heat, which is where we do have problems sometimes with fireboxes when we're using the lime in the Portland mix.
Kevin: How do you want it?
Good?
Mark: That looks great.
All right.
I want to make a a heavy bed.
That way, if I have to plumb or level it, I'll have the play.
Kevin: Okay.
Mark: All right.
Try to flip that right into place.
Looks good from here, Kev.
Just flip it right -- yep.
Right on.
The other important -- is the plumbness.
That's perfect.
That's where these little shims come into play, Kevin.
Kevin: Okay.
Mark: So I'll put that in there.
♪♪ So I'm gonna grab this.
♪♪ Keep wiggling it down.
You got it?
Kevin: Yeah.
Mark: Round and round.
♪♪ Now the top.
Okay.
♪♪ Kevin: This is a Rumford throat right here.
Mark: It's a Rumford throat.
It actually acts as a funnel, if you want to just.... Kevin: It's basically got that funnel shape, right.
Mark: It's got the funnel shape.
Kevin: Broad and wide at the base.
Gets narrower on top.
Okay.
So now that this is in place, you can build a damper on top of it and then connect us up to the chimney?
Mark: That's right.
Then we'll be in place.
Kevin: All right, well, I love the improvement, and I love the little lesson on Mr. Rumford's design.
Thank you, Mark.
Mark: Thank you, Kevin.
Kevin: I'll leave you to it.
Mark: All right, thanks.
♪♪ Kevin: So from this vantage point, you get a good sense of the project.
Up front, we've got the original house, the 1720 gambrel, and then we've got the timber-frame ell here in the middle, coming back to our addition.
Now, this original timber frame, which was just put back in place thanks to Arron and his team, that was originally one story back in 1720.
At some point they bumped it up to two stories, and our homeowners, they want to take it back down to one story but to have a cathedral ceiling.
So they're going to reuse those timbers to create the cathedral ceiling, but it's not going to be structural.
We're actually going to have to build a roof over the entire thing.
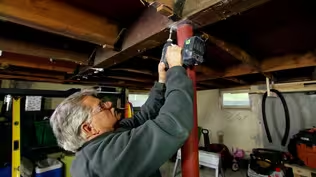
So that means we need some steel -- a 35-foot steel beam fabricated off-site going between these two structures.
And the other day, Tommy and Charlie padded them out with 2x12s on either side.
And now it's going to be flown in as soon as we find some way to get the steel posts in.
Tom: All right, our first steel column is coming in.
It's actually a 3-inch-by-5-inch with a plate screwed or welded to the top.
Now, this is precut to the length, a little over 22 feet long.
And he's got to position it right because the plate on the top of the column has to go parallel with the beam and we can't turn it once it's in.
So that should just fit through the structure.
Going to come right down through the hall.
Man: Come on down.
Come on down easy.
Tom: There's a lot of coordination going on here.
Man: We're good.
Tom: Bringing it right down.
It's being controlled by radio, by Jay up there telling the crane operator what to do.
You can see that coming down nice and slow.
Nice and easy.
Coming right in.
Now, that's precision for you.
Look at that.
This post should have a base put on the bottom of it.
But what they did is they left the square base off the bottom, which is going to be the foot to this column.
And that allows this column to come through a much smaller rectangular hole.
Jay, I think your guy knows what he's doing there.
Look at that, huh?
Nice.
Man: Down easy.
Thank you.
Tom: A little bit of coordination right there, so the radio guy and the operator.
Beautiful work.
So now we'll just weld that.
Kevin: This is our second post right here.
It is hollow, so it only weighs about 200 pounds.
But those two posts have got to be able to carry a steel beam that weighs over a ton.
Man: And touchdown.
Kevin: This is our beam right here.
It's 35 feet long, and each side has been padded out with three 2x12s.
That makes it easy to marry our roof rafters to right here.
And then on top, there's a 2x10.
It's been cut on an angle, both sides.
This matches the pitch of the roof.
The whole thing weighs over 2,000 pounds, and that's partly because it's so long, but it's also got to carry the entire weight of the roof as well as a full snow load.
So they're calculating about 15,000 pounds for this thing to have to carry.
♪♪ Charlie: Use our spud wrench, and it's tapered so we can line up the holes easier.
Got it.
Good.
That's it right there.
All right, I'm on.
♪♪ I think we're good.
We know we measured it.
The heights for the columns are right.
But just for the heck of it, check it with the level.
Right on.
Perfect.
Kevin: All right, that is satisfying to see that beam going.
Tom: Oh, it sure is.
I love watching that stuff go in.
But this ridge beam is actually doing a lot.
It's actually carrying the load of the roof, but it's also keeping the walls from bowing out.
Kevin: All right.
And our roofline is gonna look like what?
Charlie: Right over here we put a mock-up.
You see a 12 pitch gable that'll drop on the steel beam onto structural lumber on top of these old beams.
Kevin: Right here in the middle.
Charlie: Right here in the middle.
Charlie: And on the outside wall will be a 4 pitch shed roof right where that 2x4 shows it dropping on it.
Kevin: So underneath here, we're gonna look up to the bottom of the shed.
And then underneath here, this is all cathedral so we'll look up to the bottom of that roofline.
Tom: Right, and underneath the cathedral, you gonna see all the old boards and the old rafters.
So it's really gonna be a cathedral room right here.
It's gonna be beautiful.
Kevin: Yeah.
Making some good progress.
Charlie: Next time we're here, this will be all framed up.
Kevin: I love it.
Tom: Moving along good.
Bill: All right.
Should I get up now?
Man: Sure.
Go right ahead.
Bill: Oh, you didn't tell me anything about the foot pedals.
Man: That's just moves it back and forth.
You don't even have to worry about that.
Bill: But I shouldn't touch it, right?
Man: Well, no.
♪♪ ♪♪ Bill: Oh!
[ Laughter ] Okay.
That was fun.
♪♪ ♪♪ Kevin: With our timber-frame ell dismantled and now put back together again, complete with a big steel beam, it is time to start thinking about some of the interior finishes, including our kitchen.
Helen, how are you?
Helen: Hi, Good morning.
Kevin: Good morning.
Karen, Good to see you again.
Karen: Good to see you as well.
Good morning.
Kevin: So nice to have you back helping us with the interior design.
A kitchen is obviously an important step.
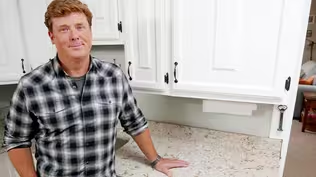
So, Helen, have you given any thought to the countertops yet?
Do you know where you're leaning?
Helen: Sure, I have.
I'm partial to a natural material.
Kevin: Mm-hmm Helen: And we're thinking seriously about soapstone.
Kevin: Oh, yeah, classic.
Helen: Classic New England.
And I'm also -- I'm a scientist.
I've been working on soapstone... Kevin: Oh, that's right.
I hadn't thought about that.
Helen: ...for half my life.
Never had it in a kitchen.
Kevin: Sure.
Helen: So, excited to look at that.
And really, you know, this place is huge.
There's all kinds of materials in here.
Karen: There are thousands of slabs here.
We're in the right place -- a huge warehouse.
And I think we should start with engineered quartz.
We can look at other things as well.
There's a lot to see here.
Thousands of slabs.
Helen: Sounds good.
Kevin: Good to look at it all.
We've got it all right here at our fingertips.
Karen: Kevin, this is Al.
Kevin: Al, nice to meet you.
Karen: This is Al's family business.
He imports slabs of material from all over the world.
Kevin: Terrific.
Karen: Beautiful things to see here.
Kevin: Yeah, including some quartz samples, right?
Al: Yes.
This is a man-made product.
We usually we call that engineering stone.
And the pros of this material -- It doesn't have any pores.
So this material should not stain.
Kevin: People love it because it is so durable.
The only downside about this product, you have to worry a little bit about the heat.
So your pans, your pots that are hot, you have to be careful a little bit with this material.
Kevin: Gotcha.
Al: So it's always good to put something underneath when you have a quartz in your countertop.
Kevin: Right.
Helen: I think it's actually beautiful, but it has a very modern feel.
Kevin: They've got a timber frame from the 1720s.
Al: I know.
Kevin: I don't think quartz is actually -- we know quartz is not what you're looking for.
But it's good to know it's an option, although I think we're committed to natural materials, right?
Al: Correct.
Kevin: Which I think you must have millions of.
Al: Yes, we do.
Right this way, Kevin.
So, Kevin, this is one of the most popular marbles that we have in the warehouse.
It is a local marble from Vermont we call the Danby marble.
Good material for a kitchen countertop.
But you have to worry about the porosity on this material.
So marble has a lot of calcium, and when marbles have a lot of calcium, the pores are usually more open.
Kevin: Right.
Al: So you could stain this material easy compared to the engineered stone.
Kevin: Right.
So a little trade-off with the natural stone.
But it is classic, right?
Helen: This is just gorgeous.
I mean, it's very quiet, but it still has a lot of variation in it.
Kevin: Can I put you into a quiet piece of marble, perchance?
Helen: Well, it seems like it has kind of a much more "look at me" than we want the countertop, I think, to be in the background a bit more.
Kevin: Not quiet enough, Al.
Helen: Not quiet enough.
Kevin: All right.
I think we're moving on from -- it is beautiful, though.
Al: It is.
Kevin: What else you got natural you can show us?
What am I looking at here, Al?
Al: This is a black granite called the jet mist.
It's not too soft and not too hard.
You have to be careful with things that still could stain, but it's more strong versus the marble, which is a softer material.
Kevin: And it's darker, Helen, so does that sort of tone work sort of with your timber-frame idea?
Helen: I think the darker tone is good, but I'd like something, I think, with more movement in it.
Kevin: This is kind of monolithic.
Al: So the next one over is the Barroca soapstone.
Kevin: So, soapstone.
And this is kind of what you had in your head, Helen, soapstone?
Does this live up to what you had in your head in terms of look?
Helen: This is more beautiful than what I had in my head.
Kevin: [ Laughs ] Well, that's good.
Helen: I just love it.
Kevin: More beautiful is better than less beautiful.
Helen: Yeah.
it has a lot of variation in it, and it has some different color.
You know, some gray, bluish, some greenish streaks coming through here.
Kevin: And Karen, as our advisor, would you suggest that it's a good choice for us?
I thought it was a great choice.
It looks wonderful with the cabinet color.
I 100% approve.
I absolutely love it.
Kevin: So that's two votes for it, Al.
Although it is a very different stone, even though it's natural, like the granite and the marble.
It is different than anything we've seen.
Al: It is.
Correct, Kevin.
This is a soapstone.
It's probably one of the softest material by nature because it's made of talc.
Nevertheless, the Barroca soapstone, it is a harder soapstone that gives you the strength that you're looking for your kitchen countertop.
Kevin: Right.
Al: It gives you that nice rustic old feeling in an old house.
If it were to be scratched, which it could be... Al: It could be.
It could be scratched.
So you could easily repair a soapstone with a very fine sandpaper.
You sand it down, then you reapply the mineral oil on the material, and it blends in and becomes a perfect material again.
Kevin: Yeah, let's talk about that oil because we do want to oil it.
We do want to protect it.
So can you help us think through staining with all of these materials?
Al: Of course, Kevin.
I have some samples here to show it to you.
We have a couple marbles.
One marble is from Brazil.
The other one is a Danby marble, Vermont, local.
Kevin: Nice.
Al: We got a couple of granites in here.
One is polished, the other one is honed.
And we also have the two soapstones.
Kevin: And you made a mess of them all.
What did you put on them?
Al: So we put this on about for 12 hours.
We put lime, wine, and turmeric on each one of these samples to show it to you if it will stain or not.
Kevin: All right.
Well, and now we wipe them off 12 hours later?
Al: Yes, sir.
Kevin: Go for it.
Al: So we wipe these off, and you will see the reaction on each one of them.
Kevin: Oh, yes.
I'm gonna get a little bit of that turmeric off of this right there.
That's the lime in this corner?
Al: That's the lime on that corner right there.
This is the wine in here.
And the turmeric, eventually, you can see it stains.
Kevin: So I come down in the morning and my kids are getting grounded for sure because that is not going away, those colors?
Al: Yes, I mean, you probably will have a hard time trying to remove that on a marble because, as I mentioned, the pores are more open so it could stain much easier.
Kevin: Right, and then even on the Brazilian, it really performs in a similar manner, right?
Al: Correct, and you can see perfectly where the wine is and the turmeric is.
And where the lime was, it actually etched the material.
So you lose that shine, the reflection on the material, the polish, and you see more of a mark.
So the granite is definitely more resistant, but it does have pores so you could definitely stain the material as well.
Kevin: Okay, so definitely did better than the marble, although there are some remnants right there.
And then the soapstone, moment of truth.
Al: Sure.
So I don't get the color.
I do see the outlines of these materials, though.
Al: Exactly.
This is mostly superficial, Kevin.
As you can see, the product has not gone into the material.
Kevin: So I see it here.
But you're saying that it has not absorbed down into the material.
Al: Into the material.
Kevin: Would I see that in something else?
Let me just pull up the... Al: Sure, if you look at the marble and compare versus the red wine, you see the stain that went inside the material because the pores are open.
Kevin: Right.
So that surface staining that I've got on the soapstone that's going to go away or I could fix that, whereas with the marble, there's just no fixing that at all.
Al: Correct, I mean, this superficial, you can eventually clean it out and buff it out, versus the marble, you will actually have to use a product to go in the material in order to remove that stain.
Kevin: Is this why you use this stuff in the lab?
Helen: Absolutely.
Kevin: Well, are you still comfortable using it in your kitchen?
Helen: Yeah.
And I have to say, great experiment, guys.
[ Laughter ] Kevin: From a scientist.
Well done.
Well, Al, we appreciate you showing us around.
That was very good.
Karen, as always, thank you for the help with the design.
Karen: Thank you.
Kevin: Helen, thank you for decisions, and decisions mean that we can move forward.
So that is a wrap for now.
But next week we're going to look at a whole bunch of interior things, including lighting -- how we're going to light up these counters in that old timber frame.
So until then, I'm Kevin O'Connor for all of us here at "This Old House."
All right, so whoever came up with turmeric... Kevin: Next time on "This Old House"... Man: It's a puzzle.
Kevin: It is.
And I can add one more piece to the puzzle, too.
You know, your entire ceiling of this big vaulted space is literally going to be the old roof boards.
This is a dark material.
Man: It is.
Kevin: And imagine everything up there that is this dark.
Heath: Right.
Kevin: You're gonna have to light this up, Heath.
You're gonna have to give us some volume and some general light into this space.
Heath: That's the one thing we actually have an answer for that I think we've all agreed upon and we like, which is nice.
Man: Yes.


- Home and How To

Hit the road in a classic car for a tour through Great Britain with two antiques experts.


Support for PBS provided by:
Funding for THIS OLD HOUSE is provided by The Home Depot and Renewal By Andersen.