E20 | Transition Garden, Granite Post | Ask This Old House
Season 21 Episode 20 | 23m 42sVideo has Closed Captions
Jenn plants a sun and shade garden; Tom talks downspouts; Mark engraves a granite post.
Jenn Nawada shares why she loves hiking and how nature inspires her landscape designs. Then, she helps a homeowner transform a small sun and shade backyard with a new garden; Tom Silva explains the importance of gutter downspouts and how they work; Mark McCullough adds street visibility to a farm by remounting an original farm sign and engraving an 1800s granite post.
Problems playing video? | Closed Captioning Feedback
Problems playing video? | Closed Captioning Feedback
Funding for Ask This Old House is provided by The Home Depot, Renewal By Andersen, and ChipDrop.
Support provided by:


E20 | Transition Garden, Granite Post | Ask This Old House
Season 21 Episode 20 | 23m 42sVideo has Closed Captions
Jenn Nawada shares why she loves hiking and how nature inspires her landscape designs. Then, she helps a homeowner transform a small sun and shade backyard with a new garden; Tom Silva explains the importance of gutter downspouts and how they work; Mark McCullough adds street visibility to a farm by remounting an original farm sign and engraving an 1800s granite post.
Problems playing video? | Closed Captioning Feedback
How to Watch Ask This Old House
Ask This Old House is available to stream on pbs.org and the free PBS App, available on iPhone, Apple TV, Android TV, Android smartphones, Amazon Fire TV, Amazon Fire Tablet, Roku, Samsung Smart TV, and Vizio.
Keep Exploring


This Old House Insider Newsletter
Get This Old House exclusive stories, tips, and behind-the-scenes information delivered right to your inbox every month.Providing Support for PBS.org
Learn Moreabout PBS online sponsorship♪♪ Kevin: On "Ask This Old House," our experts travel across the country to answer questions about your house.
♪♪ Today, Jenn helps save a shed by installing a drip edge, then transforms its surroundings by adding a combination sun and shade garden.
Plus, it's time for Downspouts 101.
Our teacher, Tom, will school us and why they are critical to the upkeep and preservation of buildings and homes.
And Mark will give an old granite post a new life on the farm -- on "Ask This Old House."
Jenn: Part of my job is a desk job.
When I'm doing my designs, I am at my drafting table, and then I have to write an estimate.
But when the client says yes, it's my ticket to freedom.
[ Mid-tempo music plays ] And then I go get to play outside with rocks and plants and create what I put on paper.
I love being outside.
You feel good outside.
It just makes everything calm down.
It brings you back to your reset state, and...
I need it.
I think everybody needs it.
There are so many patterns in nature.
I think so many artists get their patterns from a leaf, from a branch, from a silhouette of a tree.
And I think just mimicking that, the design's already done.
It's already been created.
♪♪ I think I get inspiration from being in the woods as well.
Like, you just see a boulder, and then you see a swath of ferns, and a lot of times in my designs I'll pull that element into the design just to mimic nature, 'cause nature knows best.
So that's what I'm trying to do for people in their backyards -- bring them from inside to outside.
Woman: Thank you so much.
Jenn: Good luck with everything.
♪♪ Kim: Hey, Jenn.
Jenn: Hi, Kim.
Kim: Nice to meet you.
Jenn: Nice to meet you in person.
Kim: Thanks for coming by.
Jenn: Thanks for writing in.
You want to explain your space for me here?
Kim: Yeah.
So, this is our backyard.
Not a lot of greenery here, and I'm actually trying to figure out how to make this just a little bit of an oasis back here, something that's less of an eyesore and something that I just enjoy.
Jenn: All right.
So, is this sun or shade?
Kim: Well, that's the problem.
It's got sort of half sun and half shade, and I just didn't know how to handle that.
Jenn: It's actually not a problem.
We could just determine where the shade is.
We do shade perennials and sun perennials over there, so there's always a solution to that.
And then what about the shed?
Kim: This is our gardening shed and, you know, multipurpose.
I actually love it.
It's charming.
Jenn: It is charming.
Kim: I like it.
So I'd love to incorporate it more into the yard instead of having it look like just sort of an afterthought.
Jenn: Okay.
Perfect.
So, one, you're gonna need clean access to get in and out of the shed.
So maybe a few stepping-stones or some kind of path.
And then, second, you can see where the water drips off the roofline from the drip edge up top, and then the dirt is splashing on.
It's gonna cause rot in your wood.
And I think if we put a drip edge on the ground, that could fix that, okay?
There's a lot of moving pieces.
It's a small area but a lot of things going on.
I'm gonna get my tape measure, make some measurements, and put a little plan together, and then we'll go from there.
Kim: Great.
Okay.
[ Mid-tempo music plays ] ♪♪ Jenn: Okay.
So here's the plan I came up with.
I'd like to start with a shed.
Here's the drip edge.
It'll come out 12 inches.
That's gonna fix any water back-splashing up and rotting your wood.
New England stepping-stones.
Thought I'd pick a native New England stone.
Kim: I love that idea.
Jenn: So it's a Goshen stone.
It's a durable stone.
You're gonna be able to get lawn mowers, snowblowers in and out.
So it's gonna create perfect access while maintaining a natural vibe.
This is the shadiest part of the property, on your right side, and plants like hosta will do perfectly there.
Big foliage.
It'll feel nice and full.
And over on the left we have all full-sun perennials -- multiseason -- spring, summer, fall, right?
And also, as a bonus, on the side, we have annuals.
So every year you could switch it up.
And depending on the season, I think cosmos would look so beautiful up against the fence line.
So, what do you think?
Kim: I love that idea.
Looks great.
Jenn: So, I wanted to get the first stone in for many reasons.
To get the right grade.
I wanted to have clearance of this door swinging open, 'cause before, it was getting stuck.
Kim: Perfect.
I love the stone.
Jenn: It looks so good.
So before we place the other stones, what I want to do is get the drip edge in.
So we're gonna go travel back this way.
I want to come off 12 inches, right?
Twelve inches here.
So about right there.
And then...we're gonna mark this line.
I've got a can of paint.
So what I want to do is mark it so it'll define the edge.
What we're gonna do is excavate down about five inches.
So I had already bent to fit.
Good?
Kim: Looks good over here.
Jenn: So next, grab a spike and then just take your hammer.
So this is the fabric.
Just tuck it in so it's about an inch below.
And next, I've got the decorative stone.
The first stepping-stone is in.
I want to get the second one in.
We're gonna dig it to the depth of one and a half, two inches so we can get them level.
Kim: Good.
All right.
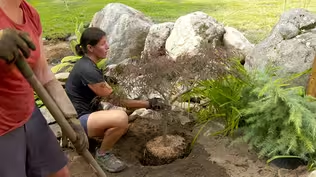
Jenn: And now I want to take the weeds out, turn over the soil, loosen everything up, and add some amendments, like compost.
[ Mid-tempo music plays ] Every job I do, I always lay out the plants.
And before you get them in the ground, it's an opportunity to move them.
Kim: Right.
Makes sense.
Jenn: So what do you think?
Kim: I think it looks great.
I would like to maybe move that one a little forward.
Jenn: This is your house.
You can move anything you want.
♪♪ I think it's good.
Okay.
So I see you've got the hosta.
Let's get that in the ground.
When I plant perennials, go around, you tease the roots at the side so they don't start to grow circular, like how they were in the pot.
That looks pretty good.
Kim: Now, how deep do you want to plant it?
Jenn: It should be at the soil line where the plant is in the pot.
Kim: Okay.
Great.
Jenn: I have to also account for mulch.
We plant them a little bit high and then just go around and make sure there's no air pockets, and then we move on to the next.
♪♪ ♪♪ It wasn't in the plan, but you could use a few daffodils.
Kim: I would love that.
Jenn: Put the root side down.
It's about six inches deep.
And put like eight to ten in there.
Awesome.
And then we backfill.
Sometimes I just drop little piles and then go back and spread them.
Kim: Sometimes big piles?
Jenn: Yes.
♪♪ Kim, this plan really came together.
Kim: I love it.
I love the stepping-stones.
I love the drip edge.
And I just can't believe the transformation.
I can't wait to see the flowers in bloom all season long.
Jenn: They're gonna travel throughout the season.
All you have to do when you come to falltime to put the garden to rest -- cut back all the perennials two to three inches high.
Springtime, do a little raking, add a little fertilizer, do your watering, and enjoy.
Kim: Thank you!
[ Mid-tempo music plays ] ♪♪ ♪♪ Kevin: Hey, Tommy.
Tom: Hey, Kevin.
How are you?
Kevin: All right.
Gutters and all things gutter, huh?
Tom: Yeah.
Gutters and downspouts.
How do you get the water away from your foundation?
I mean, think about it.
You have a gutter that's sitting on you fascia board, and you've got to get the water out.
So you need an outlet in the gutter.
Now, this is an outlet that comes with a little piece of gutter that you could put into it.
But you can also get this separate, drill a hole in your gutter, and put one in it.
So if you have a gutter like this and you want to connect your downspout to it, most of the time it's very rare that you're gonna see where you can go straight in.
Kevin: There's gonna be an overhang typically, and the corner board's gonna be back here.
Tom: Yeah, and some houses don't have an overhang, but that's not common.
Now you have to think about -- This is an "A" style downspout.
It's two pieces.
It's wider on one end than the other so that one will go into it, like that.
You also want to make sure you don't put it on upside down, such like this.
Now you have a seam where the water can run out, okay?
So you put it on the right way.
You think about the overhang that you have.
So this goes in, and this would be basically like an eight-inch overhang right here.
So if you had a 12-, 14-, 24-, whatever, you take them apart.
You put this into the gutter here.
This goes against the house, and you'd make a filler piece from a downspout to go in between, and that solves the problem.
Kevin: Okay.
Understood.
Tom: Now, you also have to think about the style.
This is an "A" style, and the gutter would come down flat and sit on the house -- downspout.
Kevin: Different shapes have different names.
Tom: Yeah.
This is an A.
This is a B. Kevin: So it's sort of at 90 degrees to that.
Tom: It changes the direction of the downspout and lets it go that way.
Kevin: Yeah.
Tom: And that is an A-B.
Kevin: Oh.
I was gonna go C, but I get it.
'Cause they got the A and the B together.
Tom: Yeah.
Exactly.
So you have a transition where you can come down one way and then flip over and go the other way.
Kevin: So smart.
Tom: Right.
Right.
Now, the other thing you got to think about is getting the water away from your house.
It's important that you get the water away from the foundation.
So this is a diverter that the downspout will sit in here, and now, when that water is coming down, it goes into the diverter.
It gets it away about two or three feet.
And this can fold up out of the way if you want to cut your grass or work on your gutter, and then you basically let it fall down.
Kevin: Yep.
Tom: Now, it's important that, like I said, you want that water to be away from your foundation.
Three to four feet is always a good number because the water will drain into the ground here.
You don't want it to drain in against your foundation, especially in New England, when the ground freezes.
Now you have a big chunk of ice against the foundation.
That could cause problems, and you could end up getting water in your basement.
Kevin: Gotcha.
Tom: If you have a situation that's really tough -- Let's say you have a gutter up high and you have a crazy overhang or maybe you got a situation where you got a fence in the way, you can take a pipe like this -- This is for a larger downspout.
But you could take this and go around a corner with it, bend it, or you could go at the bottom and use it as a diverter, stretch it out, and really get it away from the foundation.
Kevin: The sound of that.
Right.
That's a good way to get water away.
Tom: Yeah.
Absolutely.
Kevin: Turn it like that.
Tom: Yeah.
You have to remember that water is the enemy.
You get it into your house, it's gonna cause a lot of problems.
Kevin: You don't think about the gutters too much -- until they stop working and the water's going where it shouldn't.
Tom: There's a leak, and it's always too late by then.
Kevin: Right.
Thank you, Tommy.
Tom: My pleasure.
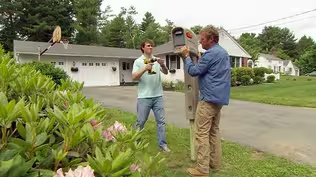
[ Mid-tempo music plays ] Mark: I'm on my way to a homeowner's house who's written me about a granite post.
Now, historically, granite posts were used for marking property, hitching your horse, or even fence-posting.
Today, we still use them as markers, but we'll also use them as a mailbox, and we use them mainly for decorative purposes.
I happen to love them very much because...they're stone.
♪♪ Hey, Victor.
How you doing?
Victor: I'm great.
How are you?
Mark: All right.
Great.
Thanks for having me out.
I love this place.
It's a real, live working farm.
I mean, chickens all over the place.
I just heard a rooster.
You got these horses over here.
I mean, this is great.
Victor: Yeah.
First of all, thank you so much for coming out.
Mark: My pleasure.
Victor: We're not exactly sure how old the property is.
We think 1800s.
Our household, carriage barn, and there's stables over there that are original.
Gradually, like everything, it got subdivided.
My parents bought about four years ago.
I've been managing it for about 10.
We board other people's horses.
And we have the chickens.
We sell our eggs in town.
Mark: All right.
That's all great.
Now, when I drove in, I saw this beautiful granite post right out front.
Victor: Yeah.
So a couple of years back, we'd always seen this thing lying down in the brush down there.
And I had an excavator here doing some work anyway, so I asked him to pluck it up.
It turned out it was a nice, kind of square post.
So we put it in our front entryway island here.
Mark: Why don't we check it out?
Victor: That'd be awesome.
Mark: All right.
Let's go.
All right, Victor.
So this is the post.
Victor: Yes, it is.
Mark: It looks great.
I love it.
So, how'd you get it in here?
Victor: Yeah.
I have a small tractor, and a friend of mine and me brought it over here, dug about three feet down, tried to make it kind of plumb and level, and packed the base of crusher run.
Mark: Okay.
Well, you did a great job.
And I'm glad to hear that you did the crusher run.
Some people would tend to put cement in here, which I don't like, because if it does get hit by a plow or a car, it's gonna snap.
If you have the crusher run and it gets hit, it's just gonna be knocked over.
We pick it up.
We put it back into place.
So all right.
Well, more good news.
I think this post is actually original to the property, and there's a couple reasons why.
Victor: Wow.
Mark: Yeah.
You see this notch right here and this one and this one?
That is for feather-and-wedge placement.
That's what splits the granite.
If I were to do it today, I would use a drill, and these notches would be much deeper into the stone, which would make for an easier break.
But back then, when they did it by hand, they just went in as much as they had to, and then they would split the stone.
I know you had something specific in what you wanted to do with it.
Victor: So, we have a problem on the street occasionally when I have visitors, we're giving a tour of the farm or something.
They'll blow right past.
They don't even know there's a farm here.
We do have this older sign that we think is also original to the property, but it's kind of lost on this tree.
And we don't really have good street numbering either.
Mark: Okay.
Okay.
So, that sign, actually, would probably mount perfectly on the front side of this post, which is lucky for us.
Victor: Oh.
Mark: Yeah.
And putting numbers in shouldn't be too hard.
I actually have the tools in my truck.
So if you can take this sign down with a ladder and a screw gun, I'll get the tools that we can etch the numbers into and we can get going.
All right.
Okay, Victor.
So what I've done here is this is an erratic line, as you know.
So what I did was I found the plumbness of it.
I went over, I got the levelness of it.
That helped me with my center point, which is right here.
I'm gonna take that and use that as my screw hole for the sign.
So the sign will look like -- just like that.
Victor: That's great.
Mark: Right there.
The only problem I have is the sign is leaning down.
So what I'm gonna have to do is go into the stone, hog it out a little bit so the sign sits more into the stone itself, and that will give me a level look.
Victor: Great.
Mark: All right.
We're gonna have to use some hand tools and maybe a grinder to get that out.
But I'm probably gonna trace the sign and get going on that.
And if you don't mind giving me a hold right there, Victor.
Victor: Yeah.
Mark: I'm looking right in.
Okay.
Now we're all marked out, Victor.
You're gonna need those glasses.
You're gonna need that ear protection.
I'm gonna use my own.
We're gonna use the grinder, and we're gonna start here and here, and we're gonna take out these humps.
And again, that's gonna allow the sign to sit back to where it's supposed to be.
Be advised -- We may have a little dust.
But that's what the HEPA vac is for.
[ Grinder whirring ] Sign.
Okay, Victor.
If you could hold me into place.
Okay.
Go up in the end.
Okay.
Victor: A little bit more?
Mark: Yeah.
A little bit more.
[ Grinder whirring ] All right, Victor.
I think we're good.
We're seated where we want it to be.
We can level and plumb this up a little bit better once we have the screws in.
But you know the old stuff.
You never get it exactly perfect, but you do have to keep working it.
Victor: Yeah.
It's been repaired before here.
It's been soldered, so it may not even be a right angle.
Mark: Right.
Okay.
So, Victor, you see what I'm doing?
I put a little silicone... Victor: I was wondering how you were gonna figure out... Mark: ...on the top of my bit.
That's where I want my hole.
[ Drill whirring ] Again the same trick -- a little bit of silicone.
Right in.
We're pretty well lined up in the top.
Victor: Okay.
Mark: So we're lined up there.
And you know what I'm gonna do?
I'm gonna take this bit... and I'm gonna find... Victor: Yeah.
Let me... Mark: ...where we are.
There.
Now... [ Drill whirring ] All right.
Victor: Nice.
Pull this out?
Mark: Yep.
All right.
We're pretty snug right there.
Victor, what do you think of that?
Victor: I love it.
It's so much better than up on the tree.
Mark: So why don't we get set up to etch in the numbers?
Victor: Perfect.
Mark: All right.
And I'm gonna use some stencils for those.
As you can see, I taped a couple together.
And I love the way they look vertically, so I'm gonna go up and down, like that.
But I'm probably gonna go to my high point, which is the top of the stone.
I'm gonna measure down to the top of the sign.
That looks about 10 or 11 inches to me right now.
I'll take that number, go to the bottom of the sign, and come down, and that's where we'll start our letters.
Victor: Got it.
Mark: I have an etching machine, which I love to use because it lets me trace these stencils out perfectly.
And I think you're gonna love it when I'm done.
Victor: Yeah.
That sounds great.
Mark: All right.
Let's get going.
Victor: Nine and a half.
Mark: Okay.
Let's call it nine and a half.
So that's the top of our first stencil.
Victor: Is matching that distance to the top of the sign and making it the same in between the numbers and the sign -- Is that a proportionality thing or is it... Mark: Well, masons are always plumb and level, and we just want to make sure everything is easy on the eye and make sense to the eye, so... [ Mid-tempo music plays ] ♪♪ [ Drill whirring ] So, Victor, what I'm doing here is I'm using a Dremel tool.
And again, that allows me to gouge out these numbers the way we did.
It just lets us take out small pieces at a time.
♪♪ ♪♪ ♪♪ ♪♪ All right, Victor.
What do you think?
Victor: It looks incredible.
Mark: All right.
We got the sign in the right spot.
The address number's right below it, so no confusion.
Victor: Yeah.
It's great.
People will finally know where they're coming to when they pull up.
Mark: Right.
Victor: Is there anything I need to do maintenance, upkeep-wise?
Mark: Mother Nature is gonna be our friend.
She's gonna weather those numbers a little bit, and after a couple of years, it'll look like it's been here for 200 years.
Victor: That's what I wanted to hear.
Mark, thank you so much.
We really appreciate it.
Mark: All right, Victor.
And if you have questions about your house, we'd love to hear from you, so keep them coming.
Until then, I'm Mark McCullough for "Ask This Old House."
Victor: Man, this looks really great.
I can't believe it.
Mark: A little bit of weathering, those numbers will fade a bit, everything will be great.
Kevin: Next time on "Ask This Old House," Jenn transforms a sun-damaged yard into a sun-loving garden.
Then Mark will show you how to clean different types of stone surfaces to help spruce up your yard this spring.
And have you ever removed a radiator but struggled with patching the floor?
Well, Tommy will show you how.
All that on "Ask This Old House."


- Home and How To

Hit the road in a classic car for a tour through Great Britain with two antiques experts.


Support for PBS provided by:
Funding for Ask This Old House is provided by The Home Depot, Renewal By Andersen, and ChipDrop.