E23 | Garden Restore, Bathroom Fan | Ask This Old House
Season 22 Episode 23 | 23m 42sVideo has Closed Captions
Lee restores a garden bed; Celebrating painter Stephanie Young; Heath installs a bath fan.
Lee Gilliam helps a homeowner improve the soil conditions of her garden bed before installing new plantings; a New Hampshire painter and business owner shares her journey in the trade; Heath Eastman helps a homeowner mitigate bathroom moisture by installing a remote bath vent and timer switch but runs into some trouble when he finds old wiring in the wall.
Problems playing video? | Closed Captioning Feedback
Problems playing video? | Closed Captioning Feedback
Funding for Ask This Old House is provided by The Home Depot, Renewal By Andersen, and ChipDrop.
Support provided by:


E23 | Garden Restore, Bathroom Fan | Ask This Old House
Season 22 Episode 23 | 23m 42sVideo has Closed Captions
Lee Gilliam helps a homeowner improve the soil conditions of her garden bed before installing new plantings; a New Hampshire painter and business owner shares her journey in the trade; Heath Eastman helps a homeowner mitigate bathroom moisture by installing a remote bath vent and timer switch but runs into some trouble when he finds old wiring in the wall.
Problems playing video? | Closed Captioning Feedback
How to Watch Ask This Old House
Ask This Old House is available to stream on pbs.org and the free PBS App, available on iPhone, Apple TV, Android TV, Android smartphones, Amazon Fire TV, Amazon Fire Tablet, Roku, Samsung Smart TV, and Vizio.
Keep Exploring


This Old House Insider Newsletter
Get This Old House exclusive stories, tips, and behind-the-scenes information delivered right to your inbox every month.Providing Support for PBS.org
Learn Moreabout PBS online sponsorship♪♪ Kevin: On "Ask This Old House," Our experts travel across the country to answer questions about your house.
♪♪ Today, Lee improves the soil conditions of a garden space that takes it from dreary to dreamy.
Tracy: I cannot believe the difference from this morning till now.
Kevin: Then we meet a painter whose passion for the trades inspires those who work around her.
And Heath installs a bathroom vent for a homeowner in an old house with some vintage wiring.
That's all coming up next on "Ask This Old House."
♪♪ Tracy: Lee.
Lee: Hi, Tracy.
How are you?
Tracy: Fine.
Nice to meet you.
Lee: Nice to meet you too.
Got an e-mail from you about a project you have going on in the back.
Tracy: Yeah, my backyard right now is a blank slate.
Lee: Okay.
Tracy: I travel quite a bit, and I haven't had a chance to do anything back there.
So I'm looking for something low maintenance and to fill it in, make it look better.
Lee: Great.
Let's go take a look at it, see what we got.
Tracy: Great.
Lee: Okay.
Tracy: So here is my lovely yard.
Lee: [ Laughs ] Tracy: Nothing here.
The soil doesn't look great and I don't know what to do with it.
It's rather daunting.
Lee: You definitely could have a nice garden here, but the conditions aren't really right right now, so we'll work on those.
Tracy: I would like that because it's, you know, it's cozy back here.
Or it could be if we had some plants.
Lee: Sure.
A lot of stones.
Somebody looks like somebody used the peastone for, like, a mulch.
Tracy: That's what it was when I moved in here.
There was white peastone everywhere and tried to rake up as much as I could.
But every time it rains, it comes back to the surface.
Lee: Okay.
Also, we have an issue with the pH, so we got some moss growing in here.
Tracy: Is that what happens with the pH level?
Lee: So what I want to do is like amend the soil and it will help the plants that we want to put in.
Tracy: Alright.
So that fixes the pH level.
Lee: That should.
And it also looks like we have a little heat, you know, issue probably.
Tracy: It does.
It gets really warm here, particularly until like mid part of the afternoon.
Lee: Okay, great.
So I'd like to introduce drip irrigation in here.
Tracy: Okay.
Lee: I think it'll work really well.
Okay?
Tracy: Alright.
Lee: And that goes down and we'll put them around all the plants, and that will water the plants, so it'll be good.
Tracy: Alright.
So if we can fix it all up, then we can have a nice garden back here?
Lee: It'll work.
Tracy: Alright.
Lee: Alright?
Tracy: Let's do it.
Lee: Okay.
Let's go.
So, let's do some raking.
Let's get these stones up the best we can.
Tracy: Alright.
They make such a mess.
Lee: I know.
We're not gonna get them all, but we'll get a good percentage.
We'll just put them in small piles.
♪♪ Tracy: Look at that.
Looking good.
Lee: Yeah.
Not bad.
Now we're going to till the soil.
So that goes there.
Tracy: Alright.
Lee: Okay.
I'll start this one.
Good?
Tracy: Yep.
Lee: All I want to do is go back and forth nice and slow.
Let the machine do the work.
♪♪ Just like that.
This will allow us to add fertilizer, and it'll help the pH level and restore the soil quality.
♪♪ We rototilled the soil, so it's got some oxygen in there.
It's nice and fluffy right now, but let's add compost in, okay?
This will help the plants take off and survive.
They love this.
It's all organic.
So beneficial to the flower beds.
So now I want to put some organic fertilizer.
It'll help the roots get going.
Tracy: Great.
♪♪ Lee: And what I want to do now, we'll rototill this in.
[ Motor starts ] And I'm just going to do a light one.
We went down nice and deep before.
I just want to get a nice mix.
♪♪ ♪♪ Soil is all amended and ready to go.
So I picked out some plants.
We did some boxwoods, hide the foundation, evergreen all year round.
Tracy: I like that.
Lee: Alright.
And then I went with some hydrangeas.
This is an Annabelle hydrangea here.
And then this one over here is a lacecap hydrangea.
Nice burgundy color, leaf in the fall, real pretty.
Tracy: I love hydrangea.
Lee: Yep.
And then we did some sedums down below for fall color.
Tracy: Nice.
Lee: Catmint, pollinator.
All the plants.
Tracy: I'm not familiar with that plant.
So pollinator for bees and butterflies?
Lee: Correct.
They love it.
Tracy: Great.
Lee: And then I topped it off with some black-eyed Susans for like that summer color.
Tracy: Nice.
Lee: Okay?
I think we're good.
Tracy: It looks great.
Lee: Thank you.
I'm gonna have you hold that for a second.
Thank you.
Tracy: Got this one.
Lee: Let's try to get these plants in the ground, and then we can add our irrigation.
What I like to do is see how it's all root-bound?
Tracy: Yes.
Lee: Okay.
You just want to break it up a little bit.
We'll put it in the ground.
Tracy: And how high up do you put it?
Lee: I like to put it down level with the flowerbed that we have.
Tracy: Okay.
Lee: Okay?
Keep it right at the same level.
So I like to plant the hole a little bit bigger than the pot.
Tracy: Makes sense.
They look great.
♪♪ I asked a good friend of mine, Mark, to come by.
They're going to put the irrigation line in the ground, and what they use is a ditch digger, so we don't have to dig up a trench.
Does a nice clean job.
So now what we're going to do is temporarily remove a piece of the bluestone so we can get the line underneath the walkway.
♪♪ Then they can run the lines around the plants as usual.
♪♪ So, drip irrigation has been put in.
So I think we're ready for mulching.
I love to use this leaf mulch.
Tracy: How is that different from other mulches?
Lee: Well, other mulches are more like wood chippy and a kind of like dye and stuff like that they put on them.
This is all organic.
It breaks down beautifully.
Tracy: Yeah, it looks really nice and a lot of moisture, it seems like.
Lee: Correct.
It'll hold the water.
So what I want to do is probably put like two inches down.
Tracy: Okay.
Wow.
Look at it.
Lee: What do you think?
Tracy: Oh, it looks amazing.
Lee: Not too bad.
Tracy: I cannot believe the difference from this morning till now.
Looks great.
Lee: So I need you to do me a favor.
I need you to water every day for about 10 days, okay?
Tracy: Okay.
Lee: Alright?
About 25 minutes each time we're watering, okay?
Tracy: Alright.
And the irrigation system will be set up to do it that way?
Lee: Correct.
Tracy: Okay.
Great.
Great for me.
Lee: Thank you.
Tracy: Oh, thank you so much.
Lee: Nice to meet you.
We'll see you soon.
Tracy: Nice to meet you too, Lee.
Take care.
This is incredible.
Lee: Thank you.
Bye-bye.
♪♪ Kevin: We meet contractors all across the country who go above and beyond in their trades.
Today, we want to shine a spotlight on a talented painter who's brushing her way through the world of home improvement.
Stephanie: When you're in the room, a painter sees everything.
We see every imperfection, everything.
You as a customer, you're not even going to see that.
Hi, I'm Stephanie Young.
I own Pro Image Painting LLC in Londonderry, New Hampshire.
In high school, I thought I was gonna be a dental hygienist.
Like, that's what I originally went to school for.
Then I was going to get my EMT and paramedic and go that route.
And then I ended up really liking painting.
I was meeting different people all the time.
I was working in different houses, I was going different places.
And that really was -- it made me, like, really love it even more.
And I found that painting was one of those gratifying things that when you finish it, it looks beautiful.
I've always worked really hard at whatever I've done.
So, I started the company in 2007.
It was not glamorous when I first started.
It was super-hard work.
I didn't make any money for like at least five years, you know, but I stuck with it.
After nine years, I actually called one of my leads that was with me before then.
I trained them on how to do stuff slow and steady, what we need to do step by step.
And this is actually how the business grew.
We ended up getting one more person and then another, and then another.
And once I could trust them providing the product that I provided for the last 10 years, I was able to let them do their thing.
So all this stuff tomorrow is going to have to kind of move because they're going to put a giant couch right there and then in the other room.
So we'll see what we got left.
Man: Alright.
Stephanie: Thanks.
And that actually turned into what we are now.
We have actual employees.
They're not subcontractors.
I have long, you know, reputable employees.
Ten years, five years, six years that have been with me.
So, I picked these up the other day that all the brass hinges are going to get replaced with.
I think it's so important to believe in the people that are under you and train them the best they can, because honestly, like, that's the outcome that we want, right?
Like, I need people to support me.
I need to support them.
It's so cool to see people grow and be appreciated in a job that if you work hard, you're going to get the benefits from it.
And I make sure of that because I've worked hard my entire life on some jobs and it doesn't get you anywhere.
You know what I mean?
Like, in life, like, I think it's fair that if you're going to put in like 110%, like, pay it forward to that.
Let's all grow together.
Let's be the best we can.
Even if employees weren't going to stay with me forever, it's a true thing, right?
Like, stop the whole "Well, I don't want to train them because they're going to start their own company."
Honestly, like, things are going to happen.
They're going to happen.
You know, do the best you can and then train them like they're going to be here forever and it's only going to help everybody.
♪♪ And I know that, honestly, I couldn't do this physically forever.
I've had back problems.
I blew my knee out two years ago, and the only difference between my back and my knee, when my knee blew out, I was like, "oh, my gosh, I have a crew that can still keep going."
You know, we're not just a company, we're not just one person or two people painting before.
We're a company and we're going to support each other.
I think it's great for us to be prepared.
You can call the crew and make sure they have everything that they need.
Pro Image Paint Academy is something we kind of just came up with because everyone's been reaching out to me on, like, how to apply products and do stuff, and I'm able to, like, help them with, like, troubleshooting or growing their business.
Right?
Like, we're all in the same boat.
We're just trying to, like, survive.
We're trying to, like, do the best we can.
Obviously, I've been painting forever, and the worst part about painting was cleaning paint brushes.
And I was like, "There has to be a better way."
So I came up with a great idea.
I went to the hardware store.
I ended up grabbing some tools to make the idea happen.
I tested it.
The Brush Wash is a tool I created.
It cleans paint brushes.
And the best part now is that you can find the Brush Wash.
If you just search online, it'll come up for you.
♪♪ Every week we're working for a repeat customer, whether it was 16 years ago or like a couple months ago.
No joke.
Like, that's why we're so successful is because it's all about the repeat business for us.
We're doing something right.
I love what I do.
I want to provide the best product for people.
And I think that comes across when we're in your house and then delivering it.
Right?
I think people need to take more chances and just start training people.
You just have to put the work in.
Don't be lazy about it.
It's not going to happen overnight.
Kevin: If you know a contractor who you think is worthy of celebrating, we'd love to hear about them.
Write us and let us know.
Heath: So, today I'm heading to meet a homeowner who's looking to do a project in the second-floor bathroom of her 1920s home.
Now, while I love working on older homes, the age is a little bit concerning.
I'm anticipating that we're going to find some wiring that's much older than what we want to deal with.
It doesn't mean the project can't be done, it just means it'll take a little more work to get there.
Jericho: Hi, Heath.
Heath: Hey, Jericho.
Nice to meet you.
Jericho: Nice to meet you.
Heath: So, I saw that you wrote in about a bathroom fan issue that you're having.
Jericho: Yeah.
It's upstairs.
Heath: Let's go take a look and see what's going on.
Jericho: So, this is the main bathroom.
We do everything in here, shower, and we get a lot of moisture.
So during the summer we open the window.
But during the winter... Heath: A little chilly.
Jericho: Yeah, a little bit cold, so... Heath: So this is the main bathroom that everyone pretty much uses for the shower, so this is getting used for multiple warm showers a day.
Jericho: Right.
Heath: Okay.
And we really probably ought to have some kind of ventilation in here besides that window.
Jericho: Right.
We definitely need a vent.
Heath: Alright.
So we could probably cut one in, but I'm not really sure what's upstairs.
Is the attic open?
Do we have some potential access?
Jericho: Yeah.
We can go up.
Heath: Yeah.
Let's take a look and see what we can fit in there.
Oh, wow.
This is a great attic.
Jericho: Thank you.
Heath: Alright.
And that looks like our main plumbing stack.
So this is roughly the width of that hallway.
And our bathroom wall was about five feet deep.
And we had a little bump inside the bathroom where this should be.
And that makes sense.
That's our five-foot mark there.
That's where that little bump would be.
So good.
And then we can see this pipe right there that lines up at that same mark.
So that should be somewhere inside that bathroom wall as well.
So it looks like our bathroom wall comes here and runs down about nine feet.
Great.
So we have our switch here.
This whole ceiling area, it's all wide open and we have perfect access for that ceiling to add whatever you want for a fan.
Jericho: Great.
Heath: So we have a couple of options.
We can either do a conventional fan, which you'll typically see whether it be a 10x10 square, give or take, or one of the large round ones, cuts into the ceiling, has the ductwork come up and vent out.
The motor's down there, does a great job, but a little bit louder.
You can add a light.
It's a little bit bigger and bulkier, where you kind of have a small ceiling and a light fixture there.
I'm not sure if that's the best answer for us.
So I do have another solution.
We can do a remote motor, a remote fan where the motor goes up here.
We just put a small duct in the ceiling downstairs, draws a lot of air up here, and then pushes it out the side of the gable.
A lot quieter, cleaner, smaller footprint down there.
What do you think?
Jericho: Okay, I love the idea of a quiet fan.
Heath: Perfect.
So let's go grab the fan.
I'll give you a couple of switch options, make a couple of decisions, and we'll go from there.
Jericho: Okay.
Great.
Thank you.
♪♪ Heath: Alright, Jericho.
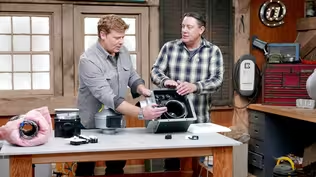
So, these are the parts of the fan we're going to install up there.
So the heart of the system is that fan motor that goes in the attic.
This is the unit right here.
So it's pretty simple.
It's just a motor that will power up.
It has a four-inch intake, four-inch exhaust.
And this will just go right out the side of the house.
But in the bathroom itself, that four-inch intake comes out of this.
So we're going to stick this in the bathroom somewhere.
And you can see it's got a fairly small footprint compared to a conventional fan.
This is really all you're going to see.
Jericho: Oh, okay.
Heath: A lot cleaner, a lot smaller.
I think it looks really, really good.
Jericho: Yeah.
Heath: So the next question is where do you think you may want to locate this?
We can pretty much put it anywhere in that ceiling in that bathroom.
Jericho: So I was thinking in the center of the shower.
Heath: Okay.
And the last decision is how do we want to control it?
So we have a few options.
Normally you can just do a simple switch, but I think we may want to go with a couple of other choices that may work better for us.
So the first one would be a humidity sensor where we can set the humidity level, and as it senses the steam from the shower, it turns on.
Then as it goes away, it turns itself off.
The other option is maybe a timer, something with just a predetermined time that you press a button that goes on for 15, 20, 30 minutes.
Pretty simple.
Any preference?
Jericho: I think I like the idea of the timer.
Heath: Timer?
Jericho: Yeah.
Heath: Great.
Attic, bathroom, ceiling over the tub.
Throw the timer in and we'll be all set.
Just that easy.
Jericho: Okay, great.
Heath: Let's grab the tools and get to work.
Jericho: Okay.
Heath: Alright.
So we've turned the power off.
Just want to make sure.
Yeah, none of the lights work.
So we're good.
So let's go ahead and take this switch apart and see what we're working with.
Kind of what I expected, but I was hoping for might get a little better.
So this is BX wiring.
It's probably original to the house based on the age of the home, and this is something that we can't extend.
We don't want to add a fan control off of this circuit.
At some point.
You should probably consider looking at having some of this updated based on the age and condition.
So we think we still want the fan switch somewhere over here or somewhere else in the bathroom at this point?
Jericho: Yeah, ideally right next to the light switch.
Heath: Right next to that?
Okay.
So we'll put this back and then we're gonna look for another power source to power this fan.
Jericho: Okay.
♪♪ Heath: The first thing I need to do is source an access point to fish the new wire for the remote motor.
It looks like I can drill a hole that will run parallel to this plumbing chase from the basement to the attic.
I want to go up to the attic and do the same thing, staying as in line as I can.
Next, I'm dropping a fiberglass fish down from the attic and catching it in the basement... tying the new wire on and then pulling it back up to the attic.
♪♪ I'll repeat the same process to wire in the bathroom fan switch.
♪♪ To install the grill in the shower, I'm cutting the hole using a six-inch hole saw.
To help with the installation of the ductwork, I've called a sheet metal technician.
♪♪ Now that the damper is dropped into place, I'll secure it to the joists using wood screws.
And finally, we'll install the exhaust grill on the ceiling.
With the remote motor mounted and wired, all that's left to do is connect the ductwork and run it to the exterior of the gable end.
Hey, Jericho, you want to come check it out?
Jericho: Sure.
How's it going?
Heath: I think we're done.
You want to give it a shot?
Jericho: Sure.
[ Faint humming ] Heath: Just barely hear it.
Jericho: Yeah.
It's quiet.
Heath: Yeah.
So it's actually moving a lot more air than you think.
So it's going to really help keep this room steam-free and quiet.
Jericho: It's great.
I love it.
The showers are going to be so much more comfortable.
No more cold in the winter.
Heath: No dripping walls, no steam on the mirror.
You should be good.
Jericho: It's great.
Thank you.
I appreciate it.
Heath: Alright.
Thanks.
I'll see you later.
Jericho: Alright.
Kevin: Alright.
Well, that took a little turn on you right there.
Heath: [ Laughs ] Kevin: You jumped away from the electrical box quickly.
Heath: I did, I did.
Once I found the BX inside behind there, I knew we didn't want to touch it and we had to move on to something else.
Kevin: Alright, so I need to know more about BX because I'm not that familiar with it, but it looks like we got a history lesson here.
Heath: Yeah.
Quick rundown of what we have.
So, the first-generation wiring you might have found in the house was knob and tube.
I'm sure we've all heard of this at this point.
So it usually had two conductors like this that would come down side by side on the other side of a bay or up to a fixture.
They'd be separated by porcelain insulators that would go through the framing or porcelain supports to hold the cables up.
And this is what we'd see for the actual conductor inside of each one.
And this is the one you're going to hear about all the time that people want out of the house.
You don't want to insulate around it if you're doing any kind of blown-in.
A lot of insurance companies don't even want it in there.
They want it removed before you even get into the house.
Kevin: We see it a lot on the age of the houses that we're doing, and it always comes out.
Heath: Yeah.
So you'll see this in, you know, late 1800s, up to about 1900, somewhere in there.
Kevin: Okay.
And then next up?
Heath: That's the one we found, the BX cable.
Kevin: Right.
Heath: So somewhere around late 1800s, 1900 up to 1930, 1940s, this was used.
Kevin: This is pretty good.
I mean, I got to say, when I see it, I'm just like, "Wow, this is a -- this is a beefy system right here."
Right?
We've got two conductors, which you want.
They're wrapped in this nice metal sheeting.
Heath: It's a very hard jacket.
I mean, it's hard to break.
You know, it looks like two good conductors and they actually feel pretty good.
Kevin: But you jumped away from it.
Heath: I did.
Kevin: Why?
Heath: So, what happens is once it's been stripped and it's exposed, that's when it dries out.
So this cable is roughly 100 years old.
You're worried about it.
So when you start bending it and, you know, you undo the tape and then rewire it, insulation really just peels apart.
Once that falls apart, we get an exposed conductor.
Kevin: Yep.
So we definitely don't want exposed conductors.
Even if you can wrap them up or whatever.
Heath: Because then we're risking shock and/or fire.
Kevin: Yeah.
And you just didn't want to touch it because you're afraid if you did, you're going to be the guy that cracks it.
Heath: Yeah.
And we don't want to expand a system like that.
We don't want to add more to it.
Kevin: Right.
Okay, so then they got rid of BX and they gave us what?
Heath: So they started with the first generations of NM cable, nonmetallic sheathed cable.
And it looks similar to what we have today.
But it's a little bit different.
So you may or may not find a ground in it.
But if you do, the ground is usually smaller than the actual conductors.
Kevin: Oh, interesting.
Heath: This might be a 16-gauge ground with 14-gauge conductors there.
Kevin: So we don't like the fact that it's smaller.
Why is that bad?
Heath: It doesn't help us with the fault path.
If we have something that would need a full size, we want a full-size grounded conductor to get that.
Kevin: And we do still see this quite a bit.
Right?
So I think of it as cloth-covered.
Heath: Right.
Kevin: So this can stay, but it's not the latest and greatest.
Heath: But pay attention to what you wire to it.
Correct.
And same thing.
You don't want to add to it when this ground is too small.
Kevin: Okay.
And so this is what we really want to see.
Heath: That's the stuff we use today where everything is the same size, slightly different jacket and a higher temperature rating.
Kevin: So we like the jacket, three conductors.
And you're telling me that that ground is actually the same gauge as the hot and the neutral in there?
Heath: It is.
On this particular one, it's the same size.
Kevin: So you had a solution for the homeowner which was just run new stuff to, you know... Heath: Wasn't really an option.
I was hoping I could find something else I could tap off of that was newer, but we just didn't have it.
Kevin: If I find this in my house, what am I doing?
Am I jumping away from it?
Are you going to make me replace all?
Heath: We always want to say don't panic.
You can see a lot of it can be in good shape.
Kevin: Right.
Heath: And it's hard to tell someone, "Go ahead and replace all this wiring, spend all this money and see no noticeable difference."
Kevin: Yeah.
Heath: It's hard to justify, but at the same time, there can be safety issues.
I would say replace it as you can.
If it's exposed in the basement, exposed in an attic, you have easy access to it, it's not too much money and it's within your budget, go ahead and start replacing it.
Kevin: Right.
Heath: As you renovate, definitely replace it.
You don't want to add to it, but I don't want someone to panic and think that it's that much of a disaster that they have to rip it all out at once.
If you go to replace a fixture and take something down and you see this, you're going to know if it's brittle and needs to be addressed.
Kevin: And definitely don't add to it no matter what.
Heath: Do not add to it.
Kevin: Cool.
Alright.
Does the wiring museum know you stole their stuff?
Heath: I only borrowed a couple items.
Kevin: Alright, well, that's it for us.
So until next time, I'm Kevin O'Connor for "Ask This Old House."
Kevin: Next time on "Ask This Old House," Ross helps a homeowner install a smart thermostat with mismatched wires.
Then looking to give your deck a refresh?
Mauro gives tips on staining.
And did winter leave your patio looking dingy?
Mark shows a homeowner how to get theirs looking as good as new.
Mark: Let the tool do the work.
Kevin: All that on "Ask this Old House."


Support for PBS provided by:
Funding for Ask This Old House is provided by The Home Depot, Renewal By Andersen, and ChipDrop.