E23 | Glen Ridge Generational | A Breath of Fresh Air
Season 45 Episode 23 | 23m 42sVideo has Closed Captions
A new brick walkway and wood fiber insulation are installed. ERVs and HRVs are discussed.
The two primary suites to accommodate multigenerational living are taking shape, and the first-floor foyer is opened up, highlighting the new staircase. The local shop where the stairs were fabricated is toured. At the house, a new brick walkway adds curb appeal. The builder demonstrates the new wood fiber insulation, and details on HRVs, ERVs, and period trim are discussed.
Problems playing video? | Closed Captioning Feedback
Problems playing video? | Closed Captioning Feedback
Funding for THIS OLD HOUSE is provided by The Home Depot and Renewal By Andersen.
Support provided by:

E23 | Glen Ridge Generational | A Breath of Fresh Air
Season 45 Episode 23 | 23m 42sVideo has Closed Captions
The two primary suites to accommodate multigenerational living are taking shape, and the first-floor foyer is opened up, highlighting the new staircase. The local shop where the stairs were fabricated is toured. At the house, a new brick walkway adds curb appeal. The builder demonstrates the new wood fiber insulation, and details on HRVs, ERVs, and period trim are discussed.
Problems playing video? | Closed Captioning Feedback
How to Watch This Old House
This Old House is available to stream on pbs.org and the free PBS App, available on iPhone, Apple TV, Android TV, Android smartphones, Amazon Fire TV, Amazon Fire Tablet, Roku, Samsung Smart TV, and Vizio.
Keep Exploring


This Old House Insider Newsletter
Get This Old House exclusive stories, tips, and behind-the-scenes information delivered right to your inbox every month.Providing Support for PBS.org
Learn Moreabout PBS online sponsorshipKevin: Today on "This Old House," we are going to show you a blown-in insulation that we have never used or seen before.
Tom: You pre-build the stairway, take them on site, and you have a crew that installs them?
-Nick: Correct.
-Tom: Wow.
That's a lot of work.
Jenn: Today the brick walkway is going down, and it's all in the family.
♪♪ Ah.
That's it.
♪♪ ♪♪ Kevin: Hey, there.
I'm Kevin O'Connor.
And welcome back to "This Old House" and to our project here in Glen Ridge, New Jersey.
I'm coming down from the new third floor, which is gonna be a new primary suite for our homeowners, and if you look up there, you can see that it is framed out, we've got the ductwork in, and we've also got the insulation in on the underside of the roof.
That is closed-cell foam.
But below that, they're also gonna blow in dense-pack insulation because they're trying to get to an R-60 on that roof system right there.
That's a lot of insulation.
We've got a new staircase coming from the third floor down to the second floor.
That's a big improvement from what was here.
You may recall that somewhere in this area, there was this tight, winding staircase up to the attic.
Not up to code.
Not very nice.
So that has been replaced.
Behind me, we've got a second primary suite.
Now, this is gonna be for the homeowner's daughter and the son-in-law because two generations are gonna be sharing this house.
So primary suite there, a couple bedrooms for the kids eventually, as well as a laundry room.
And one of the most dramatic changes to date is this right here -- a brand-new staircase, nice and wide, that replaces what was here.
Now, you may recall these used to have carpeting on them, a turn right here, they were narrower.
And this is a big improvement.
And check it out.
When you walk through the front door, you can now look all the way through this house all the way up to the third floor.
It really opens things up a lot.
Another thing that opens it up is this foyer area, because there used to be a chimney over here, a couple closets.
Now it is wide open, celebrating the staircase, the one up the top, and there's even another one down here to the basement.
And look at this.
This is all finished work right here.
So, this is an oak tread.
This is a poplar skirt board.
And these were installed just a few days ago.
About five guys or so pulled them off of a box truck, and they set all three staircases in place.
And in about two hours, they were ready to go.
And that's because they were prefabricated off-site at a mill shop, which we had to check out.
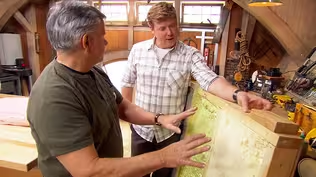
♪♪ Tom: Nick.
How are ya?
I'm Tom.
Nice to meet you.
Nick: Nice to meet you, Tom.
Tom: I just left the project house, and the stairway is beautiful!
Nick: Oh.
Thank you.
Tom: So, basically, you pre-build the stairway that's gonna go into the house.
Nick: Correct.
We'll take all the measurements of the home and the foyer, and then we'll come back here and map out everything in full scale and design a staircase to fit in that space.
Tom: Wow.
Nick: We specialize, obviously, in wooden staircases and railings, straight stairs, curved stairs, so we get involved in a lot of really unique and a lot of high-end projects.
Tom: Well, I'd love to see how our staircase was built.
Nick: Let's go take a look.
Tom: Alright.
So it looks like you got quite a few jobs lined up right here.
Nick: We do.
We're pretty busy.
So, after the stairs are designed, this is the first part of the project where we come and we route the stringers for the staircases.
Tom: And how are you cutting these?
Are you cutting these with a hand router or are you doing it with a CNC machine?
Nick: Uh, we used to do them by hand with a hand router, but behind us, we have two 2-axis CNC's.
One of them is dedicated to doing the wall-side stringers, as you can see here, with the pocket route.
And the other one is dedicated to the cutout, or open-side stringers, as you can see here with the miters.
Tom: Yeah.
You know, that's nice and true and straight.
You're not gonna get that with a handsaw.
Nick: No, no.
Tom: And this is cut on that machine right there?
Nick: It is.
You can see Bob working back there on a project.
It's come a long way since the old days of routing by hand.
Tom: I bet it has.
I've done these on the job site, and it's definitely time-consuming.
Nick: Yes, it is.
And over here, we have the final stage where we assemble all the pieces into a staircase.
As you can see, they're -- they're snugging the risers in the routed wall-side stringer now.
Tom: Mm-hmm.
Nick: And the next step will be to attach the cut-out stringer we saw earlier onto the risers.
Nick: I notice on the back side of the risers here you have the pocket slots here for the screws.
Nick: Yes.
We try to do as much fastening as we can underneath the staircase to prevent imperfections on the surface.
Tom: I noticed that on the staircase at Zack's place because I didn't see a lot of nail heads or anything on the face, which is really nice.
Nick: Yeah, it makes for a much cleaner finish.
Tom: Yeah.
They're just tacking it off right there.
Nick: Yep.
They're just putting a couple brad nails in each riser to cut out a section here.
And in this part of the process, as you can see, they're putting the steps in, pocket screwing them from underneath.
Tom: Yep.
Yep.
Nick: After all the treads are in, they'll come back and tighten up all the wedges and fasten everything securely.
The glue is the last step in the process.
We want to make sure everything's tight and everything's square before we put the glue.
Because once the glue dries, there's no changing anything.
Tom: Oh, yeah.
That's right.
Nick: So, once the stairs are completed, they're pushed out to the back of the warehouse here.
Tom: What about all the railings for these staircases?
Nick: Well, the railings are also part of your project, and we'll be installing those in the upcoming weeks.
Tom: Well, that's great.
I can't wait to see them.
And it's a very impressive shop here.
And thanks for the tour.
Nick: You're welcome.
♪♪ ♪♪ Jenn: The concrete walkway had to go, and this was the perfect time to add a little curb appeal.
Jason, looks like you brought a little family affair here.
Jason: Yeah, I brought my mom and dad to help with this project.
Jenn: Welcome.
Nice to meet you.
How do you guys know how to do this?
Judy: Well, back in Ohio, we had a landscape contracting business.
Jack started it.
Jenn: So, what kind of projects did you do?
Jack: Well, uh, we did walkways, patios, gardens.
It was a landscape design build.
Jenn: Mm-hmm.
Jack: So we've had a number of years of experience with this.
Jenn: Excellent.
And how did you guys get started here?
What was your process?
Judy: Because we came in from Ohio, we did not have to do the excavating.
[ Laughter ] Jack: That was part of the deal.
It was supposed to be done.
Jenn: That is a big part of the deal, so that's great.
Jack: We got the gravel base down yesterday, and Jason compacted it this morning, and now we're getting the sand base laid down and Judy's laying the brick.
Jenn: Right, and I see you're laying the pavers in a bed of sand that's been screeded flat in between the rails, and you're following the existing curve shape of the walkway.
Jason: Yeah, it's gonna be the same shape, but now we're gonna have a herringbone pattern.
Jenn: Alright.
So, can I help?
Jason: Absolutely.
[ Laughter ] Jenn: Show me what you're doing.
Judy: The first thing we need to do is we need to create a grid so that we can follow that and keep our lines straight because herringbone is tricky to lay.
Jenn: Laying pavers in a herringbone pattern does take a lot of precise measuring, especially when the path is curved.
♪♪ The pavers have to go in at a 45-degree angle according to the layout lines.
Using a herringbone pattern also means pavers will need to be cut with a wet saw to finish the edge of each row.
We'll work our way from one end to the other.
♪♪ Doug Rose has advised people on walkways like this for decades.
Hey, Doug.
So, let's talk about the pavers we're using here.
Doug: What we have here is a clay brick paver.
We call them authentic clay brick pavers because they're made from clay and shale.
They're designed for paving applications only.
As you can see, there's the beveled edge and a spacer tab to allow for a sand joint and easy installation.
We're in Northern New Jersey here.
You get a lot of freeze-thaw.
These are laying in the ground.
And they would tend to normally absorb a lot of moisture, but these are very dense.
Low water absorption.
Actually, immune to deicing salt, as well, so when you have to put down snow melt... Jenn: Oh, fantastic.
Because that's a big, big deal here in this area of the country.
So, I have a question for you, though.
Let's talk about brick from a chimney because a lot of these bricks came down from the house.
And a lot of people say, well, why don't we just repurpose and reuse these?
Why would you or why wouldn't you use these for a walkway?
Doug: That's a great question, Jenn.
Because why not reuse a brick that's already here on site?
Um, it's really about the purpose of the brick and using the right material for the right application.
As you can see, this was used probably in the chimney application, had mortar applied to it.
Unfortunately, this is probably gonna have a very high water-absorption rate.
It's probably not gonna survive very well in the ground.
Jenn: Alright.
So if they wanted to reuse these on site, they could make a fire pit in back or -- just anything vertical, make a little wall.
Doug: Absolutely.
Interior applications.
A rustic wine cellar.
Jenn: Yeah.
Alright.
Fantastic.
Thanks for that information.
I'm gonna go back to help these guys get this walkway in.
Doug: Good luck.
Have fun.
Jenn: Alright.
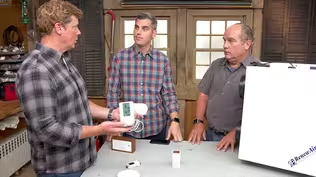
♪♪ Kevin: We've got closed-cell insulation on the underside of the roof, but as I said, we're also gonna be blowing in another layer of insulation, including a layer into these sidewalls, Zack.
And when I hear "blown in," I think cellulose, but you've got something else up your sleeve?
Or in a suitcase?
Zack: Yeah, we are.
We're actually using something called wood-fiber insulation.
And it's exactly what it sounds like.
Kevin: Okay.
So, can I, like, pick a little piece out of it?
Zack: Yeah.
Go for it.
Yeah.
So that's just wood fibers treated with borate, which makes it resistant to fire and mold and mildew.
Kevin: And where does the wood come from?
Like, what are we talking about?
Zack: So, this is a post-manufacturing product.
You know, a tree is round, right?
But they cut this dimensional lumber out of it.
There's a lot of excess.
And that excess gets made into this.
Kevin: Well, that's interesting.
So cellulose insulation is sort of, you know, paper ground up and turned into insulation.
Now we've just got the straight wood turned into insulation.
And in terms of performance, what is this getting in terms of R-value per inch?
Zack: This is gonna be 3.8 per inch, which is comparable to cellulose.
Kevin: Okay.
And when I see wood in the wall, I'm thinking like, "Okay.
What happens when it burns or not burns?"
And what happens when it gets wet?
Zack: So when it gets wet, it's gonna dissipate that moisture over the whole area of the stud cavity better than a lot of other insulations.
Obviously, if you had a rainstorm and a tree fell and a lot of water got into this, you would have to replace this insulation just like you would with any other insulation.
Kevin: Gotcha.
And if you're offering to prove that it's not gonna burn on us, I'll take you up on that one, for sure.
Zack: Let's do it.
Kevin: Alright.
Whoa.
Look out.
Zack: Here we go.
Kevin: Alright.
Wait a second.
So it's immediately turning to charred black.
Zack: It chars, but you'll notice there's no -- there's no spread of the flame.
So I could hold that flame there forever, and it's not gonna travel.
And especially -- remember, when this is in a stud cavity, there's no oxygen that can get in there.
Kevin: So you're telling me that no matter how long I hold this here, this is not going to ignite and it's not going to spread?
Zack: Correct.
That borate's really doing its job on every fiber of the wood.
Kevin: Alright.
Well, I mean, that is impressive.
I mean, we've got charring, but no ignition and no spread.
The proof is in the torch, as they say.
So help me out with -- Let's start with cost.
And also, you know, I said it's new.
I've never seen it before.
What's its track record?
Zack: So, this is about the same price as cellulose, so it's a sideways move in terms of switching from that product, which is sort of the most common blown-in.
Kevin: Yeah.
Zack: And although it's a brand-new product for this country -- it just started being made recently -- um, this has a long track record in Europe, so I'm pretty confident that there's not gonna be any issues with it.
Kevin: Okay.
Sounds pretty good to me.
Alright.
So let's talk about blown-in because I know you really like the process.
And why is that?
Zack: I do.
Let me -- Let's look at this wall, and maybe I can tell you why.
So, obviously, there's a couple of common options.
We have spray foam, and we have batt insulation.
So think about installing batts around these obstructions here.
And would you be able to fill all this and cut around this?
You're never gonna get that type of accuracy.
So, then, spray foam is a great option for a retrofit like this 'cause it'll fill all the crevices, but it'll actually fill in these crevices down here, and that'll push our WRB, that membrane on the outside of the house, out and create issues for the siding team.
Kevin: I've heard you talk about this idea before, you know, that you're worried about installation, right?
And if it's harder to do, it's probably not gonna be done right, in which case you're gonna have a diminished performance.
And so you really like the fact that something like this takes that out of the equation.
Zack: Exactly.
You want to make it easy on the people working at the job, make it easy for them to do the right thing every time.
Kevin: Okay.
And are we ready to install somewhere?
Zack: Yeah.
Over here, we've got a wall that's ready to go.
Kevin: And, so, the process outside, similar to cellulose?
Bags into a hopper that's gonna blow through a hose?
Zack: Yeah.
It's like a cube.
You break it up, and then you feed it into that hopper.
[ Whirring ] Kevin: Tony, you ready to go?
Tony: Yes.
I'm ready.
Zack: This is the same membrane you would put for cellulose or any sort of blown-in installation.
And what it's gonna do is retain that as it's getting injected into the wall, so it's forced into all those nooks and crannies, and also we get the accurate density for the R-value we're targeting.
Kevin: And then his experience is telling them how firm it needs to be?
Zack: Exactly.
Kevin: Right.
And he doesn't even need to treat this.
That won't fall out.
Zack: Nope.
You could actually remove this netting, and it would retain itself because all those fibers really link together.
Kevin: Very cool.
And then just repeat the process through all the bays.
Zack: That's it.
♪♪ Kevin: Our basement has come a long way from the days when there was a coal chute down here.
The original heating system were steam radiators run off of that coal and then converted at some point to oil, again to gas -- and that system was so inefficient that they had to add some heat pumps for a couple rooms that were too drafty.
Well, now all of that has been replaced by a modern ducted heat-pump system.
And, Chris, you guys installed it for us.
Thank you for that.
You've also gave us a fresh-air option, right?
Chris: Sure.
This is an HRV, which is a heat recovery ventilator.
Not to be confused with an ERV, which is an energy recovery ventilator.
Kevin: Alright.
I'm already confused.
So the difference between ERV and HRV?
Chris: So we're trying to bring in fresh air from the outside into the house, and we have to treat it for both humidity and temperature.
So, HRV will take care of temperature only.
ERV will do humidity and temperature.
Kevin: And, so, in this house, why only the temperature are we worried about?
Chris: Yeah.
Great question.
In our climate, in this house design, with the small amount of ventilation we need, HRV is just a more budget-friendly solution, and it does the job of introducing the fresh air.
Kevin: Okay.
Basic idea, though, is the same for both, if not just that little difference with humidity.
Walk me through it, how these work.
Chris: So this is -- this is a core where the air passes through.
Kevin: Right.
Chris: And you can see it's a metal core.
Kevin: So I've seen these before.
Our guy Richard has shown me a bunch, and I've always seen them with sort of a soft fabric, not the fins.
Is that the difference?
Chris: That is the difference.
So, the fabric will basically transfer humidity, moisture.
This does not.
Kevin: Ah.
Okay.
So only the temperature is actually going through those cores right there.
I'll get this back in right here.
And we can follow that airflow path.
You're pulling in fresh air from outside?
Chris: Exactly.
Right here.
We pull in the air from the outside.
It's coming in through here and going this way.
And it's going through this duct and being introduced into our heat-pump air handler.
Kevin: Gotcha.
And then when it goes out... Chris: It goes out from the heat-pump air handler, it comes back through here, and goes down this way.
So the two air streams cross paths, and then it's exhausted out of the house.
Kevin: Right.
And what I have learned from Richard is cross but don't touch.
So they're actually not mixing here.
Chris: Correct.
Kevin: This is just where the heat from the two different air temperatures swaps from one to the other.
Chris: Absolutely.
Kevin: Gotcha.
And the cost of something like this to add the system to a house like this?
Chris: The whole system, with the ductwork installed, is about $2,500.
Kevin: Ah.
So that's not too bad, especially if you're talking about indoor air quality.
Chris: Oh, yeah.
Kevin: Which is important.
We know -- I just looked at the installation package here.
We saw that the house was wrapped in a membrane, and then we packed the stud bays full of insulation.
We tried to tighten this up as much as we could.
That limits natural air infiltration.
Chris: Yeah, absolutely.
You got a tight house.
You've got all kinds of stuff happening inside, from showers to cooking to chemicals from cleaning.
You want to exchange that air.
You want to introduce outside air in.
You want to get that stale air out.
It's for the health of the house and the occupants of the house.
Kevin: Pretty common these days... Chris: Oh, yeah, it should be a necessity pretty much anytime you build a tight house.
Kevin: Good.
Alright.
Well, we're glad you're on the job, and I appreciate the explanation.
Chris: Thank you.
Kevin: Thanks, Chris.
♪♪ Now that the walls are insulated, wallboard is next.
And right after that, we've got the interior trim.
Now, you may recall that this house was taken back to the studs, so we have got a clean slate to work with.
And to help us pick the period trim for this house, we're leaning on our architect, Dan Kopec.
Dan, good to see you.
Dan: Hey, Kevin.
Great to see you.
Kevin: Yes.
So, this is a tough problem for a lot of people, picking trim.
I mean, there are so many choices.
Dan: It is.
And because, as you said, we didn't have any original profiles that were worth salvaging.
Kevin: Right.
Dan: And this house had gone through a bunch of renovations over its time.
And so there was inconsistency between rooms.
Kevin: A little bit of this, a little bit of that.
Dan: Right.
And so we're left with some rules of classical architecture that are gonna give us some guidance.
Kevin: I'd love to hear the rules.
Dan: So let's start with the baseboard.
And we're dealing with a first floor that's 9-foot ceiling.
Nice, tall spaces.
Kevin: Yeah, sure.
Dan: Regardless of the height of your room, you want the baseboard to be about 7% of the height of the room.
Kevin: Oh.
So just do the math.
Dan: Correct.
So at 9 feet, we want to end up at about 7.5 inches.
We ended up hedging that a little bit higher because it's a Victorian and it wants a little bit more grandeur.
So we started with a 1x8, which, as you know, measures a true 7 1/4".
Kevin: Yeah.
Dan: And then added a base cap to that.
Kevin: Okay.
Dan: And so we end up with just over that 7% of the room for the base.
Kevin: Okay, so you start at the base and then you go where?
Dan: And then we're gonna go to the windows and doors.
So we're gonna case those openings, right?
The casing on those windows and doors wants to be about half the width of the height of the baseboard.
Kevin: Oh, interesting.
So there's some correlation between this and this in terms of scale.
Dan: Scale-wise, yes, and also the profile.
So, you see this casing has a backband to it.
Kevin: Right here.
So there's a feed, a flat part, and you would typically call this a backband.
Dan: Correct.
And if I take the cap off of this base, we're gonna get that same shadow lines here that we're going to see around those door and window casings.
Kevin: So that when the two are next to each other -- I'll give that back to you to put over there.
When the two are next to each other... Dan: We end up with a nice interface there.
Kevin: And then what's the next thing you're thinking about?
Dan: We end at the crown.
I think there's a sample of it over there.
Kevin: I'll grab this here.
[ Grunts ] So walk me through these pieces.
Dan: Sure.
Crown molding is about terminating the wall.
And so what we chose to do here is build this out of a couple pieces of -- of trim.
We've got a classic crown here with a bead that's appropriate to the style of the home and that cove that gives us the terminating shape of the crown.
But then we took a piece of baseboard and put it on its side... Kevin: Gotcha.
Dan: ...to get that extra shadow line on the ceiling.
The third piece of this crown is the picture rail, so that you could hang a wire with a hook and display your artwork in the house.
Kevin: So I assume the homeowners absolutely love this because this is beaut-- 9-foot-high ceilings.
This is going to look amazing.
Dan: It's a great way to terminate the wall.
Unfortunately, it's also pretty expensive.
Kevin: Oh.
So we're not going with this?
Dan: No.
Kevin: Oh.
Okay.
So what are we going with?
Dan: This is the piece of crown from that build-up.
We decided that there was enough detail in this crown to just use the crown, right?
We get that bead.
We have the cove.
Kevin: They look terrific.
Dan: It really terminates the wall nicely.
Kevin: This is real world.
Right?
People have budgets.
And they have a wish list, and then they have a reality.
So they end up with this.
Dan: That's always a really important part of the job -- to recognize that there is a budget.
Kevin: I'm looking at a second casing option right there.
Dan: Sure, this profile is a little different, but I think it's helpful for us to see that, traditionally, these window and door casings likely would have also been built up.
You would have had flat casing with the bead cut in.
Kevin: So flat stock here.
This is cut in.
Could have been applied, but you're thinking most likely just cut into this piece.
Dan: Correct.
And then to get that heft, you'd have a backband applied separately.
We still do this, but there's 10% cost difference to get it all pre-assembled in one piece.
Kevin: Oh, interesting.
So this is what -- So now we get the bead, the flat, and the built-up here.
But instead of out of two or maybe three pieces, it's all cut out of a single piece.
Dan: Correct.
So this piece -- 10% more than buying it separate.
But from a labor perspective, carpenter's -- He's doing it once.
He's going around those windows and doors one time, not two.
Kevin: Gotcha.
Okay.
So, if you can come to a place like this and they can make two pieces into one... Dan: Right.
I know you're thinking about this, right?
Kevin: Why not a three -- Why not three pieces turned into one piece of base?
Dan: Well, a couple things.
First, this piece of 1x8 is simple for the carpenters to go and install around the room.
And even though we've put new wood floors throughout the home, there's going to be some deviation in that floor.
Kevin: That's a very unforgiving seam.
Dan: Very unforgiving.
And so the shoe is gonna help us take up that deviation.
And then when we apply that base cap, we're gonna get the same ability to take up any deviation up here, and that joint is gonna be concealed in that -- in that shadow line there.
Kevin: All those shadow lines help hide any imperfections on the walls and floors.
Dan: Right.
And speak appropriately to the style of the home.
Kevin: Awesome.
Well, that's why we work with a pro like you and we come to a place like this that's got the options and the solutions.
So thank you, Dan.
Appreciate it.
Dan: Thank you, Kevin.
Kevin: Alright.
Well, next time, we are gonna see that trim package go up and we're gonna see how Zack and Kalen install it.
It's kind of a unique process.
We'll also see some tile and some tree work.
So until then, I'm Kevin O'Connor... Dan: And I'm Dan Kopec.
Kevin: ...for "This Old House" down here in New Jersey.
Kevin: Next time on "This Old House"... Jenn: While the gas lanterns and bluestone sidewalks really give Glen Ridge that old-world charm, it's the mature trees that accentuate that idyllic setting.
Kevin: Floor tile is porcelain, it looks like?
Man: Porcelain.
Kevin: What is that pattern?
Man: So this is a two-piece star-and-cross pattern.
Kevin: Very nice.
Okay.
Tom: And today, we're gonna be installing base-cap moulding -- and we need one that bends.


- Home and How To

Hit the road in a classic car for a tour through Great Britain with two antiques experts.


Support for PBS provided by:
Funding for THIS OLD HOUSE is provided by The Home Depot and Renewal By Andersen.