E24 | Glen Ridge Generational | Tested and Approved
Season 45 Episode 24 | 23m 42sVideo has Closed Captions
A baseboard detail becomes a focal point, and a prefabricated shower niche is installed.
The house has been restored to its original Victorian look, and it has been made airtight. The results of a blower door test is revealed. A baseboard installation becomes a focal point at the house's entrance. The borough's shade tree commission chair speaks on the decline of older trees. A prefabricated shower niche aids in a perfect tile layout, and a prefabricated window casing is installed.
Problems playing video? | Closed Captioning Feedback
Problems playing video? | Closed Captioning Feedback
Funding for THIS OLD HOUSE is provided by The Home Depot and Renewal By Andersen.
Support provided by:

E24 | Glen Ridge Generational | Tested and Approved
Season 45 Episode 24 | 23m 42sVideo has Closed Captions
The house has been restored to its original Victorian look, and it has been made airtight. The results of a blower door test is revealed. A baseboard installation becomes a focal point at the house's entrance. The borough's shade tree commission chair speaks on the decline of older trees. A prefabricated shower niche aids in a perfect tile layout, and a prefabricated window casing is installed.
Problems playing video? | Closed Captioning Feedback
How to Watch This Old House
This Old House is available to stream on pbs.org and the free PBS App, available on iPhone, Apple TV, Android TV, Android smartphones, Amazon Fire TV, Amazon Fire Tablet, Roku, Samsung Smart TV, and Vizio.
Keep Exploring


This Old House Insider Newsletter
Get This Old House exclusive stories, tips, and behind-the-scenes information delivered right to your inbox every month.Providing Support for PBS.org
Learn Moreabout PBS online sponsorshipKevin: Today on "This Old House"...
This is what's going in?
Gary: Correct.
You'd like to have a full tile top and bottom.
Kevin: Wow, you nailed it.
Elizabeth: We're planting two yellowwood trees.
Jenn: Mm-hmm.
Fantastic.
Tom: And today we're gonna be installing base cap molding.
And we need one that bends.
♪♪ ♪♪ Man: Ahh.
That's it.
♪♪ ♪♪ ♪♪ ♪♪ Kevin: Hey, there, I'm Kevin O'Connor, and welcome back to "This Old House."
And welcome back to Glen Ridge, New Jersey, where we've got ourselves a beautiful Victorian on our hands, built in 1887.
And when we got here, in need of a lot of changes inside as well as out.
Now, when we got here, the entire house was covered in asbestos shingles, which we knew were not original to this house.
And so our architect drew a scenario where we would have claps on the first floor, shingles on the second floor, and then that beautiful diamond pattern up there on the gable on the third floor.
But now when the asbestos shingles came off, it turns out we did not have that diamond pattern up there on that gable end.
But the historic commission, which oversees this entire town allowed us to keep them primarily because they exist on the flanking houses here in this neighborhood, and it's a great look.
You may also recall that on the porch, we had a solid shingled wall right here.
And now that has been changed.
We've got all of the posts that are put in, which is close to what was here back in 1887, and they sit on these brick piers.
Now, that's just a veneer of brick covering up a new helical pile that was screwed into the ground to support this whole porch.
Makes for a big transformation on this house.
And there's still some more details to come.
We're gonna have some brackets go in right here, and then our windows are gonna have some shutters.
And that is gonna really make the front of this house sing.
Now, we've only got a couple of weeks left on this project, so you can see the level of finishes here on the inside.
Check out our beautiful, new wide staircase right up to the second floor.
And above that, another one from the second floor to the third floor with that beautiful panel detail on the other side that Zack built for us.
You can see that the wall board is up.
Hey, Kalen.
Kalen: What's going on, Kevin?
Kevin: We've also got some of the trim work.
Got casings around doors that you can see are already in.
And check out our beautiful, new floors.
All throughout the first floor -- white oak, which is a beautiful detail.
Right here, we're gonna have a full bath.
You can see that this is in the tiling stage.
And the reason there's a full bath down here is because our homeowners, Sunita and Shankar, they're gonna be living up on the third floor and up there, they've got a sleeping area, a seating area and a bathroom.
But eventually they have the option to come live down here.
And that's why they would need a full bath.
If that ends up happening, off of this family room, there is a front room that can be closed off with two sliding pocket doors, and they could turn that into a bedroom for first-floor living.
Here in the back of the house, there's gonna be a breakfast nook built into this corner.
And then right here, we're gonna have -- I guess I'm gonna call a pantry.
So it's gonna have some storage, some lower and upper cabinets as well as a sink.
And all of this is right immediate to the back door.
Hey, guys.
Zack, how are you?
Zack: Hey, Kevin.
This is Beth, our energy auditor.
Kevin: Beth, nice to meet you.
So, blower door test.
Um, comparing it to the original blower door test?
Did we do one?
Zack: So we didn't do one because we noticed there were a lot of holes in this house.
There were some major ones in the foundation, the side walls, and we figured a blower door wouldn't be able to keep up with the amount of pressure differential and leaks.
Kevin: So leaky we couldn't even measure it.
Zack: Exactly.
Kevin: Do we have a sense of how bad it was, though?
Zack: Well, our architect, who's pretty experienced with houses of this area, feels like it's probably 10 ACH, 50 or worse.
Kevin: Alright, so you got to explain that to us.
ACH is... Zack: Air changes per hour at 50 pascals.
So this fan here creates a pressure differential of 50 pascals, which is roughly equivalent to a wind on the outside of the house pushing on all sides.
Kevin: And so what does a 10 mean?
So what does a 10 air changes per hour mean?
Zack: Basically means the total volume -- air that's inside this house -- when this fan is running, changes 10 times every single hour.
And that's air you're heating and conditioning, dehumidifying is getting taken out.
Kevin: Every six minutes, you have to recondition all of the air in this house.
Zack: Under testing conditions.
Kevin: Right, exactly.
So, Beth, you run the blower door test for us at this stage.
Beth: Mm-hmm.
Kevin: What did we get to?
How did we do?
Beth: 2.9.
ACH.
Kevin: Wow.
Zack: Slight improvement.
Kevin: So from 10 or more to less than three on the air changes per hour.
And what do you think of that number?
Beth: I think it's a great number.
I don't see it a lot in retrofits.
And it's even lower than code for new construction.
Kevin: Oh, wow.
Congrats.
That's very well done.
I like to hear it.
Zack: Well, remember, we treated this house sort of like new construction where we have that WRB on the outside and we taped all the windows.
And so we did as much as we could, but obviously it's still not a brand-new house.
Kevin: Right.
And at some point, we can get too tight, which we have to then compensate for?
Beth: Yes.
If you're too tight, if you are below that three -- Three is the cutoff -- You have to install mechanical ventilation.
Kevin: Which you did.
Zack: We did.
We put that HRV in the basement, which is sort of equivalent to opening a window up.
So you're not trapping all the stale air that we're breathing out.
Kevin: So energy efficient, save us a ton of money, but also healthy with fresh air coming in.
Well done, guys, I love to hear it.
Zack: Yeah, some good news.
Kevin: Congrats.
Can I look at the numbers?
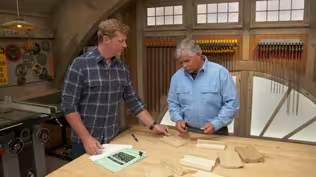
♪♪ ♪♪ Tom: So trim's really looking good in here.
Zack: Yeah, we got the baseboard in.
We got most of it in, but there's this little complicated section I wanted to show you here.
Tom: Oh, yeah.
Zack: We've got a couple different angles.
The skirt's a different height than the baseboard.
The architects actually specified this radius detail here.
Tom: Oh, it's like an eased up on a handrail.
Zack: Exactly.
And he thought that would look better, especially because it's dressed towards the front door.
Tom: Well, definitely look better because you're right.
This is a focal point when you first come in.
And it's gonna be seen right away.
But there's a couple of different ways you can do this.
I mean, I have a couple of short pieces of molding because we were cutting it on the other room, but... Alright.
So we can take a couple of pieces of baseboard like this, bisect that angle.
Then you could come up here and bisect this angle.
But with the eased up, that detail is a little bit different.
We have to find a radius on this piece here and mark a radius.
Zack: Mm-hmm.
Tom: And then we can then find the radius down here.
And then finding the molding to go on there.
We can either have it made with a molding machine.
You could turn it on a lathe, or you can even make it out of plaster.
Zack: Oof.
Tom: You know.
And that's a little tricky, but you make it on a table.
They do a little tin knife and you draw it and you form it and you put it on there and it blends right in.
That's the way they did a lot of it in the older houses.
Zack: Well, we're pretty lucky.
The lumber yard that I purchased this molding from actually sells it in a flexible variety.
So, this is actually...
Seemed like the easiest solution.
Tom: Yeah, we've used this quite a bit.
This is great.
It's handy as anything because it saves a lot of time.
And we can form that to go right up the way we want it to.
Let's see if we can bend this one.
Oh, yeah.
Look at that.
That'll bend nice.
And then we'll miter that together.
So that's gonna make a nice look.
Alright.
So what we need to do is figure out our radius here and here and cut it.
Zack: Alright.
Let's get started.
Tom: Okay.
Alright, I ripped a piece down the height of the base.
We can put it on there.
Scribe a line once we do our arc.
Zack: Alright, that'll work.
Tom: Okay, so now we got to find the radius for this.
Zack: So I can put a block here.
So we're -- we're measuring off that.
Tom: Alright.
Perfect.
Alright.
So I'll get a square line off of our center right here.
Right there.
Zack: Alright.
I'll go this way.
That good there?
Tom: Should be.
Zack: Oh, perfect.
Tom: Yeah.
Zack: I could take this compass in here.
Put it in the corner there.
Tom: Yeah.
Now, that will be like the center of our circle right there.
Zack: Oh, right.
Yeah.
Tom: A radius.
Zack: That's bisecting there, right?
So... Tom: Turn it around.
Zack: Alright.
So... Tom: Swing that.
Nice.
Perfect.
So now that transition, when the molding comes up, will swing right into that nicely and end up so we can then miter that corner.
Alright.
We have that one.
Now we need to mark the circumference or the radius right down here.
To do that, first thing I want to do is mark a line on the wall using a framing square.
Alright.
So I'll make a line up the wall like that.
What I want to do is now I need to find the same distance.
So if I measure from here down right there at the bottom of that miter.
5 7/8.
Oh, 6 -- almost 6 inches.
So if I mark from this point here over and I put a mark on the temporary base right here, I set my framing square on that and draw a square line up off of the baseboard.
Now that will be the center of our circle.
Down to the baseboard will be our radius of our circle.
So I'll take a string.
I'll put a pencil in the string.
I'll hold the radius point right here.
Put a mark.
Check it there.
Now I'll mark the arc of the circle right here.
And swing my arc right up.
Zack: That looks good.
Tom: Yeah.
Now mark the top of the baseboard.
Now we have our piece that's gonna be cut.
Right there, we have the transition up and over and up again.
Alright, let's cut them.
♪♪ ♪♪ ♪♪ ♪♪ Alright, Zack, let's see how we did.
Zack: Perfect.
Let me see here.
♪♪ ♪♪ ♪♪ ♪♪ Pass me that gun.
Thanks.
♪♪ ♪♪ Alright.
This is looking good.
We'll try that base cap now.
Zack: Alright, there's that piece.
And here's the flexible one.
Tom: I'm gonna start in the corner with a square cut.
That looks good.
You got a nice tight fit there.
So you're gonna mark the short right there.
Zack: Alright.
Done.
Tom: Okay.
Now we want a transition point up here on the wall.
Line that one up.
Alright.
That's perfect.
Okay.
So now these lines that we have here at the top and the line that we have at the bottom, that's gonna give us our bisected angle for our miter.
Alright.
Now mark underneath.
Okay.
So again we're gonna cut from this point to that point.
That's gonna give us our bisected angle.
And the two pieces of molding should go together nicely.
♪♪ ♪♪ Alright, now we're ready for the flexible piece.
That looks great.
Let's get a nail right above my finger.
Alright, get one right above my thumb down here.
♪♪ Alright, Zack.
There you go.
Looks pretty good, huh?
Zack: Yeah, it looks great, Tommy.
Thanks for the help.
Tom: Yeah, that little subtle detail there, it's in the front entryway.
You notice it, but you don't notice.
Zack: Yeah.
It's gonna make the job much better.
Tom: Yeah, it sure looks great.
Alright.
A lot of fun.
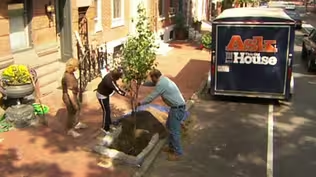
♪♪ Kevin: This town is very proud of its big old trees, but they don't last forever.
And so when the old ones come down, they have a commission to make sure that the new ones come in and that they are just right.
And before the snow came down, Jenn met with the head of that commission.
Jenn: While the gas lanterns and bluestone sidewalks really give Glen Ridge that old-world charm, it's the mature trees that line these streets that accentuate and give it that idyllic setting, and Elizabeth Baker makes sure it stays that way.
So, Elizabeth, tell us about the Shade Tree Commission.
Elizabeth: Well, the Shade Tree Commission was formed in 2010.
Jenn: Mm-hmm.
Elizabeth: Exactly 100 years after the original Shade Tree Commission was formed.
And in 2010, what we were facing was a loss of trees at epic proportions.
Jenn: So you brought it back?
Elizabeth: I did.
Jenn: So tell us about the species of trees that you select.
How do you go about selecting them for each street?
Elizabeth: Well, we've gotten to know what works best on Glen Ridge streets.
Jenn: Mm-hmm.
Elizabeth: We have 57 different tree species planted.
And because maples are no longer acclimated to this region, we're picking trees for the future.
So we are looking at southern trees.
Jenn: Okay.
Elizabeth: For example, we are planning a lot of yellowwoods, which are indigenous to the southwest United States, and we're having very good success with them.
Jenn: So in your commission, so you'll go take a street, maybe one or two streets per year, and then you... Elizabeth: We walk it.
Jenn: Okay.
Elizabeth: Decide what tree shall go into every site.
We're very diligent about it.
We do our homework, but we strive for as many big trees as possible.
Jenn: It really gives it that classic, old-world charm and just feels -- It really makes it feel like a neighborhood.
Right?
Elizabeth: Yes, it does.
My love of trees comes from growing up in this town.
Jenn: Ah, it's so cool.
Elizabeth: It truly does.
Jenn: Yeah, yeah, well, I'm sure you're gonna create lots of memories for people on this street, so... Elizabeth: Well, I hope so.
Jenn: Excellent.
I'm looking forward to see what's being planted on this street.
It looks like your crew is getting ready.
What cultivars are we planting here?
Elizabeth: Okay, we're planting two yellowwood trees and a blackgum.
Jenn: Fantastic.
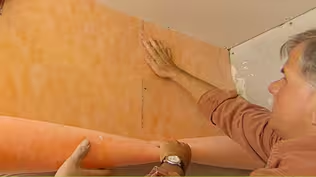
♪♪ ♪♪ Kevin: On the second floor, we've got the extra bedrooms behind me, but from this doorway back is the entire primary suite, with a bedroom back there, an office right there, and then closet and bathroom right here in the middle.
Gary, nice to meet you.
Gary: Hey, Kevin.
Nice to meet you.
Kevin: So you got a lot of the tile down already.
Love the floor tile.
What is that pattern?
Gary: So this is a 2-piece star and cross pattern, interlocking pattern.
Kevin: Okay.
Gary: We went zero entry going into the shower, so meaning curbless.
The glass door will go here and about 38 inches out right into this wall, all leading to the drain.
Kevin: Right.
So shower in this corner.
Floor tile is porcelain, it looks like?
Gary: Porcelain.
Yeah.
Kevin: Same as the wall tile?
Gary: Same -- same as the wall tile.
It's a 2-inch by 6-inch porcelain.
Kevin: Oh, yeah.
Okay.
And so it's got a glazing on it.
And you can see it's got that sort of rough texture almost if it's handmade.
Gary: Exactly.
Kevin: That's nice.
Gary: And we used a crosshatch pattern, which is three going vertically, three going horizontally... Kevin: Oh, nice.
Gary: ...starting with a full tile at the floor.
And I started with a half tile right in the corner.
Kevin: Layout is everything for you guys, right?
Because if you get it wrong, it doesn't look right.
And you got a million cuts.
Gary: Exactly.
Kevin: So you start in the corner and you start on the floor and you work your way up and in.
Gary: Up and in.
Yeah.
Which leads us to our soap shelf, our recessed niche.
Kevin: Right.
A niche that's not in yet though.
So this is what's going in?
Gary: Correct.
Kevin: So these are great.
Gary: These are great.
They're already waterproof, pre-made.
Kevin: But you didn't precut the opening.
Gary: Not yet.
Kevin: So explain that to me.
Why not?
Gary: Well, we like to have a full tile top and bottom of the soap shelf and left and right.
Kevin: So even more accurate than laying it out beforehand is to start tiling... Gary: Correct.
Kevin: ...get it close, and then fine-tune it to exactly where the niche goes?
Gary: Exactly.
This way that ensures exactly where my full tiles are.
Kevin: Wow.
So you got to cut that out after.
Gary: Yep.
Kevin: And you've scored it.
So is that ready to come out?
Gary: Ready to go.
Kevin: Alright, I'm with you.
I want to see this whole thing go down.
Off it goes.
Wait.
Now, hang on a second here.
So...you are between two studs.
You're in a bay.
Gary: Correct.
We actually got really lucky on this one.
We're...We had... Kevin: [ Laughing ] I figured you'd be right in the middle of a stud or something like that.
Gary: Normally we would be.
This time we got lucky.
Kevin: So had you ended up with a stud somewhere in here, would you still do this, knowing that you had to cut through a 2x6 or a 2x4?
Gary: Oh, absolutely.
We always try to get a full tile top, bottom, left, right.
Kevin: Whatever it takes to get this right, you'll do it there.
Gary: Correct.
Kevin: Okay.
Well, we'll take the luck.
So in goes the pre-made niche.
Oh, I get it.
I thought these were gonna overhang, these little ears, but they actually run flush.
Gary: Exactly.
Kevin: Okay.
So that's so -- Can you prove to me that you nailed it with your layout here?
Gary: I sure can.
Kevin: So there's our crosshatch coming right in to where it has to.
And then on the horizontal, which would go here... One, two.
And there's gonna be spacers.
[ Whistles ] Gary: Full tile.
Kevin: Look at that.
Perfect.
And that means that inside the niche, we'll have a full horizontal and then three verticals.
Gary: Correct.
We'll fold that right in.
Kevin: And I'm just presuming here that this ear is the size of a tile.
So it starts there and continues?
Gary: Correct.
Kevin: Wow.
So you nailed it.
Okay.
And in terms of fastening, how do you do that?
Gary: Uh, so I usually put six screws -- two here, two here, two here, which we're ready to do right now.
Kevin: Okay.
Gary: If you want to just pass me those screws.
Kevin: So there's your drill.
These are the buttons that you would use normally to install the sheets... Gary: Correct.
Kevin: ...on this wall anyway, right?
Gary: Yeah.
Inch and a half screws with, uh, washers.
Kevin: So you're just pushing those in.
There's that guy.
You got one?
Alright.
And then obviously you just got the screws there.
♪♪ Gary: Well, now we have to put the fabric over the seams to ensure 100% waterproofing.
♪♪ ♪♪ Kevin: And so then it's just repeat the process around all four sides.
Gary: All four sides.
Kevin: Wow.
Look at that.
And so you'd never have any idea that this niche was put in after the fact.
Gary: Nope.
No one will know.
Kevin: Awesome.
Appreciate it.
I'll leave you to it.
Gary: Thanks, Kev.
Kevin: Thanks, Gary.
♪♪ This house has almost 60 window openings, and all of them need to be trimmed out.
And so Zack and his crew found that it's better to sort of prefabricate the trim packet.
It gives them a level of efficiency.
And also they found some good air sealing.
Kalen, when I was upstairs with Zack, I saw the plastic on the window because you guys were spraying them.
I didn't realize the plastic went on the back first.
Kalen: Yeah, because we have them pre-assembled, we have the opportunity to do a few things and one of those is putting the plastic on before.
So that's gonna help us get a cleaner job, and it's gonna save loads of time for the painter.
Kevin: Nice.
And then the caulk that you got going on?
Kalen: Yeah.
Yeah.
We got a healthy bead of sealant going all the way around.
That's gonna do two things for us.
It's gonna help us achieve a better air seal, and it's also gonna allow me to use fewer nails because I can bed that in and it's gonna hold it in place once it seals up.
Kevin: Nice.
Alright.
So is this one ready to go in?
Kalen: Ready to go in.
You wanna give me a hand?
Kevin: Yeah, absolutely.
We just eyeballing this?
Kalen: Just eyeballing it, yeah.
Kevin: Oh.
It's interesting.
I'm way high up top.
Kalen: Yeah.
You can come down.
Kevin: Right?
Oh, there we go.
Kalen: I'm low, too.
Kevin: How is your reveal over there?
Kalen: I'm looking pretty good.
I can fool with the top after, but as long as we get this corner right here good, I can go ahead and get a fastener in it.
Kevin: I'm looking pretty good, too.
Kalen: Alright.
You ready?
Kevin: Yep.
♪♪ Just four nails and you're basically set.
Kalen: Basically done.
Kevin: What do you think, Tommy?
Tom: Ah, I like it.
The last of the window casing went in.
You got a little more trim to do around the house, and it's really starting to look good.
Zack:: It's coming along.
Tom: Yeah.
Kevin: So what do we got coming up next week, Zack?
Zack: Next week we got kitchen cabinets, finishing the floors, painting the interior.
A lot of little details.
Kevin: Alright.
Sounds good.
Getting down to the homestretch.
So until then, I'm Kevin O'Connor.
Tom: I'm Tom Silva.
Zack: I'm Zack Dettmer.
Kalen: And I'm Kalen Gomez.
Kevin: For "This Old House" down here in New Jersey.
Tom: Looking good.
I really like the way you do this trim.
Make it up as a unit and put it in place.
Kevin: Next time on "This Old House," I'll learn about a 2-part paint that makes an ideal cabinet finish.
Zack: And I'll show you how to install crown molding without a nail hole in sight.
Jenn: And I'll share my design plan that provides curb appeal and color throughout the seasons.
This is another viewpoint looking down into the garden from the steps.
Sunita: Oh.
Looks amazing.
Kevin: That's next time.


- Home and How To

Hit the road in a classic car for a tour through Great Britain with two antiques experts.


Support for PBS provided by:
Funding for THIS OLD HOUSE is provided by The Home Depot and Renewal By Andersen.