E24 | Smart Thermostat, Bluestone Clear | Ask This Old House
Season 22 Episode 24 | 23m 42sVideo has Closed Captions
Ross wires a smart thermostat; Mauro shares deck staining tips; Mark cleans a stone patio.
Ross Trethewey helps a homeowner install a smart thermostat after discovering he's missing a common wire; Mauro Henrique shares deck staining tips, what stain options are available, and the level of maintenance required for each type of stain; Mark McCullough helps a homeowner revive his bluestone patio by showing how to use the appropriate tools and materials to clean it.
Problems playing video? | Closed Captioning Feedback
Problems playing video? | Closed Captioning Feedback
Funding for Ask This Old House is provided by The Home Depot, Renewal By Andersen, and ChipDrop.
Support provided by:


E24 | Smart Thermostat, Bluestone Clear | Ask This Old House
Season 22 Episode 24 | 23m 42sVideo has Closed Captions
Ross Trethewey helps a homeowner install a smart thermostat after discovering he's missing a common wire; Mauro Henrique shares deck staining tips, what stain options are available, and the level of maintenance required for each type of stain; Mark McCullough helps a homeowner revive his bluestone patio by showing how to use the appropriate tools and materials to clean it.
Problems playing video? | Closed Captioning Feedback
How to Watch Ask This Old House
Ask This Old House is available to stream on pbs.org and the free PBS App, available on iPhone, Apple TV, Android TV, Android smartphones, Amazon Fire TV, Amazon Fire Tablet, Roku, Samsung Smart TV, and Vizio.
Keep Exploring

This Old House Insider Newsletter
Get This Old House exclusive stories, tips, and behind-the-scenes information delivered right to your inbox every month.Providing Support for PBS.org
Learn Moreabout PBS online sponsorship♪♪ Kevin: On "Ask This Old House," our experts travel across the country to answer questions about your house.
♪♪ Today, Ross helps a homeowner install a smart thermostat with mismatched wires.
Then looking to give your deck a refresh?
Mauro gives tips on staining.
And did the winter leave your patio looking dingy?
Mark shows a homeowner how to get theirs looking as good as new.
Mark: Let the tool do the work.
Kevin: All that on "Ask This Old House."
♪♪ Ross: Hey, TG.
TG: Hi, Ross.
Thank you so much for coming out here.
Ross: Yeah, nice to meet you.
TG: Nice to meet you as well.
Shall I show you the thermostat area?
Ross: Yeah.
That's great.
Let's go inside.
TG: Mm-hmm.
I was upgrading the house to smart thermostats.
And I was able to do the one upstairs, but I had some challenges with the one down here.
Ross: Okay.
Got you.
So it looks like a heating and cooling thermostat.
Do you know what you have for heating and cooling system?
TG: I have a forced-water baseboard heating.
Ross: Okay.
TG: Yeah.
And I have air handlers upstairs.
Ross: What I expect to see for heating and cooling thermostat is a five-wire setup -- red for 24-volt power, white for heating, yellow for cooling, green for fan, and blue as the common wire.
Okay.
So let's take a look behind the scenes.
So I can see right away that we have two different R connections.
I have an Rc and an R. So that usually means dual transformer, meaning we have separate transformer for the thermostat downstairs running the heat and the separate control for the air conditioning upstairs.
If I pull these wires out, I see the two bundles.
One is the red and the white, which are R and W, which is going for the heating side, and I have my Y, my G, and my Rc, which is running the cooling and the fan control.
I also have these extra wires.
So I got four additional wires here.
And that's a really good sign, because I usually don't have enough wires to make that work.
So next thing to check is I want to take a picture of this, and I want to see if we can repurpose and use any of these extra wires because we don't have a common wire.
Right?
There's nothing landing on the C terminal, and smart thermostats need a common wire, right?
So it's a very important thing.
So let's see where these wires go.
Do you know where the air handler is?
TG: It is up in the attic.
Ross: Okay, so we'll go to take a look there.
And then we'll see what we get for wiring.
Okay.
I'll head up first.
TG: The air handler is up there in the back.
Ross: Okay.
Great.
The first thing we're going to do is kill power, and we're going to then pull the panels off, take a look inside.
Okay.
So we have the evaporative coil right here.
We have the blower motor right here.
Here is the control cabinet.
First thing to do is verify the power is off.
TG: Mm-hmm.
Ross: So we are going to check with our voltage detection, make sure that that works.
No power there.
No power.
Okay.
Now we can pull out the rat's nest of wires.
I can see this brown wire.
That goes down to our thermostat, and I can see that it's got five wires.
We have a red, a white, a yellow, a green, and a blue.
If you remember downstairs, we had seven wires.
TG: Yes, I do.
Ross: These are the wires that we had, so we did have a blue and a green.
We also had a brown and an orange.
TG: Yes.
Ross: But I can tell this is a white wire.
The sheathing on it is white.
The sheathing on this is brown.
So it tells me that it's two different wires.
TG: Okay.
Okay.
Ross: Okay?
TG: How do we reconcile that?
Ross: Yeah, so what I need to see is one, do I have continuity, meaning that do these wires actually go all the way down to the thermostat?
TG: Mm-hmm.
Ross: Okay?
And so to do that, I'm gonna bundle the wires, the extra wires, together with a wire nut and I'll come up here and then we'll just verify continuity.
And if we do, we're going to be in luck because one of these can be used as a common wire.
I'm gonna go downstairs and check that.
And we'll come right back up.
Okay, so I bundled the wires together downstairs.
And now we're going to check for continuity.
Okay?
So I take out my multimeter.
I set that to continuity.
TG: Mm-hmm.
Ross: And you can see that it's an open loop.
That means that it's open.
[ Beep ] And I should get a beep when I touch them together.
[ Beep ] So that's the beep that I'm looking for.
So now when I go with my probes across the green wire and the blue wire, I should get that beep.
And, unfortunately, still open loop.
See the OL?
TG: Yeah.
Ross: And no beep.
So that means that this brown wire is then spliced somewhere between here and the thermostat.
And when they made the splice, they probably didn't connect the wires to the spare wires.
TG: Okay.
How do we solve that?
Ross: So, the next thing to do is to see if we can find the splice.
TG: Okay.
Ross: So we know it goes from here somewhere down to the thermostat.
Let's trace for that and see if we can find the splice because then if we can find the splice, we can make the proper connections.
TG: Okay.
Ross: Okay, so that brown wire, the thermostat wire, runs right across here.
And then you can see it dive down right here.
And then I can see that it goes down the wall cavity right there.
So that means that that splice is happening somewhere in the wall cavities going down to thermostat downstairs.
So, that's unfortunate.
Now I understand why you were having some troubles.
But I do have some solutions.
So why don't we go downstairs and we'll talk those solutions there?
TG: Sounds good.
Ross: Alright.
Sounds good.
Alright.
Alright, let's do a quick recap.
With your old thermostat, you didn't need a continuous power source.
TG: Mm-hmm.
Ross: Alright?
You ran the old unit off of batteries.
Batteries work just fine because they only ran a clock.
So it didn't need a lot of power.
The new smart thermostats need 24 volts of constant power.
So without the common wire here, your smart thermostat would be running on batteries, and it would deplete really quickly.
Okay?
So, we have a couple of different solutions.
The first one is we could find the splice.
That is like a needle in a haystack.
I do not recommend we do that because we don't want to cavity your house.
We don't know which wall cavity.
TG: Sure.
Ross: The next solution would be to run a new wire, right?
From this thermostat up to the attic.
Now, that also could be really challenging because we're getting through two wall cavities.
You have to get through this wall cavity, through the second-floor wall cavity and then up to the attic.
That could be also challenging.
The next solution is that we could repurpose the fan wire and make that a common wire.
Okay, so let me show you.
What you have currently is seven-conductor, 18-gauge wire.
So this represents the wires that are in your wall that go up to the air handler.
Now, this one, the orange, the brown, the blue, and the green, do not make it past the splice.
So those are not available to us.
We have the 24-volt hot, we have the fan, and we have the cooling wire.
So my proposition is to move the white wire to a common wire.
Therefore, I have 24 volts on the red and the common to power up the thermostat, and I run the cooling on the Y wire.
Now, the downside of doing that is that I'm going to lose independent fan control.
So, for example, if I go fan auto versus on, I don't have that capability if I do that.
So, I guess, my first question is, do you use the fan on switch?
TG: Never.
We usually leave it at auto, and that's how we use it.
So that would not be a big loss for us.
Ross: Okay.
Alright.
So that could be the best solution.
Do you agree with that?
TG: Oh, yeah.
I'm very comfortable.
Ross: Alright.
I'm going to go grab the thermostat.
I'll be right back.
TG: Okay.
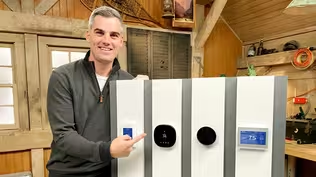
Ross: So here's the thermostat that I've chosen for you.
For one, it is compatible with dual-transformer systems.
So this one will work with what you have.
Here you have the thermostat, the back plate, and the trim plate.
So this is going to mount here into the trim plate, and that is going to mount there.
So that is what you're going to see on the wall.
They also sent us some labels, so we can label it.
And they also gave us a remote sensor.
And this is gonna be great for when you don't want to sense at the thermostat and you can sense temperature somewhere else.
TG: Okay.
Ross: So, if you can help me get the labels on the wire, we good?
TG: Absolutely.
Ross: Alright, let's do it.
♪♪ So now we can take the back plate off the wall.
So now we got the back plate trim plate.
We're going to slide them through, and we're going to check for level.
I'm going to mark for my holes.
♪♪ ♪♪ Next, we can put the wires.
We're going to land each terminal on the right spot.
Now we're going to mount the thermostat to the base, and then we can go upstairs and make sure we switch the G wire with the common wire, and then we can turn power back on.
♪♪ So that one we'll get a wire nut in there.
Now we can take the brown wire and the red wire and we're going to be joining that with this white wire.
With those connections made, I'm now going to apply labels, and I'm going to put some electrical tape on these wire nuts so they stay made.
With all of connections made, I can now put them back into their cabinet.
We can put the covers back on.
♪♪ Okay, I turned power on.
You should be up and running.
TG: Yeah.
I'm a step ahead of you, Ross.
I downloaded the app and set it up already.
Ross: Very nice.
Alright.
It looks pretty good on the wall, too.
TG: It seems to be working.
Ross: Well, you're in good hands.
If you want the remote sensor, you can always set that up if you'd like.
But, yeah, you should be ready.
TG: I'll go ahead and pair it a little later once I set everything else out as well on this, Ross.
Ross: Alright.
TG: Okay.
Thank you for all your help, Ross.
Ross: Of course.
TG: Appreciate it.
Ross: Take care.
♪♪ Kevin: Hey, Mauro.
Mauro: Kevin.
Kevin: Oh, spring and decks.
Decks and patios.
I love it.
Mauro: Spring is right around the corner, right?
Kevin: Okay.
Mauro: And today, we're going to talk about three different types of wooden deck that we see most out there.
Kevin: Okay.
So pressure-treated, I presume?
Mauro: You know the pressure-treated.
Kevin: Very common.
Mauro: Very common.
Chemically treated.
So you have to wait about six months before you do anything to it.
It has to dry, has to weather.
Other than that, nothing will work.
Kevin: That's a really good tip.
So don't just put it down and go after it.
Let it dry out.
Mauro: Let it dry.
Kevin: Okay.
This guy?
Mauro: This one here is the mahogany.
Kevin: Yep.
Mauro: Basically, you don't have to do anything to it.
It's beautiful as is.
Kevin: Hard, rot-resistant.
Looks beautiful.
Mauro: Tight grain, look good.
You see the grains.
Beautiful, this red, red brownish popping out.
Kevin: You see a lot of this?
Mauro: A lot of it.
Kevin: Yeah?
Mauro: A lot of it.
Kevin: Oh!
Mauro: This guy here is the rich cousin.
Kevin: That's -- [ Both laugh ] Mauro: Feel the weight.
Kevin: I know.
It's crazy.
That's twice as heavy.
Mauro: Exactly.
It's like a man's toy and a kid's toy.
Kevin: So ipé.
Mauro: Ipé.
It's not "I-pay."
It's ipé.
Kevin: Ipé.
Mauro: Ipé.
Kevin: Of course.
Similar to mahogany.
Mauro: Similar to mahogany.
Very tight grain, even more brown than the mahogany.
Kevin: Mm-hmm.
Mauro: And it's a beautiful wood.
Kevin: Related, though, right?
Similar family?
Mauro: They're all cousins.
Kevin: All cousins.
Exactly.
Mauro: This is richer.
Kevin: Okay.
Well, let's say we do decide to do something to it.
Mauro: Right.
Kevin: I guess first things first is you never recommend paint underfoot.
Mauro: Oh, no, no, no, no.
Kevin: You always want stain.
Mauro: You're going to have to stain.
The difference between paint and stain, the stain will penetrate better on the wood.
And the paint stays as a film on the top surface.
Kevin: That's eventually going to come off.
Mauro: It's going to come off.
You're gonna walk on top of that.
It's gonna peel, it's gonna scratch.
It's gonna do everything.
Kevin: And our options for stain?
Mauro: Option for stain, I got this board that I can show you.
On this on here, we have transparent finish just like a penetrating oil.
It's good for these two type of wood.
It brings out a little more of the brown, the red is just as beautiful, but you don't have to do anything with this too.
Kevin: So it's basically a clear color.
And in this case, you know, when it gets the wood wet, basically, that's why it turns dark?
Mauro: It turns dark, a little more brown.
Kevin: So this version?
Mauro: This one over here is the semi transparent.
Okay?
Which shows a little bit of the grain and a little of the color from the wood.
You can see that, but you're adding color to it.
Kevin: So, in this case, if you wanted to add some browns and get away from some of the reds, that's what you're getting with the semi transparent.
Mauro: This is what you get.
Kevin: But you're still seeing through it.
Mauro: Still seeing through.
You're seeing a lot of grain.
You'll see about 25% of the pigmentation that you put on and 75% of the grain popping right out.
That's with the semi transparent, 75/25.
Kevin: And that's a... Mauro: This here is the solid right there, which is going to be good for this type of wood here.
Kevin: Yeah, it seems criminal that you'd put a solid on something as beautiful as mahogany or ipé.
But I get it on the pressure-treated.
Mauro: Oh, yeah.
If you're going to the trouble and have the mahogany or the ipé, which is a lot more money than this, why put this stuff on top of that?
Kevin: And with the semi, excuse me, with the semi and the full body right here, you can pick your color.
Mauro: You can pick any color.
Kevin: So now you can get something like this, really any color you want.
Mauro: Exactly.
Kevin: Or blend between what's underneath.
Mauro: Yep.
You're going -- No, you're not going to see any grain.
Kevin: With the solid?
Mauro: The solid.
Kevin: Right.
Gotcha.
Mauro: Two coats is good.
Kevin: Okay.
Mauro: But it's gonna be like flat paint, and you're not gonna see any grain at all.
But this, you don't want to see the grain on that.
Kevin: In terms of the levels of protection, we are getting something in protection-wise out of the clear, correct?
Mauro: On a clear coat.
For this, if you use on top of those two brown wood, you're going to have like every year, depending on the location your deck is, or every year or two years, you're going to have to recoat it.
Kevin: Right.
Mauro: Okay?
And the benefit is, like, you're going to tight the grain even more.
You're gonna avoid moisture that you're getting there.
You're gonna have an extra protection for U.V.
for those two type of wood, more this than that.
Kevin: Gotcha.
Mauro: But then the semi transparent, you don't want to use -- If you're going to the trouble to have mahogany or ipé, you don't want to use that.
You want to keep the natural, beautiful color.
Kevin: Right.
But so the more stain we have, the more pigment, the more protection we're gonna get?
Mauro: You're gonna get for the pressure-treated.
Kevin: So solid's gonna give us the most protection?
Mauro: Exactly.
Yes.
Kevin: And then how often do you think I'd have to redo a solid coat?
Mauro: On this one, decking is a thing that you use all spring, all summer long.
So if it doesn't see much scratch on it, it's gonna have like three or four years, it's time to recoat it again.
Kevin: Gotcha.
Okay.
Well, deck season gets me excited.
And you coming to my house to do this gets me even more excited.
Mauro: Absolutely.
If you have one of those two, I won't touch it.
Kevin: Okay.
Mauro: But if you have that one, we'll treat it for you.
Kevin: Sounds good, pal.
Thank you.
♪♪ Mark: Avi.
Avi: Hi, Mark.
Nice to meet you.
Mark: My pleasure.
How are you doing?
Avi: Good.
Mark: Alright.
So you sent me some pictures.
This is the patio.
Avi: Yeah, we've had this bluestone patio for about three years.
Mark: Okay.
Avi: And yeah, over the years, it's become discolored and stained.
So I'm looking for ideas on the best way to clean it.
Mark: Okay.
So first thing I notice is we have a lot of trees around the patio.
That's probably what's causing a lot of the staining.
You can look over here.
I see a lot of mold, mildew.
I do have some cleaners that we can use.
I actually brought some equipment with me that has attachments.
But at the end of the day, I think we're going to be able to clean this up just perfectly.
Avi: Great.
Sounds good.
Mark: Let me show you what I have.
Okay, Avi, these are our choices for cleaning the patio.
First off is muriatic acid.
It may not be a candidate.
Why?
Because it's probably too strong.
That's why you see the gloves and the glasses and the long-handle brushes.
Then we have vinegar.
It's really specific to one stain that is common with masonry.
That's called efflorescence.
This is the bleach.
This is the stuff that is most commonly used on the mold, the mildew, and the algaes.
And next to that is an all-purpose cleaner, which basically does everything that these three do and a little bit more.
Avi: Okay.
And can these be used straight or do they have to be diluted?
Mark: Okay, great question because this muriatic acid is cut five to one.
I usually like to use a clear bucket.
So when I say five to one, I'll give you an inch of the muriatic acid and then I'll give you five inches of water.
That's the correct dilution to start with.
The vinegar, almost the same thing.
I don't cut it quite as much.
It's actually a three to one ratio.
So again, in my clear bucket, I have one inch of vinegar, then I add three inches of water to dilute it.
Bleach is a different dilution.
It might be that strong or it might be that weak depending on the stains.
Over here, you have no dilution at all, and this actually works very, very quickly.
They say it works in 30 seconds.
And to be honest with you, I'm probably willing to give that a try.
Avi: Okay.
And what about for pets and vegetation?
Are they safe?
Mark: So, no go with the muriatic acid.
Going all the way back to the all-purpose cleaner, this is great because it considers the environment, the pets, and the people.
Avi: Great.
Mark: Alright.
So why don't you grab the bottle?
I'll get the brush and the bucket.
And we'll get going.
Alright.
So the first thing we're going to do is move the patio furniture.
The rain is our friend today because usually, the next step is to hose down the patio and the surrounding landscape to dilute the cleaner and protect the nearby vegetation.
Alright, Avi, one thing we always have to remember before we get started, we're always going to want to do a test area.
That way we can make sure the cleaner doesn't discolor the bluestone, ruining the entire patio.
So I'm just going to take my brush out of this bucket, and I'm going to spread a little bit of the solution onto the stone.
With most of these cleaners, there's a dwell time.
So we're going to let this sit.
This one happens to be very, very quick, so 30 seconds to a minute.
This one contains bleach.
I can smell that.
I don't know if you can.
Avi: Yeah.
I can smell it.
Mark: Alright.
I like that because we know it's working.
So that's dwelled for about a minute.
And as you can see, the solution is already picking up the dirt.
You can just check that out.
Avi: Yeah, I can see it coming out.
Mark: And you can see the reaction to it.
So I'm just going to spin this brush.
Okay, Avi, so I think this has done its deal for the amount of time that we needed.
Do we have a hose handy?
Avi: Yes.
Mark: Alright.
Why don't we rinse this off?
Alright, great.
Okay, Avi, this looks like it's doing what it's supposed to be doing.
Let's go get the power washer.
Avi: Okay.
Mark: Alright, Avi, so what I've done is I've taken our solution, and I've put it in a spray bottle.
It's gonna make it easier, and it's going to make it faster.
So why don't you grab that spray bottle?
And you can almost start in place right there and do the whole patio.
♪♪ Okay.
I like the way you're putting it on evenly.
♪♪ Avi: Do you have to be careful with the composite?
Mark: So, great question, but just stay off as much as you can.
Avi: Okay.
♪♪ Mark: Okay, Avi, as we let the solution take effect, next thing we're going to do is power wash. Avi: Okay.
Are there any tips and tricks to power washing?
Mark: So I think every single homeowner should have a power washer in their arsenal.
If you don't have one, they're easy to rent.
But a thing that people get hung up on all the time when they start using a power wash is they have a trouble regulating the pressure.
So if you keep the pressure down, another thing that we're going to have to be careful about as you can see this joint right here... Avi: Yeah.
Mark: Okay, so that potentially can be blown out, and we don't want to do that.
But before that, I actually have this great little attachment for the power washer that's going to help you regulate the water.
As you can see, I have a double wand right here.
You can see that hole right there.
Another hole right there.
That acts as the jet.
That applies to pressure.
On the outside ring of this dish, you can see a scrub brush.
So as you go back and forth with the wand, you're going to see that the stuff gets cleaned up very nicely.
Avi: Great.
Mark: Alright?
So very easily attached, if you want to pull that back.
This just slips in.
You'll hear it lock in.
Now you're ready to go.
Avi: Okay.
♪♪ ♪♪ Mark: Let the tool do the work.
♪♪ Avi: Is that okay to leave the edges?
Mark: Yeah, do that, and then we'll come back and get a brush.
♪♪ ♪♪ Alright, why don't we rinse this off?
Avi: Wow, Mark, this looks fantastic.
Mark: Alright, Avi, I'm happy as heck.
Came out great.
Avi: So now that it's done, I have a question about sealing.
Do you recommend sealing?
Mark: So, I'm not a huge sealer guy, and I'll tell you why.
I love the concept.
It does bring the color out.
But as you can see, we have a rain day today, and the bluestone does give you a pretty good grip.
Unfortunately, once you apply a sealer, it's going to keep the water out.
And in the wintertime, that water is going to beat up and turn to ice.
That's when you may have a slip and fall.
So for myself, as long as you stay with it and maintain it every spring, I think you're probably good to go.
Avi: Good.
And what do you recommend for maintenance going forward?
Mark: So once a year, you might want to get the power washer out, hit this whole patio again, and you should be good to go.
Avi: Great.
Thank you so much.
Mark: Alright, Avi.
Avi: Okay.
Take care.
Mark: There you go.
Thank you.
♪♪ ♪♪ Kevin: Next time on "Ask This Old House," Mark helps a homeowner restore their 100-year-old firebox.
Then, Lee and Jenn give their favorite tips on transitioning your yard from spring to summer.
Plus, Tom and I get some help organizing a workshop from our Glen Ridge project general contractor, Zack Dettmore.
Zack: How satisfying is that, huh?
Tom: Very satisfying.
Zack: Everything in its place.
Kevin: All that on "Ask This Old House."


- Home and How To

Hit the road in a classic car for a tour through Great Britain with two antiques experts.


Support for PBS provided by:
Funding for Ask This Old House is provided by The Home Depot, Renewal By Andersen, and ChipDrop.