E25 | Circuit, Table Saw, Fireplace | Ask This Old House
Season 21 Episode 25 | 23m 42sVideo has Closed Captions
Heath installs a circuit; Richard fits a fireplace insert; Tom explains table saw safety.
Heath Eastman helps a homeowner whose kitchen breaker trips when the basement humidifier is running by installing a new circuit; Tom Silva showcases the importance of table saw safety by demonstrating safety techniques for common sources of table saw injuries; Richard Trethewey helps a homeowner supplement their homes heating by installing a wood burning insert into their drafty fireplace.
Problems playing video? | Closed Captioning Feedback
Problems playing video? | Closed Captioning Feedback
Funding for Ask This Old House is provided by The Home Depot, Renewal By Andersen, and ChipDrop.
Support provided by:


E25 | Circuit, Table Saw, Fireplace | Ask This Old House
Season 21 Episode 25 | 23m 42sVideo has Closed Captions
Heath Eastman helps a homeowner whose kitchen breaker trips when the basement humidifier is running by installing a new circuit; Tom Silva showcases the importance of table saw safety by demonstrating safety techniques for common sources of table saw injuries; Richard Trethewey helps a homeowner supplement their homes heating by installing a wood burning insert into their drafty fireplace.
Problems playing video? | Closed Captioning Feedback
How to Watch Ask This Old House
Ask This Old House is available to stream on pbs.org and the free PBS App, available on iPhone, Apple TV, Android TV, Android smartphones, Amazon Fire TV, Amazon Fire Tablet, Roku, Samsung Smart TV, and Vizio.
Keep Exploring

This Old House Insider Newsletter
Get This Old House exclusive stories, tips, and behind-the-scenes information delivered right to your inbox every month.Providing Support for PBS.org
Learn Moreabout PBS online sponsorship♪♪ Kevin: On "Ask This Old House," our experts travel across the country to answer questions about your house.
♪♪ Today, with two appliances running at the same time, this kitchen loses power, and Keith has a solution.
Then, Tom will demonstrate the safety features on a table saw to help keep you and your fingers intact.
And Richard will explain how an insert like this can keep the temperature up and your heating bills down.
It's all coming up next on "Ask This Old House."
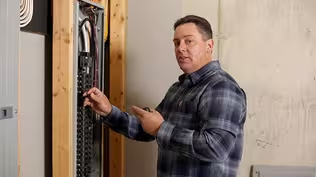
♪♪ Heath: So, we're on our way to see a homeowner who wrote in about a breaker that keeps tripping when she uses a couple of appliances at the same time.
Now, while there are several reasons that a breaker may trip, from her description, it sounds like we have the appliances that maybe have some heating elements that draw a lot of current that's overloading the circuit and causing the breaker to trip.
And that's a good thing.
The breaker's doing its job and preventing any damage.
So what we'd like to do is go there, take a look, see how many things are truly plugged in, see where the wiring goes in addition to where she has things plugged in, and see what we can do to solve the problem.
Christina: Hey, thanks for coming.
Heath: Nice to meet you.
Thanks for having me.
Christina: Yeah.
Come on in.
Heath: Let's take a look.
Christina:Sure.
Heath: So, I saw that you wrote in about an issue with the kitchen.
Christina: Oh, yeah.
So, I've got the coffee maker running right now.
Watch what happens when I turn on the toaster.
Yeah, give it a second.
Heath: Okay.
Only happens when the dehumidifier's running.
Heath: We have a dehumidifier, too.
So we have a coffee maker, a toaster, the lights, and a dehumidifier?
Let's go take a look at the dehumidifier in the basement and see what else is on with it.
Christina: Sounds good.
All right, so down here, we've got the dehumidifier.
Heath: Okay.
So we know that's part of that same circuit.
And we're right under the kitchen.
The kitchen's directly above us.
Christina: Yep.
Heath: This is where it's plugged in.
Couple of things that are concerning right off the bat.
So, I think the best option is for me to go out, grab some tools, grab a ladder, we'll take a look around, see what else is on this, and go from there.
Christina: Sounds good.
Heath: All right.
♪♪ Christina: So what did we find?
[ Both laugh ] Heath: All right.
So we've done a little bit of poking around, and I think I have a pretty good idea of what's going on down here.
Now, to kind of give a backstory, code requires when we have a kitchen that we have a minimum of two 20-amp circuits for the countertops, two small-appliance branch circuits.
And the reason that's there when we're doing something newer is for your appliances like you have now, we're seeing the issue with the coffee maker and the toaster being a little too much.
We want to have the option to plug those into separate receptacles so they're on different circuits so you can run them at the same time, if you want.
Here's the good news.
We do have a couple of circuits coming this way.
Wires come over to here, they hit a couple of junction boxes up here, and then they go into the kitchen that's right above us.
So we have your coffee maker, a receptacle in the middle, and then your toaster.
But, unfortunately, there's also a basement receptacle tied into this kitchen circuit.
So now we have three sizable appliances all trying to run on the same circuit.
So the first thing I want to do is take the coffee maker, slide it over to the middle receptacle, they're now on two separate circuits, and you can run them both at the same time.
Christina: Sounds easy.
Heath: [ Laughs ] That's the good news.
The next step is, we have to deal with this.
There's no way that this should be tied in with those kitchen-counter receptacles.
So we're going to start by removing this from the mess of the junction boxes up here and make this go away.
And we have a lot going on down here.
So, one of the first things we have is, we're looking at this wiring coming in, and this is 14-gauge wire, which the problem in this case is, it's tied into a 20-amp breaker.
That breaker is much too big to be protecting a wire this small.
This needs to be on a 15-amp breaker, or we have to up the wire size to 12 gauge.
If I plug the tester in...
So you can see we have the indicator lights in the front that's telling us we have an open ground, if we look at our chart.
So we have a hot and a neutral but no ground wire.
And then we should have GFCI protection, as well.
So if we push this test button, this should trip and shut down, but it's not.
So we know we don't have any GFCI protection because that isn't tripping anything.
And one of the last things we see is, when we have appliances like this -- dehumidifier, sump pump -- we really don't want to run a thin cord.
This cord is much too small.
We don't want to run a cord at all, if we can avoid it.
If you absolutely have to do it, you want to use something short like the.
Appliance cord like this.
But we want to really stay away.
From all of these.
Things.
So what I'd like to do is install a new 20-amp circuit, so it's all by itself.
We'll come down here, mount it to the stone so we can plug these in.
I just don't want to mount it to the wood because we have some nails up there.
It looks like you might mount some things, hang a few things.
I want to make sure we protect that wire from physical damage, keep it out of the way, and we should be good.
Christina: Great.
Heath: What do you think?
Christina: Yeah, sounds good.
Heath: All right.
♪♪ We'll start by shutting the power off at the breaker and removing the existing basement circuit.
♪♪ Then we can work on mounting the box and the conduit for the new receptacle.
I want these to be as tight to the wall as possible to prevent anyone.
From hanging things on it or using it in any way that might risk damage to the wire.
You might also notice that I'm using metal conduit here.
Now, typically, the code doesn't allow you to install NM cable in conduit, but there are exceptions like this when we need physical protection.
♪♪ All right, Christina.
So now that we have the box mounted, we're going to go ahead and pull the wire, and I'm going to need your hand with this.
So, I actually have it on a reel that should kind of guide it out of the roll okay.
But I want to make sure it doesn't get snagged up.
So if you want to make sure that comes off nicely, I'll go ahead and pull it over to the box.
That should be pretty good.
Christina: So why are these all being nailed into a board instead of right into the joists themselves?
Heath: That is a great question, and we get that all the time.
The problem is, we want this wire to follow a solid surface in the house.
And the reason being is, we want physical protection for that wire.
I know it sounds kind of silly, but you have a coat hanger?
Christina: Yeah.
Heath: So, a lot of times, you might find in a basement, it's pretty easy to do something like that.
If you have live-voltage wires and start hanging things on them.
possible to get damaged.
If you have a running board, it's going to land on the board and not get hurt.
And same thing -- you see someone that has a wood shop or anything else down in the basement, they store things in the rafter.
You want it to rest up on top of this and not on the wires themselves.
So if we run it on a running board, solid surface, keeps them protected.
Christina: Makes sense.
♪♪ ♪♪ ♪♪ Heath: All right.
Let's give it a shot.
Christina: Let's see about it.
Heath: So, dehumidifier's on, coffee maker's over there on its own, toaster, and no breaker tripping.
Christina: Look at that.
Heath: Looks good.
Christina: Great.
Thanks.
Heath: All right.
That should solve it.
Christina: Thank you so much.
That's great.
Heath: See you later.
♪♪ Kevin: Hey, Tommy.
Tom: Hey, Kevin.
How are you?
Kevin: All right.
So, table saws.
What are we talking about?
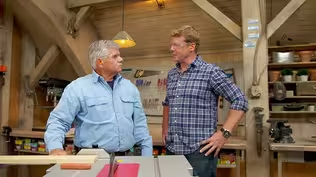
Tom: Well, let's talk a little bit about table-saw safety.
What I'm going to do is, I'm going to show you one thing, or a couple of things, that's really dangerous about a table saw because there are a lot of injuries every year.
Kevin: Yep.
Tom: So I'm going to remove the riving knife.
And everything that we're doing right now I do not recommend anybody to do.
It's strictly for the demonstration on what goes wrong.
Kevin: Okay.
Tom: Okay.
So now, what you have to think about is not only getting your hand cut but kickback.
Kevin: Yeah.
Tom: And kickback, with a table saw is where the saw blade actually throws the wood right back at you.
So you think about it is when the user is cutting the board, they move the board back and forth, and look what it's doing to the blade.
Kevin: It's actually twisting the blade.
Tom: Twisting the blade.
So now you're fighting with the blade, and when that blade wants to -- and it's usually after the halfway point -- it's going to take the board, pick it up, and kick it back at you.
Kevin: So this blade is spinning forward.
So there's a lot of force trying to push this way.
Tom: Right.
Kevin: You're saying that, on the front half, the teeth are going down, you're pushing the wood down, but once you get past midway, now the teeth are coming up.
Tom: You have a lot of flat surface on the up pressure.
And when you hit these blades' teeth on the back, it's going to grab it and go.
Kevin: Okay.
Well, I mean, it happens to me, it might have happened to you, but I'm not sure people who it hasn't happened to understand how fast it happens and how scary it is because it's just shabam.
Tom: It's shabam is right.
So, the key is, watching the blade, watching the rip fence, having a straight edge, not a crooked edge.
Kevin: Okay.
Tom: All right.
So, if you want, I have a piece of foam, and we're going to show kickback with the piece of foam, not a piece of wood.
Kevin: Going to demonstrate it.
Tom: So, we can plug the saw in.
I get my safety glasses on.
Kevin: Brave man, Mr. Silva.
Tom: [ Laughs ] Kevin: Okay.
Tom: All right.
So now I'm going to rip this through, see if I can get it to kick back.
See how it lifted?
[ Table saw whirring ] [ Table saw shuts off ] Kevin: So, not nearly dramatic if it was a piece of wood.
Tom: Oh, if it was a piece of wood, it would be -- Kevin: Chwpoo!
Tom: It would be deadly, let's put it that way.
Kevin: But you can see the idea.
It was both trying to force it up, which is really bad, and in that case, shooting it back.
Tom: But, also, if you think about it, I said I have two things against me.
I don't have a riving knife.
The riving knife would help against this, would help against the pinching of the board when it went through, but, also, the blade being so high, if I was to cut, go through here, and this grabbed my hand on a takeoff point, I would probably lose my fingers.
Kevin: Right.
Tom: If I put the blade down where it should go, where the teeth just come through the top of the surface, and I did get kickback, I would get less chance of losing a finger.
Kevin: So, nowadays, you can't even buy one of these things without a riving knife on there.
Tom: No.
And it's -- I think it's cut down a lot on the accidents.
So I have my height, a lot less, and I have my riving knife that now helps me control that piece to keep it tight against the rip fence and straighter.
Kevin: Right.
Because it's very difficult for it to start to go this way... Tom: Right.
Kevin: ...because it's going to be hitting this knife, preventing it from crossing that plane of the blade.
So, let's keep this on.
Tom: Mm-hmm.
Kevin: Let's make sure this is the proper height.
Tom: It is.
Kevin: Let's keep an eye on this little gap right there so that we're perfectly safe.
And then I notice where you're standing, which is... Tom: I'm right here.
I got room for that piece to go right by me.
Kevin: That's all good safety protocol, good.
So, what about the newest safety feature?
Tom: I really cannot cut myself bad on this saw.
Because of the safety feature on this saw, as soon as my skin, if it gets to that blade, that blade just disappears.
Kevin: Right.
Tom: Instantly stops.
Kevin: It's a remarkable technology.
Tom: It is amazing.
Let me show you something.
Let me show you what I made.
There you go.
Kevin: [ Laughing ] What?!
What?
Tom: Hamburgers and hot dogs.
Kevin: You got to be kidding me.
Tom: Oh, no.
Kevin: Are those hot-dog fingers and a hamburger palm?
Tom: Yeah.
Kevin: Hi.
It's nice to meet you!
[ Both laugh ] Tom: All right.
So let me show you what happens here.
So... Kevin: Oh, my God.
Tom: This saw has a special feature, but I'm going to turn it off for the demonstration.
Kevin: Are you literally going to run this through?
Tom: Yeah, absolutely.
Kevin: Oh.
Are you a ketchup or mustard guy?
Tom: Watch.
[ Both laugh ] We're going to find out.
[ Table saw whirring ] [ Table saw shuts off ] Kevin: Ugh.
Tom: That's pretty gross.
Kevin: Oh, my God.
[ Laughs ] I'm laughing because you made a "hand-burger," but that's not laughing material.
Tom: A lot of people have lost limbs because of that.
Kevin: Yep.
Okay.
But as you say, special technology here.
Tom: Yeah.
So, special technology.
So now I've got to take it and put it back in the safety mode.
Kevin: Tell me you have another hand-burger.
Tom: I might.
I might.
I'll have to look.
Kevin: So, explain to everyone how this technology works and what's going on.
Tom: Okay.
So, inside the saw, down below here, in back of the blade, there's actually a brake.
And that brake has electric -- let's say, like, electric field in it that's sent out, and it goes around the surface of the teeth, and it senses any moisture.
Kevin: Right?
And when it senses that... Tom: It automatically short-circuits the brake, shuts it off, and stops it instantly.
and the blade falls down.
Kevin: Right.
Tom: But let's see how that medium-rare turns out.
[ Table saw whirring ] [ Table saw stops ] Kevin: Wow.
Wow!
Tom: So let's see -- And let's see the damage.
Not a nick.
Kevin: Look at that.
Tom: Nothing.
Kevin: Nothing.
Tom: Nothing.
Little worse there.
Kevin: Compare and contrast is remarkable.
Tom: [ Chuckles ] Yeah.
Kevin: That's just instantaneous.
And so the blade is gone.
The blade's ruined.
Tom: So you never, ever reuse the blade.
Kevin: So, other attachments, as well.
Another thing that we took off.
Tom: Keep the sawdust from blowing up in your face.
If you're ripping a lot, you have one here with a higher riving knife.
So if I push this through like that, you run a saw... Kevin: So this is protecting your fingers.
Tom: This is protecting your fingers.
It's keeping the sawdust from blowing in your face, also.
So let's put that right in the groove.
There you go.
Now, as you run it through, you see those little things right there on the back that your fingers are pulling up?
Those are called pawls.
So as I push this through -- right?
-- they're in the air, and if they're jagged, they're like teeth.
So when it grabs, it digs into the wood, stops it from kicking back at you.
Kevin: So, riving knife, good operator, Pause, blade guard like this, dust collection.
You have all of these features on a new saw.
Add in the flesh-sensing technology, you really start to understand why table-saw injuries have dropped so precipitously.
Tom: Way down.
Yeah.
Kevin: That is awesome.
Well, lots to learn there, Tommy.
Unbelievable demonstration, which is terrific.
And you've -- Hey, listen, you know what?
Tom: Let's fire the grill up.
[ Laughs ] Kevin: Well done.
Tom: Oh, thank you, thank you.
Kevin: Well done.
Thank you, Tommy.
Tom: My pleasure.
I'll take one of those for the road.
♪♪ Ryan: Richard, thanks for coming.
Richard: Nice to see you.
What a nice part of the world you're in down here.
Ryan: Yeah, thanks.
We love it here.
We've been here about 10 years.
Richard: Great house.
Ryan: Thanks.
This is where we spend most of our time.
Richard: Very comfortable living room.
You can sit and watch TV, watch our show, do anything you want here.
Ryan: We do, we do.
And it's comfortable, but it's freezing cold.
Richard: But it's not comfortable.
Ryan: It's not comfortable.
Yeah, it's cold.
And it's on electric baseboard heat.
And we don't like to turn it on because it's very expensive.
People often complain about electric baseboards, but the main house has got its own heating system, right?
Ryan: Yeah, that's on gas.
Forced hot air.
Richard: So it looks like the house -- the original house probably ended right here.
You can see the registers.
And this was probably an add-on?
Ryan: That's right.
In the mid '80s, they put this on, and it's just over a crawl space.
Richard: So they've been freezing since the mid '80s.
Ryan: Right.
So we like to use the fireplace.
But the problem is, you don't get any heat out of it unless you're right here.
So it kind of makes the rest of the house cold.
Richard: And people love the romance of a fire.
You know, it's so great to sit around it, but they don't realize that most of its life, it's a net loser, that more heat's going up than coming in.
So let me show you what I mean.
Ryan: Sure.
Richard: All right, Ryan, I brought along this little demonstrator to help understand the concept of draft.
This was designed to teach school kids some of the science that is involved.
And so with this, this represents the chimney here.
This down here is the firebox.
And so -- and this candle represents the fire that you have to work so hard to light and cut all that wood.
Ryan: Yep.
Richard: So, now, once we start that going, the products of combustion, your fire, fights its way and goes up this chimney.
And it'll have some lift.
And so draft has begun.
When you first light the fireplace, you also have plenty of heat coming this way, and it comes by radiant energy.
It's going to come out and heat the table and you and the air that's close to it.
But after that fire is halfway gone, now that draft is now pulling air in and going up the chimney.
And it's really a net loser.
Ryan: It's not throwing the same heat at you.
Richard: Correct.
So, with these incense sticks, I'm going to exhibit what really happens inside the physics of the building itself.
So now this tube represents -- Because this is a sealed box.
This represents air.
Could be from another room, it could be from the living room, or it could be from another chimney in the building.
So with this fire going, look what happens.
You notice that the smoke goes downward.
That fire needs air to burn.
It needs air for draft.
And so it's going to pull air from wherever it can find it.
Okay?
So, in this example, it's pulling it down the tube, but it could be pulling it in through the firebox right here.
So most of that heat you're trying to have inside the building is now leaving this way.
Ryan: Right.
Richard: So what do you do?
Well, in an ideal world, maybe this fireplace liner, could it be changed automatically?
Imagine if you could have, like, an IRIS damper that could close off to match so that the draft would proportionalize.
Ryan: Sounds like a great idea.
Richard: Well, they haven't invented that yet.
Because you have to worry about the toxic fumes.
You can't afford to have anything go wrong with that.
Ryan: Okay.
Right.
Richard: You could try a glass fireplace door to try and hold that draft down and control the air thing.
Ryan: And that would stop all of our heat from going up.
After the fire is done, I could close the doors.
Richard: Right.
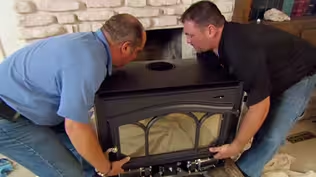
But, really, the only solution, I think, for you in this application is either a wood stove installed into this or a thing called a fireplace insert, because thereby we can isolate the combustion process from the heating of the room.
Ryan: So not as much air is going to be sneaking up that chimney.
My heat.
Richard: You ready?
You want to be warm?
Ryan: Let's try it out.
Richard: Okay.
All right.
So this is a wood insert, fireplace insert.
They come in gas, as well.
Ryan: Wood's Perfect.
I'm always cutting up wood That's fallen down on the property.
We have a lot of trees.
Richard: You got like an acre of them, don't you?
Ryan: We have an acre of trees.
They're always coming down.
I chop them up.
Be nice to get some heat out of them.
Richard: All right.
So, the way it works, firebox is right here.
Exhaust will leave right here.
But instead of going into that wide-open chimney, it'll go into a stainless-steel exhaust pipe that'll go all the way up.
Okay?
Ryan: Okay.
Now, on the combustion side, instead of all the air being able to come in through that way-too-big pipe, all the air that's going to be burned comes in through an opening at the bottom that is proportional.
It's a small, controlled opening that's proportional to the size of this fire.
Ryan: So it's not sucking all my heated air out the... Richard: Correct.
So, now, safely, those combustion products will always leave and go up, out through the chimney so you don't have to worry.
Ryan: Okay.
Richard: Now, that's the combustion side.
On the heating side, it's different because it has a heat exchanger.
Air can be drawn in through the bottom.
Cold air will settle at the bottom, it'll be pulled in through here, through a fan that sits behind it.
Now, you bring that cold air in, the air passes behind the firebox, but it doesn't pass into the firebox.
It's completely -- A heat exchange happens, and you send heated air out this way, which means it's going to heat here and right over there.
Ryan: And the fan comes on automatically?
Richard: Right.
If the fire's going, it'll come on and send that heat out.
So it's just going to be perfect.
Ryan: That's amazing.
Richard: Perfect solution here.
This is not a do-it-yourself project, so we've enlisted some pros to help us, so we're ready.
Ryan: Sounds great.
Richard: Paul and his crew just arrived.
The first thing they're going to do is to remove the old damper to make room for the vent pipe.
♪♪ An insulated stainless steel liner is then installed from the top of the chimney.
♪♪ Paul: Keep coming.
Richard: With the liner in place, Paul and his team placed the insert into the firebox... Paul: That's good right there.
Richard: ...and connect it to the liner.
Man: We're in!
Richard: After, the crew will cut the liner to size and install the chimney cap.
To finish off the install, a flat surround and backing plate will seal off the entire opening and give a perfect finished look.
♪♪ We are getting close to launch time.
Ryan: I'm excited.
Richard: We have loaded the firebox.
You can see the typical fresh fire would have paper, kindling, paper in a stack like this, and you're going to light it from the top.
Now, underneath, I want you to see a couple of things.
Right here, there's a button, and you're going to -- on every fire, you're going to push it in.
And that opens an additional damper that gives you more oxygen into the firebox during the early period.
And over time, it's going to close, once it's going.
Ryan: All right.
Richard: Down here, there's a toggle switch going to be for the fan.
It's either automatic or manual.
And a little switch right here, you can change the fan speeds.
Ryan: Okay.
Richard: We are ready for you to launch.
Ryan: Beautiful.
Richard: All right.
Fan's on.
A little bit of heat coming out.
Not bad.
Ryan: This is amazing.
And here comes the gang.
Richard: Oh, the whole team.
Hello, guys.
Ryan: This is Maisy.
Richard: Hi, Maisy.
Ryan: And Darien.
Richard: Hi, Darien.
How are you?
Ryan: And Kate.
Katie: Hey, Richard.
How are you?
Richard: Have you guys been cold so far before?
Maisy: Yeah.
Darien: Yes.
Richard: Well, what do you think now?
Isn't that something?
Maisy: Yes.
Darien: Amazing.
Katie: It's incredible.
Richard: All right.
There's going to be some new chores, though.
Somebody's going to have to cut and split wood.
Who's going to do it?
[ Laughter ] You guys can fight about it.
Enjoy.
Ryan: Thank you, Richard.
Katie: Thank you, Richard.
Wow, you guys, look at that!
Darien: It's so hot.
Katie: Oh, my gosh.
Maisy: Whoa.
♪♪ ♪♪ Kevin: Next time on "Ask This Old House"...
If a tree falls in the woods, what would the team at "Ask TOH" do?
Find it, mill it, and transform it, of course.
Tom and Nathan team up to turn a fallen tree into a beautiful custom bar top.
And it's a wrap on season 21.
The team comes together to celebrate another great year of "Ask This Old House."
Jenn: Whoop whoop!
Kevin: That's coming up on "Ask This Old House."


- Home and How To

Hit the road in a classic car for a tour through Great Britain with two antiques experts.


Support for PBS provided by:
Funding for Ask This Old House is provided by The Home Depot, Renewal By Andersen, and ChipDrop.