E25 | Firebox Restore, Tool Storage | Ask This Old House
Season 22 Episode 25 | 23m 42sVideo has Closed Captions
Ross discusses IAQ; Mark repairs an antique firebox; Tom and Zack Dettmore organize tools.
Ross Trethewey emphasizes the importance of managing Indoor Air Quality; Mark McCullough restores an 1888 Victorian fireplace by replacing its crumbling firebox; Jenn Nawada and Lee Gilliam discuss transitioning landscapes from Spring to Summer; Tom Silva and Kevin O'Connor recruit general contractor Zack Dettmore to organize tools in the miter saw station they built earlier in the year.
Problems playing video? | Closed Captioning Feedback
Problems playing video? | Closed Captioning Feedback
Funding for Ask This Old House is provided by The Home Depot, Renewal By Andersen, and ChipDrop.
Support provided by:


E25 | Firebox Restore, Tool Storage | Ask This Old House
Season 22 Episode 25 | 23m 42sVideo has Closed Captions
Ross Trethewey emphasizes the importance of managing Indoor Air Quality; Mark McCullough restores an 1888 Victorian fireplace by replacing its crumbling firebox; Jenn Nawada and Lee Gilliam discuss transitioning landscapes from Spring to Summer; Tom Silva and Kevin O'Connor recruit general contractor Zack Dettmore to organize tools in the miter saw station they built earlier in the year.
Problems playing video? | Closed Captioning Feedback
How to Watch Ask This Old House
Ask This Old House is available to stream on pbs.org and the free PBS App, available on iPhone, Apple TV, Android TV, Android smartphones, Amazon Fire TV, Amazon Fire Tablet, Roku, Samsung Smart TV, and Vizio.
Keep Exploring


This Old House Insider Newsletter
Get This Old House exclusive stories, tips, and behind-the-scenes information delivered right to your inbox every month.Providing Support for PBS.org
Learn Moreabout PBS online sponsorship♪♪ Kevin: On "Ask This Old House," our experts travel across the country to answer questions about your house.
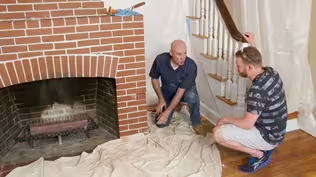
♪♪ Today, Mark helps a homeowner restore their hundred-year-old firebox.
Then Lee and Jenn give their favorite tips on transitioning your yard from spring to summer.
Plus, Tommy and I get some help organizing the workshop from our Glen Ridge project general contractor, Zack Dettmore.
How satisfying is that, huh?
Tom: Very satisfying.
Kevin: Everything in its place.
Coming up next on "Ask This Old House."
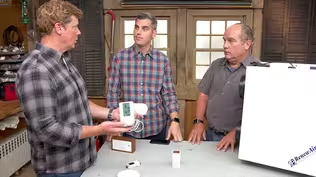
♪♪ Ross: Indoor air chemistry is super, super complex.
We're talking about IAQ, right -- indoor air quality.
There's been a lot of research over water-quality standards and the food-quality standards that we use -- and for good reasons, right?
But the air quality is the one that's kind of been the third on that list.
And if you think about what we eat, what we drink, and what we breathe, if you're looking for an average person, they ingest about 4 pounds of food every single day.
They drink about 8 pounds of water every single day.
But they breathe about 30 pounds of air a day.
And so I think it's about time that we start to focus more on the air quality in our buildings.
I do a presentation called "The Unintended Consequences of Building Airtight."
That whole idea is that, you know, we build these awesome houses, we seal them up so well.
We've reduced their heating bills, we've reduced their cooling bills, but now you have the ultimate Petri dish where you've stored and captured all these contaminants, and it doesn't get to outside -- it's trapped.
So we have to ventilate for those buildings appropriately.
So let's make sure that you are now running your ventilation system, so the bath fans... Man: Okay.
Ross: ...kitchen fans, et cetera.
Make sure you're running that because we want to get that moisture out of the house.
People are definitely scared about indoor air quality because it's kind of, like, this unknown thing, right?
It's kind of like the boogieman in a way.
You have this esoteric idea that, you know, air quality is just, you know -- "If I can't smell anything, it's fine."
And so a lot of people don't really have a full understanding of it.
But the way I think about it is that the data doesn't lie.
And if we can get these IAQ monitors, you know, into people's houses, you know, we can start to get baselines.
We can start to understand how that building is performing and how healthy that building is.
What we do is we typically pick like six or seven proxies for indoor air quality.
So that could be carbon dioxide, like what we breathe out.
It could be particulate matter, like when we burn stuff.
VOCs -- like off-gassing of chemicals from furniture and carpets.
Now, DIY, consumer-friendly devices that measure those six things I talked about.
For people that are kind of scared about IAQ, you know, I tend to push back to say, you know, we don't know what we don't measure.
The analogy I give is, if you're gonna go to the doctor, right, for some health issue, what they're gonna do is gonna run some tests to establish baselines and understand, you know, where things are at, right?
We pick these six proxies as an example, and we watch those over time, and that gives us the ability to say, hey, if one of these goes, you know, out of line and goes above a certain threshold for a long period of time, we now know about it, number one, so the information's there, and then we can come up with a solution to solve that or try to figure out why it rose, right?
So it shouldn't be scary.
It should be used as, hey, we're making sure that we have peace of mind and we have healthy buildings to live in.
We design buildings for people, not the other way around, so we want to make sure we get the ventilation, filtration, source capture right, and it's going to become more of an issue when our buildings get tighter and tighter.
And so, you know, my kind of goal is just to make people more aware of it so that we can start to understand what the air quality is like, and we can make sure that these buildings are going to get healthier.
♪♪ Mark: Hey, Ryan.
Ryan: Hey, Mark.
How are you?
Mark: I'm doing great.
Doing great.
Oh, I love the house.
Ryan: Oh, thanks.
Mark: You wrote me about a fireplace?
Ryan: I did.
Absolutely.
Mark: Let's check it out.
Ryan: Let me show it to you.
Mark: Great.
Ryan: So, we bought the house about five years ago, and one of our favorite parts of the house is this original 1888 fireplace.
Mark: Yeah!
It's a built-in piece of art.
I'll tell you that.
Ryan: Yeah, for sure.
So, you know, our favorite part really is this artistic tile.
And we've named these two children on the tile Agnes and Rutherford.
Mark: Alright, I love it.
Ryan: Yeah, so, it was originally an 1880s coal-burning fireplace, and I'm really glad that we could convert it to natural gas and then keep that coal-type insert to celebrate its original character.
So, we've put the gas insert in, but we're a little bit afraid to turn it on, given the state of this firebox.
Mark: Okay.
Well, there are a couple of things that I see right off the bat.
You can see the fire brick, of course, has a hole in it.
This top piece and the side pieces were actually made in a form.
So you put the form on the ground, you pour the material into it, you smooth it off, you let it set up.
When you flip it over, you have these lines in the concrete.
That's going to mimic the jointing of a brick.
But the only thing that does worry me is I know back in the day, 1880s, they did use asbestos in some of the masonry materials.
So I may just grab that piece and have it tested just to make sure that we're good to go.
Ryan: Yeah, for sure.
Mark: Alright.
So let me grab this.
Oh, yeah.
Yeah.
So it'll be good to test it.
Ryan: Okay.
Fantastic.
Mark: Let's go.
Ryan: Great.
Thanks.
♪♪ Mark: Alright, Ryan.
Well, I think we got pretty lucky.
This tested negative for asbestos.
Ryan: Great news.
Mark: Great news.
And this is the fire brick that I propose to use.
Anytime that I'm doing any type of repair work, I always want to mimic existing.
It's not always as easy as it sounds.
Sometimes we're restricted by code, which we are in fireboxes, so we are predicated to use a fire brick.
This fire brick comes in two colors.
It's a red or it's this yellow.
As you can see, this yellow matches very nicely.
Ryan: Oh.
Yeah.
Mark: The size is a little bit different, but I'm not worried about that because I can use a saw and cut these brick any way I want to mimic what we have.
Ryan: Great.
So, what's different about fire brick?
Mark: So, this fire brick is made with what we call refractory cement, and all it is is a heat-resistant cement.
So that's why it's code to put it into fireboxes.
Ryan: Okay.
Mark: Alright.
So, why don't we move this coal basket, and, that way, we can see exactly what we're going to do?
Ryan: Sounds good.
Mark: Okay, Ryan, so, in the spirit of keeping the original integrity, these sidewalls look like they're in pretty good condition, so I think we'll leave those.
Obviously, the back wall, we can see the damage right now.
I can see that just wants to come.
Ryan: Wow.
Mark: Right.
And, again, we have this major crack in the top piece, so that's going to eliminate it for us trying to use it again.
But when we take this piece out, we do have to be careful because there is a damper on top of this firebox.
I'm not really sure just yet on if it's tied in with this steel that holds this apron.
But as we get deeper into this... you can see that it wants to come.
And instead of banging things around with a hammer and a chisel, I think I'm just going to try to twist them out.
Here we go.
There we go.
Okay.
♪♪ You get that piece.
I have this one.
Ryan: Okay.
♪♪ [ Whirring ] ♪♪ ♪♪ Mark: Okay, Ryan, now that we have everything cleaned out, we're going to do the layout and, most specifically, the back wall.
Ryan: Great.
Mark: So, during the demo, we were able to save a few of the original pieces.
And, again, as discussed before, we always want to be original whenever we can.
So we're going to take this brick.
We're gonna put it back there.
This is the other one we were able to salvage.
We're going to put that there.
And the reason I want to do that is because the match for that brick is right there.
So we're going to take our modern-day fire brick.
And we'll go in the middle.
And that is basically what your back wall is going to look like.
To complete the layout, we're going to use a half brick here.
And then we're going to come back over.
And then we're going to tuck this brick in the back.
Like that.
And this creates what we call a running bond pattern.
And the bottom course is going to repeat on the third course.
That's gonna bring us to the height of our fluted fire brick.
And then the last two courses that we do, we're going to tip in to give it the Franklin bend.
And the Franklin bend, don't forget, will throw the heat out.
And the first thing I'm gonna do -- I'm gonna ask you to do it -- is dip that brick in that bucket of water.
Ryan: Okay.
Mark: Real quick.
Ryan: Why do the bricks need to be wet?
Mark: So, these fire brick are so dry that they'll extract the water that's in the mortar.
And once that happens, the mortar becomes very brittle.
Ryan: Oh.
Mark: And our wall will start to wave.
Ryan: Oh.
Okay.
Mark: So we want to pre-wet these brick.
I'll take that one, Ryan.
Again, I'm just going to line that up with existing.
♪♪ Make sure I'm plumb.
♪♪ Now, because this brick is in the middle of a course, I'm gonna do my head joints before I slip that brick in.
And always very important to have full head joints.
Ryan: Oh.
That's perfect.
Mark: Yeah.
Yeah.
♪♪ And we'll go to next course.
♪♪ Alright, Ryan, I think it's your turn.
Ryan: Alright.
I'll give it a shot.
Mark: Feeling good?
Ryan: Yeah.
Mark: Alright.
Spread that mortar.
Exactly.
You can wiggle that into place, too, Ryan.
To get the Franklin bend in, the last course we had to do was 5 1/2 inches all the way across.
And the Franklin bend will reflect the heat.
Alright, Ryan, what do you think?
Ryan: It looks wonderful.
Thank you so much.
Mark: Alright.
Great.
So, the only thing I'm gonna do is leave you with a little bit of homework.
You can see that haze that I already put on those yellow fire brick.
Well, in your jar is a little bit of ash and soot.
I have a damp rag in my hand.
And as you can see... ...darkening up the brick pretty good, right?
Ryan: Matches perfectly.
That's great.
Mark: Yeah.
Yeah.
You can go darker if you like, but I think you're doing pretty good right now.
But, anyway, I hope you enjoy.
Ryan: Perfect.
Thank you so much for coming by.
I really appreciate it.
Mark: Alright.
Okay, Ryan.
Ryan: Thanks.
Mark: Thank you for having me.
Ryan: See ya.
♪♪ Kevin: Hey, Jenn.
Hey, Lee.
Jenn: Hey.
Lee: Hi, Kevin.
How you doing?
Kevin: I'm doing alright.
What are you guys kibitzin' about here?
Lee: What are you talking about?
[ Laughter ] Jenn: Making a game plan.
Lee: [ Laughs ] That's a shot.
No, we're talking about -- We're talking about going from spring into summertime now.
Kevin: Busy time of year.
Jenn: Yes.
One of my favorite times.
Lee: Exactly.
Kevin: What is on the list?
Lee: Well, mulch is one, always, okay?
And putting in your annuals, getting ready for that.
What do you think?
Jenn: Well, we've already done the cleanups, you know, raked out all the debris from the winter.
People have mulched.
Some people are waiting for the pollen to finish coming down.
Lee: Preference.
Jenn: But this time of year is great.
Transitioning to spring to summer to set up for lounge time in the summertime.
Kevin: Alright.
So let's start with the beds, alright?
Can I have you do the beds?
Give me, like, the garden stuff that I got to be thinking about because I'm ready for mulch.
I want it in.
Lee: What you got to do is cut the beds in first.
Get a nice cut in, nice edge on everything, and then probably put down a nice layer of mulch, whether you prefer, like, a leaf mulch or a hemlock mulch.
Jenn: Yeah.
Leaf mulch is great because it's composted leaves and adds all the nutrients to the soil.
Kevin: I like a dark bark mulch.
Like, a dark bark mulch.
Jenn: It is dark.
You have to -- You have to give it a try.
Lee: And also maybe a little light pruning on plants that already flowered.
Kevin: Yeah, what gets pruned this time of year?
Lee: I like to do, like, rhododendrons, azaleas, lilacs.
Also I like to do the tulips that come up.
Kevin: Oh, you cut the bulb plants back.
Lee: Yes.
Cut those back.
But the daffodils, we don't like to do because they like to grow -- They like to have their energy go back on the dead.
Jenn: Right.
So tidy that up.
Clean what needs to be cut back, any dead from the year before from the perennials.
And like we said, all the spring-blooming lilacs.
It's the best time of year to shape them because later on in the season you're gonna cut off the blooms for the next year.
Kevin: Right.
Exactly.
Jenn: So on the checklist.
And then also for -- We'll talk about lawns in a second.
I know.
I feel it coming.
Another thing is if you have an irrigation system or whatever kind of watering system you have, once you get it all blown out and set up for the season, you want to check all the heads, make sure everything's working properly.
And then think of timing of watering as the temperatures rise.
Lee: Morning's the best time, I think, and I like to do it early so you get the lawn hydrated and your plants are hydrated.
Jenn: Yeah.
Deep watering is better than more frequent watering.
Kevin: Yeah.
Alright.
So on to the lawn.
On to the lawn!
Jenn: Yep, yep.
Kevin: So, we put our first fertilizer down, the pre-emergent.
That was early spring.
Lee: Correct.
Kevin: What are we doing now?
Lee: Now we're going to put down some nitrogen, get it green, and some phosphorus.
So that will hold us through any stress through the summer coming up.
Kevin: Gotcha.
Now, I like to aerate.
You guys are down with aerating, right?
Lee: Yes.
Aerating is really good.
Kevin: Do you do that before you drop that second fertilizer down, after?
Does it matter?
Lee: You can do it before or after.
Really doesn't matter.
But the issue is you want to get down that thatch layer so you're getting some nutrients down in that layer -- and oxygen.
Jenn: Yeah.
Very important.
Kevin: So busy time, exciting time for both of you guys.
Jenn: Yeah.
Once it's done, you just sit back and watch it all grow.
Lee: Exactly.
Jenn: It's so fun.
Kevin: Get on the patio and enjoy it.
Thank you.
Jenn: Yeah.
You're welcome.
Lee: Thank you.
♪♪ Kevin: Hey, Tommy.
Tom: Hey, Kevin.
How are ya?
Kevin: Zack.
Welcome to the shop.
Zack: Thanks for having me.
Kevin: Yeah, well, it's been a pleasure working with you down in Glen Ridge.
You're doing a great job on that house down there.
Tom: Doing a great job.
Zack: I appreciate that.
Kevin: And, you know, we were thinking of you because we did this project not that long ago where we built the miter stand but also some storage with the flanking cabinets.
And after seeing your truck down in Glen Ridge, we were like, "What's wrong with this kid?"
Zack: I only do remodeling so I can have the tools to organize.
It's just a side project.
Tom: My hat's off to your organization.
That's for sure.
He's the organizer.
I always want to be.
I have a vision, but I can't seem to do it.
Kevin: Yeah.
Super-organized.
Zack: You're the kind of builder I want to be.
[ Laughter ] Kevin: Well, we put you two together.
We've invited you up here, and we're thinking you're just the guy to help us organize all of the tools.
We got a ton of stuff everywhere, and now we have some new storage.
Tom: Big job.
Kevin: I guess the first question to you is, like, what do you think about?
Like, what's the number-one thing that goes to your head when you see a mess like this?
Zack: So, the first thing I think about is, like, big, bulky things.
So, in general, humans are lazy, right?
We're gonna be lazy.
So if something is hard or difficult to put back in the correct spot, we're not gonna do it, right?
Tom: True.
Zack: So make sure your ladders and your miter saws are easy, like you have.
The vacuum's kind of bulky.
That's right in the center.
So you've done that.
The next thing is essential tools should be in a location that's easy to get to.
So whatever you're using the most -- pencils, tape measures, hammers -- those should be high up, waist height, not a lot of walking to get to them.
Kevin: Mm-hmm.
Zack: And then the final thing is putting the solution where the problem is.
So if you need a pencil and you're at the miter saw, there should be pencils in that location so you're not getting yourself all set up then having to walk to a different location.
Tom: Yeah, you got a board, you want to mark it.
You don't want to be hunting for a pencil.
"Oh, it's right here -- right beside me."
Zack: Exactly.
Tom: Makes sense.
Zack: Making it intuitive, basically.
If it works for you and Tommy, then it'll work for anyone working in this space, and it'll make more sense for things to fall back to where they need, and you can kind of group like tools together.
Tom: That's the trick, putting things back where they belong.
Zack: Yeah.
Tom: That's my problem.
Doesn't seem to want to go back where I took it from.
Zack: So, there should be no will power.
Tom: Yeah, exactly.
Zack: We can't rely on will power.
We have to rely on the system wanting things to go back where they belong.
Tom: Right.
Kevin: So, in terms of -- I just heard group "like tools" together.
We've got a whole bunch of different things here.
We've got drivers.
We've got hand tools.
We've got some saw stuff.
Is that where we start?
Zack: Yeah, so, I would say the hand tools you use most frequently, we'll find where they go, the easiest-to-access place.
And then for something like table-saw-related tools, we should put those close to the table saw.
And we can just sort of generally pull these things into drawers, and then we'll see how quickly those drawers are filling up and if we need to move things around just for the sake of storage.
Kevin: Do a glue drawer?
Yes.
Tom: Alright.
Here's a little magnet.
That's handy.
Zack: Well, that's good.
I made this our designated junk drawer.
If we have a spot where miscellaneous things like this go, then it'll keep the other drawers we're trying to organize clear of useful tools that we're not sure how to organize.
Tom: Sounds good.
Kevin: Ooh.
Two more things for your glue drawer.
Zack: Oh.
We're in full glue swing right now.
Kevin: Two-part epoxy.
Zack: Whoa!
♪♪ Kevin: Okay.
Looks like everything is kind of grouped into their piles.
Zack: Yeah.
Kevin: You know, with power tools in one area.
And I think the biggest drawer is the hand tools here to the side.
Zack: Right.
So, in general, I like to have the systems be modular so you don't have to throw out the old system and make a new one when you get one new tool.
But I think we know those hand tools you use all the time -- tape measure, pencils.
So I think it's safe for us to make a specific system that keeps those things really organized.
And for that, we're going to use foam.
And it's sort of like just a different version of having the peg board on the wall that you trace around it to show where things go, except we're gonna cut the shape out of the tool out in the foam.
♪♪ Kevin: It's like a crime scene for hand tools.
Zack: Yeah.
Exactly.
Kevin: [ Laughs ] ♪♪ Zack: This little tool.
Will make it easier to remove it from the foam.
Tom: Look at that.
Kevin: Boy, that looks good.
How satisfying is that, huh?
Tom: Very satisfying.
Kevin: Everything in its place.
Tom: Yeah.
Kevin: Okay.
Dare we tackle bits and drivers, Zack?
Because this... can be a nightmare.
Zack: It is totally a nightmare.
Because there's so many.
So, there's a couple of different ways we can go about this.
Um, you've got some nice sets already that are well-organized, so instead of us wasting a bunch of time coming up with another system for this, I say we just reuse those and throw them right in.
Tom: Yeah.
Zack: But for items like this that we have a various amount of different fasteners, we can actually use extruded aluminum, and we went with a profile of a "U" channel because you can actually put something inside that and use that as a primary container.
Tom: Perfect.
Kevin: We applied some magnetic tape to the back, which is pretty easy to get.
And so that'll actually just stick anywhere at the bottom of this drawer, and we can build containers any which way we want.
Tom: Any way you want.
Kevin: Oh, so this becomes a spot, but also the cavity between becomes a spot.
Tom: Right.
Zack: Exactly.
Tom: We can take this out to make it bigger or smaller, whatever we need.
Zack: Yeah, so we'll try and take our best guess at what's going to work for you guys.
But the nice thing is, because it's magnetic, you can completely move things around without having to throw it out or clean anything up.
Tom: I like it.
Kevin: Really good.
Okay.
So how do we tackle that?
Zack: So, you can cut these right on the miter saw.
So if you want to cut maybe two more to 9 3/8".
Tom: Okay.
What I need to do, though, is I need to stick some of this magnetic tape on the piece first so when I cut it, I'll cut the magnetic tape at the same time.
Kevin: All going on this front part?
Zack: I think minus-2 potentially.
[ Saw buzzing ] Why don't we drop the bits in?
So, I would say we start with -- Phillips is the most common.
♪♪ Kevin: Does this just calm your little organizational heart here, getting everything right?
Zack: Yes.
[ Chuckles ] Yes, it does.
Kevin: Right?
Zack: I'm quite satisfied right now.
Tom: Alright.
That looks beautiful.
What a difference.
Kevin: Yeah, it makes a huge difference.
Nice to have those finally organized.
And I got to admit, Zack.
It's oddly satisfying.
Why did I enjoy that so much?
Tom: I kind of enjoyed it, too.
It was fun.
Kevin: What is that?
Zack: I don't know.
I think that's how you know it's a successful project.
Like, if you're relying on will power and discipline to put things in the right spot, that's not gonna happen.
But if it's fun and satisfying, things are gonna fall back to where you wanted them to be in the first place.
Kevin: Alright.
Tom: Yeah, I think it made a big difference, and I know we have more to do, so... We got to get into the organizing thing.
You're gonna have to come back.
Zack: Alright.
I'll come back again.
Kevin: Come back and join us.
We appreciate you coming this time, and we really look forward to finishing up that project in Glen Ridge with you.
Tom: Yeah.
Absolutely.
Zack: Yeah.
It's gonna be fun.
Kevin: So until next time, I'm Kevin O'Connor... Tom: I'm Tom Silva.
Zack: And I'm Zack Dettmore.
Kevin: For "Ask This Old House."
Tom: Alright.
So we got like six more drawers to do.
Then we gotta deal with this mess here.
Zack: Oh.
This is gonna be a doozy.
♪♪ ♪♪ Kevin: Next time on "Ask This Old House"... everything is rosy in Portland as Jenn visits the Rose Test Garden to find the perfect flower variety for a homeowner.
Jenn: When this all fills together, this is gonna be a wall of color.
Kevin: Then Nathan helps a homeowner repair some bathroom tiles.
And we have a little fun with the cast as we see how well we know our fans.
All that on "Ask This Old House."


- Home and How To

Hit the road in a classic car for a tour through Great Britain with two antiques experts.


Support for PBS provided by:
Funding for Ask This Old House is provided by The Home Depot, Renewal By Andersen, and ChipDrop.