E25 | First Period Gambrel | Look-Alike
Season 44 Episode 25 | 23m 42sVideo has Closed Captions
A sink is fabricated out of soapstone, and a backsplash is fabricated from an old board.
It's all about the finishes as the restoration nears an end. Wide pine floorboards are installed with cut nails to match the existing wood in the original house. A kitchen sink is fabricated out of soapstone, and a backsplash is fabricated from an old board. A combination appliance efficiently supplies hot water where there's a high supply demand. Lighting installation wraps up in the ell.
Problems playing video? | Closed Captioning Feedback
Problems playing video? | Closed Captioning Feedback
Funding for THIS OLD HOUSE is provided by The Home Depot and Renewal By Andersen.
Support provided by:

E25 | First Period Gambrel | Look-Alike
Season 44 Episode 25 | 23m 42sVideo has Closed Captions
It's all about the finishes as the restoration nears an end. Wide pine floorboards are installed with cut nails to match the existing wood in the original house. A kitchen sink is fabricated out of soapstone, and a backsplash is fabricated from an old board. A combination appliance efficiently supplies hot water where there's a high supply demand. Lighting installation wraps up in the ell.
Problems playing video? | Closed Captioning Feedback
How to Watch This Old House
This Old House is available to stream on pbs.org and the free PBS App, available on iPhone, Apple TV, Android TV, Android smartphones, Amazon Fire TV, Amazon Fire Tablet, Roku, Samsung Smart TV, and Vizio.
Keep Exploring

This Old House Insider Newsletter
Get This Old House exclusive stories, tips, and behind-the-scenes information delivered right to your inbox every month.Providing Support for PBS.org
Learn Moreabout PBS online sponsorshipKevin: Today on "This Old House"...
Normally, we would light this cathedral ceiling with recessed cans, but that would take away from the rustic look.
So Heath has a clever solution.
Richard: Soapstone goes back to Egyptian times.
We're going to build a soapstone sink using modern technology.
♪♪ Man: Ahh.
That's it.
♪♪ ♪♪ ♪♪ Kevin: Hi, there.
I'm Kevin O'Connor, and welcome back to "This Old House" and to our project here in Ipswich, Massachusetts, from 1720.
Well, we are coming down to the home stretch, which means it is mostly about the finishes.
Hey, Tommy.
Tom: Hey, Kevin.
How are you?
Kevin: I'm doing all right.
Oh, look at this.
We got the boards going back down.
I love this room.
It's going to be Bill's office?
Tom: Yeah, it's going to be Bill's office, and we weren't going to touch a thing.
[ Both laugh ] Kevin: I remember.
Tom: So we straightened it out a little bit.
We didn't make it level, but we're working on the floors right here.
Kevin: So saving them from different parts of the house?
Tom: Yeah, they came from different parts of the house, putting them back down, trying to use cut nails and screws.
Kevin: Well, saving the old floors but did not save the old fireplace.
Tom: No.
Kevin: There was that big behemoth which wasn't original.
It was old but not original.
Tom: It was definitely not original to the house.
It was probably done in the '50s, my guess.
Kevin: Yeah.
Tom: But it was too big.
And so basically we built a new fireplace, Rumford.
Much more efficient, much more in keeping with the period of the house and much smaller.
Kevin: And I love the fact that they went with the bead board, sort of dresses up the wall.
Tom: The bead board really dresses it up.
And if you look here, because of the fireplace, the Rumford takes up less space.
It's square on the bottom, then it tapers and goes up like that.
You have a lot of space behind this side.
Kevin: The chimney is really sort of in a center here.
Tom: Yeah, yeah.
So they put in a couple of hidden doors right here.
Kevin: Oh, cool.
Tom: Yeah.
To make the doors fit perfect into the opening, Mike the carpenter created a very narrow gap that are consistent all the way around the opening so the doors do fit like a fine piece of furniture.
To make the door, he starts with crosscutting three poplar panel strips.
Then he inserted the beaded detail, fit it, and fine-tuned it and put it in place.
He then put a couple of clamps underneath it, glued it, let it dry.
Then he custom fit the door, crosscutting it and ripping it.
Then fine-tuning it with a belt sander.
The hinges are hidden hinges.
After the hinges are in place, it fits the door back and forth.
Fine-tunes it, if needed, and it's all done.
Kevin: Little carpentry magic.
I love it.
Tom: Yeah, I love it myself.
Kevin: And some magic going on in the pantry, too.
Tom: Yeah, there's a lot going on here.
We actually repurposed the old floorboards and boards that were up in the attic.
We took them up, Helen and Bill and myself.
And Kevin, the carpenter, he did a beautiful job repurposing all those boards.
Kevin: Wow.
I never realized that they were so red.
Look at that color.
That is awesome.
Tom: To make the stiles and rails for the cabinet doors, we first had to cut them down to make them straight.
To make a mortise and tenon joint, he used a router.
♪♪ To accept the panel into the stiles and rails, he created a rabbit.
After all the pieces are cut, he glued the stiles and rails together, letting the panel float for expansion and contraction.
♪♪ But if you look at the detail, there's an inset panel.
Sits nice and flush, but it's a tongue-and-groove detail, also.
So they fit nice and strong in each joint, and you've got much more glue surface than just a flat surface.
Kevin: Kevin does good work.
So, counter goes in eventually?
Tom: Yeah, and we're going to do the backsplash right now.
Helen's out trying to find a piece of wood that she wants to use for that.
Kevin: Oh, cool.
Tom: We'll get it cut in later.
Kevin: All right.
Well, maybe I'll give you a hand.
Thank you, Tommy.
Tom: Great.
All right.
Talk to you later.
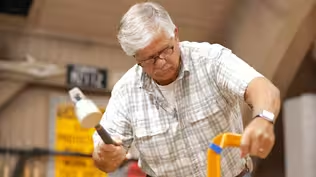
♪♪ ♪♪ Kevin: Josias, wide pine flooring.
You probably don't put a lot of this down, do you?
Josias: No, and we haven't used that like in eight years.
It's pretty soft wood, but the homeowner loves it.
Kevin: Well, I get it, right?
Because it's all throughout the house.
So they're trying to go for a match.
This thing, that's almost 18 inches.
Josias: 18 inches.
Kevin: Square edge.
How'd you put it down?
Tell me the process.
Josias: We started with a moisture barrier.
Kevin: Moisture barrier.
Then the next level?
In order to prevent from cupping, we use a glue down.
So every board has been glued down.
Kevin: Yeah.
I mean, I'm looking at the size of these things, and I'm looking at 10s and 12s, at least, maybe even longer.
Josias: Yes, they are like around 14.
Some of them are a little bit more.
Kevin: And so what are we using for nails?
We're using cut nails.
Kevin: Yeah.
Josias: These all nails that they used, try to match this up.
Kevin: So, much wider than they are thick.
Josias: Yes.
Because they are going right in the joists.
Kevin: So you guys have pulled some -- some of the old nails out of the house, and that's a traditional cut nail right there, tapered shank.
And, as you say, we've worked with these guys before.
They're still making them.
Josias: They still make them.
Kevin: Locally.
So this is the replica, also with the tapered shank.
Very cool.
Okay.
So, I'm looking at your marks right here.
You guys have lined these up so that you're nailing not just through the subfloor but right into every joist.
Josias: Yes.
Kevin: And then, in terms of nailing them down, any technique to these reproduction cut nails?
Josias: If you notice, the width is twice as wide.
So if you're not careful, you have to put it right with the grain.
Kevin: Oh, yeah.
So you guys are just turning it?
Josias: Yeah.
Kevin: So twice as wide as they are thick.
Josias: Yes.
Kevin: Don't put the width across the grain.
You're going to get some splitting, especially towards the ends.
So with all of the nails in, what's -- how are you guys going to finish this off?
Josias: We're going to sand it and stain it, and we're going to finish with polyurethane.
Kevin: Gotcha.
Okay.
Well, you know, it's a long way to go to put down a really soft wood at these dimensions.
It's going to show sort of all of the blemishes over time.
Josias: Yes.
Kevin: But the reason we're doing it, obviously, is above us here, trying to match this, so I give the homeowners credit for making those choices, but I appreciate the fact that you're able to get it down for us.
Josias: Yeah, no, definitely.
Kevin: All right.
Josias: Takes twice as long, but it's worth it.
Kevin: You got it.
Josias: Homeowners happy.
Kevin: You got it.
Thanks, Josias.
Kevin: Thank you.
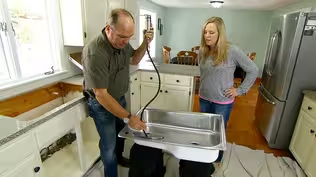
♪♪ Richard: The homeowners picked out soapstone for the kitchen.
I was curious to see how they built a watertight custom soapstone sink.
So, Pierre Rancourt, you and your team are stone fabricators extraordinaire.
Pierre: Yep.
Nice to meet you.
Richard: So we're using soapstone.
Pierre: Soapstone, yep.
They picked out this soapstone slab.
This is from Brazil.
They picked it out at a local supply yard.
Richard: Yep.
Yeah, I've always had -- I've had soapstone in my house, and I've always loved it as a material.
It's really great.
But you do everything here, right?
Soapstone, marble, quartz... Pierre: Everything.
Soapstone, quartz, granite, quartzites... Richard: But now we have to turn this into a sink.
Pierre: Exactly.
So, what we were given by the designer and the homeowner is a picture of a sink that they wanted.
Richard: Yeah, I can see it right here.
Pierre: And so we have to translate that into how we can cut that from a slab.
And you can see all the little components that are going to go into that sink.
And then what we do is, we take all of these pieces that we're going to need to cut and we can lay them out on the slabs.
These are the three slabs of soapstone that the homeowner chose.
Richard: And this stuff, if you cut it wrong, it's really expensive.
Pierre: Yeah.
You don't want to make mistakes with this.
Richard: All right.
Let's see what you do.
Pierre: Come on in.
♪♪ ♪♪ Richard: So this is where all the magic happens -- here.
Pierre: Yep.
This is where it happens.
Richard: All right.
Is that our sink right here?
Pierre: Yep.
So these are all the components to our sink that have been cut by the CNC saw.
Typically, the way we do it is, we'll cut all these dado channels first, and what the dados do is, it gives us that extra surface to bond everything together.
So you got three different surfaces to bond.
Richard: Epoxy here, epoxy there, epoxy there.
Pierre: And then, once that is done, we'll cut the holes.
That waterjet is 60,000 PSI water with a garnet dust.
Richard: I'm taken by how precise this has to be, too.
If this thing was off by 1/16 of an inch, how would it go together?
It's not like wood that you can just sort of push it together.
Pierre: Once you're off by a little bit, then every little piece is off, and it makes it very tough.
Richard: All right.
Are we ready to put this together?
Pierre: We're ready.
Richard: All right.
So that's the epoxy and the hardener.
Man: So, basically, we're trying to spread the epoxy as fast as we can.
We don't have a lot of time.
♪♪ Right now, we're going to fill all of them at once.
Then we're going to start putting them together.
The back's going to go on first, then the sides.
♪♪ Then the center, than the front.
Richard: All right.
So what do you do now?
Pierre: Now what they're doing, they're wiping off all the excess epoxy that was used in the joints before it dries.
Richard: It really is labor intensive, isn't it, during this moment?
Pierre: Yeah, this is -- This is the tough part right here.
♪♪ Richard: What's the liquid?
What's -- What's being used to take this off?
Pierre: That's an acetone that they're using to clean off the epoxy.
Richard: Yep.
♪♪ Beautiful work, guys.
Unbelievable.
Well, it is such a work of art.
Is there any care and feeding for the soapstone sink?
Pierre: Well, nothing's necessary, but some people like to put a little mineral oil on it, keep that nice, rich, even look to it.
Richard: Well, you guys are artists.
Thank you.
Thanks for showing us how it's done.
♪♪ ♪♪ Tom: The homeowner, Helen, found a beautiful piece of old pine, so I'll use it to make the backsplash.
Kevin: Did Helen choose a good board, Tommy?
Tom: She sure did.
Look at this piece right here, Kevin.
This piece was an old piece of sheeting, probably 20 inches wide.
And you can see this white wash on one side and unfinished on the other side.
Kevin: Yeah, but that's been dressed up.
How did you get it to this state?
Tom: Well, what I did is, I basically sanded it down by hand, 80 to 120 grit, and then I filled all the holes with some glue and wood and some pegs that I made.
Then I put four coats of wax on it.
The reason I put wax on it is because it's going to be a backsplash, and you get some splashback, and I wanted to be able to clean the wood.
She didn't want to put anything on it, and I said that, "First of all, it's too rough.
You'll get a splinter.
And second of all, you need to be able to wipe it off if it gets wet."
So if you take this water, for example.
Kevin: Oh, no.
Tom: Yeah.
Kevin: You're going to what?
Tom: Yeah.
Lookit.
You put the water on it.
Look what happens.
Kevin: Okay.
Not bad at all.
Tom: So you take that, and the water just drains right off.
Kevin: No kidding.
Tom: All right.
Wipe that with that rag, and it's as dry as can be.
Kevin: I'll get this right here.
A quick wipe down.
Tom: Look at that.
Kevin: Wow.
300-year-old board.
All this time, we're telling people nothing but tile near the sink.
Tom: 300-year-old board.
Well, now -- Let me just dry fit it real quick.
Kevin: I'm not going to even guess that it's not going to be anything but a perfect fit.
Tom: Well, we hope so.
Kevin: Look at you.
Tom: So that's going to fit good.
And we'll pull it back out because I want to put a sealer across the back there.
Kevin: So, what was your templating process like... Tom: Well, you know -- Kevin: ...allowed you to make that meticulously good cut right there?
Tom: Well, as you know, there's many different ways to template.
So this one, I always like to do something different.
This one I used a piece of the floor protection cardboard.
Kevin: Yeah, yeah.
Tom: And I made it smaller than the size of the backsplash, and I taped it to the wall.
Made a bigger opening in the paper for this and taped that to the wall.
Took my framing square, used the wide part of the framing square because I couldn't stand it up.
So I used that for the bottom and the top.
And then I used the narrow part of the framing square, the leg that's up, and I marked the ends, holding it tight to the cabinet.
Now I have my length, my height, and my location for the box on each side, but I couldn't get the framing square in to mark the top and bottom.
So I took my combination square apart, and I just used the top of that.
I put it on the bottom where I wanted, and I put it on the top here where I wanted it, and I marked the bottom.
That gave me the location for the box.
Transferred the marks to the board.
Cut it, and it fits pretty good.
Kevin: You talk about it like you just made a cup of coffee in the morning.
[ Both laugh ] It's unbelievable but not surprised at this point in time.
Tom: Yeah.
So, now all we have to do is, we want to clean this off, and we're going to run a bead of caulking against the back.
All right.
So now we're ready to put it in.
We have the caulking on the wall, so I'm going to tilt it to get it under the cabinet, slightly.
I'm going to put it in, having the board up as straight as I can get it, put it in, and then slowly work it in.
And as I work it in and I twist it up, the board will go into the corner deep.
Kevin: Oh, yeah.
Tom: Now it's in because it's up and down.
Kevin: Tight to the right.
Tom: Right.
So now when I push it in, the leading edge, or the finished edge, is touching the wall.
I can push it in place.
So you can see that the board is loose at the top.
And because we've nailed the bottom, I can push it in nice and tight and put my nail right in the stud right there.
Come down here, another stud.
Line it up, push it tight.
[ Nail gun fires ] Nail it.
Come down here, find my other stud mark.
[ Nail gun fires ] Another nail right there.
And that's in place, and it's not going to go anywhere.
Kevin: That is terrific.
Tom: It looks great.
I love the fact that we're able to reuse a piece of wood from the original part of the house.
It's waxed, maintenance-free.
Kevin: Well, Tommy, you are a magician.
Thank you.
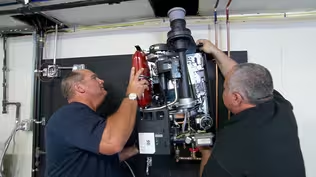
♪♪ ♪♪ Richard: As we got into the project, we learned the homeowners had added this beautiful tub, and it is spectacular, but it has a lot of hot water needed to fill it.
So there's particular challenges for the plumber to size it correctly.
So I brought these blocks along, and they represent gallons per minute.
So a block like this, in this example, represents 2 1/2 gallons per minute, and that's really what the law is in the United States for the maximum amount of water that's supposed to come out through a faucet aerator for a shower or for a sink.
Except what happens now, if we have a tub spout like this that could allow as much as 10 gallons per minute -- so four of these, 2 1/2 times 4 -- it could be 10 gallons a minute.
And we have a tank downstairs that's 26 gallons.
What does it mean?
In about two minutes, we're running cold out of the spout.
So what do you do?
Do you throttle back and make this only be 5 gallons a minute?
Well, then it would take how long?
15, 20, 25, 30 minutes to fill the tub, and people are not happy.
So it's a particular challenge when you have a tub this big to have enough hot water and make it efficiently.
Let me show you.
So, this combination appliance will do a lot of things for us.
At the very top, it has a gas-fired condensing boiler right here.
And this will be super efficient heating, and we're going to heat up water, but it also has one more heat exchanger inside of it, which sends heated water down to this tank at the very bottom.
This will have 26 gallons of hot water ready to go for kitchens, bathrooms, lavatory.
So what we have to do is add some sort of storage.
So in this case, we've added a stainless-steel tank, super insulated, an electrical element right here to maintain the tank, a mixing valve at the top to be able to store more energy.
So any time you want to fill that tub, they'll be ready to go.
♪♪ ♪♪ Kevin: Hey, Heath.
Heath: Hey, Kevin.
Kevin: Finishing touches for you, huh?
Heath: Yeah, just wrapping up these island lights.
Kevin: Oh, man.
Speaking of island, look at this beauty, huh?
Giant piece of soapstone.
Heath: It's amazing, yeah.
Kevin: Yeah, the hardest room to light, if I recall.
Heath: By far.
Kevin: Right?
Heath: Let's turn these on and take a look and start from there.
Kevin: Yeah, please.
Three pendants, glass shades, big round bulbs.
Beautiful.
Look at that.
Heath: We want to do at least three good-sized fixtures that we can make sure we cover this with a good amount of light.
Kevin: And it's really the only light we've got in here, at least for task, because you couldn't do much with the ceiling.
Heath: Right.
So the homeowners and all of us were opposed to really making holes in this and taking away from the beauty of this, so we wanted to find alternate solutions, and this is one of them.
Kevin: Okay.
So we're hanging these.
And what did you do?
Just put in some big sturdy boxes to hold these behemoths?
Heath: So we just used a box that we got at a local home center that's a fan-rated box that can carry a fair amount of weight if we decide to change the fixture.
But a lot of planning had to go into it.
Because of the center of the island, isn't quite as easy as you would think because we have an angle, something like this... Kevin: Oh, yeah.
Heath: ...we want to make sure that we account for the fact that the canopy sticks out and the angle and everything comes out.
Really pushes the lights this way.
So that box has to come further back, when you think, in order for this to land in the center.
Kevin: Very good.
Well, let's test it out.
Do you think we got enough light for everything people have to do?
Heath: I think we do.
So, over the island... Can read that nice and bright.
Kevin: How about over here?
Heath: We can slide it around.
Kevin: Pretty good.
Over there.
Not bad.
I'm not sure who's happier that she bought the book, Marion or us.
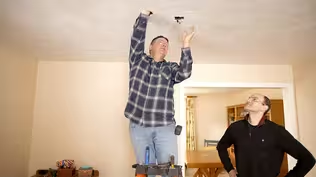
Heath: [ Chuckles ] Kevin: And adjacent to the kitchen, we've got the family living-room area, so not as much need for task lighting but still challenging.
Heath: It's still a challenge.
So we want to light this room, but we have the same issue.
We don't want to put recessed lighting in there that takes away from the beauty of the ceiling, but we want to show the beauty of the ceiling.
Kevin: Absolutely.
Heath: So a lot of times we do that with up lighting of some kind, whether it's a sconce that washes up or floor lamps that shine up.
Kevin: Gotcha.
Heath: But we don't have the space for that in this case, other than the floor lamps.
So what we've chosen to do is put LED lighting tape in the top of the beams.
Kevin: Oh, very cool.
All right.
I remember you talking about that.
Are they all in?
Heath: So, we have three of these done.
We have one more to go.
So if you want to jump on that ladder and give me a hand, we'll finish this up.
Kevin: Happy to do that.
Oh, clever.
Look at that.
Heath: All right, Kevin, So, the first thing we're going to do is install this aluminum channel that we have here into this groove that was routed on the top of the beam.
What we want to do is lay the channels out and then go ahead and take a rubber mallet and just gently tap it into place to make sure it settles in between this groove.
And once we do that, you can see the screws that are inside of this channel, as well.
Then we can screw it into place and make it secure.
Now, once the channel's in, we're going to start installing the LED tape.
In this case, our pieces come in 5-foot sections with an adhesive back.
So we're going to peel the adhesive back off, lay the tape in the channel, and then when it gets to the 5-foot point, we're going to hold it up and add a second piece.
How that works is it simply plugs together.
So we're going to have one end and the other end plugged together and then continue on and lay that in the rest of the channel.
Once that's complete and the LED tape's in, I'll go ahead and make the connection at the terminal blocks on one end.
And when that's set, we're finally going to snap the covers in.
So we have a diffuser cover that goes on the top of this channel.
This helps soften that up and make it a nice, smooth, even light.
All right.
I think we're all set.
You want to jump down and give it a shot?
Kevin: I want to see what this looks like, for sure.
Okay.
Let's see how you did, Heath.
Heath: All right.
Kevin: Energized, right?
Oh.
Heath: Oh, yeah.
That looks great.
Kevin: Doesn't it?
Look at that.
Heath: Yeah.
Kevin: Well, what a terrific way to celebrate that ceiling.
Heath: It's just what we're hoping for.
It really shows how beautiful that is.
Kevin: So you think enough light from that just to kind of give you the nice necessary ambient lighting in here?
Heath: I do.
Especially at night, just having a nice indirect soft light, let you enough to see, you can get back and forth, not in your face.
It's very comfortable.
But we still have a lot more going on.
We have some accent lights for certain parts of the wall, floor lamps, sconces, a few other hanging pendants.
So I think this is gonna be more than enough light when all is said and done.
Kevin: Tough room.
You're killing it.
Heath: Thanks.
Yeah, we're really getting there.
What do you guys think?
You like?
Jenn: Looks so beautiful.
Lit up with the wood.
Mauro: Amazing.
Tom: It brings the ceiling to life.
I absolutely love it.
Kevin: Yeah, and it brings us that much closer to wrapping up this project, which is coming next time.
So, still some work to be done, though.
Mauro: Absolutely.
It all comes down to colors, and I still have a lot more painting to do.
Jenn: And there's a bit more hardscape to do and some plantings, and we're almost there.
Tom: Yeah, and I like a project like this.
For me, it brings back a lot of old memories.
I grew up in an old house, working on these things, but I love it when homeowners take these old houses and they do it justice, and they repurpose and reused as much material as they can.
I just -- I think it's great.
Kevin: Well, they did.
Heath: And we've just got a few more small things, some wall plates, a few more light fixtures, couple of finishing touches, and I think we'll be in great shape.
Kevin: All right.
Great shape and wrapping it up.
And that's all coming up next week.
So until then, I'm Kevin O'Connor.
Mauro: And I'm Mauro Henrique.
Jenn: I'm Jenn Nawada.
Tom: Tom Silva.
Heath: Heath Eastman.
Kevin: For "This Old House" here in Ipswich.
All right, back to work, everybody.
Jenn: Let's go!
Mauro: We got more work to do.
♪♪ ♪♪ Kevin: Next time on "This Old House"... A little over a year ago, we came to this quaint New England town.
Just down the road from here was a little tired old 1720 gambrel home.
And today is the day that it all comes together and the house is complete.
♪♪


- Home and How To

Hit the road in a classic car for a tour through Great Britain with two antiques experts.


Support for PBS provided by:
Funding for THIS OLD HOUSE is provided by The Home Depot and Renewal By Andersen.