E25 | Glen Ridge Generational | Spring Forward
Season 45 Episode 25 | 23m 42sVideo has Closed Captions
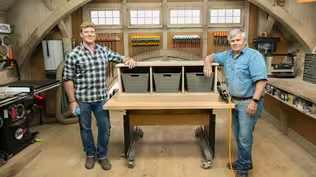
A built-in bench is constructed. The primary bathroom vanity gets a new durable finish.
The Glen Ridge, NJ project is one week from completion. The kitchen cabinets and countertops are being installed. The inset-style cabinets came prefinished and flat-packed for value to the homeowners. A built-in bench is constructed using salvaged material. The primary bathroom vanity gets a new finish. A new landscape is designed, and cabinet crown molding and recessed lighting are installed.
Problems playing video? | Closed Captioning Feedback
Problems playing video? | Closed Captioning Feedback
Funding for THIS OLD HOUSE is provided by The Home Depot and Renewal By Andersen.
Support provided by:

E25 | Glen Ridge Generational | Spring Forward
Season 45 Episode 25 | 23m 42sVideo has Closed Captions
The Glen Ridge, NJ project is one week from completion. The kitchen cabinets and countertops are being installed. The inset-style cabinets came prefinished and flat-packed for value to the homeowners. A built-in bench is constructed using salvaged material. The primary bathroom vanity gets a new finish. A new landscape is designed, and cabinet crown molding and recessed lighting are installed.
Problems playing video? | Closed Captioning Feedback
How to Watch This Old House
This Old House is available to stream on pbs.org and the free PBS App, available on iPhone, Apple TV, Android TV, Android smartphones, Amazon Fire TV, Amazon Fire Tablet, Roku, Samsung Smart TV, and Vizio.
Keep Exploring

This Old House Insider Newsletter
Get This Old House exclusive stories, tips, and behind-the-scenes information delivered right to your inbox every month.Providing Support for PBS.org
Learn Moreabout PBS online sponsorshipKevin: Today on "This Old House," I'll learn about a two-part paint that makes an ideal cabinet finish.
Zack: And I'll show you how to install crown molding without a nail hole in sight.
Jenn: And I'll share my design plan that provides curb appeal and color throughout the season.
Sunita: Oh, looks amazing.
Shankar: Oh.
♪♪ ♪♪ Man: Ahh.
That's it.
♪♪ ♪♪ ♪♪ Kevin: Hey, there.
I'm Kevin O'Connor, and welcome back to "This Old House" here in Glen Ridge, New Jersey, where, believe it or not, we've got just one week before we wrap this project up.
Now, since we were here last, we had some wainscot to go into the dining room right here.
We got a recessed panel look nice and low to accentuate the height of the ceilings.
But the main event is right here with this new staircase.
So we've got some lights that the electrician put up along the side so that we could actually illuminate the treads.
But we've also got oursel-- Ooh, look out.
I think that is the quartz for our laundry room upstairs going in.
But we've got our railing system in right now.
So we've got the beautiful oak-top hand rail right there.
We've got three balusters per step.
We've got the beautiful skirtboard right there and check out the base where the newel lands, a beautiful look.
So this big open staircase is done.
We had some patching done on the drywall by the painting crew, and we have got cabinets starting to go in.
So this is a wet bar, a blue, or is that a purple color?
But in the kitchen, a more subtle look.
Zack, how are ya?
Good to see you.
Zack: Hey, Kevin.
Kevin: So I'm psyched to see the cabinets going in.
You guys picked a recessed panel, sort of a shaker look right there.
Zack: Yeah, it looks pretty good.
We decided since this is an old Victorian, it really had to have inset cabinetry to really fit the look of what this kitchen should feel like.
Kevin: I know you're a stickler for the paint.
This came pre-painted?
Zack: It did.
So there's actually a company just a state away that makes these cabinets.
And because we are trying to really offer the client some value, an inset cabinet tree package is typically more expensive than overlay cabinet tree package.
So you're limited when you're trying to find the most value for the client, and we wanted to give them a lot of cabinetry in this house.
So these cabinets actually come flat-packed, and then we built them on-site.
Kevin: Really?
Zack: But you'll notice the quality of these.
This is flawless.
This is honestly one of the best paint jobs I've seen in the industry.
It's very smooth.
And what I like about a smooth paint job is it's going to be easier to clean.
Kevin: But you're telling me that these didn't come as pre-assembled boxes, that they're all individual parts and pieces?
So, what?
You get the door like this?
Zack: Yep, the door is painted and wrapped up.
This face frame here came assembled.
This panel's assembled.
This is assembled.
And our drawer boxes are all glued and assembled.
This is actually a tray pullout, but, you know, it's all dovetailed and then solid maple.
Kevin: So that's a pretty nice drawer package right there.
Looks like you've got the recesses for your hardware.
So that doesn't come attached.
You guys installed, I take it?
Zack: Yep.
And this hardware is very high quality and same hardware you would see in any high-end cabinetry package, and it's got, of course, soft closing functions as well.
Kevin: Ooh, let's check that out.
Okay.
So once that hardware is installed, ooh, yeah, there you go.
So what do you think, homeowner-friendly in terms of the assembly and then installation or no?
Zack: I would say if you have some solid DIY skills, you could probably do a short run of cabinetry, maybe a bar or a built-in.
But if you're trying to do a whole house and you integrate the custom details like we have here, it's definitely a professional-only job.
Kevin: Gotcha.
So in terms of savings, what do you think you end up saving by choosing this option?
Zack: Obviously, it depends on your labor cost.
But for us, it was at least a 25% savings going with this.
Kevin: That's really nice.
Alright.
Well, I know later today, you and I are going to be taking the crown and actually installing on the top right there, but you've got a project with Mr. Silva.
Zack: Yeah, I'm gonna get to that.
Kevin: And I've got an appointment upstairs, so we'll regroup.
Zack: Alright, see ya in a bit.
Kevin: Thanks, Zack.
♪♪ ♪♪ Tom: Alright, let's see what you have here.
Zack: Alright.
So we've got this little mud room area, and there's going to be one piece on this side and one piece that's going on this side, right?
Tom: Yeah.
Zack: The architect actually designed this built-in to sort of look like a piece of furniture.
Tom: I see.
Yeah.
That's nice.
So this will be a template so we can follow to cut our sides.
Zack: Exactly, and there'll be a shelf here, right?
Tom: Yeah.
Zack: And a bench here to get their shoes on.
And we'll put some beadboard on the back.
Tom: Alright.
Well, that sounds great.
Zack: Let's make it.
Tom: Okay.
Zack: So this is what we're going to make them out of.
Tom: Yeah.
Zack: Glued these up and pre-stained them all.
Tom: You did that?
Zack: Yeah, just because, you know, it's hard to stain something when it's an inside corner, so it'll be easier to get a nicer, even finish with everything pre-stained.
Tom: Absolutely.
Alright.
So what do you want to do?
You want to trace this or...?
Zack: Yeah, I figured we would trace it, cut it out with a jigsaw, and then we can finish it up, fine-tune it with a router.
Tom: Okay.
[ Saws buzzing ] Alright.
We now screwed our template to the side of the bench.
We've made it flush on the back side, and you can see that it's slightly proud on this side.
We didn't cut on the line.
We made an allowance for the router bit, which is a straight-cutting bit with a bearing on the bottom.
The bearing will follow the template, and the cutter will cut the wood flush with the template.
Now, you notice when I cut when we're going with the grain when coming up on it, if we come away from it, that could chip that piece right up.
Also, you notice how slow I went.
I could have even gone slower.
Like a big CNC machine you see when they cut whole border, they go back and forth, but they make small passes.
They go down, they cut it again and again and again.
We did it all at once.
That's why we want to go slow and steady.
Too fast, burns the wood and burns up the bit.
Zack: Gotcha.
[ Tool whirring ] Tom: Alright, that's two.
That looks good.
Zack: Let's sand it and maybe ease over the edge.
Tom: Okay.
[ Tools whirring ] Alright, so we have our finished edge all sanded.
Now we're just going to ease over this outside edge right here, which will be the inside of the rack with a quarter-round bit right here and a bearing, and we'll just run that across and that will round it over.
And we'll just sand it up lightly.
Alright.
That looks good.
Ready to put them in?
Zack: Yeah.
Let's see how these fit.
Tom: Oh, yeah.
That looks good.
Now we'll just screw it into the wall where the shelf and the seat go.
♪♪ ♪♪ Alright.
You ready with the template for that seat?
Zack: Alright.
I've got this little jig here we made.
And I could just pop that in there.
Tom: Hey, hold it nice and tight to the wall.
That goes left and right.
This jig is really handy.
Great for stair treads, shelving in a closet.
Anything where you have two parallels between something.
Zack: That's actually the old floor joist from the framing.
Tom: Oh, nice.
♪♪ Look at that.
♪♪ Alright.
That looks good.
Zack: Yeah.
Alright, let's get this beadboard on the back now.
Tom: Okay.
♪♪ ♪♪ Alright, that's it.
Alright.
That looks pretty nice.
Zack: Yeah, I like that a lot.
Tom: I like it, too.
Now I know where I can sit to have my coffee.
Exactly.
[ Both laugh ] ♪♪ Kevin: Hey, Lazaros.
Nice to meet ya.
Lazaros: How you doing?
Kevin: I hear you're the guy that has upped Zack's painting game.
Lazaros: That's correct.
Kevin: He says you're the best of the best.
Lazaros: Yeah, we try.
Kevin: Alright.
Good.
So what are we working on here?
This is vanity from the bathroom?
Lazaros: Vanity for the primary bathroom.
It came in a light color.
The homeowners weren't very satisfied with the color, and they wanted to change it.
So we're going to give them what they want.
Kevin: Okay.
And what is on here now?
Is this the old?
Lazaros: This is the primer.
Kevin: This is the primary new color.
Lazaros: New primer.
We tinted it to the color to give it a better backing for the top coat so we don't have to go so many coats over it to cover.
Kevin: Gotcha.
What are we using?
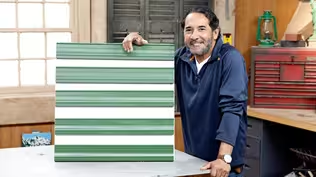
Lazaros: We're using a imported water-based product from Italy.
It's a two-part process where we have to mix a catalyst to it.
I made this sample here for you.
This is what the finish is going to look like, and it's going to feel.
Kevin: Holy smokes.
Lazaros: Very durable.
Kevin: It feels like a 30-mil piece of plastic right here.
Lazaros: Yeah.
It's going to bend and it's going to be impact-resistant.
Kevin: Why so bulletproof?
Lazaros: So, since we're putting this in the bathroom, and we know that you like to use hair spray, so if you get a little hair spray on the finish, it's going to be durable.
So the catalyst gives it a, you know, moisture and chemical resistance.
Kevin: Gotcha.
Lazaros: So if we were to put a regular latex paint on this, your hair spray would damage the finish.
You'd call me back.
I charge you.
You pay me.
Kevin: Exactly.
Lazaros: So we're going to do it once, and hopefully, it'll last as long as we hope so.
Kevin: I'm nowhere without my hair spray.
So I need you, brother.
Okay.
So what is your process?
Looks like we're going to spray it, right?
Lazaros: Yes.
So the primer, I measured out my primer.
I know how much I need for my top coat.
It's all measured in here.
Kevin: This is our top coat, part of it, at least?
Correct.
That's the finish.
I got to add my catalyst to it.
Kevin: Yep.
Lazaros: And then I got to mix it, give it a little sweat time, and then I'm going to pour it into the cup.
I'm going to hook this up, and we're going to spray it.
Kevin: Beautiful.
I'll let you get to it.
I'll watch what you do, alright?
Lazaros: Alright.
Thank you.
Kevin: Awesome.
Thanks.
♪♪ ♪♪ Lazaros: Alright.
We got the first coat on.
Kevin: Looks pretty good, huh?
Lazaros: Yeah.
We're going to let it set up.
We're going to do a wet-on-wet application.
So within an hour, I'm going to put another coat on this.
So in the meantime, letting this set up, we're going to go do the doors and spray those and then go back to this and then go back to the doors, and then Zack can come up here and install it.
Kevin: Beautiful.
I appreciate it.
Thanks, man.
Lazaros: Alright.
Thank you.
Kevin: Take care.
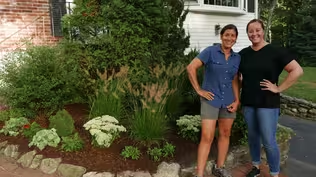
Jenn: Hi, Sunita.
Hi, Shankar.
Sunita: Hey, Jenn.
Jenn: How are you?
Sunita: Good.
Jenn: Well, didn't expect the five inches of snow, but... Shankar: Perfect timing.
Jenn: This is perfect timing to plan.
Absolutely.
And then, right when the ground thaws, you'll be ready to go.
Perfect.
I just wanted to talk about, you know, you have so many great plants here.
You have, like, the structure of the corridor of dogwood down that side, the Japanese maples, and all the other plantings around -- the whole neighborhood is established.
But there were a few plants in the wrong place that outgrew their space, right?
Sunita: Right.
Jenn: The hollies that were up front?
Sunita: Yeah.
Those were not that healthy, and we really would like to incorporate more native plants.
Jenn: Mm-hmm.
Sunita: And pollinators.
Jenn: Absolutely.
Shankar: Add more color as well.
Sunita: Exactly.
Jenn: Funny you should mention that 'cause I do remember us talking about the natives and pollinators.
And also, it will be a great, great viewpoint for the front porch and not really obstruct and block your view, right?
So here's what I was thinking.
So, have an arc come off of the house.
It's centered on these steps right here, and this is what the overall view would be.
Sunita: Uh-huh.
Jenn: And then in the spring, I have mostly perennials in here.
So I was thinking bulbs go in.
So that first sign of spring, you have daffodils.
You could put tulips.
Everything will be just starting to wake up.
And as the tulips, daffodils have the show, then other perennials will start growing like columbine.
Then you'll have the bee balm come in.
So here is in full bloom.
This is like June.
Sunita: Oh, that looks great.
Jenn: Starting from June all the way into the fall.
You're going to -- It's going to have transitions of colors throughout each season.
Sunita: Uh-huh.
Jenn: Okay.
And so these two purple ones on the ends are -- they're called butterfly bush, and that will attract butterflies.
In the center, we have little lime-white hydrangeas just for a structure.
These are going to be shrubs that stay above the ground.
Everything around it is going to die back as a perennial.
Your natives are the black-eyed Susan.
You have cone flowers, and then monarda, which is the bee balm.
There's so many different varieties of things, and it's just fun to see it just evolve and grow and change and flow.
Shankar: Absolutely.
It would compliment the surrounding plants to the Japanese maple.
Jenn: Yes.
Shankar: The dwarf one.
Jenn: Yes.
So when the snow melts, we could start digging.
Sunita: Sounds great.
Jenn: Okay?
So let's go inside and get warm and talk about it some more.
♪♪ Kevin: Zack, I see where you get your affinity for the high-quality paint job.
Lazaros is awesome.
Zack: Isn't he great?
Kevin: Yeah, he's terrific.
Zack: So, speaking of paint, this crown molding that we're going to install on top of these cabinets is actually pre-painted with that same, very uniform finish you saw on the doors and the face frames of these cabinets.
Kevin: The paint job that you love so much from this manufacturer.
Zack: Exactly.
But because it's pre-painted and because we want to get a very nice installation, we're going to do a couple of things differently.
And the first thing we're going to do is we're going to consider where we're making our miters on the pieces.
But in this case, we actually want all of our miters to come out of the same board wherever possible.
So essentially, we're folding the piece through.
Kevin: Okay, and why are you doing that?
Zack: The reason we're doing that is because this is maple, and maple has a lot of tension in it.
So as it goes through the shaper that creates this profile, it may relieve some tension and the board may go slightly this way or slightly that way, such that two disparate pieces may have a slightly different profile.
And I'll actually show you this.
This is the same board, right?
So I just cut through the center of the same board, and you can see it's flush on this side, and it's flush on that side whereas these two boards, this is the same cut out of two different boards.
And if I line up the bottom and although it's flush here, there's about a 32nd proud on that side.
And because if we mitered these together, it would be a longer cut, it would accentuate that imperfection, so we would have to either add wax or touch it up with some touch-up paint, but it really wouldn't be as flawless a finish versus if we use the same board.
Kevin: Wow.
You are fussy.
Lazaros has gotten to you real bad.
Zack: [ Chuckles ] The other thing we're going to do is we're actually going to affix a block on the back of these, so we're avoiding visible fasteners through the front.
And finally, we're going to pre-assemble our miters on the bench so that there are no face nails through the front.
We'll make sure there's enough glue and support on the back to hold the joint together.
Kevin: Alright, so measure, cut, and assemble?
Zack: Yep.
So I went ahead and cut this piece about an inch long, so we can just put it in its final location and just mark the back of the cut here.
And that'll hopefully avoid any errors when we get to the miter saw.
We'll bring that to the wall.
[ Saw buzzing ] Now we're ready to glue it up.
So what we're going to do is we're going to take a standard wood glue and apply some here.
And that's going to be the bond that really holds the pieces together long term.
In the center, we're going to add a quick-setting glue, which is a little bit more brittle, which is why we're not using it on the full joint, but it's going to set up much faster once we spray this activator on the back of the joint, and then we can use that to rotate it around and reinforce the back of the miter.
Flip it right over.
Perfect.
So I'm going to put a bunch of glue here, and then you can squeeze a dowel down into that as it runs down.
Just kind of embed it as best you can, but make sure it's low enough that you can't see it from the top.
Yeah, that's good.
Kevin: So using that sort of just that round is going to touch both of those ends and become kind of an anchor.
Zack: Yeah, it does a better job of reinforcing than you think it would.
We're going to use this special type of hot glue that's formulated to bond to wood like this.
Kevin: Look at that.
So it's like a weld almost.
Zack: So now what we're going to do is we're actually going to fix these blocks that I made.
It's a pretty simple piece of plywood, two pocket holes.
We're gonna use some fine-thread pocket-hole screws because this is hardwood.
Now we're going to put one down at this end.
Keep it off the edge a little bit in case there's any imperfections in the wall.
It doesn't hit the block.
So as I set that up on top there, now we can screw right through the top.
Kevin: You got a pretty good system here, Zack, between the flat-pack cabinets, the pre-painted crown, and then your installation techniques.
It's nice.
Zack: It goes pretty easy, right?
Kevin: Yeah.
And with the quartz countertops in, I'm starting to get a feel for the elegant kitchen you're building us.
Zack: We're in the home stretch.
♪♪ Kevin: One of the other finishing details that's going in is our lighting package.
Within the last hour, the sconces have gone onto the wall, and we've got a beautiful chandelier here in the dining room area.
So the table is going to be right there.
And then, Matt, you're putting in the rest for us.
We've got some lights that have got to go into the kitchen.
I don't see any boxes for surface mounting.
I don't see any holes for the recessed lights.
Matt: Yeah, we're currently lining up the laser for the recessed lighting.
Kevin: Ah!
So you knew we were doing recessed lighting?
Matt: Yes.
Kevin: So you got a wire up there, right?
Matt: We do.
Yes.
Kevin: Good.
So, we left a wire up in the ceiling about halfway into the dining room space so that we have plenty of extra wire to reach up in there.
Kevin: So why not put the holes in when the drywall goes up?
Why did you wait?
Because you got to dig through this now.
Matt: Well, so things always change.
We want to make sure that the lights are going to end up exactly where we want them.
Kevin: Right.
Matt: Here, as an example, we're going to have the row centered between the end of this peninsula and this pantry.
Kevin: Gotcha.
And I guess we sort of knew where these were going to go, pretty close, but they could move an inch or so one way or the other.
Matt: Yes.
Kevin: This means you are dead.
That's where you got to be.
Matt: That's right.
Kevin: Awesome.
Okay.
So laser, you put down, and then I presume recess going along this line in the ceiling all the way down?
Matt: It will be, yes.
Kevin: And the wire is already up there.
So, what are we using for fixtures?
Matt: We are going to use a wafer-style light here.
Kevin: Oh, yes, seen them before.
Matt: We have a six-inch, four-inch, and a three-inch fixture.
Kevin: And you can tell where they get their name, right?
Thin as a wafer right there.
Matt: Yes.
Here we'll be using the four-inch.
Kevin: That's the popular one these days?
Matt: It is.
And you can see the best part about it being so thin is that if we run into any type of obstruction in the ceiling, whether it be a ceiling joist, plumbing, or HVAC, this will fit right up underneath it.
Kevin: So, you really can not have to drill beforehand.
You can go in anywhere in the ceiling?
You're okay?
Matt: That's correct.
Yeah.
Kevin: Alright.
So LED technology, obviously.
Matt: Yep.
As you can see, we have five color settings for temperature on the back.
Kevin: Which is awesome because sometimes homeowners know what they want, and then they change their minds.
Matt: Right.
Kevin: Oh, that's a little too blue.
That's a little too yellow.
So you can go back after the fact and go anywhere between those five?
Matt: Absolutely.
Kevin: That is tremendous.
So are you ready to drill and install?
Matt: We are.
Kevin: Let's do it.
Matt: Alright.
Kevin: Put the dot right in the center of your X.
You have got it up on the ceiling.
Matt: And we can use our hole saw to cut out our hole.
Kevin: [ Laughs ] Score.
Matt: Look at that.
My favorite part.
Alright, we have plenty of slack in this wire here.
It'll pull back to the remaining three fixtures that we have.
Kevin: That's satisfying, huh?
Matt: Always better to have too much than not enough.
[ Drill whirring ] So, the feed for our lights comes from this switch over here and it ends all the way down there where we've all that slack out of the ceiling.
We're going to begin by pulling this slack back to this first one, and then we'll work our way down.
Kevin: Got it.
Oh, yeah.
There it goes.
Look at you.
Matt: And that's just enough.
Kevin: Done this before, haven't you?
Matt: Yes.
Kevin: [ Laughs ] Matt: We'll take these two conductors and we'll pass them right through this connector.
Have these all the same length.
Make sure it's a bit easier to tuck the wires back in at the junction box.
Kevin: And that driver box is designed that it doesn't have to be mounted?
It can just sit up in there?
Matt: In this situation, it can just sit right up in the ceiling here.
Plug this into our wiring harness, bend these clips back.
Kevin: This is my favorite part.
Matt: And there you go.
Kevin: Kitchen is gonna look awesome when it's lit up, Matt.
Thank you.
Oh, look at this.
There they are.
Pops, alright?
Tom: Nice and straight.
Kevin: They are, aren't they?
Zack, this is it.
We're down to the final stretches here.
You're going to finish on time?
Zack: I think we'll just make it.
Kevin: I love to hear it.
Alright.
Well, that is exactly what we have coming up next time, the wrap of our project here in Glen Ridge.
So until then, and for all of us, I'm Kevin O'Connor from "This Old House" here in New Jersey.
Kevin: Next time on "This Old House," the first phase of demolition began 11 months ago on our 1887 Victorian in Glen Ridge, New Jersey, and soon led to the discovery of extensive damage that required rebuilding nearly all of the interior.
The entire first floor is gone.
Now, our Victorian is newly renovated for improved efficiencies and comfort with ample room for multi-generational living.
Next time, we hand the keys back to our homeowners.


- Home and How To

Hit the road in a classic car for a tour through Great Britain with two antiques experts.


Support for PBS provided by:
Funding for THIS OLD HOUSE is provided by The Home Depot and Renewal By Andersen.