
E26 | Outdoor TV; Granite Fire Pit | Ask This Old House
Season 24 Episode 26 | 23m 12sVideo has Closed Captions
Installing an outdoor TV enclosure; preparing for a renovation; granite slab fire pit.
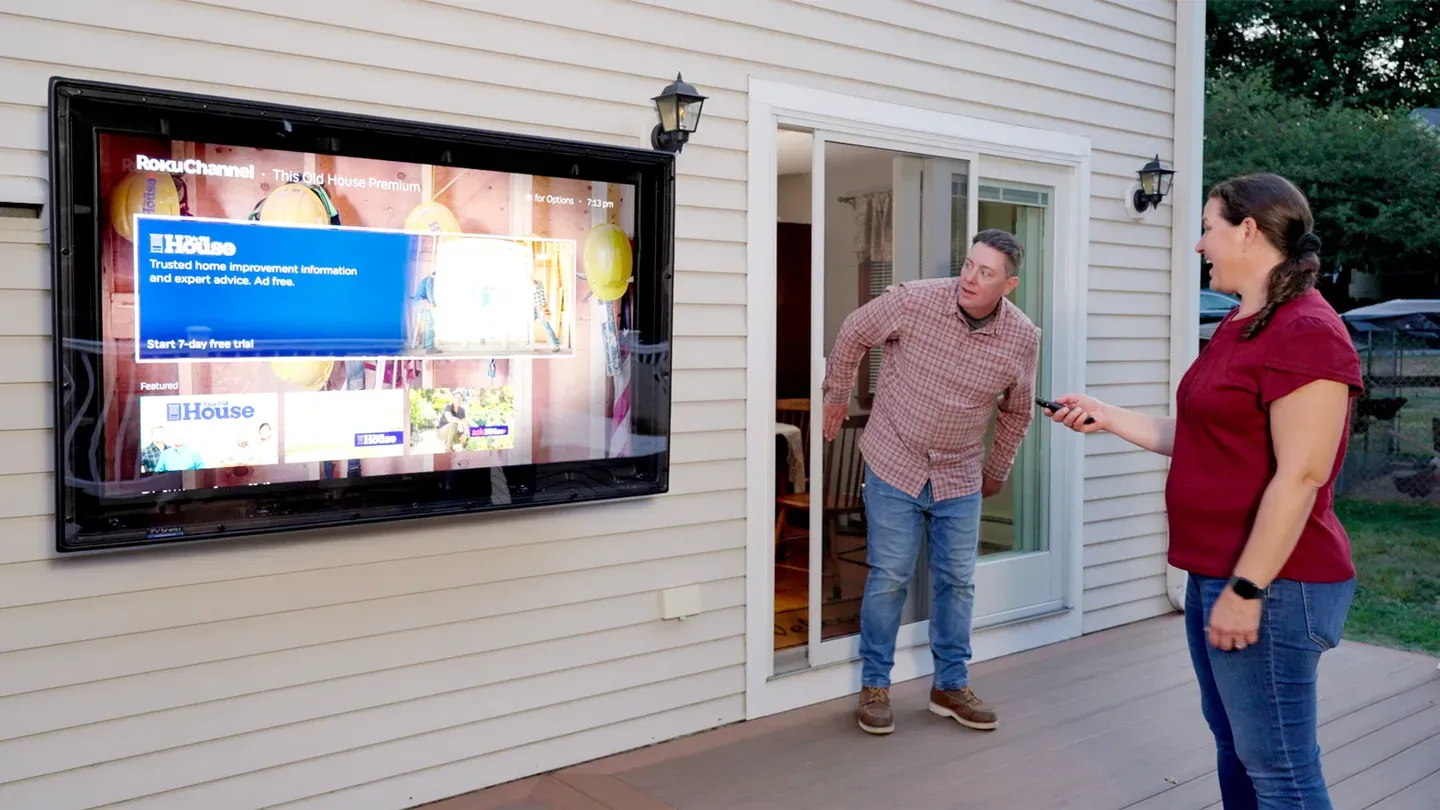
Heath Eastman installs a weatherproof outdoor TV enclosure so a homeowner can enjoy shows and sports from their deck. Kevin O'Connor, Tom Silva, and Zack Dettmore discuss essential preparation steps a homeowner should take before a renovation. Then, Mark McCullough replaces a crumbling fire pit with a sleek, modern square design built from four granite slabs.
Problems playing video? | Closed Captioning Feedback
Problems playing video? | Closed Captioning Feedback
Funding for Ask This Old House is provided by The Home Depot, Renewal By Andersen, and ChipDrop.
Support provided by:


E26 | Outdoor TV; Granite Fire Pit | Ask This Old House
Season 24 Episode 26 | 23m 12sVideo has Closed Captions
Heath Eastman installs a weatherproof outdoor TV enclosure so a homeowner can enjoy shows and sports from their deck. Kevin O'Connor, Tom Silva, and Zack Dettmore discuss essential preparation steps a homeowner should take before a renovation. Then, Mark McCullough replaces a crumbling fire pit with a sleek, modern square design built from four granite slabs.
Problems playing video? | Closed Captioning Feedback
Where to Watch Ask This Old House
Ask This Old House is available to stream on pbs.org and the PBS app.
Keep Exploring

This Old House Insider Newsletter
Get This Old House exclusive stories, tips, and behind-the-scenes information delivered right to your inbox every month.Providing Support for PBS.org
Learn Moreabout PBS online sponsorship♪♪ Kevin: On "Ask This Old House", our experts travel across the country to answer questions about your house.
♪♪ Today, when a homeowner wants to put a TV outside, Heath provides some guidance on how to properly install the unit.
Joanna: Looks incredible.
Kevin: Then, do you have questions on how to start a renovation?
Tommy and Zack give some insights on the do's and don'ts.
Then Mark helps a homeowner redesign their aging fire pit.
Marcos: Thank you so much.
It's beautiful.
Kevin: All that on "Ask This Old House."
-Heath: Hi, Joanna.
-Joanna: Hi, Heath.
-Heath: Nice to meet you.
-Joanna: Nice to meet you, too.
Heath: So I saw that you wrote in about using an outdoor TV.
Joanna: Yes.
We love the space.
We're out here all the time.
And we've got a family of three boys.
We love to watch sports together.
So right now, we're bringing a TV from inside the house, carrying it, lugging it, along with a stand, in and out when we're trying to watch TV.
Heath: That's not great, dragging that out.
But one of the concerns would be, it seems like you have a lot of sunshine on this deck.
Joanna: Yes, we do.
We're lucky to get a lot of light here, but actually this wall doesn't get sun.
Heath: Let's take a look at it.
This seems like a great wall.
It's nice and shady, even though the rest of the deck is sunny.
And you said it stays like this most of the day.
Joanna: Yes, it's in the shade all day.
Heath: Nice.
So when you had your other TV out here, did you actually have it up against here, or did you have it somewhere else?
Joanna: No, we used to bring out a table and stand for the TV, and then bring the TV and plug it into that outdoor outlet.
Heath: And you typically put it a little further out?
Joanna: A little further out.
Yeah.
Heath: Okay, so when you had that plugged across there, a little bit of a trip hazard.
Joanna: Oh, yes.
Yes, there was a couple of scary moments.
Heath: So now I see why you want to put it on the wall.
-Joanna: Exactly.
-Heath: So the nice thing is you have power out here, but I'd be a little concerned about the same kind of thing if we just plugged in.
If I just ran a cord down and plugged in, it's still going to be loose, someone still might snag it walking back and forth.
And you could staple it, which isn't a bad option.
But I don't always like to do that.
If you want to take this in or service it or anything, then you have to take all that apart.
-Joanna: Makes sense.
-Heath: So I think I might make a little more sense while we do have that power there, might be able to utilize it.
I want to put a receptacle behind the TV, keep the cords out of the way, out of sight, nice and clean.
I think that'll work a little better.
For mounting the bracket, I think we get lucky.
Looking at the nails with the clapboards, I think we can see where the studs are.
I want to make sure this is nice and secure and secure that.
So those are 16 inches on center.
With any luck, if it's done right, those should be our studs.
So we should be able to bolt right to those nice and secure, and should be good.
So the last thing to kind of consider is the size of the TV.
Now, we're going to be a little limited as to what we can fit between the vent and the light and the location, but when you have the TV out here before, what size did you have?
Was it like a 50?
-Joanna: We had a 55.
-Heath: 55.
And sitting on that table and probably being a little further over and closer to the seats was probably fine.
We start to put that back here, as silly as that sounds, that may not be quite enough for what you want to have out here.
So looking at this, a quick measurement.
Yeah, we've got about 66, 67 inches.
If we walk back over here, take a look.
I think we have just enough room to sneak a 65 in there, which I think might be just about right from sitting out there.
What do you think?
Joanna: I think that sounds great.
Heath: All right.
Let me grab a couple of things, and we'll get started.
-Joanna: Sounds good.
So, what is this?
I thought we were installing a TV.
Heath: We are, but this is actually an outdoor TV enclosure.
I didn't want to just take a regular indoor TV and mount it to the outside wall and use it that way.
I mean, we've seen it done.
People throw covers on them, think it's okay, and in some areas you might get away with it, but it's not a good practice and I don't recommend it.
I mean, even when the cover, we're still prone to drastic temperatures, humidity getting inside there, causing premature failure and possible other damage.
So I don't want to do that.
We could buy an outdoor TV.
Great solution, but they are what they are.
There's technology that's enclosed to them.
They're all sealed up.
They're a great all in one solution, but they can also be very expensive.
So this is the enclosure I want to use that's going to let us be flexible.
It's going to have the best of both worlds where we can take either a TV you already have or something that's changed or been updated and install it into the system.
Joanna: Okay.
Sounds like a great idea.
There seems like a lot going on in here.
What is all this?
Heath: There is.
So we're basically copying all the benefits of the outdoor TVs and trying to put it in this enclosure.
So we have integrated cooling fans on thermostats.
So if it gets too hot, it'll draw fresh air from the top and blow her out of the bottom.
And the other feature is on the bottom here.
This is where our power cord is going to come out.
So this pops out.
We can actually make a little slice on that X, pull the cord through and kind of keep it sealed and put that back in.
We have an additional heater we can add if we want, this humidification control.
Joanna: Oh, that's awesome.
Now is this easy to clean?
I can imagine pollen and outdoor dust could get on there.
Heath: Great question.
So hopefully with the sealing, we don't get anything on the inside.
But the outside is just simply a polycarbonate.
Just use a particular cleaner for that.
We can wipe it down almost like a wax and kind of seal it up and keep it from scratching.
It's gonna look great.
So I think this is a great setup to use, whether a TV you have, something new, make it nice and simple and get all the benefits.
What do you think?
-Joanna: Sounds great.
Heath: All right, now we got our work cut out for us.
Joanna: Yes.
Now this looks more like a TV.
Heath: This is your TV.
So we've taken this TV and what you've done, you can see, we've put it on these foam blocks.
This is from the manufacturer of the enclosure.
They provide these blocks for us.
They're very clear about the instructions.
Make sure you put them underneath the frame, not just the screen but the frame all the way around to carry this.
Because what's gonna happen is it's gonna make it easier for assembly for us to bolt everything on.
Then we actually can slide the enclosure over and let it drop down and bolt it into place.
So we get that little bit of height for the TV itself.
So we're gonna go ahead and start lining the brackets up and figure out what we need for hardware.
♪♪ And give that a shot.
Joanna: Thank you.
Yeah.
Heath: Just so it's snug, not quite tight yet.
Joanna: Snug not tight.
♪♪ Heath: Now it's time to install our power cords and get everything organized inside here.
So I'm going to start by installing this piece right here.
Joanna: What is that?
Heath: So that is a surge suppressor and power filter.
Keep all the equipment that we have in here and any future equipment protected.
So next we'll put the power cord in.
Joanna: And what's this power cord for?
Heath: So this is feeding our surge protector.
And then everything else will plug into this.
This isn't necessarily ready for outdoors.
This is.
Joanna: So that's what we'll come out of... Heath: So this will come out.
And just to kind of help ensure that we stay together, we use this a lot for outdoor lighting with Christmas lights and holiday lighting and other things to keep the moisture out.
-Joanna: Nice and tight.
-Heath: It'll be good to go.
Now let's see if we can line it up to our bolt holes.
♪♪ -Joanna: There we go.
Easy.
-Heath: That's it.
Now we'll pull the cord for the surge protector through.
And I just want to slide that back through like that.
♪♪ You want to center the bracket on the housing unit.
Once center has been established, it's time to locate a spot on the side of the house, remembering you want to place it on the studs.
If we go right there, we can bolt it in cleanly.
Seal this with silicone.
Keep everything nice and sealed.
Next, what I want to do is see how tall it is.
So that's 10 inches of mounting area.
It should be bottom of bracket somewhere down here.
With the space for the mount located, it's time to find a spot for the new receptacle.
I'm just gonna do a little test hole down there.
That way, we can poke around and see what's there, any plumbing pipes, just in case.
I do this a lot for cutting a light box in the ceiling, just to give us an idea of where things are, to make sure we're really going to clear what we want.
♪♪ That looks like we're pretty good.
-Joanna: Looks pretty good.
-Heath: I can spin around, not hitting anything.
Now what we're going to do, this is the bracket that the receptacle's gonna actually slide into.
And then we'll just drive a couple of screws.
[ Tool whirring ] ♪♪ ♪♪ So the receptacle is wide open.
So I think we're good.
Now that we have the location for the receptacle for the new TV, I'm going to go ahead and run the wire from the panel to the new receptacle location.
We swapped out the existing breaker in the panel for a dual function AFCI/GFCI breaker that'll provide additional protection.
This breaker will shut off the power to the circuit if any water gets in, making sure we prevent any electric shock.
Now it's time to install the box for the new receptacle.
Putty is placed around the edge of the box to create a watertight seal.
[ Drill whirring ] Time to wire the new receptacle.
Ground first, then the neutral, and finally the hot wire.
I still have a habit of taping my devices up.
We do it in metal boxes all the time, and it's kind of carried over, so it's just become a habit.
That's good.
And the one thing to point out is this is a special receptacle for outside.
It is a weather resistant and tamper resistant receptacle.
It's designed to be out here in this box.
We're just gonna go ahead and snap that cover back on.
You just want to get it started right in there.
Joanna: Okay.
Heath: We're using lag bolts to hang the mount to support the weight of the TV and the enclosure.
[ Drill whirring ] Before we send these home, I want to put a little silicone around them, so as it goes in, it'll draw the silicone in and then kind of seal up against it.
A layer of silicone is added to the perimeter of the mount to help create a watertight seal.
To hang the TV, the screws are aligned to the mount and then tightened.
Plug that in there.
All right, Joanna.
The power is on.
Joanna: And it works!
Heath: Oh, look at that.
That's your favorite channel.
Look at that.
-Joanna: Looks incredible.
Heath: Well, I'm really happy with it.
I hope you are.
Joanna: I am, too.
I can't wait to sit out here and enjoy it with the family.
Heath: All right, well, thanks again for writing in.
Joanna: Thank you.
♪♪ Kevin: Just the gentleman I wanted to talk to.
So how to think about starting a renovation, right?
Lots to think about.
You're working with your builder.
Like, how do you guys go through that process with the homeowner?
Tom: It depends on what type of project are you doing.
Like, for example, this is a kitchen renovation.
So you're going to be without the kitchen.
Are you going to live in the house, or are you going to move out of the house?
You also have to remember that the contractors are going to be at your house every day, bright and early, because this is their office.
You leave to go to your office, but they're coming to go to their office.
-Kevin: Right.
-Tom: So you got to be aware and prepare for that kind of stuff.
Kevin: So prepare yourself, kind of get in the mind set that, okay, this is going to be disruptive.
Tom: It's very, very disruptive.
Kevin: You can come anytime you want, pops.
What do you think about next in your conversations?
Zack: I mean, I think the big thing is to start sort of very big picture.
Like everyone wants to get specifics with types of countertops right away.
But really what you want to understand is, can you afford to do this project?
So in big scale, you know, we want to renovate a kitchen and you also have to broadly share how much money you want to spend and share that with the people you're talking with, because you want to make sure you're sort of in the right ballpark.
Kevin: Because if you're two X away, it's just probably going to fall apart and not really work.
Zack: Yeah, you're wasting everyone's time.
Tom: Yeah, I mean, if you have a budget, let's say your budget is $100,000, well, then your mind set, you should try to think of that as like $80,000, $85,000.
Leave yourself a little cushion for things that may pop up, and they're going to pop up.
You open up a wall.
Oh, there's a structural problem.
You got to deal with that.
Oh, I want to change my countertop to something else.
Well, you're going to spend probably your $80,000 or $100,000, but just be aware of it.
And, you know, this is a big investment.
Your home is your biggest investment that you make.
You want to make sure that you do it right.
Kevin: Okay.
Other things on your list in those conversations?
Zack: I think the major thing is understanding how selections work.
I think most homeowners think that they can sort of pick the tile when it's time to put in the tile and pick the counter when it's time to put in the counter.
And that's probably the worst thing you can do for your budget and your timeline.
And remember, if you're out of this house, you're paying rent somewhere else.
So we really encourage people to not start the job until they're ready to finish the job.
So basically, there's 500 decisions that need to be made to come up with the drawings like this, right?
And there's got to be specifications about the types of appliances, types of windows.
All of those decisions need to be made before we can go off to permitting.
And you cannot skip one of those.
Sure, you could maybe wait on paint colors, window treatments and furniture, but you can't be waiting on tile and, you know, appliances.
Those things all need to be completely figured out well before we show up with a tool.
Kevin: Once you guys get started, you want to keep going nonstop.
-Tom: Absolutely.
Kevin: Don't let the homeowner give the contractor a reason to stop, because they can't find the tile that they were dreaming about.
Tom: Well, it's like Zack said, we have a list of 500 things, but we got a list of appliances.
First of all, you want to know if you can buy those appliances.
Do you have to order them?
Are you going to have to wait?
If so, buy them early.
If you have a tile that you're going to pick out and you really like that tile, great.
Pick out a second choice just in case you can't get that tile.
For some reason, it's stuck on a ship somewhere.
Believe me, it's happened.
Kevin: Speaking of timing, I mean, that makes me think about permitting, right?
Because sometimes you have to pull a lot or few, but you do have to pull them.
And that can take time.
Zack: Yeah.
You do.
I mean, it looks different in every municipality, but basically how it works here in general is your sub trades like electrical, plumbing, mechanical, they have their own specific trades.
So if you're doing a small job, like swapping a water heater, they'll pull them themselves.
If you're doing a whole big house, then a general contractor like us is going to sort of handle all of that.
Tom: Yeah, they're going to pull, we're going to pull the main permit.
And then the plumbers or the electricians are going to go in and feed off of that permit.
Kevin: But are we talking about like a lot?
Are we talking about long term?
How long can a permitting process take me?
Tom: It could take four weeks, six weeks, basic.
But then it depends on what's going to happen.
This is inside the house.
This is the kitchen.
You're not changing the footprint at all.
If you change the footprint, do you need an easement?
Are you going to be too close to the lot line?
What about conservation?
All of those things make a difference timing wise.
So, you know, it could take a year, year and a half sometimes.
-Kevin: Yeah.
-Zack: Yeah.
-Tom: It's crazy.
-Zack: If you're touching the outside of the house, leave more time.
Tom: Are you going to deal with the historical committee, all of those things.
Then you got to wait for that, so... Kevin: Okay, lots to think about, but thank you, guys.
-Tom: A lot.
Kevin: Good information.
♪♪ -Mark: Marcos.
-Marcos: Hey, my friend.
-How are you?
-Mark: I'm doing great.
How are you?
-Marcos: Nice having you here.
Mark: All right.
My pleasure.
Of course.
I love the backyard.
I love this patio.
Mother nature, right out by the fence over there.
You can't beat it.
Marcos: That's why we moved here.
Mark: Oh, great.
But you wrote me about a fire pit.
Marcos: I did, yeah.
Mark: Why don't we, uh, check it out?
I love it right off the bat, actually.
I can see that there's a little bit of repair work that you guys -- -Marcos: I did that myself.
-Mark: Okay.
-Marcos: You can tell it's not okay.
Mark: Okay.
So are you thinking about another repair, or do you want to do something brand new?
Marcos: If we go for brand new, it would be would be great.
Like almost same shape, rectangular.
Mark: Okay, so when I came through the backyard, the first thing that grabbed my eye was this patio.
I love the granite.
I love the fact that you mixed a couple different colors in here.
I actually have some similar material that might match that really, really well.
Marcos: That would be beautiful.
Mark: And first thing we have to do is get rid of this guy.
Marcos: Yeah, absolutely.
Mark: Yep, yep.
I have some tools in the back.
Why don't we grab them and start hammering away?
-Marcos: I'm here, too.
-Mark: All right.
Marcos: I can't wait, I can't wait.
Mark: Okay.
Let's go.
♪♪ All right.
A little tougher than I thought.
-Marcos: Yeah.
-Mark: That's okay though.
♪♪ That whole corner wants to go.
Good job, Marcos.
Here's a nice rock.
♪♪ All right, that might be it.
I'll take this one, Marcos.
Okay, Marcos.
-Marcos: Yes, my friend.
-Mark: This is the granite.
Marcos: Yeah.
Mark: As you can see, we have a nice rock face edge.
I think that gives the stone character.
The coloration of the stone is going to match one of your pieces of granite here, so I like that.
Marcos: I have a question.
I see this one piece.
-Mark: Yeah.
-Marcos: With the heat, it will not gonna crack or... Mark: We picked this granite on purpose.
You can see how big and bulky this is.
It's going to take the heat, but we are going to do a few things to prevent that from happening.
So the reason we don't put this in concrete is because it stabilizes it too much.
And when the heat kind of blows this granite up, it has nowhere to go.
So that's why we're going to continue to use the gravel or crushed stone bed that's under these pavers and go from there.
The other thing that we're going to do that's going to help alleviate that cracking, if you will, is we're not going to put any masonry joints.
-Marcos: Small gap.
-Mark: That's right.
There's going to be a gap there, and it's going to let this stone breathe a little bit.
So when the heat does hit it, it's going to expand a little bit.
But we're going to give it the room to do so.
-Marcos: Nice.
That makes sense.
-Mark: Right.
Marcos: That makes sense.
Mark: You were about 12 or 13 inches off of the patio before.
We're going to give you that.
We can even give you a little more if you like, but that's where we'll start... -Marcos: Beautiful.
-Mark: ...is 12 or 13 inches in height.
Again, that's the way it's going to look.
Marcos: I appreciate that.
That will be awesome.
Mark: Time to dig.
So what I think I'm going to do, we have to go 12 inches deep.
-Marcos: Yeah.
-Mark: Around the perimeter, we're going to want to put a gravel or crushed stone in there.
That'll support the new fire pit.
Uh, and the way we're going to do that is I'll take the pick, I'll get into the ground.
I'm going to work myself backwards and around that corner.
And all you do is follow me with the shovel and the wheelbarrow.
All right.
-Marcos: Got it.
Mark: So give me a... Safety first, Marcos.
Marcos: I give you all the space.
Mark: Yep.
Thank you, sir.
And I'll just churn this up.
Marcos: Nice.
♪♪ Mark: Oh, yeah.
But actually, it's picking up pretty well, so... ♪♪ All right, Marcos, I might run that one out.
♪♪ -All right, Marcos.
So the digging is now done.
We ended up going over a foot just because I wanted to get to certain conditions that I like.
That's actually hard clay back down there.
So that's what we like.
And now all we have to do is bring the gravel in.
As we bring the gravel in, we're going to compact it as we go to make sure it's nice and solid.
Why do we need it solid?
Because it's going to act as a base for these big stones.
So we want it nice and solid, but we're also going to want it for drainage.
So let's get a wheelbarrow and get the gravel going.
All right, I just want to make sure everything is level and then bring in the stones.
Now that the hard part is done, right, all the digging, we get the easy part of moving these stones into place.
Marcos: You kidding me?
I want to enjoy the fire pit.
I don't want to break my back, man.
Come on.
-[ Mark laughs ] Mark: Well, hopefully this goes smoothly.
So we're going to take these two pieces.
We're going to go this way.
-Marcos: Me and you?
-Mark: Me and you.
-Marcos: Ay, yah.
Mark: And then we're going to take the two small ends, we call them the bookends and climb them in.
-Marcos: Okay.
-Mark: And I'm kidding.
-Marcos: You start.
-Mark: Yeah.
Right.
Okay.
So I actually brought some help with me today.
Only because I know we would need it.
Marcos: I thought you was... you was kidding.
Okay.
Mark: So we'll go call the guys.
Marcos: Yeah.
Mark: Guys!
I have these butt ends of the pieces of granite that are going to go into the other piece of granite, and I want to make sure they're as tight as possible.
So I want to take the high points off.
Scrap them up.
Marcos, I guess we just get out of the way.
-Marcos: Yeah, man.
-Mark: With this, yeah.
Let these guys do their thing.
Great.
All right, now walk the dog back.
Watch your bubble, Fred.
Right there.
All right, one down, three to go.
♪♪ You guys are good.
Try that.
There we go.
All right, Marcos, one more piece left.
What do you think?
-Marcos: It's beautiful.
-Mark All right.
-Marcos: One more piece?
-Mark: One more.
-Marcos: And we're done.
-Mark: We're done.
-Marcos: Very good.
You guys are good!
All right, Marcos.
Stones are in.
We backfilled all the way around the stones.
The one last step that we do have to do is just install this lava rock.
So when you build a fire and the fire goes out, it'll still emanate throughout.
Marcos: There we go.
It looks very good.
-Mark: Yeah.
This is good.
-Marcos: Yeah.
Mark: All right, Marcos, I have a little bit of homework for you, if so desired, and you want a screen to cover this, they do make them, so just look it up.
Yep.
The other thing I need you to do is just sprinkle some grass seed on the back where we backfilled them.
-Marcos: I have them.
-Mark: Yep.
Okay, great.
Other than that, all you have to do is light a fire.
Marcos: Thank you so much.
It's beautiful.
It is really beautiful.
-Mark: Okay.
-Marcos: Thank you.
-Mark: Glad you're happy.
-Marcos: Thank you.
-Mark: All right.
Marcos: Thank you, man.
Mark: And if you have questions about your house, keep them coming because we'd love to hear from you.
Until next time, I'm Mark McCullough for "Ask This Old House."


- Home and How To

Hit the road in a classic car for a tour through Great Britain with two antiques experts.
 New Episode




 New Episode




Support for PBS provided by:
Funding for Ask This Old House is provided by The Home Depot, Renewal By Andersen, and ChipDrop.