E3 | Lexington Modern | The Big Dig
Season 45 Episode 3 | 23m 42sVideo has Closed Captions
A concrete block wall is built to connect the new mechanical space out front to the old.
Accessibility is at the forefront of this renovation, which requires major changes. A new mechanical space is being created out front and will be connected to the old mechanical space by a new concrete block wall. Out back, a new foundation has been poured for a larger walkout basement. The new HVAC ducts are installed considering the new energy code. Framing for the new elevator begins.
Problems playing video? | Closed Captioning Feedback
Problems playing video? | Closed Captioning Feedback
Funding for THIS OLD HOUSE is provided by The Home Depot and Renewal By Andersen.
Support provided by:

E3 | Lexington Modern | The Big Dig
Season 45 Episode 3 | 23m 42sVideo has Closed Captions
Accessibility is at the forefront of this renovation, which requires major changes. A new mechanical space is being created out front and will be connected to the old mechanical space by a new concrete block wall. Out back, a new foundation has been poured for a larger walkout basement. The new HVAC ducts are installed considering the new energy code. Framing for the new elevator begins.
Problems playing video? | Closed Captioning Feedback
How to Watch This Old House
This Old House is available to stream on pbs.org and the free PBS App, available on iPhone, Apple TV, Android TV, Android smartphones, Amazon Fire TV, Amazon Fire Tablet, Roku, Samsung Smart TV, and Vizio.
Keep Exploring


This Old House Insider Newsletter
Get This Old House exclusive stories, tips, and behind-the-scenes information delivered right to your inbox every month.Providing Support for PBS.org
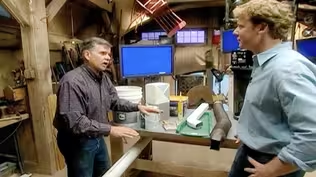
Learn Moreabout PBS online sponsorshipKevin: Today on "This Old House"... we are gonna connect the old to the new as the big dig comes to Lexington in the form of a tunnel.
Richard: And we need to run ductwork in this beautiful space, but there's no room in the ceiling or the wall, so we're gonna run it under the slab.
♪♪ ♪♪ Man: Ahh.
That's it.
♪♪ ♪♪ ♪♪ Kevin: Hi, there.
I'm Kevin O'Connor.
And welcome back to "This Old House."
Whether you are thinking of aging in place or you just generally want to improve the accessibility of your house, I think you're gonna learn a lot from this project that we are working on here in Lexington, Massachusetts.
And that's because accessibility is driving a lot of the choices for this renovation.
And they require a lot of changes, which you can see here in the front.
So there was a middle section right there connecting that two-story garage with the original building right here.
That's gone.
It's gonna be rebuilt as a new entryway and a dining room.
And Charlie's crew also did a massive excavation here in the front for a new basement.
Another big change out front was the removal of the fireplace.
So if you can see that double glass door just to the right of it with the framing, that's where the fireplace was -- non-working, so they decided to take it out.
From here, you get a sense of this new front basement.
This is the footing, the outline of the basement.
You can see the forms are going up right now because they're gonna pour a concrete wall.
And what's cool is that from this driveway up to that entrance, there's gonna be a ramp, but it's gonna be built into the ground and it's gonna feel like it is part of this house.
So, as I said, a lot of changes out front and even more out back.
Here's our new foundation out back.
We've got a downstairs bedroom and rec room going in here, and this is 12 1/2 feet of poured concrete.
It was all formed up.
So you can see the form lines right there.
And those are gonna have to be tended to.
The decision is to put a concrete parge on the outside of this face right here.
That's what we've got on the original structure on the corner, so it'll tie these two together.
And it's also the right look for a mid-century modern.
We've got the window openings and a big opening for a glass door right here.
And as you walk into the space, you can see the work that's been done on our buttress wall.
Now, if you recall, it was tied into the existing foundation right here, poured underneath it.
So they formed it up, poured it.
Forms are off.
And now at this point, you can see that, well, Charlie and his guys, they're ready to start framing.
The old rec room was behind me at the bottom of a staircase coming down to the lower level.
Charlie, you took those out and I hear the old mechanical room's not working for you either.
Charlie: Yeah, we were tight for space as it was, so I needed more mechanical space because we've added on more square footage.
Kevin: And where are you getting a new space?
Charlie: Right over here.
Well, this is our new mechanical space under the dining room.
Kevin: So a basement that we never had before.
Makes sense.
Charlie: No, never had it.
But it's gonna allow us to put our new air-conditioning, our heating, and even our electrical system down here.
Kevin: Okay.
And so now we've got one in the front and the back.
Charlie: Right.
So all of this section will do the existing part of the house, the whole front section, and then the back existing mechanical space will do the entire back section of the house.
Kevin: Nice.
Charlie: And this is how we connected them.
Kevin: Oh, my gosh, Charlie.
Charlie: It might look a little excessive, but, you know.
Kevin: You built a tunnel through the house.
Charlie: Tunnel, hallway, whatever you want to call it.
But we had an excavator inside the house.
We were able to reach in, dig it all out.
A lot of hand digging, also.
And we cut the foundation open to connect the two spaces.
Kevin: Oh, my gosh.
So you can walk through here.
Charlie: You can walk through here.
But all of this in here is going to allow our two mechanical rooms to connect to each other, our ductwork, our electrical, pipes, you name it.
Kevin: All right.
Well, you are intrepid.
No small jobs.
And, Mark, you're the guy who's got to, I guess, what, build the sidewall there?
Mark: That's right.
We're gonna throw this wall in.
Kevin: So block.
Mark: Block.
We do have a lot of concrete guys on-site.
Formwork.
Kevin: Why not just pour it while they're here?
Mark: So it would have been easy enough, except for the fact that if they did use formwork here, we'd have to dig this grade back even more, which may become a problem, right.
Kevin: So if you use block, can you make that wall as strong as, say, like, a poured monolithic wall back there?
Mark: So I can.
I'm gonna use a bunch of individual blocks.
As you can see, this is a 12-inch block, so it gives me a bigger spread than an 8-inch block, which means more strength.
Kevin: What do you got?
You got the backhand slide there?
Mark: The backhand slide.
Kevin: Look at you.
Mark: But I'm slinging this more to Kevin because I want to get that ladder mesh in.
Kevin: And so the ladder mesh, Mark, is doing what?
Are you tying one block left and right to each other or... Mark: So it ties block together, but it's also there for lateral pressure.
And the reason I do the mortar first is because I do want to sink this into the joint.
Kevin: Okay.
Mark: Make sure we get maximum strength.
I'm also gonna do the block.
The head joint is the most important, only because if you don't have a proper head joint, you're gonna end up with water infiltration.
And, again, I'm gonna wiggle that into place... just because I want to make sure it's full -- the head joint.
Kevin: Full meaning that you've got good contacts?
Mark: That's right.
Kevin: Both sides.
Mark: Yeah.
[ Drill whirring ] Kevin: All right, so hole into our, I guess, what, the footing?
Mark: That's right.
So... again, don't forget -- This is a very beefy footing.
It's at least 20 inches deep.
We've got re-rod poured into it, so we have a nice, strong footing, and that's why we're able to drill into that concrete.
Kevin: So we've got a connection at the head joints connecting this block to that block.
Mark: Right.
Kevin: You've got your wire fence... Mark: The ladder.
Kevin: Ladder.
Thank you.
Wire ladder sort of spanning those joints this way.
Mark: Right.
Kevin: Now you got -- You got bar coming up vertically.
Mark: Exactly.
So this is gonna be our vertical reinforcement.
And, again, all we do, I make sure I have the right depth.
I do.
And now I'm gonna fill this hole with epoxy.
And that's what's gonna lock down this re-rod into the footing.
Kevin: And an uncooperative tip.
Mark: Yeah, a little bit.
I want to work the re-rod to that epoxy anyway.
So as you can see... And I'm gonna swish it around a little bit to get the air bubbles out.
Kevin: And how long do you think that takes to set up?
Mark: Probably 15 minutes.
Kevin: Nice.
Mark: But I can already feel it getting -- I can feel the tension in the rebar against the epoxy, so...
Right there.
Yeah, about 15 minutes, I'll be good.
Kevin: So that sets up.
And now that's just sitting in the middle of an empty cell, so you got to tie rebar to CMU.
Mark: Right.
So part of the process of making this monolithic is, any cell that you see that's empty, we're actually gonna grout, just like that.
Kevin: Empty, whether it's got the bar in it or not?
Mark: Whether it has rebar or not, we're gonna manually put it into each cell.
It's gonna be 5,000 PSI.
So it's gonna be really strong.
So the only thing we're gonna do with this rebar is, we're gonna make sure we put in other pieces as we go.
But we're also gonna want to tie this for a 2-foot overlap, so... Kevin: So wire that together, continue all the way up to full.
Mark: All the way up to full height.
Right.
Kevin: And so full height gets us basically to the bottom of the plank right there.
That's our wall.
Mark: Right.
Kevin: And then we tie into the floor system, as well?
Mark: We can tie into the floor system, as well, with the rebar.
But another connection we're gonna make is, we're gonna take the existing concrete.
We're gonna use that, as well.
Kevin: Mm.
Mark: We have a piece of rebar.
And as you can see, it's got a 90-degree bend in it.
Kevin: Mm-hmm.
Mark: We're gonna drill into the existing concrete.
We're gonna epoxy that, as well.
And then we're gonna grout.
That will become solid.
And that will help.
Kevin: So I get it.
Yeah.
You got a monolithic wall, right?
Everything's tied together.
You're pinned to the footer, you're pinned to the floor up top.
And then you actually pin it again to the side, pour concrete walls.
Mark: Exactly.
Not gonna move.
Kevin: No.
And the kids are gonna love it, having a tunnel in the house.
And I feel a lot better about it now.
Mark: Right.
Kevin: Thank you, Mark.
Mark: You got it, Kevin.
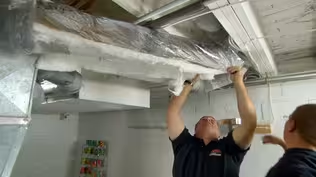
♪♪ ♪♪ Richard: When this house was built in 1960, the HVAC contractor had a particular challenge on this end of the building.
These are solid brick walls on these two sides.
There is no attic, no place to hide ductwork.
So the only choice they had was to run ductwork under the slab, the concrete slab.
So the material of the day was simple metal.
This is all that's left of it.
And this would have been entombed in the dirt and then concrete over the top of it.
The insulation of its day would have been fiberglass.
Now, this could pick up moisture.
And once you introduce moisture both from the ground and from the ductwork, look what it does.
It's gonna rot away the metal.
Ironically, we have the same challenge today -- what to do with the ductwork.
So we contemplated actually running some ductwork up against that ridge and just covering in the soffit.
But that didn't cut it with the homeowners, right?
Charlie: It didn't.
They didn't want any part of making that beam any larger.
Richard: All right.
So what have you got done today?
It looks like quite a bit.
Charlie: Well, that concrete right there is where our original slab was with a wood floor on top of it right through the entire floor.
Richard: No insulation underneath, wood floor on top of it.
So that slab was, what, R-zero, and that whole HERS rating thing sort of invited us to get rid of this because there's so much brick and so much glass, right?
Charlie: That's right.
So this is really gonna be our starting grade to meet all of our thicknesses that we have.
Richard: Yeah.
Charlie: We have closed-cell foam, concrete slab, 2-inch sleeper system with rigid foam in between.
Richard: Yeah.
Charlie: We have subflooring, radiant heat, and our finished floor.
Richard: And this is great because this closed-cell will act both as a thermal break and as a moisture barrier so no moisture comes up through and gets that wood.
Charlie: Nothing's getting through it.
Richard: And now we have to bury ductwork underneath all that.
Charlie: That's right.
So we found out our new locations and we put them all where they have to be.
And we started with excavating a trench to all the locations for our registers.
And then we sprayed some closed-cell foam.
And it will be our starting base once the ductwork goes on it.
Richard: James Bouchard is helping us again this year on the HVAC.
James: Hey, Richard.
How are you?
Richard: Doing good.
All right, James.
So what are the rules about running ductwork under slab nowadays?
So we want it to be -- The structural integrity has to be there.
It has to be dry, and it has to be insulated to code.
Richard: Okay.
So what are you gonna use?
James: So right here, this duct is what we typically use in a house -- 30-gauge galvanized metal.
And as you can see, the weight of the concrete would just crush this.
Richard: There's no strength at all to that.
You put concrete on that, it'll crush like nothing.
James: Exactly.
It'll fall right apart.
This spiral is double the gauge thickness, and it has this seam right here that adds to structural integrity.
You could stand on this.
It's not gonna crush.
Richard: You could stand on it?
James: It's gonna last a lifetime.
Richard: Could I stand on it?
James: Go ahead.
Richard: No, you do it.
[ Laughs ] So that's a big difference.
That's gonna last.
Okay.
So we know it's gonna be structurally sound, but we also need to make it dry and insulated.
So let's get started with the install.
♪♪ ♪♪ ♪♪ ♪♪ ♪♪ ♪♪ So, Charlie, what are you doing?
Are you spraying this yourself?
Charlie: Yeah.
They make a do-it-yourself kit.
So I picked one up.
First thing you have to do is check the box, what they recommend, pick up the proper respirator, eye protection, and even gloves.
Richard: And what are you trying to do is to put this closed-cell completely around it because we want it to be -- both have good structural integrity and to keep that moisture so it doesn't look like that old ductwork that we had before.
Charlie: We will be 100% wrapped in insulation.
Richard: All right.
Cool.
James: And we want to make sure that this is cleaned with acetone because it comes off the factory covered in mineral oil.
So we wiped it all down with acetone, get all the oil from the factory off.
That way, you get a good adhesion and it'll last forever.
Richard: Right.
All right.
You ready to spray?
Charlie: Yeah.
Let's go.
Richard: All right.
♪♪ ♪♪ ♪♪ Look at that.
Already set.
Richard: Nice job, Charlie.
So if we come back here, James, what, 80 to 100 years, is this ductwork gonna look just perfect?
James: Should last a few lifetimes.
Richard: Good.
Nice job, boys.
James: Thank you.
Charlie: Thanks.
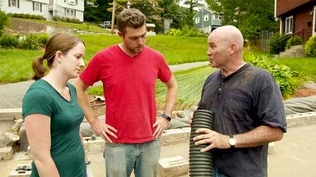
♪♪ Kevin: Our homeowners are installing an elevator during the renovation.
It's gonna be the best way for their son, who will eventually need it to get from the main level down to the lower level.
So to see what the elevator looks like and how they work, we've come here.
This house just had one installed to access a new garage addition.
It's a similar unit to the one we're using in Lexington, and it was installed by the same company we're working with.
Kevin: Hey, Jonathan.
How are you?
Jonathan: Kevin, how's it going?
Kevin: All right.
Nice to meet you.
Jonathan: Nice to meet you.
Kevin: So you're a busy man these days?
Jonathan: Yeah, I'm booked about three months out right now.
Kevin: Everybody wants an elevator?
Jonathan: Everyone wants one.
Kevin: All right.
Well, we've got one here.
What's the story?
Why do we have one?
Jonathan: So the story here is, the homeowner decided that they wanted to stay here and age in place.
So she's moving out of her main home and moving to an addition above the garage.
And her son is moving into the main home.
Kevin: How do you get an elevator in there, What'd you guys do?
Jonathan: So this is a bump-out that's about roughly 5x4 1/2 feet interior.
Kevin: Okay.
Jonathan: And then in addition to the hoistway, you also need space for a machine room.
Kevin: Which is what?
What does a machine room get you?
Jonathan: Machine room is where all the machinery space is kept.
So that way, nobody gets inside or accesses it.
Kevin: Oh, yeah.
Oh, that's actually not that big, right?
It's kind of shallow.
About 4 feet wide.
Not too bad.
And what am I looking at?
Jonathan: This is your hydraulic tank because this is a hydraulic elevator.
There's two main types of elevators that are installed in residences -- overhead cable drives and hydraulics.
Hydraulics tend to be a little bit more quieter and they take up a little less space.
Kevin: Gotcha.
And then this box?
Jonathan: That is your controller.
That is what tells you when the doors are closed and the gates are closed so that it can safely operate.
Kevin: So we have a pump, which means we need power.
Where do you guys have to put in for electric?
Jonathan: So you need a 240 circuit fused at 30 amps and you also need a 120 circuit fused at 15 amps.
Kevin: That's not too bad.
Not that uncommon.
All right, well, let's go see what it controls.
Jonathan: Yep.
Absolutely.
Kevin: Okay, let's see what we got.
Right here at the entrance.
Makes sense.
Jonathan: Elevator right here.
Kevin: And how similar or different is this to what we're getting in our project?
Jonathan: So the project in Lexington is a little bit different.
Same mechanical-wise, but the doors are gonna be different.
In Lexington, they're gonna be sliding automatic doors, where this is a manual swing door with a manual accordion full gate.
Kevin: Okay.
But still an elevator door here?
Kevin: Yes.
This is a special elevator door with a cut-out here for your interlock, which is what keeps the door closed when the elevator's not there.
Kevin: Yeah.
Jonathan: The frame is also special because the door has to close within 3/4 of an inch of the edge of the hoistway.
Kevin: Which is right there.
And then you say the accordion door -- sort of a safety mechanism.
Two doors.
Jonathan: Yep.
Keeps everyone inside the elevator safe.
Kevin: I've been in a few of these by now, and I've learned that you can pretty much customize the trim, pick anything you want.
Jonathan: Yes.
Yep.
There's different trims for the call stations, different finishes for the wood.
Kevin: Okay.
What I'd really like to see, though, is the operation, the mechanics, the chase and all that.
Can we have a look at those?
Jonathan: Yeah, absolutely.
Let me get set up.
All right, step on in.
Kevin: Okay.
Jonathan: We've safely locked the elevator out here with the ball valve and the stop switch there.
Kevin: Beautiful.
Jonathan: So this is the hoistway that the elevator rides inside.
So as you can see, it's not much bigger than the elevator.
Kevin: Right.
And did you guys build it, and what's it made out of?
Jonathan: No.
So this is a contractor-built hoistway.
They build the -- It's a stick frame with Sheetrock on top of it for fire rating.
Kevin: Okay.
But a concrete floor.
Jonathan: Yes, concrete floor.
So that way, it's a nice, solid foundation for the elevator.
Kevin: Right.
And there's your pit.
Jonathan: Yes.
This is your depression.
That way, the elevator can stop flush with this floor.
Kevin: And then, so how is this thing working?
Jonathan: This is your piston here.
It's a roped hydraulic, not a direct hydraulic.
Hydraulic fluid drives this piston up here, which, in turn, drives the ropes down here.
And you have your traveling cable here, which is basically the communication between the controller and the elevator.
Kevin: Traveling because it goes up and down with the box and the box rides on this?
Jonathan: This is your main rail that the elevator is gonna ride up and down on.
Kevin: Okay.
Jonathan: This is a fire-rated 2x12.
So that way, you keep your fire rating inside the hoistway.
This here is gonna be your tape selector.
That's what tells the elevator when to slow down, when to stop, and when to take off.
Kevin: And can we see the mechanics above the cab?
Jonathan: Absolutely.
Let's head upstairs.
Kevin: Okay.
Mostly to the top right here.
Jonathan: Let's lower this down so you can see the top of the elevator.
Kevin: Okay.
A little elevator technician override there.
Jonathan: Yeah.
Kevin: Boy, it is quiet, isn't it?
Jonathan: Yeah.
Kevin: And that's because it's the hydraulic cable.
Jonathan: Yes.
Yep.
Kevin: Can you hold it there?
Jonathan: Absolutely.
Kevin: So what am I looking at?
Jonathan: So this is your brains for the top of the elevator.
Kevin: Right.
Jonathan: And it communicates to the brains for the whole elevator and the machine room.
Kevin: Well, surprisingly compact.
And I like the fact that it's as quiet as it is.
That's very nice.
Big question is, what does it cost us to put an elevator in?
Jonathan: Roughly a ballpark number -- about 50 grand.
Kevin: And is that for your elevator work?
Jonathan: That is just for the elevator work.
Kevin: Chaseway construction is in addition to that?
Jonathan: In addition to all this.
Kevin: Well, if it keeps you in your house, I could see why people are calling you up and having you do it.
Jonathan: Absolutely.
Kevin: I appreciate the tour and we look forward to seeing you in Lexington.
Jonathan: Yeah, I'll see you soon.
Kevin: Thanks, Jonathan.
Bring her up.
Let's take a ride.
♪♪ ♪♪ ♪♪ Tommy, I just laid eyes on our new elevator.
Really nice box.
Tom: Yeah.
Kevin: I love it.
And you know what I like, too?
Unlike that one, this is not gonna be an addition on the outside of the house.
We get to put it right in the middle of the house.
Tom: Yeah.
Nice, centrally located.
It's really great.
Kevin: Of course, you've got to frame out for it.
Tom: Yeah, well, you definitely have to frame out for it.
Think about these floor joists right here that are cut off.
They ran all the way across here and they were rested on the old wall that was here.
Kevin: Yeah.
Tom: All right?
So once we cut those away, they have to be supported.
Kevin: And by supporting them, you mean transfer the weight that's on them to somewhere else?
Tom: Transfer it out, just like a header over a window.
Kevin: That's why you got a double here.
Tom: We got a double here.
All right, so this is a double floor joist that a double header will go into.
But if you look at this side over here, there's actually four engineered LVLs and a filler strip right here.
Kevin: Why more on that side?
Tom: Well, this wall over here -- or this beam is gonna be asked to carry a lot more load.
Above that is just a wall that runs up.
This wall is gonna run up to carry a roof that's going to be angled up over that wall, but over to the other side of the building.
Kevin: So carrying floor and roof system?
Tom: Floor and roof.
Kevin: Gotcha.
Tom: And so now we have to take half of this load right here and transfer it to that one and that one.
Kevin: So you got a double here.
Do you put a double up on this opening?
Tom: Yep, a double opening.
Usually an opening that is wider than, let's say, 40 inches... usually everything is doubled.
Kevin: Okay.
So I'm looking at this framing and I'm thinking, "Okay, if this was an opening for, say, a staircase or whatever, it seems sufficient."
But the elevator I just saw, that's a big beast.
This does not look like it's sufficient to carry an elevator, as well.
Tom: Well, this isn't really carrying the elevator.
It's helping hold the elevator.
Kevin: Right.
Tom: But a lot of the weight is transferred down to the concrete floor.
Kevin: Ah.
Gotcha.
I mean, we have to have strongbacks built in this wall here so the elevator will bolt against it.
But all of the transferred weight will be down to the floor.
Kevin: Good point.
Right.
So that's pressing on the pad that was already poured for us.
Tom: Right.
Right.
Kevin: Okay.
You ready to get these in?
Tom: I am.
Let me nail this one off first.
Kevin: All right.
Kevin: All right.
The first one in.
Here's the second one.
Tom: Get that.
Make sure it doesn't fall on you.
Kevin: Aww.
You care.
Tom: Huh?
Kevin: Boy, that doesn't look close at all.
There you go.
There you go.
All right.
That's not going anywhere at all.
Hey, Richard.
Richard: Hey, guys.
How are you?
Kevin: All right.
Richard: You got a big hole here.
Kevin: Ah.
Won't be for long.
This is where the new elevator's going.
And that's coming up in a little bit.
But next time, what do you got for us?
Richard: It's about accessible bathroom design.
Gonna learn from an expert about how to do it properly.
Kevin: Okay.
And, Tommy, what about you?
Tom: Well, out front, we're gonna open up that span of that room there by removing the old ridge beam and putting a new ridge beam in there that will carry double the space.
Kevin: I love it.
Big open floor plan.
And the exterior is gonna start coming back together as framing continues.
So until then, I'm Kevin O'Connor.
Tom: I'm Tom Silva.
Richard: I'm Rich Trethewey.
Kevin: For "This Old House" here in Lexington.
Richard: I could drop something right on your heads here.
♪♪ Kevin: Next time on "This Old House"... Man: And this new space is going to be our kitchen and dining room completely open, no walls.
We have to take this Lally column out.
Jenn: And I'll reveal my landscape design plans in 3-D, complete with retaining wall, patio, and fire pit.
Woman: It looks really beautiful.
Richard: And smart, accessible design is all about the details, and there's plenty to learn from right here.
Kevin: That's next time.


- Home and How To

Hit the road in a classic car for a tour through Great Britain with two antiques experts.


Support for PBS provided by:
Funding for THIS OLD HOUSE is provided by The Home Depot and Renewal By Andersen.