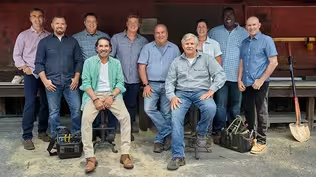
E5 | Generator Hookup, Brick Lintel | Ask This Old House
Season 22 Episode 5 | 23m 42sVideo has Closed Captions
Heath installs a generator transfer switch; Mark fixes a faulty brick lintel repair.
Heath Eastman assists a homeowner who wants to hook up a generator to their home by installing a transfer switch to the circuit board; Environmental contractor, Ron Peik demystifies asbestos and shares options for mitigation; Mark McCullough fixes a faulty brick lintel repair on an 1833 home, discusses the difference between Flemish and American bond, and how to match existing mortar and joints.
Problems playing video? | Closed Captioning Feedback
Problems playing video? | Closed Captioning Feedback
Funding for Ask This Old House is provided by The Home Depot, Renewal By Andersen, and ChipDrop.
Support provided by:


E5 | Generator Hookup, Brick Lintel | Ask This Old House
Season 22 Episode 5 | 23m 42sVideo has Closed Captions
Heath Eastman assists a homeowner who wants to hook up a generator to their home by installing a transfer switch to the circuit board; Environmental contractor, Ron Peik demystifies asbestos and shares options for mitigation; Mark McCullough fixes a faulty brick lintel repair on an 1833 home, discusses the difference between Flemish and American bond, and how to match existing mortar and joints.
Problems playing video? | Closed Captioning Feedback
How to Watch Ask This Old House
Ask This Old House is available to stream on pbs.org and the free PBS App, available on iPhone, Apple TV, Android TV, Android smartphones, Amazon Fire TV, Amazon Fire Tablet, Roku, Samsung Smart TV, and Vizio.
Keep Exploring

This Old House Insider Newsletter
Get This Old House exclusive stories, tips, and behind-the-scenes information delivered right to your inbox every month.Providing Support for PBS.org
Learn Moreabout PBS online sponsorship♪♪ Kevin: On "Ask This Old House," our experts travel across the country to answer questions about your house.
♪♪ Today, are you considering connecting a backup generator to your home?
Heath will share some options and tips for what you need to know.
Then we will answer all your questions on asbestos abatement.
Plus, Mark helps a homeowner repair a sagging brick lintel on his 1830s home.
Mark: You have a museum piece right here.
This is a piece of art and should be repaired as such.
Kevin: That's all coming up next on "Ask This Old House."
♪♪ Ramez: Morning, Heath.
Heath: Hey, Ramez.
Ramez: How are you doing?
Heath: Nice to meet you.
Ramez: Likewise.
Heath: So I saw that you wrote in about a generator.
You want to tell us a little bit about what you got going on?
Ramez: Yeah.
So we just moved here less than two years ago.
Heath: Okay.
Ramez: And because of just the trees around us, we lose electricity a lot.
Heath: I can see that.
Ramez: So my father-in-law was generous enough to gift me a generator.
Heath: Okay.
Ramez: I just would not like the idea of connecting it with extension wires to, like, the fridge, for example.
Heath: I appreciate it.
I'm glad -- I'm glad you want to do it safely.
Ramez: Yeah, I'd love to connect it to the panel, but I don't feel comfortable doing it.
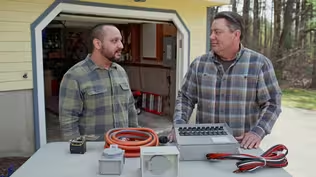
Heath: Okay, so it looks like we have a good portable gas-powered generator here.
We have a newer electrical panel that's going to give us some flexibility as far as connections.
Ramez: That's great.
Heath: But there are a couple of things we want to keep in mind.
So we want to have this generator outside.
We want to get the exhaust end away from the house.
We want make sure we don't get any carbon monoxide coming back in.
So in order to do that, we want to connect it from the outside and then feed back to this panel.
So we really have a couple of options that we can do this safely with.
So let me grab those.
We can take a look and go from there.
Ramez: Perfect.
Thank you.
Heath: Alright.
♪♪ Alright, Ramez, let's go over those two options I was talking about.
So the first one is a conventional transfer switch.
Now, how this works is we tie all these circuits to the panel, but we have to pick a certain number of circuits.
So we're going to want to pick your heating system, refrigeration, certain lights, things like that.
And then when it comes time to use it, you pull the generator outside, cord-connect it, start it, and then you simply flick from line to generator.
That's it.
One at a time.
Powers up what you chose, like refrigeration, heating, some lights, that kind of thing.
When you're done, the power comes back on.
Turn them back to line, turn the generator off, unplug it and put it away.
Simple, nice and easy.
The disadvantage is you're limited to the number of circuits, so you have to pick what you want to have in the house.
You can't run everything.
You're not going to have lights everywhere.
You're not going to have receptacles everywhere.
So just be aware that is the limitation.
Ramez: Okay.
Heath: The other way to do this is with a mechanical interlock.
And what this does is it's a little bracket that goes over the main breaker and we install, in this case, a 2-pole 30 breaker that's going to let the power come in from the generator to the panel safely.
So if we're looking at the interlock, when you use the interlock, in this case, the main breaker would be here.
And the breaker that's providing the power from the generator would go here in your panel.
So here the main breaker, we turn this off.
This will allow this bar to slide over.
When that slides over, we can then move this one.
This lets us turn the generator breaker on.
Now, the main can't go on because this will prevent this handle from sliding while this is on.
When the power is restored, we want to go back to utility.
Turn this off.
Now that goes back over.
This can't move and the main can go back on.
When you do this, you have the flexibility of turning on everything in your house -- lights, receptacles.
So you're living like you normally would for the most part.
But the drawback is now you have to pay attention to what you're running.
You can't run anything too big.
No electric ovens, electric dryers, central air-conditioning units based on the generator you have.
You only can run so much, but you can still walk throughout the house and treat it like normal.
Ramez: So what will happen if I overload the generator?
Heath: You'll hear it.
The generator will bog down, it might stall.
It might trip the breaker that's feeding it.
It all depends.
So you really want to try and avoid that.
Ramez: Okay.
Heath: And the last thing we're going to look at is how we connect it.
So we're going to have a power inlet box they're called.
We're going to mount it on the outside.
Two ways to go.
One with that front and one with the bottom feet.
We have this cord that's a twist-lock cord that plugs in, twists, just like the name says, and doesn't come out.
So once it's in there, it stays, will not release until you untwist it.
My preference is this way.
When you're installed like this, this is still exposed to the weather a little bit if we're in a bad storm or something, the cord's coming straight out, a little more stress on it.
If we install it like this and the cord's hanging from the bottom, it's twisted into place.
It can't come out.
It's completely protected from the elements.
I feel a little more comfortable with this one.
Ramez: I agree with you.
This sounds like a no-brainer.
Heath: So we have the cord.
We have that.
Which way do you think?
Ramez: I really like the flexibility of the interlock.
But I'm scared that with sleep deprivation, with two kids, I would do a mistake.
So I feel probably more comfortable with this.
And I think my wife would be probably more comfortable just putting on just some switches.
Heath: Starting it and then just throwing these switches.
Yeah, I think it's a little bit easier, and I think you have enough in the house that we can make this work and be comfortable for you.
Ramez: Great.
Heath: Alright.
Ramez: Yeah.
Heath: Let's get to work.
Ramez: Alright.
Heath: Dave from the electric company is here to make the disconnect.
He will start by removing the cover from the meter socket, removing the meter socket itself, and then testing the terminals.
♪♪ Once he's sure that there's no power that's going to pass through, he'll cover it back up, put a blank plate on and lock the system out.
This will allow us to work on the panel without it being energized.
♪♪ Next, I want to mount a piece of plywood to the wall, and I want to attach it to the studs to ensure I have a safe and stable mounting area for the transfer switch.
[ Drill whirs ] Now, I painted it black because I think it looks a little nicer on the wall than just a bare piece of plywood.
Then I'm going to connect the flexible conduit that comes with the transfer switch to the panel.
This is going to give us the length of where the transfer switch is going to land so we can locate where it's mounted.
The wires and the transfer switch are marked by letters.
Here we have two wires marked with the same letter.
One wire is going to go to the breaker and the second wire is going to take the wire that came off of the breaker, wire-nut to it and go back to the load inside the house.
We want to drill through the shelving system with a hole saw to get our conduit through.
Next, I need to run a conduit from the transfer switch to an external power inlet box.
I'll need to be a little creative here, since there's a set of deck stairs on the other side of this wall that I don't want interfering with this inlet.
Instead, I'll try to run the conduit through the holes I've drilled in the garage shelf and mount the exterior inlet on the underside of the stairs.
This location will work nicely too because the generator can be placed next to the condenser when it's being stored, so it looks like it's always been there.
♪♪ ♪♪ Alright, Ramez, well, now we're actually at the point that we can test this.
So we've gone and made all the connections to the electrical panel.
Transfer switch is completely done.
We've installed the outdoor power inlet right there, and we've located the generator where we want to put this that's level, on pavement, out of the way.
And what's the most important thing?
Ramez: The muffler away from the house.
Heath: Exhaust is going away from the house.
Exactly.
And we have it a pretty good distance.
We've got a 25-foot cord here, so we should be pretty comfortable.
Ramez: Okay.
Heath: So what I want to have you do is do the entire process.
I'm going to start by having you connect this cord to the power inlet over there.
Ramez: Alright.
Thank you.
Heath: And remember, it is a twist lock.
So you're going to push that up and just give it a little twist clockwise.
Ramez: Okay.
Okay.
I'm good here.
Heath: Good?
Alright.
And then same thing on this side.
I just want to have you do all of it so you're comfortable.
Same thing into that receptacle on this side.
Good?
Give it a little tug.
Great.
Let's start it.
Ramez: Okay.
[ Generator whirring ] Heath: Beautiful.
Generator's running smoothly.
Everything's connected.
Utility power is still off.
So let's go inside and transfer over.
Okay, so now the hard part's done.
We're all connected.
We're up and running.
Here's our switch.
And you can see that all of these right now are down in the line position.
Line means utility, the power coming in from the street.
Since we don't have that, all we have to do is simply flip these up to generator and you'll be on generator power, so... Ramez: Awesome.
Heath: All yours.
Ramez: Thank you, sir.
Heath: Just like that.
House is on generator.
Everything's working.
Ramez: That's awesome.
Heath, I can't thank you enough.
You did a fantastic job, and I think it's going to be very easy for me and my family just to turn on these switches and turn on the generator.
And we're going to be okay.
Heath: Perfect.
That's what we want.
So let's go outside.
We'll kill the generator, put everything away so you can get to it in the future.
And I'll stick around and wait for the utility company.
Ramez: Sounds good.
Thanks.
Kevin: Hey, Ron.
Good to see you.
Ron: Kevin, good to see you.
Kevin: Thanks for coming to the barn for us.
Ron: Thanks for having me.
Kevin: We are so often seeing you on the job site for decades, helping us mitigate our job sites, but it's good to have you here.
And we're talking asbestos.
What is this stuff?
Ron: It's a natural mineral.
You see it everywhere.
And they discovered it thousands of years ago.
It's been used in everything from wrapping mummies to wrapping boilers.
Kevin: So mineral meaning in the ground, and they literally go and they mine this stuff?
Ron: Right.
Yeah.
Nice fibrous material.
It's impervious to water, it doesn't rot, it doesn't decay, it doesn't burn.
It's got great insulation properties for electricity and for heat.
It's the ultimate tool in the toolbox.
Kevin: Which is why we used it all the time in lots and lots of stuff.
Ron: Right.
Kevin: Now we know it's bad for us.
So tell us what the risk is.
Ron: Basically, if it's sitting there and it's in good shape and you're not bothering it, it's not really a risk at all.
It's when it becomes friable and it starts to break up and become airborne.
Those little fibers that were so useful holding this material together now can get into your lungs.
A little bit of exposure is not going to kill you.
But over time, if you have that going on or if it's a big project, that big exposure, it's definitely dangerous.
Kevin: And the fact that it gets in your lungs and it'll never break down.
Ron: The things that make the asbestos so wonderful is also what makes it dangerous.
So what you have is you have it in your lungs.
Your lungs can't break it down, especially if you're a smoker.
It's even worse because your lungs don't function as well.
And then it could eventually lead to asbestosis cancer.
Kevin: Gotcha.
Okay.
So you've shown us before it starts off literally like something like this.
So from the ground it is mined and you just end up with it, pretty innocuous-looking.
Ron: Right.
That's mine tailings from Quebec, pretty much in a raw state.
Kevin: But then they take this and they either put it into materials or they press it and they make it into materials.
Ron: Right.
Kevin: So let's talk about some of the materials.
And again, we have to reiterate, if you have these things in your house, it's not necessarily dangerous.
Ron: Right.
Kevin: It's only when they're disturbed that it could become dangerous.
Ron: Exactly.
Kevin: Okay.
So what is this here?
Ron: That's just sheet flooring.
That's probably from the '50s, '60s, judging from the lovely pattern.
And the asbestos is primarily on the back of it right there.
And also with the glues and the mastics that they used.
For the sheet flooring, vinyl flooring, oftentimes they put the asbestos right in the glue.
Kevin: Gotcha.
And then tile, right?
Ron: Yeah.
That's your classic 9x9-inch tile.
It's all over schools and churches, even to this day.
Once again, if it's in good shape, it's not a problem.
But when it has to come up, it's got to be dealt with properly.
Kevin: And the asbestos can either be in the tile... Ron: Right.
Kevin: ...or in the... Ron: The black mastic or the mastic in general.
Kevin: Gotcha.
Alright.
And the little beads here, the little granulars.
Ron: The first bloated insulation.
It's called vermiculite.
Most of it was mined out in Libby, Montana.
The mine happened to have lots of vermiculite and lots of asbestos, so it came together.
You got a package deal whether you wanted it or not.
Kevin: So vermiculite is not necessarily a problem, but often if you have vermiculite, it comes with asbestos.
Ron: Yeah.
Kevin: And then this guy?
Ron: Transite panels.
It's like a cementitious asbestos board.
They used it almost like Sheetrock back in the day.
We see it in wall dividers in schools, mechanical rooms.
Again, it's super durable, it's super, super strong.
And also they have the same material used in outside -- if you have asbestos siding on your house.
It's flat, hard.
It actually breaks like a dinner plate.
That's your transite siding on the outside of your house.
Kevin: So if I have siding on my house or tiles on my floor and I want to know if they're asbestos or not, do I look at it and guess or...?
Ron: You want to have what's called a pre-renovation survey performed by a licensed inspector.
They'll come and actually cut out samples, send those to the lab, not samples of your 2x4s and things like that.
These are suspected surfaces of materials that could be asbestos.
Kevin: And only the technician in a lab can actually determine whether it is or isn't dangerous?
Ron: Right.
Kevin: Gotcha.
Okay.
So, we get the bad news that it is dangerous.
How do we mitigate?
What do you guys do?
Ron: We would come in basically to take out whatever you needed us to take out because you don't have to take it all out.
If you're doing a project, you're doing your kitchen and you have some asbestos in your basement, that's okay.
We're here to do the kitchen.
So we would isolate the kitchen.
We set it up all with plastic wrap.
We seal off the windows, the heating vents, make sure there's no air changing from our work area to the rest of the house.
Kevin: Gotcha.
Ron: HEPA-filtered negative air, which is that tiny microscopic filtration, and that's blowing all the dirty air through the filter and then blowing clean air outside.
And what that does is it keeps our work area under what's called negative pressure.
And that way, if there is a breach in our containment, we miss a spot here, the contaminants are not going into the rest of the house.
Kevin: Things are flowing in and out through the filter.
Ron: It's all about containment.
That's what we do.
And then plus, our guys are all protected too, with suits, respirators, so that they're safe.
Kevin: Contain the space, protect the space, protect the workers.
When they do their work, they get all this stuff up, how do you dispose of it?
Ron: It is a hazardous waste, so it does have to go.
And it's double-bagged into special bags that are marked according to regulations.
And basically they get taken off in dumpsters to hazardous waste sites that are specifically for asbestos disposal.
Kevin: So, again, not something the homeowner is doing themselves.
You guys test for it.
You guys mitigate it.
Ron: Right.
Kevin: Perfect.
Alright.
Well, we've appreciated all the help you've given us over the decades and obviously all the good information today.
Thanks.
Ron: Thank you so much, Kevin.
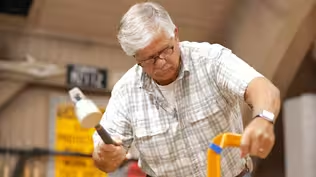
♪♪ Mark: Hey, Bill.
Bill: Good to see you.
Mark: Good to see you.
Bill, I absolutely love this house.
The old brick federal, they were really prevalent back in the late 1700s, early 1800s.
You have all the components that we look for in a brick federal.
We got the red brick.
You have the lime mortar, which lets all the materials move together.
Bill: We really love this house.
Not only is it beautiful, but we know so much history from a local historical society.
Mark: Oh, great.
Bill: It was built in 1833 by Captain James Parker Jr. and a local builder named Wilder Dodge.
Mark: Wow.
Nice.
Nice.
So during my walk around, I saw a couple areas that might need some minor work, but you sent me an e-mail about something specific.
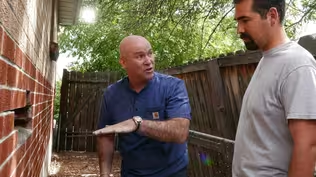
Bill: Yeah, right around the corner over here, there's a lintel repair that's in need of some attention.
Mark: Oh, boy.
I can see it right off the bat.
Look at that.
Bill: It sticks out like a sore thumb.
Mark: It sure does.
You have a museum piece right here.
This is a piece of art and should be repaired as such.
So a couple of things I noticed right away.
You can see the thickness of those joints, the color of the mortar not really working for me.
The sag.
So we're going to employ some modern-day masonry techniques, but of course we have to keep the character the same.
That means we're going to have to not only match the color of that mortar, but we're going to have to tool it exactly the way the rest of the house is tooled.
The first thing we want to do is get rid of the shutters, set up some stage so we can get to the work and work like gentlemen.
We're going to start from the top of the damage and work our way down.
We're going to take this brick and we're going to clean it as much as we can because we're going to reuse it.
♪♪ Okay.
♪♪ So there's our second wythe of brick.
You see that?
Bill: Mm-hmm.
Mark: Inside, they use what we call seconds.
If they get overcooked, that's where they put them.
They don't throw them away because everything's money.
Bill: Yeah, okay.
Mark: But they'll use them where you can't see them.
Okay.
And there's your third wythe of brick right behind that.
♪♪ Wiggle.
Wiggle.
Wiggle.
Alright.
So there's some water damage.
♪♪ ♪♪ So, Bill, we found a lot of positive things in here.
Unfortunately, we did find this nailer completely rotted.
So we do know we're getting water damage, but no worries, Bill.
We're going to pull that guy out and go from there.
Bill: Great.
Mark: Alright, Bill, the first thing we're going to do is put this wood back.
We're putting it back pressure-treated.
That way it won't rot out again.
And I'm going to drop this piece of flashing right over the window casing.
Bill: Okay.
Mark: And that'll protect it.
So blue side up.
And by the way, Bill, once the heat hits this flashing, there's a chemical reaction that happens that'll fuse this back side of the flashing to the wood.
And then we're going to get our mortar.
Get down.
We're using a type N mortar mix to lay the inner wythe of brick.
Now, Bill, just notice that I'm only doing the head joint.
Bill: Right.
Mark: I'm not going to do a bed joint on the wood nailer.
The mortar would just crack up.
And I just want to use a thinner margin trowel to get the mortar as deep as possible.
So this is adding a little strength, Bill.
Also adding a waterproofing aspect to those brick.
Bill: Okay.
Mark: This little piece of flashing is going to get tucked into that groove.
Once we tuck it in, I'm going to join it back up and make it solid.
And then we're going to put in our angle iron.
This will prevent sagging.
We just got to get it under that flash.
This steel angle iron is galvanized.
But the unfortunate thing is none of the other windows have it, so we do have to conceal it.
We're going to do that by using a brick which we call a lip stretcher.
Once we lay that in front like that, it's going to conceal this face lip right here.
See how it dips down?
Bill: Yeah.
Mark: And you can't see it straight on.
Alright.
So we're going to add one more piece of flash.
It's going to go up and under this blue flash.
This blue flash is going to sit down and then we're going to mix the mortar to match the rest of the house.
Alright, Bill, this is what I call the fun part -- mixing the mortar.
Now, normally I would use a type N because that's most compatible with the brickwork, but because we're on a historic house and it's a historic mix we're going to use what I have right here.
It's called restoration sand.
If you want to get your hand on it, you can see how fine that is.
Bill: Yeah.
Mark: It's a little bit finer than brick sand, but much finer than concrete sand, which is what we use from time to time.
The second bucket has the lime.
Again, that's what you mostly have here.
These little cups, they have Portland cement.
This is going to help me give it a little bit of strength, but it's also going to help me manipulate the color.
So to start with, we're going to use 2 1/2 gallons of sand.
I'm going to take half of what I have here for lime.
And then slowly turn it.
And, Bill, if you could do me a big favor and just go under the stage and grab just a piece of the original mortar.
Alright.
Thanks, Bill.
Okay.
Okay, so right off the bat, you can see how white that is.
Actually, if you look down to my bucket, doesn't it look similar already?
So we might be pretty close.
I might add a little bit of Portland.
And then I'm going to ask you to give me a little bit of water and maybe just a little splash to start with.
Keep going.
That's good right there.
And again, all I'm going to do is cut it in.
Alright, Bill, this looks like it's ready to go.
Let's try it out.
Bill: Exactly.
Mark: You want to pass me a half?
♪♪ Bring this in over my line.
Depending on the temperature, steel and masonry move differently.
So putting a bed of mortar on steel will cause the masonry to crack.
Keep coming, Bill.
Thank you.
As I say, mortar and steel, no deal.
♪♪ ♪♪ There you go.
Take your time.
A little bit low.
♪♪ Bill: Wow, that looks really great.
Mark: Alright, Bill, I'm glad you're happy.
The only thing I'm worried about is that haze.
But I know a good rain's going to take care of that.
So other than that, you're going to be good to go.
Bill: Awesome.
Thanks so much, Mark.
Mark: You got it, Bill.
Bill: Take care.
♪♪ Kevin: Next time on "Ask This Old House," Mauro refinishes an antique bench with an exterior-grade white wash. Mauro: This is the kind of look that we want, right there.
Kevin: Plus, Tom helps a homeowner repair a cracked double-pane window.
Woman: We did have somebody come out, and his suggestion at the time was to replace the whole unit, and then he gave us a price.
So, no more to be said about that.
Tom: Well, I can imagine that's very pricey.
Kevin: All that on "Ask This Old House."
♪♪


- Home and How To

Hit the road in a classic car for a tour through Great Britain with two antiques experts.


Support for PBS provided by:
Funding for Ask This Old House is provided by The Home Depot, Renewal By Andersen, and ChipDrop.