E5 | Lexington Modern | Gone Geo
Season 45 Episode 5 | 23m 42sVideo has Closed Captions
Framing begins for a new zero-threshold sliding glass door. Geothermal is explained.
A tour of the progress and upcoming changes are shared, including the new wall of glass with a zero-threshold sliding glass door to the back patio. Framing begins for the new slider. The geothermal heating and cooling system is explained, and back at the house, the wells are dug. At the front of the house, steel columns and a beam which will be the entrance's new focal point are being installed.
Problems playing video? | Closed Captioning Feedback
Problems playing video? | Closed Captioning Feedback
Funding for THIS OLD HOUSE is provided by The Home Depot and Renewal By Andersen.
Support provided by:

E5 | Lexington Modern | Gone Geo
Season 45 Episode 5 | 23m 42sVideo has Closed Captions
A tour of the progress and upcoming changes are shared, including the new wall of glass with a zero-threshold sliding glass door to the back patio. Framing begins for the new slider. The geothermal heating and cooling system is explained, and back at the house, the wells are dug. At the front of the house, steel columns and a beam which will be the entrance's new focal point are being installed.
Problems playing video? | Closed Captioning Feedback
How to Watch This Old House
This Old House is available to stream on pbs.org and the free PBS App, available on iPhone, Apple TV, Android TV, Android smartphones, Amazon Fire TV, Amazon Fire Tablet, Roku, Samsung Smart TV, and Vizio.
Keep Exploring

This Old House Insider Newsletter
Get This Old House exclusive stories, tips, and behind-the-scenes information delivered right to your inbox every month.Providing Support for PBS.org
Learn Moreabout PBS online sponsorshipKevin: Today on "This Old House"... Tom: We're framing a new section of the roof, installing a glass wall with four windows and a sliding door.
Kevin: We've got a 33-foot steel beam coming in.
It's structural, but it'll also give the front of the house a sleek, modern look.
Richard: And drilling begins today on the geothermal system that our homeowners in Lexington have decided on.
I'll show you exactly how they work.
♪♪ That's it.
♪♪ ♪♪ ♪♪ ♪♪ Kevin: Hey there.
I'm Kevin O'Connor.
And welcome back to "This Old House" and to our project here in Lexington, Massachusetts, where the big story for this house is accessibility.
And it starts right here at the driveway.
This is going to be a ramp for wheelchair access, and it will slowly ramp up right here.
It will also be covered exterior space.
So a steel post right here carrying a big steel I-beam coming all the way over to this corner so that you can wheel up here -- hey, Tim -- and approach to the front entryway.
You'll walk through the front door right here.
Behind you will be a dining room.
This is the proper entryway with a big mudroom coming off of the garage right here.
And then as you enter into the house, even though I'm taking a couple of steps down right now, eventually this floor will be at the same elevation all the way throughout.
You can see that Tim and his guys are still framing out this floor structure.
And then right in the center of the house here, this is the center hallway.
There's a staircase that's going to be going back in there.
You can see it with the stringer.
And then check this out.
Look at all the work that Charlie and Mark have done.
There is a mechanical room out front, and that needed to be connected to the back mechanical room.
So there is a tunnel running through this house so that we can connect it to this mechanical room right here.
The floor system will go up over here, which means we've got powder room and closets behind me, living room right here.
And then this is bedroom space.
And again, this floor level, same as the floor level out front and eventually filled in all the way through.
So lots of framing going on.
All the demolition is done except for one spot.
We've got a temporary wall here because this wall, this is all going away.
Hey, Charlie, Tommy, good morning.
Tom: Hey, Kevin.
Kevin: How are you guys doing?
Tom: Good.
How are you doing?
Kevin: Alright.
What are you up to?
Tom: Alright.
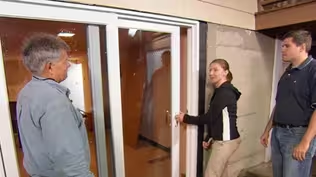
Well, we're going to remove that wall, as you said, because this is going to be a glass wall with a sliding door here and another door here that leads into a bedroom.
Kevin: Beautiful.
So that you can get out to the patio behind you.
Right.
I like it.
Tom: Now, the problem is, if you look at a conventional sliding door and you put it in, you have a step from the finished floor out to go up and over.
Kevin: Which we don't like because we want to make it accessible.
Okay.
Tom: What we want is to make it all level with the patio outside and the floor inside.
Kevin: Ooh, that's a nice look right there.
So how do you pull that off?
Charlie: This sliding door in threshold is designed to be recessed in the floor.
It has a built-in drainage system that lets the water through the threshold goes underneath to drain out on waterproofing, as well as a pan that we're going to install into a drainage system which will be in front of this door down and go into drainage, into the patio and out.
Kevin: Nice.
So we got to continue taking that wall down?
Tom: Yep.
Charlie: That's right.
[ Saw whirring ] Tom: See all these boards here got a lot of water damage from this point over here.
Well, there was a bathroom here and the wall wasn't prepped right to keep the humidity and the water from getting to the outside wall, causing it to rot.
♪♪ ♪♪ Charlie: Want to get that side?
♪♪ ♪♪ ♪♪ Tom: Alright.
I marked the floor for the new posts that are going to go in that are going to divide the glass panels.
So, you put those in there.
Now hold on to those so we can look at this.
So, inside the house, this temporary wall that's supporting it is actually going to be moved back about another foot and a half to widen the hallway.
So as you walk down the hall, it'd be like you're walking outside.
You're going to have two panels here, two panels here, and two panels there that will actually be the sliding door.
But what we're going to look at is this old sill right here.
As you can see, it's not pressure treated.
It's a piece of two by with a piece of one by on top.
Now, the new sill over here has been pressure treated, so I think what we want to do is take this piece off here, Kevin, and we'll take a look.
But I think we're going to end up changing that to pressure treated also.
Kevin: I'll get that out.
Tom: Okay.
So the next thing we want to do is cut this section of the floor and remove this top piece of the sill so we can recess the threshold down into the floor.
[ Saw whirring ] [ Hammer tapping ] [ Whirring stops ] Kevin: Alright, that one's up.
So if you guys can work on that, I've got an appointment with Richard, if that's alright.
Tom: Okay.
Charlie: Absolutely.
Tom: Got it.
Thanks for your help, sonny.
Alright.
Why don't you finish prepping for the sliding door, and I'll replace the rotted sill?
[ Saw whirring ] Charlie: I'm going to use the threaded masonry fasteners to secure it to the concrete.
If you don't get these sills set down nice and firm, you're gonna have trouble with the doors years later.
Tom: This piece of 3/4-inch subflooring will match up perfect with the other part.
[ Nail gun whirring ] Now we'll just trim off the excess.
[ Saw whirring ] Alright.
The existing overhang goes out two feet.
The new plan calls for the overhang to match the overhang over there, which is four feet.
So the new overhang has to go out another two feet.
So what we're going to do is we're gonna take some 2 by 10s, slide them in against these 2 by 10s called sistering, and they will stick out two feet.
Now with the overhang extended, we can install the header to support it all.
♪♪ ♪♪ I want to pick it up, 1/8 of an inch.
♪♪ ♪♪ ♪♪ ♪♪ ♪♪ Alright.
The beam's level, the posts are plumb, so the opening is plumb, level, and square.
Charlie: I'll tell you one thing.
That's three amazing openings.
All that glass out to the patio, it's going to be beautiful.
Tom: Right.
So we got to get the metal brackets on the posts, connections at the top and the bottom, get it sheathed on the outside, and we're looking good.
Charlie: Alright, I'll get them.
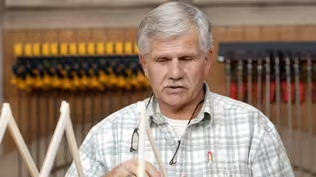
♪♪ Kevin: Billy and Michelle have decided on geothermal to heat and cool their home.
So to better understand the system, we've come to, well, sort of a laboratory of Professor Trethewey.
Richard: Welcome, students.
Kevin: [ Laughs ] Richard: How are you?
Kevin: I'm here reporting for duty, yeah.
Richard: [ Indistinct ] Let's do a little primer.
Kevin: Please.
Richard: A geothermal is just a heat pump.
Kevin: Right.
Richard: The important thing about a heat pump is they all basically work the same.
The only question is, is what is the source of the heat and what's the delivery method?
So it's always going to be air to air, air to water, water to water, water to air.
So the most common heat pump we know is air to air.
You've seen the condensers outside.
You'll see the high sidewall units.
Often it's just got refrigerant piping between the two and it either heats or it cools, end of story.
Kevin: And when you say air to air, that's because it's getting or dumping the heat from the air outside... Richard: Absolutely.
Kevin: ...to condition the air inside.
Richard: Absolutely.
Now, we also see that you might have a unit outside that could be for multiple indoor units.
And inside you might have something that almost looks like a furnace with ductwork that goes to the building and then these high sidewall -- There's no limit to the types of delivery methods inside, and they work fine.
The issue is when it gets colder outside, these have to work harder and harder.
You know, most of the year we want 70 degrees inside.
And when it's 70 outside, there's no heat loss and it's simple.
Kevin: I can do that.
Richard: You could.
We live here in the northeast corner of the United States, so it might get to be 100 degrees on a terrible day.
You might get to be zero, or even we, once in a while, see minus 10 around here.
Kevin: Right.
Well, you can see why if you have to go from something like -10 to 70 degrees, that's 80 degrees you've got to make up, so you'd probably have to work really hard.
Richard: Correct.
Now, down below the ground, after you go about four or five feet, it's about 50 degrees.
Kevin: All the time.
Richard: All the time.
Kevin: Every day.
Richard: So now, if that's the case, you could introduce a water to water or water to air geothermal heat pump.
To tap into that constant 50-degree temperature, a series of wells would be drilled down several hundred feet.
And there's a pump, and then this would come up here and go into the building right here.
Now, inside the building, it would be a lot different looking unit.
Kevin: And so just so that I understand, going from 50 degrees to 70 degrees, moving that 20 degrees is a lot easier than moving the 80 degrees here, so this is good.
Richard: And that's really the key, Kevin.
We're trying to move it.
We're not trying to make it.
We're trying to move it, and so we can find the 50 and easily pump that thing up to get the building to 70.
Kevin: Gotcha.
Richard: The piping runs into this water-to-water geothermal condensing unit, which gives us a lot of advantages.
We want the system to be able to heat and cool different parts of the building at the very same time.
Kevin: Right.
Richard: So for that, we're going to introduce two tanks.
One's a hot tank, one's a cold tank.
Kevin: Storage tanks, essentially.
Richard: Absolutely.
So now what happens is you can send heated water up to the coil in the air handler right here.
So too on the cold water side, it goes up here.
Kevin: Mm-hmm.
And when I compare an air-source heat pump to a ground-source heat pump, we like this one better, is more efficient, less efficient?
Richard: They both will work on the coldest day of the year.
It's when you start talking about efficiencies in colder weather.
As this chart shows, when the outdoor temperature drops, the air source heat pumps have to work a lot harder to reach the desired indoor temperature, while the geothermal system remains at its high efficiency because you're not subject to the vagaries of changes of outdoor temperature.
Kevin: So now you've made the house comfortable.
Thank you for that.
I still want to take a shower or run the dishwasher.
Where do I get my hot water from?
Richard: Well, this beautiful buffer tank, the storage tank's storing BTUs.
We've ordered it with a heat exchanger inside it so that we're going to take some heat off of the heat pump through this coil.
Potable water will come through here.
And now that's going to be hot enough to make the faucets hot enough.
But we also have all these -- all these pumps and all the equipment, so in the mechanical room, there's always temperature, you know, in here.
So now what we're going to do is add the last component, which is a heat pump water heater that will find the heat that's in that air, transfer it down into this tank, which will act as a reserve tank and help in the production of domestic hot water.
Kevin: Wow.
And so the equipment is what we're looking at here?
Richard: Here's our lineup.
Here's our geothermal heat pump.
This is one of two that we'll have in the building.
I, for simplicity, just have the one.
Compressor, expansion valve, reversing valve inside here.
You can see there's tappings right here.
This goes out to our wells down -- It could go 400 or 500 feet.
This goes to our piping inside the building, to our load.
Now that'll come up to the radiant, but also we'll go to air handlers.
This is a really smart blower that can spin at different speeds coming out through the ductwork.
Here's the cooling coil.
Chilled water will go through this coil back and forth.
Air will be drawn across it.
And in cooling mode, it'll take heat out of the air, thereby cooling the air.
Anytime you air condition or chill the air, there's going to be condensate.
So there's a condensate drain for that.
Here's the hot water coil right here.
So air -- Turn on the thermostat on this zone, air gets drawn in through the hot water coil.
The decision is made between heating and cooling.
The air comes out at the right temperature here.
And every part of the building can be individually zoned.
Kevin: And then your -- Richard: Be two tanks, a big blue tank and a big red tank.
They won't be, but that -- One's the buffer tank called -- They both look very similar, but the hot water tank is going to have an additional piece I mentioned.
This is the heat exchanger inside of it.
So now this stores all these BTUs ready to go for the heating, but it also has the coils inside of it.
The potable water will come through here and it'll now come out heated.
And now that last step is you got all that heat in the mechanical room.
This heat pump comes on, pulls that heated air in, transfers again through that same refrigeration cycle that's in every heat pump, transfers it down to the tank so we haven't wasted any energy anywhere along the line.
Kevin: Sounds super efficient.
Why don't we see them all of the time?
Richard: Well, I think it's the first cost.
I mean, this is a fair amount of equipment.
It has to be installed right.
It has to be done professionally.
It has to be sized right.
It has to be done generally by an engineer.
I happen to know a really good engineer.
So I can offer him to you.
Kevin: Do you?
If you could get him to our house, that would be terrific.
Richard: Alright.
Kevin: Awesome.
Thank you, Professor.
Richard: Alright, brother.
Kevin: Is there gonna be a test?
Richard: No test for you.
Kevin: Good.
Thanks.
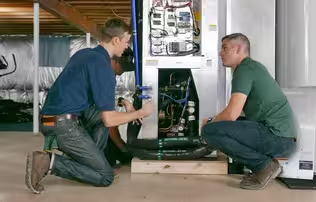
♪♪ ♪♪ ♪♪ Charlie: So, Ross, you are the engineer on this project for our heating and cooling.
Where do you start when you're designing a system like this?
Ross: After doing the energy model, which takes into account things like square footage and insulation, I engineered a geothermal system that will efficiently heat and cool the home.
As a reminder, no matter what the air temperature is outside, once you get around 20 feet below the surface, it's always about 50 degrees.
In order to tap into that constant temperature here at this project, we need to drill four wells down to a depth of 500 feet each and 20 feet apart.
That spacing is important to minimize the thermal interference from one well to another.
And today we're going to start drilling.
Charlie: Well, here's a drill bit very similar to what we're going to be using.
Ross: That's right.
So most people think it's like a screw, like an auger, but in fact, it's actually pulverizing the rock.
So it's actually hitting it about 30 times every second.
And as it's doing that, it pulverizes the rock and spins at a slow rate to move through the earth.
Charlie: And on this end, a water-air mixture goes through... Ross: That's right.
Charlie: ...and it comes out these ports here.
Ross: That's right.
Right there.
Yep, and so it's going to move that pulverized rock up to the surface.
Keep the dust down, keep the drill bit nice and cool.
Charlie: In this town, we have to be a minimum of 25 feet from the street and 10 feet in off the property line.
And that lines up perfectly to put the wells right here.
Ross: Right here.
Four in a row.
♪♪ ♪♪ The tungsten carbide drill head is attached to a 20-foot shaft.
And once they've drilled down that 20 feet, another 20-foot shaft gets added to the stack and the drilling continues.
♪♪ Here at the site, we are drilling through layers of soil and then into bedrock.
To prevent the soil portion of the well from caving in, they insert a steel casing to hold its shape.
Once we hit bedrock, we don't need to add any casing because the bedrock itself creates its own borehole.
♪♪ ♪♪ Later, a loop of high-density polyethylene pipe filled with antifreeze and water will be inserted into each hole.
♪♪ Then they'll pump in a grout mixture to completely encase the loop of pipe.
That grout will help conduct the heat between the earth and the loop pipe.
In the warm weather, the geothermal heat pump uses that constant 50-degree temperature to cool down the loop pipe and warm it up in the winter.
♪♪ Charlie: By my calculations, it's only 470 feet to go.
Ross: And three more wells.
Charlie: Well, let's get them going.
Ross: Alrighty.
♪♪ ♪♪ ♪♪ Charlie: Well, we've made a lot of progress today.
The framers have been working hard.
Tom: Yeah.
All the walls that were ready to go up went up.
Charlie: Yeah.
Tom: They're really making good progress.
Charlie: Got the footing back filled.
It'll carry our steel column.
Tom: Yeah.
This is going to do a lot.
About five or six feet down is a footing bigger than this footing because there's going to be a steel column on there that's going to go up, and it's going to be a big beam that's going to run... basically follow the pitch of the roof and it's going to rest on a steel column that's going to be bolted right to the top of that foundation.
It's pretty interesting.
I mean, these steel beams, I mean, that one there is 33 feet long.
It's about almost 900 pounds.
And the interesting thing about it, it's going to be a focal point to this modern house.
It's going to bring your eye to the front of the house.
It's going to show a pitch of the roof.
And over this column, the beam is then going to taper up at the bottom of it to give it a thinner look at the very front.
Charlie: That's right.
And ready to install now.
Tom: Yeah, I love it when these things go in.
Bring the column up over the trees.
There's a line that's dangling so they can grab it to guide it once it comes down.
And setting the first column on top of the foundation, positioning it in a right angle.
[ Drill whirring ] Now we gotta drill a 3/4-inch hole down through the plate into the concrete so that can be bolted right in place.
Pushing the threaded rod into the wet epoxy.
Get it down as deep as you can.
Once that epoxy is set, it's stronger than the concrete itself.
Alright.
Ready for the second column.
♪♪ ♪♪ Charlie: Alright.
This column is set where it has to go.
Let's start drilling.
♪♪ ♪♪ ♪♪ Tom: Give that epoxy about 15, 20 minutes to set before you tighten it up with the wrench.
Charlie: Alright, let's go grab that steel beam next.
Tom: Okay.
♪♪ ♪♪ ♪♪ ♪♪ ♪♪ I like the look of the twin columns there and that beam.
And now they can start framing the roof.
Charlie: Yeah, it looks real sleek.
Tom: Yeah.
What do you got coming next?
Charlie: Well, we're gonna start blocking in the bathrooms, and hopefully Heath is going to start the electrical.
Tom: Perfect.
Till next time, I'm Tom Silva.
Charlie: And I'm Charlie Silva.
Tom: For "This Old House."
Really coming together now.
Charlie: It really is.
♪♪ Kevin: Next time on "This Old House"... Tom: When building any bathroom, we always put blocking in for grab bars.
Here in Lexington, we're adding extra blocking to meet the residents' needs.
Woman: This is going to be customized actually to extend all the way to the door.
So as soon as he comes in the door, he has something to hold on to.
Heath: And the homeowners want to use the existing receptacle locations in the existing brick walls.
Mark: And because these walls are exposed, we can't damage the brick.
Heath: So, are you up for the challenge?
Mark: Let's go.


- Home and How To

Hit the road in a classic car for a tour through Great Britain with two antiques experts.


Support for PBS provided by:
Funding for THIS OLD HOUSE is provided by The Home Depot and Renewal By Andersen.