E6 | Double Pane Window, Paint Bench | Ask This Old House
Season 22 Episode 6 | 23m 42sVideo has Closed Captions
Mauro whitewashes an outdoor bench; Tom repairs a double pane window.
Mauro Henrique shares the importance of prep work for any painting project, and why homeowners shouldn't skip it. Then, Mauro and Kevin O'Connor team up to refinish an antique outdoor bench with a whitewash stain; With a glass expert's help, Tom Silva learns how double pane glass is made while helping a homeowner repair a broken window.
Problems playing video? | Closed Captioning Feedback
Problems playing video? | Closed Captioning Feedback
Funding for Ask This Old House is provided by The Home Depot, Renewal By Andersen, and ChipDrop.
Support provided by:


E6 | Double Pane Window, Paint Bench | Ask This Old House
Season 22 Episode 6 | 23m 42sVideo has Closed Captions
Mauro Henrique shares the importance of prep work for any painting project, and why homeowners shouldn't skip it. Then, Mauro and Kevin O'Connor team up to refinish an antique outdoor bench with a whitewash stain; With a glass expert's help, Tom Silva learns how double pane glass is made while helping a homeowner repair a broken window.
Problems playing video? | Closed Captioning Feedback
How to Watch Ask This Old House
Ask This Old House is available to stream on pbs.org and the free PBS App, available on iPhone, Apple TV, Android TV, Android smartphones, Amazon Fire TV, Amazon Fire Tablet, Roku, Samsung Smart TV, and Vizio.
Keep Exploring


This Old House Insider Newsletter
Get This Old House exclusive stories, tips, and behind-the-scenes information delivered right to your inbox every month.Providing Support for PBS.org
Learn Moreabout PBS online sponsorship♪♪ Kevin: On "Ask This Old House," our experts travel across the country to answer questions about your house.
♪♪ Today, Mauro refinishes an antique bench with an exterior-grade whitewash.
Mauro: This is a kind of look that we want.
Kevin: Plus, Tom helps a homeowner repair a cracked double-pane window.
Kate: We did have somebody come out, and his suggestion at the time was to replace the whole unit.
And then he gave us a price.
So no more to be said about that, right?
Tom: I can imagine that's very pricey.
Kevin: On "Ask This Old House."
♪♪ Mauro: Well, for any painting project, preparation is a must.
85% of any painting project is into the preparation.
If you're trying to skip on the preparation, you're not going to have that nice painting job that you hope to achieve.
So prep, prep, prep all the time.
So the preparation is what takes a little longer, but it's worth it.
Woman: Oh, great.
Mauro: Well, one of the first steps when we start prepping is make sure, even before you start your project, that the surface is clean and the surround is clean because you do not want to raise any dust.
We clean that up.
And then I'm going to use the tape.
Painter's tape is very useful.
Make sure you press down on the edges really firm.
Woman: You make it look easy.
Kevin: So you are taping to protect from drips and runs and stuff?
Mauro: Absolutely.
I don't want anything to drip on the areas that we don't have to touch.
Kevin: Perfect.
Mauro: So, we use tape all the time.
It's nothing wrong with that.
We use tape to protect surface.
We use tape to make sure the paper is secure on the floor.
We protect everything, and everything that you protect most of the time requires painter's tape.
Then we're going to tape the sink and the vanity and the toilet with the plastic sheeting.
For furniture, I like to use a very thin plastic sheeting that you can put on top of delicate stuff.
And for floorings, I like to use a canvas drop cloth.
It is a lot of work, but, you know, once you get it all set, once you protect everything, once you get all your preparation done, painting goes fast.
You apply your first coat, you let it dry for five, six hours.
And you can get a second coat.
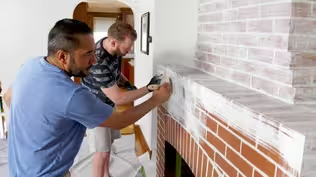
Wow.
Look at this fireplace.
Woman: It's amazing.
Mauro: That's how paint works.
Prep, patience, use a good, quality paint.
For anything that you're going to do, specific on painting, prep work is a must.
♪♪ Kevin: Hey, Mauro.
Mauro: Kevin.
Kevin: Look at this gem.
What's the story behind this?
Mauro: I got a little funny story to talk about this.
I just finished this nice project here in town, and when we're all done, usually we walk around with the homeowners to see if there's anything to do.
But she said, "I don't see a place that this thing will fit anymore.
Do you want to take it home?"
Kevin: Ooh!
Mauro: And I say, "Geez, I don't know about that."
Kevin: [ Laughs ] Mauro: But I'm a nice guy.
I said, "I'll bring it home with me."
Kevin: Yeah.
Mauro: Brought it home.
Drop it out, wife look at it.
I say, "Look what I got for you."
She said, "What is this?"
It's an antique bench.
Kevin: Yeah, alright.
Mauro: And she said, "Alright, let's keep it."
Kevin: So she agreed to keep it?
Mauro: She agreed to keep it.
And then I said, "Maybe we can do, like, a whitewash paint on it."
Kevin: Nice.
Mauro: And we'll keep it.
Kevin: Well, I'm down for learning how to do whitewash.
I've not done it before.
I presume there is prep involved as well though?
Mauro: There's some prep.
First thing we're going to do, we're going to hit it with the sandpaper, open up the grain a little bit so the whitewash stain can get a good penetration to it.
Kevin: I'll help you sand.
Mauro: Ready to go?
Kevin: So we're definitely not trying to get it down to bare wood?
We can leave some of this color on here?
Mauro: We can leave some of the color on.
That's not a problem.
That will actually help us out.
Kevin: It's got a little hatch here, a little storage.
[ Indistinct conversation ] Mauro: It's also kind of -- We can also remove that if you like.
Kevin: Oh.
Mauro: Like that.
Kevin: What do you think?
Mauro: I think it looks good.
I think we've done enough sanding already.
Kevin: Yeah.
I don't know why they call it painting.
They should call it sanding.
Mauro: Yeah, well, remember one thing.
It's preparation.
85% is prep.
Kevin: I know.
I'm aware.
Mauro: Alright.
Kevin: So how do you want to clean this up?
Mauro: Now what we're going to do, we're just going to vacuum up all this dust out.
[ Vacuum running ] Kevin: Feel good?
Mauro: All good.
It looks good to me.
Nice and clean.
No dust.
Kevin: Alright, now you got to teach me how to whitewash.
Mauro: Let's do this.
You're going to love it.
♪♪ Well, Kevin, now we're going to mix the stain that we're going to use to do this work here.
Kevin: So you're going to stain this?
Mauro: We're going to stain that, but we're going to do a mix.
Kevin: Okay.
Mauro: We're going to mix two parts, two parts of white and one part of light gray.
The gray in there.
That's good enough.
Kevin: So we got the white and the gray.
You can sort of see the contrast right there.
Mauro: It's going to look fantastic.
Now, this is the key point.
We're going to add some water to it.
We're going to turn this down so we can call it like a whitewash.
Going to add some water.
Alright.
Now let's mix and see the viscosity of it.
Kevin: Did you just throw viscosity at me?
Mauro: Viscosity.
Oh, yeah.
Kevin: Look at you.
Mauro: Look at that.
Kevin: So as I watched you pour it in there, that was almost like half part water to stain.
Maybe a little bit more than half water to stain.
Is that about right?
Mauro: We call about, I would say the whitewash, the base formula for that is like 50 and 50.
Kevin: Yeah.
Mauro: The consistency we're looking for is to be very transparent when we apply it to the bench.
Right?
We want to see a little bit of color and a lot more wood.
Kevin: Right.
Mauro: Alright, Kevin, I think we're right at the point that this looks very good.
Kevin: It's watery.
It's definitely watery.
Mauro: Yeah, it's going to drip and run.
No worry about that.
Well, let's give it a try.
Kevin: Okay.
Mauro: If we need to make anymore adjust, water is right there.
Here we go.
Kevin: Ooh, that's a lot of coverage.
Mauro: That's a lot of coverage.
We can always adjust.
This is the look that we want right there.
Kevin: Right here.
Mauro: Remember one thing.
Once it goes outdoor, it will fade even more.
And one thing, too.
I like to go back with the rag.
Kevin: Yeah.
Mauro: So I can wipe some off at the same time blend in the finish.
Kevin: So, whitewash versus limewash.
Sometimes I hear them used interchangeably.
Are they different?
Mauro: Well, they have some similar looks once it's done, but in the limewash, we have the limestone powder mixed with the water.
But the technique that you use for limewash is different from this one here and also the paintbrush that you use.
Kevin: What would you use if you were doing a limewash?
Mauro: With the limewash, you would use a box brush, which is a thicker brush.
And I can show you that.
It's this one here.
It holds a lot more material, and it's -- for the pattern that you want to have, that's the kind of brush that we use for limewash paint.
Kevin: In terms of sort of performance, when it's all dried up, differences between how limewash holds up versus the whitewash, which is stain-based?
Mauro: It holds up the same way.
Okay?
But the limewash, usually if you're doing an interior limewash, you want to put like a sealer coat on top of that.
Kevin: Sealer coat?
Mauro: A sealer coat to protect the finish.
Kevin: Okay.
I hear you talk about inside a lot when you're talking about limewash.
Can you use limewash if you had an outdoor piece?
Mauro: You can, absolutely.
You can use limewash on interior and exterior surfaces.
Kevin: I'm not going to lie, Mauro.
This is my kind of painting.
It's very forgiving.
[ Both laugh ] I mean... Mauro: It's easy.
There's no cutting line.
Kevin: There's no cutting line.
Mauro: There's nothing here.
But just see the look that we have here in the front.
It's perfect.
If you see a little more paint here, that's fine.
It's part of the patina.
Kevin: Yeah.
Yeah.
Mauro: Eventually, once it goes out the door, everything will fade.
It will blend even more.
Kevin: I feel like a third grader.
I can put it on in any pattern I want.
I can wipe it off.
Mauro: Anybody ask for a paint job say, "Well, whitewash paint is the best way to do it."
Kevin: I only whitewash.
Mauro: [ Laughs ] ♪♪ ♪♪ ♪♪ ♪♪ Wow.
Here you go.
Kevin: Yeah.
So it definitely takes on a different color as it dries and sets up.
Mauro: Look at this.
Kevin: Put your seat back right there.
Mauro: Once it dries, we can see the look that we wanted.
We see gray.
We see white.
We see wood.
We see it all.
Kevin: So are you happy with this?
Mauro: I'm super happy.
I'm really happy.
And this thing is ready to go back home.
Kevin: Beautiful.
Going to love it.
Mauro: Alright.
Nice cushion in there.
Sit down.
Relax.
Perfect.
Kevin: Good deal.
Alright.
Mauro: Alright.
We're good.
Thanks for your help.
Kevin: My pleasure.
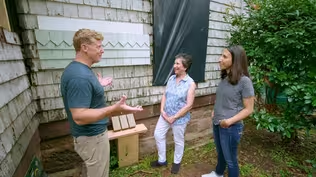
♪♪ Tom: I'm on my way to look at a window with a cracked glass.
Homeowner wrote and said that she has double-pane windows and one of the glass in one of the units is broken.
Now, a lot of homeowners think that we have to replace the entire unit.
Well, in some cases that's true.
But there are also manufacturers out there that will make you a sash only.
So you give them the window dimensions, they make the sash, and you can put it in good as new.
There are also companies out there that will make just the glass to fit into the sash that you have.
But you have to be able to take that sash apart to do it.
So we'll know more when we get there.
And I'm hoping it's one of the last two options.
♪♪ Kate: Hi, Tommy.
Tom: Hi, Kate.
How are ya?
Kate: Nice to meet you.
Tom: Nice to meet you.
So tell me, you wrote me about a window problem.
Kate: I did.
I did.
Well, it was one of those really cold winter days, and I went to lift up my shade on my window and look what I found.
Tom: Oh.
The glass is busted or cracked.
Kate: Yeah.
Yeah.
At first I thought it was outside, but apparently it's inside.
Tom: Yeah, it's definitely on the inside pane.
So, what you have here is a double-pane window, which means there's a piece of plate glass on the outside and the inside but the inside of the glass is filled with argon gas.
Argon gas is very dense and heavy, but it's also a good insulator because the glass is very inefficient.
Unfortunately, with expansion and contraction, quick temperature changes and all that kind of stuff, the glass could crack or fail.
The seal and the gas will fall out and that warm air in the wintertime that's swollen with moisture is always trying to get to cold.
It will migrate into the cracks and the window will fog up.
Kate: Wow.
Yeah.
Tom: But I don't see that it has fogged up.
Kate: Yeah, I haven't noticed that.
Tom: Right.
But all the gas has escaped, and this is the problem with these windows because lots of times you have to replace the whole unit.
They'll say, "Well, we don't have the sash."
Kate: Right.
Tom: You have to replace the units.
There are companies that will sell you just the sash.
Kate: Yeah.
Well, we did have somebody come out, and his suggestion at the time was to replace the whole unit, which -- and then he gave us a price.
So I -- No more to be said about that, right?
Tom: I can imagine that's very pricey.
Yeah.
Yeah.
Well, luckily I work with a glass company that's worked for us for many years, and they offer a system where they can come in and measure the glass.
Kate: Right.
Tom: They can take it out of that old sash and put a new piece in.
Kate: Oh, that would be great.
I mean, instead of the entire window, imagine the money we're going to save.
Tom: You're going to save a lot.
Kate: Yeah.
Tom: Hopefully he can do it.
Kate: Great.
Tom: Kate, I'd like to introduce you to Rich, our glass specialist.
Kate: Hi, Rich.
Rich: Kate, nice to meet you.
Kate: Nice to meet you, too.
Tom: He is the man that is going to fix your problem.
Kate: He's going to be my solution for the day, huh?
Rich: I hope so.
Tom: You brought a sample for us.
Rich: I did.
I brought a little cross-section of what a insulated glass window would look like.
This is a typical application.
What you'd have, you'd have two pieces of glass with a metal banding in the middle, and then there's some glue on the outside surface that doesn't allow the moisture to get through.
Tom: So what caused the failure of a window in most cases?
Rich: Most of the time, Curtains.
Tom: Curtains?
Rich: Curtains.
By dropping the curtains down, it doesn't allow the heat to travel through both panes of glass and traps it.
A lot of times it can crack glass if it gets too hot or it can break the seal in between the two pieces.
Kate: Uh-oh.
I think I know the culprit.
[ Laughs ] Tom: Ah.
Kate: I have a cellular shade inside and I -- certainly in the wintertime to keep the heat in, I just assume keep it down as much as I can.
Rich: Yeah, you're best off having it, if you can, open a little bit to allow the heat to transfer through.
When it comes down right behind it, it starts to bake the unit and makes the glue hot and it'll start to separate the glass from the actual banding itself.
Kate: Is that going to match what I have on my windows right now?
Because it looks like I definitely have a tint on there already, so will it blend in pretty easy?
Rich: So, one of the glasses is regular clear, the other one has a Low-E coating on it.
So basically what Low-E does, it basically stops the UV rays from coming in, reflects them out and puts them back to the outside.
It helps to try to eliminate or cut down on fading of the furniture and things like that.
Tom: And that goes on the interior of the glass.
Rich: Exactly.
So in this application, you have four surfaces -- one, two, three and four.
The Low-E would be on the third surface, which would be the inside layer.
Tom: Alright.
So how do you get started?
Rich: Well, we need to take some measurements and take it from there.
Tom: Alright.
Let's see you do it.
Rich: So, I'm just measuring the width and the height of the glass.
And after we get those measurements, we have to get the thickness of the glass.
I just use this little caliper.
Tom: Alright, Rich, you have everything you need?
Rich: We got everything we need.
We're all set.
Kate: Perfect.
Tom: Okay, so what's next?
Rich: So we'll send all the sizes to the glass manufacturer.
As soon as we get it back, we'll give you a buzz and we'll set it right up for you.
Kate: And how long, Rich, do you think it'll take?
Rich: Probably a couple weeks.
Kate: Okay.
Sounds good to me.
Tom: You'll call us ahead of time?
Rich: I'll let you know as soon as it's ready.
Kate: Alright.
Thank you.
Rich: Alright.
Tom: See you soon.
Rich: No problem.
♪♪ Tom: Double-pane glass is manufactured in a facility just like this all across the country.
♪♪ Alright.
The first thing that has to happen, the glass has to get loaded onto this machine.
The dimensions are entered into the computer, which tells the cutter where to score the glass.
♪♪ Once all those dimensions are in there, the computer takes over, scores the glass, the guys come, pick the glass up and it snaps to size.
Because this is insulated glass, we need two pieces the exact same size.
♪♪ Now we need to make the metal frame that holds the two panes of glass together to create that space.
We take the measurement and then we fold it all the way around.
Then there's a clip that holds it together.
Next is to drill the frames to install a desiccant insulation on the inside perimeter of the metal frame.
♪♪ Then on the outside perimeter of the metal frame, a sealant will be installed to hold the two panes of glass together.
♪♪ Alright.
The next step in the process, they want to really deep-clean that glass.
So this machine, they put it on a roller, it rolls into here with these giant scrubbers that scrub the glass and a blower right here to blow all that water off.
They want to make sure there's no imperfections in that glass when the window goes in.
And this is where the two panes of glass come together.
Marcus put a metal frame around that window and it stuck to that pane of glass.
Now it's going to go into the opening and that machine will push the two panes of glass together.
But before they go nice and tight, argon gas is injected up, which creates an insulated window.
♪♪ Now that the two glass panels are made into one unit, it's time for the final step -- to manually install a bead of polysulfide around the perimeter.
♪♪ Now our glass is ready to be transported to a window or glass door, just like Rich's, to be installed.
Hey, Kate.
Kate: Hey, Tommy, Rich.
Good to see you.
Tom: We're back.
Rich: Good to see you.
Tom: And there's your window.
Kate: And a brand-new window.
Oh, wow.
That looks great.
Tom: No crack, ready to go in.
Alright.
How do you want to get started?
Rich: So, the easiest thing -- I'll take the sash right out.
We'll put it on the table and we'll cut it right out.
Tom: Okay.
I'm going to put this over here and I can give you a hand.
Rich: Awesome.
Tom: You ready?
I got this.
We'll put it right on the table.
Rich: Yes, sir.
Tom: Alright.
So next, you're going to remove the trim?
Rich: Yep.
Tom: Nice the sash has that stop like that.
Rich: Yeah.
It makes life a lot easier when you have a removable vinyl.
Tom: Yeah, a lot of windows you can't do anything about.
Rich: Especially the new ones nowadays.
You can't even remove the glass from the actual sash they made, so they don't.
Tom: Really?
Rich: So by having a sash like this, it makes it a lot easier to replace the glass.
You don't have to replace the whole frame and everything.
Tom: Nice.
Came out pretty easy.
Rich: Yeah, so far, so good.
So the next step, we'll have to roll it down.
So if we want, we'll pick it right up.
Just watch out for the broken glass.
Tom: Yeah.
Rich: We'll turn it right down.
Tom: So we got to cut the seal there, right?
Rich: Yep.
So in between the vinyl and the glass, there's a silicone joint there.
So we just use a very thin knife and we'll cut right through it.
Tom: Perfect.
Rich: Let's see if I can just get... Alright, so now that we got the glass out and everything cleaned off, we just got to run the silicone joint so we can set the glass into the wet silicone and seal it right up.
Tom: Alright.
While you're doing that, I'll go get the glass.
Rich: Alright, so we have the glazier side-in sticker down, so that's where the glass is going to go, so... Tom: Okay.
We don't have any of these stickers in the way of the edge, right?
Rich: It should make it.
And set it straight down.
Tom: There it is.
Rich: Alright.
So what I'm going to do is take off these and we can start putting the moldings on.
Alright.
So, these have an interlock that locks into the frame.
So we have to basically put this right into the actual frame and tap it right in and it will lock right in.
Tom: Slide right in.
Rich: Yep.
Tom: Alright.
We'll do this side first.
Rich: Yep.
Perfect.
Tom: Alright, it's all set, ready to go in, right?
Rich: All set, yeah.
Tom: Okay.
You want to carry it over?
Can you line it up?
Rich: Yep.
Tom: Tell me where you need it.
Rich: Close it just a little bit towards me, Tom.
There we go.
Tom: Nice.
Okay, now the top.
Alright.
Looks good.
Rich: Yeah, thank you.
Kate: Hey, Rich.
Hey, Tom.
Rich: Hey, Kate.
How you doing?
Tom: Hey, Kate.
What do you think?
Kate: Oh, my gosh.
It looks wonderful.
Tom: Can't tell which one it is.
Kate: I can't.
No.
If I can't, nobody else will, right?
Rich: It means we did our job right.
The only thing, if you could leave it latched for 48 hours till the glue can dry and it takes shape, then everything should be all set.
Kate: Okay.
And then after that, no problem cranking it open, nothing else I have to be aware of?
Rich: Shouldn't have any issues whatsoever.
Kate: Okay.
Wonderful.
Well, thank you so much.
Rich: No problem.
Thank you, Kate.
Kate: Oh, my gosh, saved us a lot of time and money.
Tom: Well, that's it for now and for this project.
So if you've got a project at your house, we'd love to hear from you.
Until next time, I'm Tom Silva for "Ask This Old House."
That was pretty quick and easy, huh?
♪♪ ♪♪ O0 C1 Kevin: Next time on "Ask This Old House," Jenn heads to Portland to install a rain garden.
And Ross shares how moisture meters can help you identify potential water damage.
Then Mark improves the safety of a homeowner's concrete steps by installing an iron railing.
Mark: Alright.
Man: Looks good.
Mark: Yeah, looks great.
Kevin: All that on "Ask This Old House."


- Home and How To

Hit the road in a classic car for a tour through Great Britain with two antiques experts.


Support for PBS provided by:
Funding for Ask This Old House is provided by The Home Depot, Renewal By Andersen, and ChipDrop.