E6 | Lexington Modern | Reworked and Rewired
Season 45 Episode 6 | 23m 42sVideo has Closed Captions
Geothermal pipes are run, wood blocking is installed, and receptacle boxes are replaced.
The project house is progressing with an eye toward accessibility and the mid-century modern aesthetic. Geothermal pipes are run from the wells into the house. Wood blocking is installed for the future mounting of assistive devices. The new floor system allows for running new electrical wires without being visible. Old receptacle boxes in the original brick walls are replaced without damage.
Problems playing video? | Closed Captioning Feedback
Problems playing video? | Closed Captioning Feedback
Funding for THIS OLD HOUSE is provided by The Home Depot and Renewal By Andersen.
Support provided by:

E6 | Lexington Modern | Reworked and Rewired
Season 45 Episode 6 | 23m 42sVideo has Closed Captions
The project house is progressing with an eye toward accessibility and the mid-century modern aesthetic. Geothermal pipes are run from the wells into the house. Wood blocking is installed for the future mounting of assistive devices. The new floor system allows for running new electrical wires without being visible. Old receptacle boxes in the original brick walls are replaced without damage.
Problems playing video? | Closed Captioning Feedback
How to Watch This Old House
This Old House is available to stream on pbs.org and the free PBS App, available on iPhone, Apple TV, Android TV, Android smartphones, Amazon Fire TV, Amazon Fire Tablet, Roku, Samsung Smart TV, and Vizio.
Keep Exploring

This Old House Insider Newsletter
Get This Old House exclusive stories, tips, and behind-the-scenes information delivered right to your inbox every month.Providing Support for PBS.org
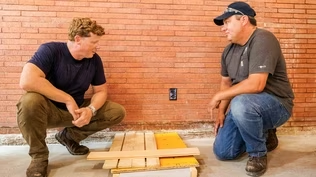
Learn Moreabout PBS online sponsorshipTom: Today on "This Old House," when building any bathroom, we always put blocking in for grab bars.
Here in Lexington, we're adding extra blocking to meet the residents' needs.
Heath: And the homeowners want to reuse the existing receptacle locations in the existing brick walls.
Mark: And because these walls are exposed, we can't damage the brick.
♪♪ ♪♪ Man: Ahh.
That's it.
♪♪ ♪♪ ♪♪ ♪♪ Kevin: Hey, there.
I'm Kevin O'Connor.
And welcome back to "This Old House" here in Lexington.
Let's get up on the lift so we can have a better look at the progress that we have made.
So, our homeowners have taken on this 1960s renovation with an eye towards accessibility, and they are doing a ton inside the house to that end, including adding an elevator.
But in the process, they also wanted to stay true to their modern roots.
And, boy, you can really tell that from the entryway.
Look at this 15-foot tall steel post that's holding up a 30-plus-foot-long steel I-beam that frames out the entryway, makes a beautiful overhang and actually gives us a slightly pitched roof, which is now a sea of sheathing.
Same sheathing we used on the roof, that we used down on the subfloor, 3/4-inch tongue and groove.
At one point, this house was just original here in the front, and then there was an addition here over by the garage, and the two of them didn't exactly really feel like they were connected.
So during the demolition, they were separated.
And now that the framing is starting to come back together, we have pulled those two structures into one.
And now the whole house feels like it's one nice, modern home.
So, in addition to all of that, the homeowners have also chosen geothermal for their heating and cooling system.
Last week, four vertical wells were dug, 500 feet each.
And this week, Charlie and Ross are over there working on it.
Charlie: You can see all four wells are completed.
As they drilled, they inserted a 6-inch casing into the ground to protect the wells from collapsing.
But once they hit bedrock about 14 feet down, the casing was no longer needed for the remaining 486 feet, because the bedrock is hard enough to create a natural bore hole.
Once the bore holes were complete, it was time to put the pipes in.
And believe it or not, they go in two at a time with a "U" on the bottom of them.
Ross: After the pipes went into the wells, next came the grout.
The bentonite grout is really the secret sauce, because that increases conduction between the piping and the earth.
♪♪ Charlie: And then it was time to put our trenches in to connect all four wells and give them a path into our house.
Our trench is about 5 feet wide, 5 feet deep, with a 6-inch layer of sand at the bottom.
Ross: Next we run the horizontal pipes that traverse from the wells into the building.
And the sand is important, because it will help prevent any sharp rocks from puncturing the pipes.
So, each one has a supply and return, so there's actually eight total pipes, four supplies, four returns, that are going to make their way into the building.
Let's continue helping the guys.
The horizontal piping that runs from the geothermal wells to the foundation wall are connected by a process called thermal fusion.
Now they're cutting the 1-1/4-inch high density polyethylene pipe to length.
♪♪ And now they're using the socket gun to create thermal fusion by heating up the plastic pipe and holding it together.
Once the pipe is heated up, they are going to remove the heat gun and then connect the pipes together so you get a nice watertight connection and a properly set pipe.
♪♪ Then they remove the vice grip.
♪♪ Alright, here we go.
Coming through.
Charlie: And made this little Styrofoam separation for the pipes.
And the reason we have this PVC pipe here, because believe it or not, I have to put a retaining wall off of this, and I want this to make sure there's no pressure on these pipes at all.
Almost there?
Alright.
Going in.
Ross: Alright.
Going through?
Charlie: Alright.
Let's get another one.
Ross: Here you go, Gabe.
Gabe: Alright.
Charlie: Alright.
That's the last one.
Ross: So, we're down here in the mechanical room, and all that geothermal piping we saw outside is coming through the foundation wall.
We have four supplies.
We have four returns.
And Derek here is making sure we have a watertight connection.
Charlie: Right, and to do that, we're using something called a link seal.
Actually slides over the pipe and then goes right into the bore.
And you use a socket, a ratchet, and it just expands that right into it, and you know what?
There's no groundwater coming in at all.
Ross: And after that, they're going to fill the system with water.
They're going to hook up a pressure gauge like this and bring it up to 70 psi pressure.
And they want to make sure that we don't have a leak, that it's not going to drop.
And on top of that, they're going to watch it over time before it gets backfilled, 'cause now is the time to fix the leak.
Charlie: Smart, and they also use water opposed to air, because it's much easier to see water leak out in that trench than hearing a little air whistle.
Ross: That's right.
So next up, we just need the equipment.
Charlie: You know what?
It's going to be here before you know it.
Ross: Alrighty.
Awesome.
♪♪ ♪♪ ♪♪ Kevin: Our framing is about 85% complete, so you're starting to get a sense of the layout.
Up front, we've got a little bit of a pantry leading to the front of the house.
Then we've got Marlowe's bedroom right in here across from a wall of windows, a laundry room, and then as you work your way towards the back of the house, we've got primary suite down on this side and then Caffrey's bedroom in here.
And, Tommy, unlike all the other bedrooms, his needs a little special treatment.
Tom: Yeah, it does.
We want to basically be able to get Caffrey out of the bed easier over time, basically.
So we're going to install a track system that runs right across the ceiling, but we have to have fastening for that.
Kevin: Right.
So, I've seen this lift system.
We went to the showroom, and it's pretty ingenious.
Those were on posts, but you want to hang it from the ceiling.
You have sort of a harness, and it can actually slide all the way down.
There's some markings here of the path.
It could bring him right into the bathroom, near the toilet or back into the bedroom.
Tom: Right, and they've come, and they've marked the locations on the floor that we transfer to the ceiling up here.
Kevin: Yeah.
Tom: So obviously we have to make sure that we have plenty to screw into.
Kevin: Okay.
Tom: And so we're going to put blocking in between the joists here.
And then after we install the blocking in the needed locations that's transferred up here, we'll infill this gap right here to make it level with 3/4-inch plywood.
Kevin: So that's going to go in between the strapping right there.
Tom: Right.
And that will be a continuous run all the way down.
Kevin: I will give you a hand.
Tom: Alright.
♪♪ ♪♪ Kevin: Going to give you this, and I'm going to bring a ladder in, and I'll help the other side.
Tom: Okay.
♪♪ Kevin: So, this is infilling to get us flush with the strapping?
Tom: Right.
Because the brackets that are going to go on the wallboard here and they screwed right through and the plywood wasn't here, it would actually dent the wallboard.
So you want to make sure you have a nice, solid, flat surface that will go right across.
Kevin: So there are a couple bays that didn't get blocking, and now the plywood's going over those.
Tom: Right.
Kevin: They're still going to screw into the blocking, though, right?
Tom: Into the blocking through the plywood.
We actually put a little bit extra blocking in for some reason if they needed it.
But it's always good to have more.
You know, more is better than not enough.
Kevin: As you always say, more is plenty.
Tom: More is plenty.
Yeah.
But you notice we're using screws to put the plywood in.
I use nails, as I said earlier, because of the shear strength of the nail and the grip strength of the screw.
The nails go in sideways.
The screws go in up.
♪♪ ♪♪ It's important that we get all this blocking in now, because obviously you can't get it after the wallboard comes in, and we can't get up in the attic to put the blocking in afterwards, either.
Kevin: Really isn't an attic up there, is there?
Tom: No.
♪♪ Kevin: 66 1/2.
Light.
♪♪ ♪♪ ♪♪ Alright.
That's in there.
Tommy, we got two bays blocked here.
Tom: Right.
That's because the track comes down here, and you got to swing over to get onto the toilet, so we'll have to fill that one in.
Kevin: Okeydoke.
♪♪ Okay, Tommy, That's in there.
Okay.
Tom: Now that's it for the track on the ceiling.
Kevin: Yep.
And we've got an accessibility consultant working for the family, Jackie, so maybe we should check with her on the bathroom.
Tom: Absolutely.
Kevin: Alright.
Hey, Jackie.
Nice to meet you.
Jackie: Hey, Kevin.
Tom: Hey, Jackie.
Jackie: Tommy, glad to meet you, too.
Tom: Same here.
Kevin: So thank you for the plan.
It's nice that when we've got the rough frame, we can get all this stuff in.
But we're also glad that we've got your smarts to tell us where everything goes.
So what are you thinking?
Jackie: Let me start with the ceiling track, because that has to do with the bathroom here.
And where the ceiling track has to be also dictated where the door was going to be and where the toilet.
Since the toilet is here, that's why there's a curve.
Kevin: Okay.
So where do we go from here?
Jackie: This wall is going to be blocked.
Kevin: Nice.
Tom: You notice we put foam in here first, and we've also put cleats on the wall, because we're going to insert plywood here.
We could use blocking like this and then position it wherever the railing is.
But the railing is a stepped railing, right?
Jackie: It is.
So a grab bar similar to this unique one.
Kevin: Whoa.
This is a grab bar, huh?
Yeah, well, it will be.
How does that work?
Jackie: So, sitting on the toilet.
You've got the first push up or even your whole arm, and then you can sort of pull yourself forward, and then you have something to hold onto while you're managing your clothes.
Kevin: So you go from seated to standing position right there.
I've never seen one of those before.
Tom: Yeah.
So the idea of it is, like I say, we'd have to put a piece here at the lower part and then another piece here at the top part.
And by basically putting the plywood over the entire wall, we're covered, no matter where that railing wants to go.
Jackie: And this is going to be customized actually to extend all the way to the door, so as soon as he comes in the door, he has something to hold onto.
Kevin: Okay, we got this wall figured out.
Jackie: Yes, yeah.
Kevin: This wall?
Jackie: There's going to be a fold-down bar that's going to come down off the wall.
Kevin: Oh, so that one folds up and down.
Jackie: Exactly.
So you can move it out of the way when you need to.
Kevin: Gotcha.
Okay.
So we got a block there.
Jackie: Some blocking for the sink.
It's a wall-hung sink, of course.
Tom: Yeah, to make sure that sink is mounted to the wall really securely, we'll put blocking in behind it so they can screw the center of the sink right into it and really hold it well.
Kevin: You guys have made some marks for us, which is awesome.
Let's talk about the shower, which, there's a little recess here now, but that's just for our plumbing.
This is going to be flush so we can wheel right in.
Jackie: Absolutely.
So there'll be a higher niche here for somebody that might be helping Caffrey.
And then there'll be a very low one for Caffrey that he can easily reach shampoo and his soap.
Kevin: Okay.
Jackie: And actually, if I could have that one again?
Kevin: Going to use that guy over there?
Jackie: Yep.
And again, Caffrey can push, pull, and then use that for balance as he's standing.
Kevin: This one's gonna go here?
Jackie: That one's gonna go there.
So he has something to walk all the way to the end of the shower with.
And there's going to be a bar here, that has a separate towel holder, so the towel isn't resting on the on the bar all the time, and it's very safe.
Kevin: Very good.
Tom: So that's the beauty of basically using plywood and using plenty of it at all different elevations, because... Kevin: You're just covered.
Tom: There's no guesswork.
Kevin: Right.
So we've got everything marked out.
Easy for us to do all this blocking because it's rough framing.
If we were retrofitting a bathroom that was already tiled, are we -- I mean, like, what do we do in that situation?
Tom: Well, you don't want to destroy the tile.
So if you have a hallway or if you have a closet on the other side of the bathroom, it might be easier to open up the bedroom wall, 'cause now if you pre-drill through the tile, you have pilot holes, you'll know exactly where you can position that 2x10 or 2x12 into the wall system.
Kevin: But that's a lucky thing to happen, to have a closet behind.
But if you don't have that?
Tom: Well, people -- There are manufacturers that make brackets that you can screw a hole into the wall, and they will really hold a lot of weight.
Jackie: They do.
They do.
Kevin: Jackie, you down with those?
Jackie: Definitely the brackets.
Don't use the suction-cup bars.
They almost always fall off the wall.
Tom: Yeah, or they pull the tile off.
Kevin: No suction cups.
Alright, I'm going to give you the bars.
Jackie.
We're going to get to work.
Thank you for the design smarts.
Jackie: Thank you.
Kevin: Appreciate it.
Tom: Thanks, Jackie.
Kevin: Alright.
Alright, Tommy.
I think this first one is narrower.
The rest are the same.
♪♪ ♪♪ ♪♪ Okay.
The 2-bys you ripped.
Tom: Actually going to use a 2x4 in here because it fit right into that wall cavity.
♪♪ ♪♪ Alright.
That wall's done.
Kevin: Alright.
So you've got these cut for this wall.
We got this one, and then we got that blocking right there.
Tom: Right.
Alright.
Let's start with the wide.
Kevin: That's one.
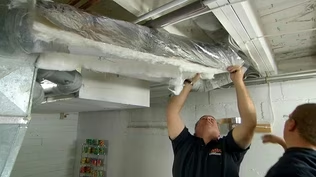
♪♪ ♪♪ This is the original part of our 1960s home.
You can see the original brick walls that Charlie's guys spent so much time trying to save.
What they couldn't save was the old concrete slab.
That came up because we're trying to meet a very tough energy code here.
So when the concrete came up, he also took the time to run new ductwork for the HVAC.
Now, there's no basement, and we didn't want to see the ducts up top.
So this was the perfect time and place to do it.
♪♪ ♪♪ Then on top of that, Charlie sprayed 2 inches of closed cell foam down on grade, and that gave us about an R-14 plus a vapor barrier.
Then on top of that, 5 inches of new concrete.
♪♪ ♪♪ Concrete needs about 28 days to set up.
Hey, Mark.
Hey, Heath.
Heath: Hey, Kevin.
Kevin: I know that the floor hasn't gone down yet, even though this is just about ready to cure and be ready to go.
This is our system?
Heath: This is the floor system that's going down on here.
So we're starting with a couple of sleepers that are sealed on the bottom where they touch the concrete.
Kevin: Oh, yeah.
Heath: Little bit of 2-inch rigid foam in the middle.
Kevin: Mm-hmm.
Heath: Then our subfloor, radiant heating panel, and then finally the hardwood floor that'll sit over the top of this.
Kevin: Looks like that's white oak right there.
Okay, so we're about to put that down.
Heath: And you're kind of curious why I'm involved in the floor?
Kevin: Yeah.
[ Laughs ] Heath: So we're involved in the floor because the homeowner wanted to save these brick walls.
They also wanted to save the receptacles that are in the walls.
Kevin: Sure, why not, right?
Heath: Hard part is, how do I get a wire to it where we have a concrete floor and no basement below us?
Kevin: Well, there's already a wire to it, isn't there?
Heath: There is.
So we started to explore to see what we have.
And from some of the demo, we could see we actually have a cavity behind here.
But I need to get to this somehow.
The wiring is inadequate.
It's antique, and we found that the boxes are too small.
The box that's actually in there is about this big.
Kevin: Okay.
What's wrong with that?
Heath: It doesn't hold enough space to hold the wires and the device we need, so we need to install something like that.
Kevin: Wait, so you got to dig into these walls just to get a new box in?
Heath: That's it.
Kevin: You guys know the lengths that we went to save these walls, right?
Mark, I hope you got some sort of a surgical approach.
Mark: I do.
I'm going to start out very delicate around the brick, but once I get that mortar out, I'm going to hit the box, and I'm going to hit it pretty hard.
Kevin: Well, I like delicate, and so I'll come back and see how hard went.
Thank you, guys.
Mark: Alright.
You got it.
Heath: Alright.
Mark: So grab your plate so we can see how much coverage we actually have.
Heath: Okay.
So that's where that's going to sit.
Mark: Something like that.
Heath: Yeah.
Mark: Great.
Okay, I'm going to pry down.
That way, I'm not going to damage the brick.
Heath: Oh, look at that.
Mark: Yeah, that's collapsed pretty well.
Now I'm going to try the side.
Okay, this cleaned up nice.
Heath: Not too bad, huh?
Mark: That was easy.
Try the other side.
Heath: Not too bad.
Mark: No.
Heath: So what we have on these, one thing to remember, is the sides aren't perfectly flat.
We actually have a little screw on the top corner here and then down here that hold the sides.
Mark: I can feel it.
Heath: Yeah, I want to make sure we don't blow anything out when we pull it out.
That was part of my concern, too.
Mark: So, great point.
So what I'm gonna do is I'm gonna go back down on the top and then I'm going to try to collapse those two sides, and hopefully we can -- Heath: Bring that in a little bit?
Mark: Bring it in.
Yeah.
Alright.
Alright.
Heath: See it wiggling a little.
Let's see if we can get that out without dragging.
There we go.
I think we cleared them.
Mark: Great.
Yep, We're clear.
Heath: There we go.
Look at that stuff.
Mark: Wow.
Heath: That's the old wire.
Mark: Yep, the old insulation.
Heath: We'll get this out of the way.
Mark: Great.
Nice cut.
Let's get that -- Heath: Let's see if that new one does us any good.
Mark: See if the new one goes in.
Heath: We'll tuck this out.
What do we got in there?
Looks like we got some depth.
Mark: Wow.
Okay.
Just what we were looking for.
A lot of that insulation.
Heath: Wow.
There you go.
We a good fit?
Mark: Good fit.
Heath: Alright, Mark.
Well, that's half the battle.
Mark: That was half the battle.
But what I want to do as the box goes back in is I want to make sure the joint is full on both sides.
That's why that box came out so easily, is because those were just kind of fake joints is what we call them.
Heath: Gotcha.
And it looks like we have room and some area in the back that we can actually use some concrete anchors to help secure this, as well.
Mark: Exactly.
So there's plenty of play for that, so this will go in nicely.
Heath: So the next step is try and drill a hole below the new floor level and see if we can get up there.
Mark: Right.
Alright.
Alright, Heath.
Heath: Alright.
So before we start drilling, we should probably mark where this floor is really going to land, right?
Mark: Right.
I think it was 4 inches, right?
Heath: About 4 inches?
Mark: Yep.
Heath: So that puts us right at the top of that course.
Cool.
So I think anything below that or as low as we can get is good.
Mark: Alright.
I think I'm going to start right here.
I have a little indentation, so that'll help me get started.
Heath: Alright.
I've got a vacuum for you.
Mark: We got the vacuum set up, which is great.
Heath: So we'll go this side.
Mark: Alright, Heath, if you want to release that shield.
Heath: Alright.
So that's there.
You got your starting point.
Let's get it nice and snug.
Mark: Ready for the vacuum?
Heath: And give me the vacuum.
[ Vacuum whirring ] Mark: Alright.
Heath: Alright.
Alright, Mark.
Now for the fun part.
Mark: Yeah.
Heath: So I want to take this fish, hopefully go through the hole you just drilled, try and curl through some of that insulation, and see if we can get up here.
Mark: Okay.
If I see it, I'll pull it out.
Heath: So gonna put a little curve on it, try and get in behind that cavity.
We'll see if we can get it started.
Mark: Oh.
There it is.
Heath: There it is.
Kevin: "There it is"?
Mark: Nicely done, nicely done.
Kevin: I like the sounds of "There it is."
Mark: Oh, does that mean success right there?
Heath: That means success.
I think we can make this happen.
Kevin: Okay, so that gets us the wire up to the opening.
What about the receptacle box?
Heath: So the box, we're going to use that metal old work box we showed you.
So we're going to start by attaching the wire down low.
We'll pull it all the way through, make it up into the box, and then we'll push that box back in, and then attach the box with some masonry anchors and touch it up with a little mortar.
Kevin: So that guy right there, you okay putting in our special brick, and the mortar will do the trick?
Mark: Absolutely.
Kevin: Love to hear it.
So did we go with smashy-smash or delicate?
Mark: Well, a combo of both, but it worked out.
Heath: Little bit of everything.
Mark: Yeah, a little bit of everything.
Kevin: Alright.
So next time, we've got a lot coming up, including our first exterior trim.
Mark: Our rough plumbing is going to be under way, as well.
Kevin: Lots more to do.
So until then, I'm Kevin O'Connor.
Heath: I'm Heath Eastman.
Mark: I'm Mark McCullough.
Kevin: For "This Old House" here in Lexington.
Alright.
Heath: Alright.
Kevin: I love the fact that we can save the brick -- I mean, not as much as the homeowners do.
Kevin: Next time on "This Old House"...
I'll tour this modern home to show how beautiful features and accessible design go hand in hand.
[ Laughs ] That's terrific.
Look at that.
Mark: We're mixing mortar to patch the original brick on this 1960 mid century modern.
Charlie: And I'll help the homeowner, Billy, build a DIY ramp for his son at camp.
Kevin: That's next time.


- Home and How To

Hit the road in a classic car for a tour through Great Britain with two antiques experts.


Support for PBS provided by:
Funding for THIS OLD HOUSE is provided by The Home Depot and Renewal By Andersen.