E7 | Lexington Modern | Ramping Up
Season 45 Episode 7 | 23m 42sVideo has Closed Captions
The original brick is repaired. A ramp is built, and a modern accessible house is toured.
A progress tour of the house is given, starting at the back addition, through the walkout basement and mechanical spaces, then up to the main floor. Repairs are made to the 1960 brick, including matching the original color and texture of the mortar. The homeowner gets help building a DIY ramp. Nearby, a modern accessible house is toured. New energy codes prompt changes to the exterior trim plan.
Problems playing video? | Closed Captioning Feedback
Problems playing video? | Closed Captioning Feedback
Funding for THIS OLD HOUSE is provided by The Home Depot and Renewal By Andersen.
Support provided by:

E7 | Lexington Modern | Ramping Up
Season 45 Episode 7 | 23m 42sVideo has Closed Captions
A progress tour of the house is given, starting at the back addition, through the walkout basement and mechanical spaces, then up to the main floor. Repairs are made to the 1960 brick, including matching the original color and texture of the mortar. The homeowner gets help building a DIY ramp. Nearby, a modern accessible house is toured. New energy codes prompt changes to the exterior trim plan.
Problems playing video? | Closed Captioning Feedback
How to Watch This Old House
This Old House is available to stream on pbs.org and the free PBS App, available on iPhone, Apple TV, Android TV, Android smartphones, Amazon Fire TV, Amazon Fire Tablet, Roku, Samsung Smart TV, and Vizio.
Keep Exploring

This Old House Insider Newsletter
Get This Old House exclusive stories, tips, and behind-the-scenes information delivered right to your inbox every month.Providing Support for PBS.org
Learn Moreabout PBS online sponsorshipKevin: Today on "This Old House"...
I'll tour this modern home to show how beautiful features and accessible design go hand in hand.
Mark: We're mixing mortar to patch the original brick on this 1960 mid-century modern.
Charlie: And I'll help the homeowner Billy build a DIY ramp for his son at camp.
♪♪ ♪♪ Man: Ahh.
That's it.
♪♪ ♪♪ Kevin: Hey there.
I'm Kevin O'Connor.
and welcome back to our project here in Lexington, Massachusetts, that's part of our 45th season of "This Old House."
So I'm standing at the back of the house where we've got a new addition.
You can see the poured concrete right here.
Up top, right here, we've got a new primary suite for mom and dad.
And then over here, a new bedroom for their middle son, Caffrey.
Because of his mobility challenges, they wanted his bedroom to be as close to theirs as possible.
Scaffolding is up, which means windows and siding are next.
And then as you walk into the addition right here, you get a sense of how much space was added.
So the old foundation ended right here where this lally is.
So we picked up all of this space this way as well as that way.
That's going to give us room for an extra bedroom down there.
And a couple of interesting features about this floor -- First of all, no thresholds, one plane all the way throughout, and an elevator.
You can see that the shaft is all framed out.
So Caffrey and the family can go from the lower level to the upper level right here.
The rest of the space will be used for a little gym in here and a little rec room in here.
And then the living space ends right at this spot right here.
This will be a walk-up to a new mechanical room.
So, there was an old mechanical room right in here.
We needed a second one.
So Mark and his guys actually built a tunnel to the second mechanical room in the front of the house.
Then they poured a new slab.
This is a nice little feature right here.
While the concrete was still wet, the family came and put some handprints in here, signed it so that they'd always have those memories.
Rough electrical and plumbing is in as well.
You can see the big sewer line right here, and we got a whole bunch more going on upstairs.
On the main level, the rough plumbing is in as well, although here it is embedded in the slab.
You can see some of it stubbed up right here where the kitchen island is going to be.
Framing is complete on this level and these brick walls of which we've got a couple interior and exterior, well, these are signature features for this house.
And the homeowners definitely wanted to save them.
So we've got that interior one.
But you can see we've also got them on the exterior here and a couple cutouts here for new windows.
But we have some repair that needs to happen.
Hey, Mark, how are you?
Mark: Hey, Kevin.
How you doing?
Kevin: Alright.
So the homeowners love the brick.
You guys went to long lengths to save it and preserve it, but we got some repairs to do?
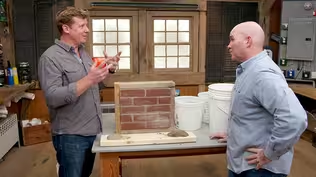
Mark: We do.
So one of the biggest challenges any mason will ever have is matching materials.
This project is no different.
Kevin: Right.
Mark: So the brick, unfortunately, isn't made anymore.
But Charlie is ahead of the game.
During demo, he salvaged a pallet of bricks.
So we do have enough brick.
Kevin: And then in terms of the mortar?
Mark: Mortar is going to be a little different beast.
We do have miscellaneous repairs right here.
We have the old gas line going into the wall.
We have to clean that up.
Charlie's bringing his siding into this jamb right here.
It's a little ragged, so we're going to have to make a cut, clean that up.
But the most important thing we're going to have to do over here, Kevin, this is the brick sill.
We're going to have to flash the window as it goes in, and then we're going to have to relay this sill brick.
Kevin: Gotcha.
Mark: But as I said, the biggest challenge we have is matching that mortar, and that's in the capable hands of one of the best masons I know -- Kevin.
Kevin: Kevin, good to see you again.
Kevin V.: Good to see you.
Kevin: Been a while.
Kevin V.: Yes, it has.
Kevin: So how did you replicate the mortar for us?
What goes into that process?
Kevin V.: First thing is achieving a mortar sample from the existing where you want to match.
So it is the mortar joint.
Kevin: So you pulled this out of an existing wall.
This is a little bit of mortar that would sit between two brick right there.
Kevin V.: Absolutely.
Kevin: Okay.
And then once you have that, where do you go?
Kevin V.: You first wash it, let it dry.
That will give you the actual color that you have to match.
Kevin: Right.
Kevin V.: And then we'll start the process of coming up with a recipe... Kevin: Okay.
Kevin V.: ...unique to the job.
Kevin: So you're trying to match just color?
Kevin V.: Color and texture.
Kevin: Ah.
Kevin V.: So you have a mortar that's 63 years old, and the aging process is exposing the sands.
The sands that they used years ago were a little bit larger than the mortar sands today.
Kevin: Right.
Kevin V.: So we introduce concrete sand a little bit larger to replicate the existing condition.
Kevin: And what are you starting with for your mortar?
Kevin V.: Starting with a type S. Kevin: Gotcha.
Kevin V.: And the reason why we use a type S is because we're introducing additional sand which reduces the psi of the mortar.
Kevin: Okay.
Kevin V.: You wouldn't typically use a type S with brick.
Kevin: Right.
So you've got your sort of test kitchen over right here, if you will.
You end up with -- We got a cup here.
It looks like you got a recipe.
And I presume that gives you that mortar profile and you did it for number 2, number 4, number 7, number 10, number 12, number 14.
Did you have a final recipe that you decided on?
Kevin V.: 14.
Kevin: Did it really take you 14 tries?
Kevin V.: To get it as close as possible.
Kevin: Okay.
And then with this recipe, make as much mortar as you want and you can patch anything?
Kevin V.: Yep.
Kevin: Beautiful.
Alright.
Well, I'll let you get back to your alchemy.
I'm going to take a trip about 20 minutes from here.
We got new construction, a house that was built to be accessible.
I'm going to go get some ideas.
Mark: Great.
Kevin: Thanks, guys.
Mark: Alright, Kevin.
Alright, Kevin.
So first thing we're going to do, we'll go after this hole, we'll drill some holes.
That'll weaken this a little bit.
[ Drill whirring ] ♪♪ ♪♪ We'll get our grinder out.
We'll just be delicate trying to take the rest of this stuff out.
Alright.
So let's jump on this vertical cut right here and that'll be it.
After that, we're going to lay some brick.
♪♪ Alright, So that looks great.
And we don't have long to work with this before it sets up.
♪♪ ♪♪ ♪♪ Alright, Kevin, it looks like we made short work of this.
I appreciate it.
This looks great.
I think all we have to do is a wash. Kevin V.: Yep.
That's it.
Mark: Yep.
That'll bring out some of the aggregate.
Other than that, I think we got a perfect match going.
Kevin V.: Yep.
It takes a little bit of time for it to dry.
Mark: Got to dry out, but then we'll be good.
Kevin V.: Absolutely.
Mark: Alright.
An honor.
Thanks, Kevin.
Kevin V.: Thanks, Mark.
Appreciate it.
Mark: You got it.
Billy: Hey, Charlie.
Charlie: Hey, Billy.
Billy: Thanks a lot for your help.
As I said yesterday on the phone, visited the kids at camp, and they're having a great time.
But with Caffrey's needs, I think there's a little bit we could do to help immensely.
There's one particular step at the dining hall that if we just put a nice ramp in there, it would just allow him to -- a better usage of that space, which is a very central point in the whole camp.
Charlie: Right.
So I saw the picture that you had sent and I saw the 10-inch rise, and to be ADA compliant with a 112 pitch, which means every foot that we're going to come out, we're allowed to drop one inch in elevation.
So that gives a 10-inch rise, means we have to come out a minimum of 10 feet.
So that will give us our ramp.
Billy: And there should be plenty of space in this location for a 10-foot ramp?
Charlie: Yeah, it looked like -- When you sent the picture, it looks like we had plenty.
So I actually went ahead and cut a couple already because I really want to see how this is going to come together because we're going to put this together, fasten it with screws, take it apart, and then you can reassemble it down at the camp.
Billy: Perfect.
That's great.
Charlie: So, I did cut two.
If you want to give me a hand, I'm marking it out now.
We'll snap a line and we can get the last two cut.
Billy: Great.
Charlie: Now, the good news is, is we're going to get two pieces out of one piece of 2x10, and I have 8.5 inches for our cut line going down to zero.
And you might wonder why we have 8 1/2.
Well, we have an inch and a half tread going on there, which will give us our total of our 10-inch for our rise.
So since we're going to get two out of one, let's mark them both right now.
So I'm going to mark the 8 1/2 down here.
Got it.
Alright, let's mark this out with a chalk line.
Hold that right on that first pencil line.
Alright.
So you're on the line and I'm going to zero here.
Alrighty.
Alright.
Now you go to zero on that one.
Yep.
Right at the very end.
Perfect.
And I got it to my 8 1/2 here.
Ready?
Perfect.
Here you go.
Got the depth already set.
Let's hit this line first, and we're going to keep the line on.
So you're going to be on that side of the mark.
[ Saw buzzing ] Perfect.
Nice job.
So, you told me that it's 40 inches wide at the widest point.
So I marked them out on the table already.
And these are really what we call a stringer, but not really your standard stringer you'd see on stairs.
But for a ramp, there's still a stringer and we're going to have four of them.
Billy: To support the treads?
Charlie: That's right.
So I already marked out on this table where they have to go.
So let's place these on my lines.
You'll be down this end here and you can see them right here, Billy -- They all have the X's in them.
It's about a 10 1/2-inch spacing in between them, and I have it marked at the top so that way it'll all be the same length.
So put that on that mark down there, Billy.
Billy: Got it.
Charlie: Alright.
And then the same thing inside here.
Next one.
Alright, next one here.
Alright.
And then one more over here.
Right to me a little bit.
Right there.
Good.
Alright.
Now that our stringers are all in place, our 2x8s are going to be really our decking for this ramp.
So let's see how we did.
10 inches, right?
Perfect.
Billy: Ten inches to the top of the tread, not to the top of the stringer?
Charlie: That's right.
So typically, you know, you'd fill in the decking.
But in this case, we're going to start at the bottom really with that piece of diamond plate.
I took the first piece of 2x8 and cut a notch into it that the diamond plate will actually sit into so it'll be nice and flush.
So put it on that one mark right there.
So we also took some wedges that we cut so it'll fill in where the diamond plate's going to go.
And that way there won't be any spring in the diamond plate.
And this is the piece right here.
This aluminum diamond plate will be placed at the bottom of the ramp and the top of the ramp to help provide a seamless transition.
Let's just dry-fit the rest of them to get all the way up to the top.
And I'll show you what we have to do next.
Alright.
Perfect.
Let's see how it fits with the diamond plate.
Right here.
Alright, perfect.
Nice and flush.
Same thing.
You'll mount this, but now it's time to take it apart.
Put in your car.
So why don't we do that now?
Billy: This is going to be really great.
Thank you so much for your help.
Charlie: I'm glad I could help and any time.
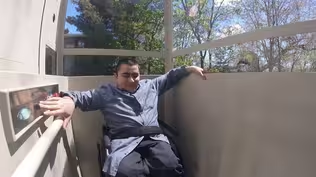
♪♪ ♪♪ Kevin: I am here at a home about 20 minutes from our Lexington project that is beautiful, modern and accessible.
And I'm here for some inspiration.
Hey, Doug.
Doug: Kevin.
Kevin: Nice to meet you.
Doug: Good to see you.
Kevin: So, we're looking for inspiration, and I figured the architect who designed a beautiful but accessible house is the perfect person.
So thank you for having us.
Doug: Great.
Happy to do it.
Kevin: Great.
Well, the first thing I noticed is that I came up a ramp, not the stairs, although one of the nicer ramps I've ever been on.
Doug: Thank you.
Kevin: A challenge?
Doug: Yeah.
So, of course, when you're making a house that's accessible, you've got to start at the sidewalk or the street, and then the house, the first floor is about four feet up from the street, which requires a ramp.
That translates into about a 48-foot-long ramp.
Kevin: That's a lot of ramp.
Doug: It is.
And we wanted the ramp also to look good and to contribute to the overall look and the aesthetics of the house.
So we created a ramp that follows along the perimeter of this planting area and this courtyard, and it drops you off here on this terrace.
Kevin: And then obviously, you know, the threshold, just a tiny little ramp.
Doug: Exactly.
It slopes just enough to keep water from running back into the house.
Kevin: Okay.
Doug: The homeowners have been in this house for 20 years -- or this property, three years in this new house that we designed for them.
Kevin: Wow, that is beautiful.
This is terrific.
Oh, there they are.
Hi.
Kevin.
Delores: Hi, Kevin.
Welcome to our house.
Kevin: Thank you very much.
Georgios: Hi, Kevin.
Kevin: Nice to meet you.
Doug: This is Delores and Georgios.
Kevin: Wonderful.
Well, thank you for the invite.
And can you tell me why accessible house?
What was your inspiration?
Delores: Sure.
The main inspiration was our daughter Mariana, who's 25 years old, and she has multiple disabilities.
So we wanted to build a house that was accessible for her but also accessible for her friends, including friends with disabilities and without disabilities.
Mariana's best friend, who uses a wheelchair, she had not been able to hang out with Mariana in Mariana's bedroom until we moved to this house.
So it's been wonderful to be able to ride the elevator together, spend time in Mariana's room.
Kevin: And does it work for your needs as well?
Georgios: Yes, absolutely.
That is the intent.
We used the universal design to meet Mariana's needs, our people in our lives with challenges and our future selves as we age in place.
Kevin: So you could stay?
Georgios: Yes.
So we feel, you know, confident that it's going to be good for us.
Kevin: Great.
And it's beautiful.
Georgios: Yes.
Delores: It is.
Kevin: Well, thank you for the invite.
We are going to snoop around, if that's alright.
We'll let Doug lead the way.
Delores: Sure.
Doug: Well, let's start with the elevator.
Kevin: We are putting one of these in our house, so this is great to see it sort of in place.
Doug: So, this is an electric cable elevator.
It's got the swinging door on the outside and this folding door on the inside.
Kevin: Surprisingly compact.
Doug: Yeah.
So it's about five feet by six feet total.
It doesn't take up a lot of space.
And it's at a key location.
It's by the entrance.
There's plenty of maneuvering space, and then it leads right into the rest of the house, the kitchen.
Kevin: So I've noticed right away the open floor plan, everything is sort of flowing into each other, one room into the next.
Beautiful, modern look right here, wider than normal from countertop to countertop.
Doug: Yeah, this is about 4'6".
We would normally do about four feet, but this gives us just a little extra space for maneuvering.
Kevin: Gotcha.
Doug: And touch-latch cabinets.
Kevin: [ Laughs ] That's terrific.
Look at that.
So you don't have to reach up and close it.
Doug: Touch it and close them.
Kevin: Very nice.
Well, you're not getting up or down a staircase if you're in a wheelchair, but you can still make stairs easier to get up and down.
Doug: Definitely.
And that's the area where universal design comes in.
You want to make it as easy as possible for someone who's older or with a disability to make -- to go up the stair easily and safely.
Kevin: Right.
Doug: And in this stair, what we've tried to do is make the stair longer and gentler in slope.
So it's got longer treads, shorter risers, and then we've got these two sturdy handrails, one on each side.
And when you're an elderly person, you may need extra support so you can support yourself going up with both sides.
Kevin: Right.
Doug: And in some cases, Mariana, for instance, is stronger on one side than the other.
She'll use one rail going up.
And the other rail going down.
Kevin: Great.
Talk about customizing it for the customer.
That's terrific.
And lighting is just -- I mean, this is great for anybody.
It's always treacherous coming down a staircase in the dark.
So why not light them up, which you guys did in the stringer.
Doug: Yeah.
Kevin: Very nice.
And I like the modern look, too.
Cable rail on one side.
Steel stringers on each.
Doug: Fits very nicely with the overall modern aesthetic of the house.
Nice, gentle stair.
Easy to go up.
This is Mariana's bedroom.
Kevin: Another beautiful room.
Doug: Yeah.
And I think most of the accessible features we want to look at are in the bathroom, starting with this pocket door, which when we open it up, you don't have any of the swing of the door to negotiate around once you're in the room.
Kevin: Clear opening.
First thing I notice is shower.
So the water is going to be contained by the door, but curbless, so nothing to step over.
In fact, you can wheel right in here if you wanted to.
Doug: Yeah, it's much easier to eliminate the curb in terms of getting into the shower.
Kevin: Grab bars two walls, easily accessible knobs down nice and low.
You've got the handheld fixture as well, so that's terrific.
And I presume big enough so that you can get a wheelchair in here.
That's why it's so large?
Doug: Yeah, exactly.
So you want to be able to get a wheelchair in.
Remember, Mariana doesn't use a wheelchair, but she does have a caregiver.
So you've got to have space to let the caregiver help when she's in the shower.
Kevin: The two-person shower.
We have seen this a lot, too.
So instead of the knobs that turn, we've got levers that are very easy to move, you know, whether you've got dexterity problems or not.
Okay.
Where to next?
Doug: Let's go to the basement.
Kevin: Let's.
Can I ride the elevator?
Yes.
[ Door rattling ] Doug: And here we are in the basement.
Kevin: Ah, which is all finished space.
Doug: Yep.
The in-law suite.
Kevin: Also a staircase but access via the elevator.
So kind of a mudroom area, storage and such.
Doug: This is where the family comes into the house much of the time because it's a three-story house.
The garage is on the basement level.
Kevin: Mm, gotcha.
So they pull the car up here?
Doug: Pull the car up here, ride their bicycles down, and we've got a ramp here to provide an accessible entrance on the basement.
Kevin: So that explains the three stops on the elevator.
You can get to anywhere you want in this house from the ground level.
Doug: Completely accessible.
Kevin: I think our homeowners are going to be very inspired by this -- super-comfortable, accessible house, but gorgeous.
A lot of good ideas.
Thank you, Doug.
Will you thank the homeowners for us?
Doug: I will.
Kevin: Terrific.
Doug: So long.
Kevin: See ya.
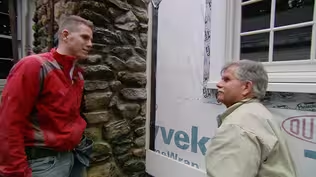
♪♪ We're making some good progress with the new trim, although a little bit of a change of plans, right?
I thought we were keeping the old.
Now it's getting replaced?
Charlie: Well, originally, that's right.
We were going to save all the trim on the original house.
But remember back when we had our HERS rating to get our building permit, we had to make the building much tighter energy-wise.
And to achieve that, we had to put two layers of one-inch foam on the roof, overlapping all the joints.
And that was a big part why we got our permit.
Kevin: Right.
So this obviously isn't wide enough anymore to go all the way up this high.
Tom: Right.
So we need nailing for the new trim.
So we're going to cover the foam insulation and raise it up a little bit.
And then we'll have a 2x8 right here behind that 1x10 trimming, plenty to nail.
Kevin: So this is coming off?
Tom: We're going to take the old trim off.
Kevin: Alright, off it comes.
Tom: You got that, sonny?
Kevin: Got it.
Charlie: Alright, I'm good.
Kevin: Good here.
Tom: I got this.
[ Drill whirring ] Kevin: I'm way low, Tommy.
Tom: Alright, bring it down a little more.
Kevin: Down?
Tom: Yeah.
Kevin: I'm two inches below -- Tom: Keep coming.
Keep coming.
Kevin: Okay.
Okay.
Tom: Keep.
Alright.
Can you push it up?
Kevin: You want it up now?
Tom: If you can.
Kevin: [ Grunting ] Oh, for crying out loud.
I can't even get it close.
[ Grunts ] [ Grunting ] Hurry!
Tom: Hold on.
Kevin: Hurry up!
[ Drills whir ] Oh, yeah.
Tom: There you go.
Charlie: That wasn't that hard.
Tom: See how easy that was?
Kevin: You guys... You guys are a delight to work for.
Tom: Alright, so now it's time to put on the new trim, and we're actually going to use this board right here.
This is a poly-ash board.
It's a manmade product.
And it's going to replace the PVC that we normally would use.
Kevin: So why are we using this?
Tom: It doesn't expand and contract quite as much as PVC.
Kevin: Okay.
Tom: PVC will expand a lot over its length with the heat, and the trim here is going to be dark.
So they don't recommend PVC be painted dark.
But we can paint this dark because of the expansion rate.
Kevin: Very nice.
Okay.
So you cut man, Charlie and I install?
Tom: I'll cut it, but the first thing I want to do is I want to take a sample piece to cut my angle up there because I've got two different angles.
Charlie: Make it flush.
Pretty good right there.
Tom: But like any of these products, we want to make sure we cut it using a HEPA vac because of the dust in the air.
You don't want to breathe it.
[ Drills whirring ] Kevin: I like that one right there.
Charlie: Nice.
Kevin: Good there?
Tom: Alright.
That's it for the trim right here.
Kevin: Alright.
So we got to finish this off.
So next time, what do we got coming up, guys?
Charlie: Well, we have a lot of roof surface, and one of my biggest concern is where we're going to drain it all and how we're going to get down.
But what I'm really thinking about is a recessed gutter in one of the roofs.
Kevin: Recessed gutter?
What could go wrong?
Tom: Should be interesting.
Kevin: Alright.
So until then, I'm Kevin O'Connor.
Charlie: I'm Charlie Silva.
Tom: And I'm Tom Silva.
Kevin: For "This Old House" here in Lexington.
Kevin: Next time on "This Old House"...
I'll tour the house next door, which has a lot in common with our project.
Tom: In a rainstorm, about 1,100 gallons of rainwater will come down here in about an hour and all end up right here.
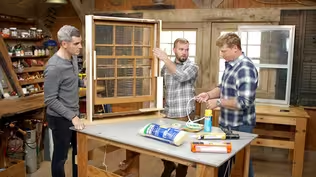
Man: And windows are an important feature in this modern home, and it's time to start installing them.
Tom: And the new window is two panes of glass 5/16 of an inch thick with argon gas in the middle.
So it's very energy-efficient.
Kevin: That's next time.


- Home and How To

Hit the road in a classic car for a tour through Great Britain with two antiques experts.


Support for PBS provided by:
Funding for THIS OLD HOUSE is provided by The Home Depot and Renewal By Andersen.