E8 | Lexington Modern | Drop in the Gutter
Season 45 Episode 8 | 23m 42sVideo has Closed Captions
A custom gutter is built. The neighbor's house, designed by the same architect, is toured.
The roof of the Lexington project is a mix of multiple roof types and pitches. A custom gutter with a downspout is recessed into the overhang to manage the volume of rainfall it will yield. The house next door, one of three designed and built by the same original architect and still maintains much of the original mid-century modern features, is toured. New energy-efficient windows are installed.
Problems playing video? | Closed Captioning Feedback
Problems playing video? | Closed Captioning Feedback
Funding for THIS OLD HOUSE is provided by The Home Depot and Renewal By Andersen.
Support provided by:

E8 | Lexington Modern | Drop in the Gutter
Season 45 Episode 8 | 23m 42sVideo has Closed Captions
The roof of the Lexington project is a mix of multiple roof types and pitches. A custom gutter with a downspout is recessed into the overhang to manage the volume of rainfall it will yield. The house next door, one of three designed and built by the same original architect and still maintains much of the original mid-century modern features, is toured. New energy-efficient windows are installed.
Problems playing video? | Closed Captioning Feedback
How to Watch This Old House
This Old House is available to stream on pbs.org and the free PBS App, available on iPhone, Apple TV, Android TV, Android smartphones, Amazon Fire TV, Amazon Fire Tablet, Roku, Samsung Smart TV, and Vizio.
Keep Exploring


This Old House Insider Newsletter
Get This Old House exclusive stories, tips, and behind-the-scenes information delivered right to your inbox every month.Providing Support for PBS.org
Learn Moreabout PBS online sponsorshipKevin: Today on "This Old House"...
I'll tour the house next door, which has a lot in common with our project.
Tom: In a rainstorm, about 1,100 gallons of rainwater will come down here in about an hour and all end up right here.
Charlie: And windows are an important feature in this modern home, and it's time to start installing them.
♪♪ ♪♪ Man: Ahh.
That's it.
♪♪ ♪♪ ♪♪ Kevin: Hey there.
I'm Kevin O'Connor.
And welcome back to "This Old House" and to Lexington, Massachusetts, where we are undergoing a sizable renovation.
The primary purpose of the renovation is to make the home more accessible for a 13-year-old boy who has Duchenne muscular dystrophy.
Hey, Tommy.
Hey, guys.
Tom: Hey, Kevin.
Kevin: So, this 1960s mid-century modern home was taken back to the studs to change the entire flow of the building.
So dining room up front where Tommy was.
This is the living area right here.
No thresholds throughout this space.
So you can actually come all the way through here with no trip points, and then into the kitchen, which is going to be through here.
So I've got the island behind me, but then we've got a wall of glass right here which you will walk out onto to the patio.
Also a wall of glass on this side right here.
And the idea, Charlie, is that you're going to have just one continuous level inside to out, which means you're going to bring this up quite a bit.
Charlie: We do.
And not only do we have the two sides of the house to contend with, but we have this retaining wall.
And what I'm really looking forward to is we're finally prepping for our structural pour that is going to support a hydrotherapy pool that we're going to put in.
Kevin: A therapy pool, huh?
That's nice.
How big is it?
Charlie: It's nice.
It's going to be 7 feet across and 20 feet long.
Kevin: Cool.
Alright.
Well, I guess that explains the structural slab, right?
Because water is heavy.
That's a lot of water.
Charlie: It is.
Speaking of water, I have something to show you up top.
Kevin: Never good.
[ Chuckles ] Never good.
Holy mackerel, Charlie.
Charlie: What do you think, huh?
Kevin: I think you got a lot of roof here.
Wow!
Charlie: We do.
We have about 10 different pitches up here.
Sometimes one's coming onto the other, then it slow-pitch down to each end.
Kevin: Yeah.
Charlie: And this is the ISO board that goes down first before the rubber is glued to it.
Kevin: So rubber, I presume, because they're so shallow?
Charlie: It is.
It's about a 1 1/2, 2 pitch in a lot of these areas.
Kevin: Yeah.
Charlie: In this section over here, we've actually had it engineered for our solar panel field going on that roof.
The existing roof over here is going to be solar on this side as well as above the garage.
Kevin: So how many solar panels in total, Charlie?
Charlie: I think there's like 69 in total.
Kevin: Right.
I presume rubber here as well, although you've switched to asphalt for above the garage?
Charlie: Yeah, we have about a 5 pitch up there, so we're able to use the asphalt on that roof.
Kevin: Gotcha.
Charlie: Solar panels will go on that also.
Kevin: So a lot of roof means a lot of water and snow to contend with.
And it looks like you're giving that some thought.
Charlie: And really, this is one of my biggest concerns here with all of these roofs coming together up against a cheek wall for our new entry addition area.
So I'm not really worried about just rain.
I'm worried about snow sitting up here and any backup coming in from there.
Kevin: So I see you've got a little bit of a crest right here.
So you've got some water shedding one way.
You've got the rest shedding down over to this side.
Charlie: That's right.
And up here we probably have about -- what?
-- 30 feet across.
And it really just channels down to one section.
And this is the area that we were concerned about.
Kevin: Hey, Tommy.
Tom: Hey, Kevin.
How are ya?
Kevin: A lot of water to contend with, huh?
Tom: Yeah.
Well, if you do the math, this is 1,800 square feet of roof.
The average rainfall per inch per hour is 0.62.
Kevin: Okay.
Tom: If you do the math, it's about 1,100 gallons, a little over 1,100 gallons an hour of rain that all have to come off of this roof to this corner right there.
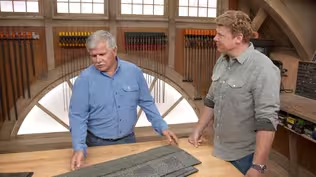
Kevin: So you've got -- Is that a gutter?
A copper gutter?
Tom: It's a gutter, yeah.
Custom-made gutter.
Kevin: Look at that.
Tom: It's actually going to sit in a trough that we're going to make into the overhang of the roof system.
Kevin: You're going to recess that into here?
Tom: Yeah, we're going to recess it right in here, drop it down flush with the roof and all the water will come down, hit this downspout and go right down into drainage system that we have by the foundation.
Kevin: Biggest residential gutter I've ever seen.
But I guess you're saying something like 1,100 gallons of water per hour, so that's got to manage all of it.
Tom: It's going to manage as -- as much as it possibly can.
If it's a downpour, like all gutters, it will probably spill over a little.
Kevin: Yeah, well, hopefully we don't end up with that.
Okay.
You guys getting ready to install that?
Charlie: Yeah.
Tom: We sure are.
Kevin: Very cool.
Alright.
Thank you for the tour, Charlie.
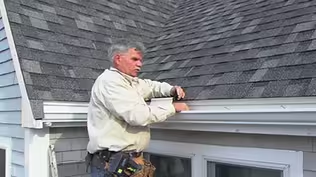
Tom: Alright, so I marked out about an 8.5-inch opening that we're going to cut and we're going to cut into the rafters also.
[ Saw buzzing ] Alright, we've got our sheathing removed, and you can see through the ends of our rafters right here in our overhang.
Now, what I'm going to do is I need to cut this rafter section out for the gutter.
So if I take the gutter, take a measurement on the front of the gutter... [ Grunts ] ...and I measure down with the edge, it's 5 inches on the front and it is 6 1/2 in the back.
[ Saw buzzing ] Now I cut this piece out all the way in and make a box for the gutter to sit on.
[ Saw buzzing ] Alright, so now that we cut the rafter tails out a lot, now you think about the structural integrity.
Well, we figured for that right from the beginning.
We added a structural beam to go from the end there all the way to the end there to carry the small section of the roof.
So that's not going to go anywhere.
Okay.
So the next thing we need to do is put a nailer in at the top right there.
[ Drill whirring ] And we have another nailer that's going to go on the bottom.
Now that we've cut our channel through our rafters, we can line it with sheathing.
Alright, so now I have to deal with this gooseneck right here.
So I measure from the end of the gutter to the center of the gooseneck is 4 1/4 inches.
That's going to be the center of my hole for the gooseneck to drop in.
[ Drill whirring ] Charlie: Alright.
These should be the last couple pieces.
Tom: Yeah.
Then come down to me.
There you go.
Charlie: I'm good.
Tom: Halfway there?
Charlie: Yep.
[ Drills whirring ] This is a self-sealing membrane, but it's actually high heat which is made for having under copper or any other metal work.
I'm going to cut them in 2-foot sections and this is going to make it much easier for us to handle.
Tom: The idea of this stuff is when you puncture it with a nail or any penetration, it will actually seal itself right around it and it won't leak.
Alright.
Our box is lined.
Now we're ready to install the gutter.
Alright.
Now the gutter's in place down onto the flange.
We brought our rubber over.
The roofer will then take it from here, and he'll nail it with a ring-shaped copper nail right there.
And that has to be the same material as the flashing itself, because dissimilar metals will deteriorate and rot.
Charlie: But you know what?
I have the ultimate test.
I've been dying to do this all day.
I'll be right back.
Tom: Okay.
Charlie: Alright.
What do you think?
Little water tester of our own.
Tom: Oh, boy.
Charlie: What do you think?
Tom: Oh, yeah.
Look at that, huh?
There it goes.
It's exiting the roof.
Charlie: Wow.
Tom: Working perfect.
Charlie: Just like we planned it.
♪♪ Kevin: This is the shower in Caffrey's bathroom.
And last time we were here, the blocking was going in.
So we had places to affix grab bars.
And since then the plumbers have roughed out the supply lines, and the fixtures as well.
And when it comes to accessibility, there are some small details that can make a big difference.
And here's an example.
The primary bathroom is on the back side here, and you can see this strapping represents the height of the sink.
But you'll notice here in Caffrey's bathroom that this sink has been lowered by a couple of inches because remember, he's likely to be wheeling in underneath the sink.
So the sink comes down lower.
But also they want to make as much room underneath the sink as possible.
So here's what they've actually done.
This is what the P-trap is going to look like.
This sweep here pushes the P-trap back, but also they are going to turn this P-trap 90 degrees to push it back even further.
That takes the drain right here over a couple of inches.
So the plumber roughed in this drain over a couple inches that way.
As I said, just a couple small details can have a big impact on Caffrey's ease of use in this room.
Hey, Heath, how you doing?
Heath: Hey, Kevin.
Kevin: So laying out the lights, recessed?
Heath: Yeah, this is the fun part, work on the layout.
Kevin: [ Chuckles ] Is it?
Heath: Yeah.
We have a pretty good plan from the architect laying everything out, and we're actually having pretty good success where everything's landing.
We're not having to worry about moving things too much as far as the framing, so it's working out pretty well.
Kevin: I also like to hear that.
And what are we using?
Heath: These are 4-inch lights with these 4-inch brackets.
It might look a little familiar to you.
Kevin: Oh, yeah.
We saw these recently at the Concord project.
Right?
You set them up into the hole and the springs will actually snap down to pull it up?
Heath: Exactly.
Kevin: And then these will articulate?
Heath: And they do.
They move about 20 degrees.
Kevin: Okay.
Heath: And it's not so critical here, but in the rest of the house, we have angled ceilings so we can actually have that shine straight down.
Kevin: And so you're just trying to keep the fixtures the same throughout?
Heath: That's it.
They want to keep the same look throughout the whole place.
Kevin: Okay, very nice.
So we just talked about a couple of small changes for Caffrey in the bathroom.
You're making some out here in his bedroom as well.
Heath: Right.
So let's take a look at some of the device boxes and they might look a little different to you.
Kevin: Definitely lower.
Heath: A little bit lower, yeah.
Kevin: Normally would be... Heath: So normally we shoot for somewhere around 48 inches to center.
Kevin: Okay.
Heath: And these are 36.
Kevin: So, again, if Caffrey's wheeling in... Heath: Exactly.
Kevin: ...it's easier for him.
Heath: We want to have easy access for him to get to those.
What we're going to do is we're going to carry this throughout the house, so no matter where he is, it's a comfortable height.
He can have access to everything.
Kevin: Every room in the house will have it that way?
Heath: Exactly.
And the easiest way to measure that for us is cut a stick, lay it on there, keep it consistent.
We don't have to worry about it.
Kevin: Got it.
Okay.
Heath: Now, same thing with his receptacles.
His receptacles are up at 24 inches, probably a little taller than what you're used to as well.
Kevin: So switches came down, but the receptacles come up?
Heath: Right.
Kevin: You're in a chair.
You got to reach down.
Heath: Easier to plug a little higher, right.
So we actually brought these up to 24 inches to the center.
Kevin: And can you show me where they typically would be just for... Heath: Our normal would be somewhere around 18.
Kevin: Gotcha.
So I guess when we're at this stage of the framing, again, small detail, but you can do it just as easily as you can put them up high or low.
Heath: It makes no difference.
Yeah, it's just where it's going to be convenient and easy to use for him.
Kevin: And for receptacles, are they going to be at this height throughout the rest of the house?
Heath: No, we're just going to keep them here in this room and a couple of other spots, but the bulk of it will be back down to conventional 18.
Kevin: Nice touch, Heath.
Thank you.
Heath: Alright.
Thanks.
♪♪ Kevin: In 1960, an architect named Bernard Lange designed and built three homes here in Lexington, Massachusetts.
We even found some archival footage of the homes.
That's his house right in the middle.
And he also built this house to the right and that one to the left for his wife's family.
Well, the one to the left happens to be our project house.
Now, 12 years ago, Kimberly, the homeowner of this house now, bought the property from Lange's family.
And because of the similarity between the two houses, we thought we'd take a tour of her house to see some of the original mid-century modern details and how they were updated to fit her lifestyle.
Hey, Kimberly.
Kimberly: Hi, Kevin.
Welcome.
Kevin: Thank you very much.
Nice to meet you.
Kimberly: Great to meet you.
Great to have you here.
Kevin: Thank you.
Carport.
You know, the only time I see carports is when it's a mid-century modern.
Kimberly: I know.
It is an unusual feature for New England, but Mr. Lange really wanted people to arrive at his home and just walk through the front door.
Hang your coat right there.
Bring in your groceries.
He didn't want a separate garage where you had to walk through the house with all those things.
Kevin: Gotcha.
So do you not have a garage or...?
Kimberly: We don't, which is somewhat challenging when you think about the stuff families have, like bikes and garbage cans and things like that.
Kevin: Where do you put it?
Kimberly: Well, we built a shed.
Kevin: Oh, so the vertical is the house and the horizontal is the shed?
Kimberly: Yes, it disguises the shed.
It was an addition that we put on.
Kevin: I didn't know when I came up.
I had no idea.
Kimberly: That's the idea.
Kevin: I bet you Mr. Lange would approve.
Kimberly: I hope so.
Kevin: Alright.
Well, we came here to see the inside.
Kimberly: Please come inside.
I'd love to show you.
Another project that we did is this whole entryway.
Kevin: Oh, so this is new?
Kimberly: It is.
We actually worked with the same architects that Billy and Michelle are working with next door.
And we did a whole bunch of work on the house, including this entryway.
It's completely different.
We added storage, changed the ceiling, the light fixtures, wall coverings, all of it is new.
Kevin: Well, you did a good job because it reads mid-century modern to me.
Kimberly: Thank you.
Thank you.
We were inspired by this door handle, which is original to the house.
Kevin: That was here?
Kimberly: It was.
Kevin: Oh, okay.
So the little blue accent is how you get the blue for the grass cloth wall covering right here?
Kimberly: Exactly.
Kevin: And check it out.
So right in the front entryway, you've got this sort of round effect right here.
Subtle, but man, does it kick into high gear!
Holy mackerel.
Kimberly: Yes.
We love this feature.
Kevin: Home entertainment in the round.
This is amazing.
Kimberly: It's a great party spot.
It's perfect for small children running around in circles.
Kevin: I bet.
So how much of this is original?
Kimberly: Well, it's original to us.
So this carpet, these built-ins, they were all here when we bought the house.
Kevin: The curved benches, that's all his work and everything like that?
Kimberly: Exactly.
Our understanding is that the Langes came here from Cambridge, where they had had many parties, and they entertained people and they wanted to replicate that.
Kevin: So people come for the parties.
Don Draper shows up.
Kimberly: Exactly.
They even carpeted the stairs so that when you had a party, you could have your martini, your Don Draper martini and -- Exactly.
Sit right there.
Kevin: That's amazing.
And so do you guys sort of keep that spirit alive?
Is this the center of everything?
Kimberly: This is the center of everything.
Christmas, parties, everything.
Kevin: Tree goes right in the middle?
Kimberly: Tree goes right there.
Kevin: That's awesome.
I love it.
Immediately adjacent to attached dining area.
Kimberly: Yes.
Kevin: This is cool too.
Kimberly: And this is the original table from the Langes.
Actually, we purchased it from them when we bought the house.
Kevin: No way.
Kimberly: Mm-hmm.
Kevin: Alright, so round, which goes with the sunken living room.
Kimberly: Exactly.
Kevin: The beautiful round fixture.
Kimberly: Yep.
Kevin: Well, this is starting to feel like a little bit of a time warp now, right?
Kimberly: We did decide to keep the original kitchen as much as possible.
Kevin: Yeah.
Does it work for you still?
Kimberly: It...does.
[ Both laugh ] Kevin: I love the hesitation.
Kimberly: We had to modernize it, but... Kevin: Aficionado.
Look at that.
Kimberly: Yes.
Kevin: So, appliances, you've got the center island, terrazzo floor.
I presume original as well?
Kimberly: Absolutely.
Kevin: Those are terrific.
And metal cabinets?
[ Tapping on metal ] Boy, we don't see that very often.
Are these original?
Kimberly: 1960.
They are.
Kevin: That is in great shape.
Good for you.
So it works and it's okay.
Kimberly: Yes.
We love living in a mid-century home.
Well-designed, great use of space.
We're very happy.
Kevin: I love the fact that you have kept so much of it original, although I do know from the architects that in addition to what you guys did outside, they did some stuff for you inside?
Kimberly: They did.
We have a big project downstairs that I'd love to show you.
Kevin: I'd love to see it.
Kimberly: And so, Kevin, I wanted to point out this to you, which is actually the original floor plan of the house designed by Mr. Lange for Mr. and Mrs. Lange.
Kevin: Yeah.
Kimberly: We think the house was shaped like a bow tie.
I'm not sure if we've just imagined that.
Kevin: I kind of get that.
Kimberly: Yeah.
The round.
Kevin: Yeah.
And you know what?
I know a lot of architects who wear a bow tie, so it wouldn't surprise me if that's where he took his inspiration from.
So do you guys call this basement?
First floor?
What?
Kimberly: We call it the downstairs.
Kevin: Downstairs works.
Okay.
Oh, wow.
Beautiful.
All finished off, huh?
Kimberly: Yes, it was a blank slate when we bought it.
Kevin: So this is the work that you guys did with the architects?
Kimberly: It is.
It is.
Kevin: All of it, wow.
Kimberly: We lived in the house for five years before we did the project.
Kevin: And what were you going for?
Kimberly: We wanted to be respectful of the architecture, have a mid-century vibe, have flexibility.
It's sunken down here, a bit like it is upstairs.
Kind of have that same vibe that you have upstairs.
Kevin: Steps on either end, steel beams exposed.
So the modernists like their industrial design and celebrate it.
You kept those?
Kimberly: Absolutely.
Kevin: Yeah.
And some playtime, too, huh?
Kimberly: Absolutely.
Kevin: Enough room for the Ping-Pong table.
Kimberly: There's a great love of Ping-Pong in my family, so we needed some space for that.
Kevin: But also some nice built-ins.
So there's some great detail and then workout space right here and open floor plan.
One big long area.
Kimberly: Yes.
But we did have a pocket door installed, so it could be an office down the line if we wanted that.
Kevin: Well, you know what?
It's nice for us to see it as inspiration for what we're doing next door because as you know, the homeowners have got a downstairs and they're thinking about sort of rec room, exercise room, living space.
So this is good inspiration.
Thank you for the tour.
Kimberly: Of course.
My pleasure.
Kevin: And you know what?
We're going to try to keep it down next door.
The big machines are leaving soon.
Kimberly: Oh, we look forward to that.
Kevin: Thanks for putting up with us.
Kimberly: Thanks, Kevin.
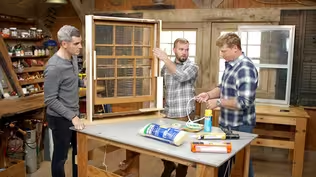
♪♪ Charlie: Well, it's hard to believe we ordered the windows somewhere around 20 weeks ago, and they finally arrived.
Tom: Yeah.
Custom windows take time.
You got to order them early.
Charlie: We were forced into putting all new glass in this house because that goes back to that HERS rating that we had to do to get our permit for the new energy code we have to deal with in the state.
Tom: Right.
Well, the old windows were just basically plate glass, a single pane of glass, 3/16 of an inch thick.
Let the sun come in and basically heat up the house.
Charlie: That's right.
Tom: Very inefficient.
And the new window is two panes of glass, 5/16 of an inch thick with argon gas in the middle.
So it's very energy-efficient.
The jambs are fiberglass, so there's no wood to rot.
These wedges right here are where we put the shims, and the manufacturer even pre-drilled the holes for the screws.
So it makes it nice and easy.
The nailing flange is just a vinyl nailing flange for screws or nails just the same as other windows.
Charlie: And even though these windows are a couple inches wider, we had a continuous header so we didn't have to reframe that.
Just some new framing on the sides.
And the architect wanted the glass to be very tight to the corner to have a very small trim detail.
Tom: Yeah, she really wanted to maximize the opening both in the glazing but also in the trim detail like you said.
So it's really going to look nice with the contemporary design.
Charlie: It is.
So our first step is to put this clapboard down on the bottom.
Tom: Right.
The idea of using a clapboard, it's thick on one end and thinner on the other, so we'll put it down.
So now the sill is pitched downward, so if any condensation should occur under this window, it will naturally drain out.
Charlie: We're going to use this self-adhering flashing.
Tom: Yeah.
Charlie: I'll hold this end up for you.
Tom: Okay.
Line it up.
Charlie: Yeah, I'm good right there.
Tom: Good?
Charlie: Yeah.
There we go.
Alright.
Tom: Okay.
Let's peel it back for a second here.
Get this off.
Alright, let me pull that off.
I'll push the middle down first and then just scrape it away.
Charlie: Here you go.
Tom: Yep.
This is just a plastic screed that we can flatten out all the bubbles.
Alright, one more piece.
The beauty of the tape, it's doing two things.
It's flashing for water, but it's also air sealing.
So it's flashing for the air, too.
Alright.
Now we're ready for these corners.
Now, these are pre-manufactured corners, already folded and bent.
So we unfold them and they'll go right into the corner nicely and fill the gap and the corner.
Now, that corner is no joint there.
Nice and tight.
Now up the sides.
Charlie: Alright.
The rough opening is a little bigger than the window itself.
Tom: Yeah, on all four sides.
So what we're going to do, we know our sill is level because we checked it and we're going to position these shims right here to create a little bit of an air gap under the window and also to get some insulation in once the window is in place.
Rather than puncture holes in the tape, we're going to tape the shims down so they don't move when we're putting the window in.
♪♪ Bring it to the opening.
I'll step inside.
♪♪ Charlie: This side's good.
There you go.
Tom: I can come this way about an eighth.
That looks pretty good on this side.
♪♪ ♪♪ Alright.
That's it for the inside.
All we got to do is a nail and flange on the outside, and then later on, the insulation company will come and insulate around the inside of the rough opening.
Charlie: You know, this is a big window, but it wasn't bad.
We only have about another dozen of these to go.
Tom: A dozen?
Not bad.
Charlie: Not bad.
♪♪ Kevin: Alright, first windows going in.
That's a great sign.
Tom: It is.
Kevin: Just in time.
I'm not saying anything, but we are officially halfway through the schedule, Charlie, so... Charlie: We are.
But you know what?
I went over it.
I'm very comfortable where we are, believe it or not.
Kevin: Good.
Charlie: But I'm not mentioning names, but I think the electrician's holding us up.
Kevin: No names.
Heath: I thought we weren't pointing fingers.
Kevin: Ooh!
No, apparently we're not pointing fingers.
Alright.
Well, that's it for us until next time.
So, until then, I'm Kevin O'Connor.
Tom: I'm Tom Silva.
Charlie: I'm Charlie Silva.
Heath: I'm Heath Eastman.
Kevin: For "This Old House" here in Lexington, Massachusetts.
♪♪ Kevin: Next time on "This Old House"...
So we are picking kitchen cabinets today, is that right?
Woman: Yes.
I actually have a rendering.
Woman #2: Wow, that looks great.
Tom: We're working on the exterior siding, starting with the vertical nickel gap.
Jenn: And this patio needs to be fully accessible, which means it needs to be flush at every entryway.
So where's the water going to go and how's it going to go away?
We'll show you our solution.
Kevin: Ooh.
Charlie: Not bad.


- Home and How To

Hit the road in a classic car for a tour through Great Britain with two antiques experts.


Support for PBS provided by:
Funding for THIS OLD HOUSE is provided by The Home Depot and Renewal By Andersen.