E9 | Paint Front Door, Generator | Ask This Old House
Season 22 Episode 9 | 23m 42sVideo has Closed Captions
Heath discusses generator options; Jenn builds a worm farm; Mauro paints a front door.
Heath Eastman shares what factors to consider when selecting a generator, such as fuel or electrical load, and the options that are available; Jenn Nawada shares how to build a worm farm, what foods to incorporate and exclude when feeding the worms, and the many benefits of worm composted soil; Mauro Henrique refreshes a homeowner's vintage front door with a fresh coat of paint.
Problems playing video? | Closed Captioning Feedback
Problems playing video? | Closed Captioning Feedback
Funding for Ask This Old House is provided by The Home Depot, Renewal By Andersen, and ChipDrop.
Support provided by:


E9 | Paint Front Door, Generator | Ask This Old House
Season 22 Episode 9 | 23m 42sVideo has Closed Captions
Heath Eastman shares what factors to consider when selecting a generator, such as fuel or electrical load, and the options that are available; Jenn Nawada shares how to build a worm farm, what foods to incorporate and exclude when feeding the worms, and the many benefits of worm composted soil; Mauro Henrique refreshes a homeowner's vintage front door with a fresh coat of paint.
Problems playing video? | Closed Captioning Feedback
How to Watch Ask This Old House
Ask This Old House is available to stream on pbs.org and the free PBS App, available on iPhone, Apple TV, Android TV, Android smartphones, Amazon Fire TV, Amazon Fire Tablet, Roku, Samsung Smart TV, and Vizio.
Keep Exploring

This Old House Insider Newsletter
Get This Old House exclusive stories, tips, and behind-the-scenes information delivered right to your inbox every month.Providing Support for PBS.org
Learn Moreabout PBS online sponsorship♪♪ Kevin: On "Ask This Old House," our experts travel across the country to answer questions about your house.
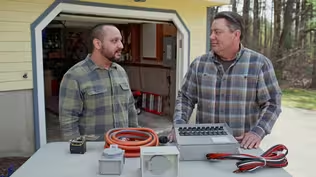
♪♪ Today, Heath shares what generator options are out there and how to make the best selection for your home.
Then, ready to open this can of worms?
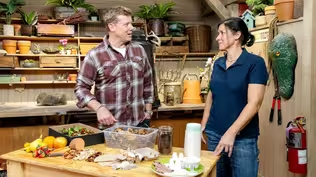
Jenn shares the benefits of worm farms and how to create one at home.
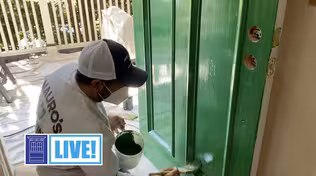
Plus, Mauro heads to Tulsa to help a homeowner paint her original front door.
Danielle: It looks amazing.
Kevin: All that on "Ask This Old House."
♪♪ Kevin: Hey, Heath.
Heath: Hey, Kevin.
Kevin: How's that mailbag looking?
Heath: Lots of questions, as always.
Kevin: What'd you settle on?
Heath: It's generator season.
Kevin: Oh, it is.
Heath: Yeah.
Kevin: Winter's coming, ice storms... Heath: And lots of questions from people on what they should do.
Kevin: Yeah.
So, what should they do?
Heath: So, for me, when we're talking about this, it comes down to three main questions we want to start with.
The first one is, do you really need it?
I mean, how much do you lose power?
Where are you located?
Are you worried about someone being home that really needs to have it on if it's down for more than 24 hours?
Those kind of things.
It's a big investment.
So you want to make sure it's really worth your while.
Kevin: I do know people who feel like they need one and it's either out of envy or overabundance of concern, but the power doesn't actually go out.
But then there are times and places where the power does go out pretty regularly.
Heath: That's when you need it.
So, once you've decided that you truly do need it, it becomes of what you need to have on.
Do you just want the basics?
Do you want refrigeration, heating?
Do you have a well pump that needs to run?
That kind of thing.
Or do you really want to live like nothing's happened?
Do you want to run the whole house, be able to do laundry, not bat an eye, and just live normal?
Kevin: Don't want to miss a football game.
Heath: That's true.
I don't blame you.
Kevin: Got to get that 72-inch TV working.
Heath: And that brings us to budget.
What's the budget to make this happen?
Kevin: So, let's start on the simpler end of the scale -- not a huge budget, and I just want to run a couple things because I just want to get through comfort and safety during the power outage.
Heath: Perfect.
That's great.
So we're going to look at starting with a portable generator.
Kevin: Mm-hmm.
Heath: And this is something you might see on a jobsite.
You know, we take them there to use for temporary power if there's nothing.
You're going to have to wheel it out of a garage or a shed to get it outside.
You're going to have to put fuel in it, which is typically going to be gasoline.
There are some propane models, but mostly gasoline.
Plug it back into the house with a cord specially made for it, start it, and then manually transfer over to get the power running.
Kevin: So the advantages are you can get in one of these things for short money, relatively speaking, right?
Heath: Yeah, $1,000 to $1,500 at a typical home supply center.
Kevin: Gotcha.
Pretty easy to operate.
The downsides would be what?
I can't run everything in the house.
Heath: Typically, you're not gonna be able to run everything in the house, just based on the general size.
Not that there isn't an exception to every rule.
You can get much larger ones, but the cost just starts getting so expensive it doesn't make sense.
Kevin: So, I'm going to pick my circuits that I want to run.
That's one of the downsides.
I do have to keep fuel in it, which means I either have to have it on hand before, or I've got to go get it and then keep refilling it if there's a long outage.
Heath: Exactly.
Either you're going to have multiple gas cans sitting around or you're going to have to go to the station.
And if you have a big storm, who's to say the station is running and can pump?
And you've got to maintain it a little bit.
So, you've got to have somewhere to store it, somewhere to store the fuel, pull it in and out.
And what if someone's home that can't move that in and out?
Kevin: I'm at work, the power goes out -- Someone's got to pull that thing out, turn it on.
You kind of have to be there to make it work.
Heath: Or if you're on vacation, you're away.
Storm comes through.
You don't want things freezing.
Kevin: Yeah.
Gotcha.
Okay, so some limitations there.
If I want to step it up a notch?
Heath: Go to the automatic.
Kevin: Okay.
So, let's describe those.
Heath: So, an automatic standby generator will start on its own.
It'll sense that it's lost street power.
It'll wait a second.
It'll start the generator.
And then once it knows everything's good, it'll transfer over and you'll run on generator power.
Kevin: Gotcha.
So, I had one of these things installed.
I love it.
It's out behind the garage.
In this case, there's different fuels that run it.
Heath: Right.
Kevin: Mine is off of propane because that's what we have in my neighborhood.
But it doesn't have to be that.
Heath: Doesn't have to be.
So, typically we're going to see natural gas or propane.
And that's going to be one of the first limiting factors of how big of a unit you can install.
If you have natural gas, typically you can install comfortably what you want for air-cooled units.
If you have propane, you're limited to what your tank sizes are, if you can't increase your tank, Kevin: Right.
Yeah.
So, they added a second tank for us, which made it viable.
But we had to do that.
Heath: Yeah.
Kevin: And then we also had to decide how big, how many of the circuits we wanted to run in the house.
And because I wanted my Sunday football, I went with the big daddy.
Heath: We want the whole thing.
Kevin: My recollection is I think we did put in a 20kW.
Heath: Sounds right.
Yeah.
Kevin: That could do a whole house?
Heath: Yeah.
So that's typically somewhere between a 90-amp or 100-amp breaker that comes on that unit.
And that can run basically everything you're using there, as long as you're reasonable.
In the middle of the summertime if it went out, don't try and run all your central air conditioning, electric dryer, electric oven.
I know you want to.
but don't run all of that.
Kevin: I would never do that.
Heath: But it lets you use all the lights, all the receptacles, your TVs, everything as normal.
Kevin: Right, but I could put in, say, a 10kW on standby, which would go on automatically, constant fuel, but then I would just have to choose what circuits.
I'm not going to run inside.
Heath: You have to be a little more cautious about what you actually use.
Kevin: Gotcha.
And if we can get a portable for $1,000 or $1,500, what do these standbys cost me?
Heath: Standby packages typically run, with a transfer switch and the generator itself, anywhere from $3,500 to $7,000.
Kevin: Gotcha.
Okay.
In any case, whether it is a portable unit or a standby unit, they are using fossil fuels to make electricity.
Heath: Right.
Kevin: Gasoline, propane, in my case, sometimes natural gas.
Heath: And a little bit more maintenance.
Kevin: And some people want to get away from fossil fuels completely.
Heath: Right.
Kevin: With solar and batteries and all that kind of stuff, is there an all-electric option to have a generator backup for my house?
Heath: There is.
So, the more we're seeing more and more solar, a lot of these companies are also providing battery backup systems.
So when you lose power, it acts like your generator.
You have a transfer switch that now kicks over to the battery running the house.
It's great.
It's clean, it's simple.
But we do have some limitations as far as where you can locate the batteries, how much they can actually run, and how many of them you really need.
Kevin: So, if I wanted to run my entire house, the equivalent of a 20kW generator, do I need a boatload of batteries to do that?
Heath: If it's for any length of time, it's going to be a fairly good-size battery setup, yeah.
Kevin: So, possible, but maybe not mainstream just yet.
Heath: Not quite yet.
I think it's a little expensive, but I think it's definitely getting there.
Kevin: Cool.
Alright.
Well, good information.
Thank you.
Heath: You got it.
Kevin: What else we got in here?
"How to make gingerbread cookies"?
Who gets that one?
Heath: Tommy.
♪♪ Kevin: Hey, Jenn.
Jenn: Hey, Kevin.
Kevin: Worm farming?
Really?
Jenn: Seriously.
Get with the times, bro.
Kevin: Where do you put them?
In a barn?
You have to fence them in?
Jenn: No, this is for inside the house.
So, vermicompost, vermiculture, worm farming -- it's all the same thing, right?
So it's the byproduct.
The worms eat through organic matter, and then what produces on the other side is an organic fertilizer.
Kevin: Which we love, right?
You want to put that in your garden.
It's going to be just black gold.
Jenn: Yeah.
You could see, you could buy it in stores.
It's called worm castings.
But it is black gold.
It has organic material in it and it's going to make your garden grow.
And this is an efficient way to get rid of your scraps indoors.
So, what I have here are, my ingredients are shredded paper... Kevin: Okay.
Looks like corrugated cardboard is part of it.
Jenn: Yeah, the newspaper, and then this is...
It's a moist... Kevin: Yeah, I feel that.
Jenn: Yeah.
So you want it to be moist and you want it to be, like, wrung out like a sponge.
Kevin: Mm-hmm, because this is going to be part of a, like a cooking process, right?
There's going to be a lot of organic things going on.
So wetness is important.
Jenn: Wetness is important.
You don't want it so damp that it's going to be just dripping out.
It's got to be like a wet wrung sponge.
Kevin: Gotcha.
Jenn: Okay.
So, this is your base layer.
You want 3 to 4 inches of this.
This is...
This is the compost, right?
You have organic matter.
Anything from grapes, avocados.
Kevin: Is this breakfast?
Did you guys have eggs?
Jenn: I had the avocado.
My son had the eggs.
Kevin: Gotcha.
Alright.
Jenn: So, you don't want any meats, anything fatty.
Otherwise it's all going to start to smell.
Kevin: It'll get rancid on us.
Jenn: Yeah.
So... Kevin: Okay.
Jenn: That's number two.
Kevin: Gotcha.
Jenn: And number three... Kevin: Our heroes.
Jenn: Our heroes are the red wiggler worms.
Kevin: Really?
Let me just pull a couple of these guys out.
Oh, there they are.
Jenn: Right?
Kevin: Wiggling indeed.
So, they're moving and about.
Jenn: Yep.
So, what these guys do is they eat over half their body weight, they consume, and then they produce the end result, the organic compost.
Kevin: So, that is the magic.
Jenn: Yes.
Kevin: So, what is the formula here?
How do we set this thing up?
Jenn: Okay.
So, I have three buckets.
The bottom bucket is going to have a solid base so nothing can leak through.
Then what I've done is pre-drilled all these holes because you're going to want drainage.
You don't want it to sit in, like -- you don't want it to have any standing water, or it's going to start to rot and stink and cause bacteria.
Kevin: Yeah.
And we will get water, right, as this thing goes through its process?
Jenn: Yes.
Kevin: It's gonna just bubble and boil.
Jenn: Exactly, so you want it to be able to drip through and essentially make a tea at the bottom.
People call it vermicompost tea.
So, it's still going to have tons of nutrients in it, and you could use that on your plants.
Kevin: Magic tea.
Right.
And then holes on the top as well?
Jenn: Yep.
So, the holes on the top...
So, this is all for so the worms can breathe.
They're going to need oxygen.
So, for drainage and oxygen.
Kevin: Tea drips out the bottom, air comes in the top.
Jenn: Exactly.
Kevin: And then you start building your layer cake.
Jenn: Yeah.
Would you like to help build my layer cake?
Kevin: Listen, that's what I've always wanted, to be a farmer.
Jenn: I knew it, I knew it.
Kevin: Just not of worms.
Jenn: So, we want 3 to 4 inches of this, right?
Shredded.
Kevin: So, this is easy to make, right?
Just whatever you got lying around the house, as long as it's this stuff.
Jenn: Any of your delivery boxes, your shredded newspaper.
Kevin: Gotcha.
Jenn: And so we just pop it in the bottom.
Alright.
Kevin: That's -- that's bedding?
Jenn: This is called bedding.
Kevin: Here's one last little... Pssh!
Gotcha.
Jenn: And sometimes, to get it started, you can mix compost in it, but this is going to be fine because this is all broken down.
Kevin: Okay.
Jenn: Next layer is the organics.
So, all this stuff, essentially, you could just dump right in here.
Kevin: Just just throw it in on top?
Jenn: Yep.
Kevin: Got a couple of carrots, onions... Jenn: Yeah, so, I mean... Kevin: Coffee filters.
I see some coffee in there.
Jenn: Yep, we got coffee, used tea bags, eggs.
Sometimes I take out the thicker filters because they're not going to break down as much.
So chuck that over there.
Kevin: Leave it behind.
Gotcha.
Okay.
Layer two.
Jenn: That's layer two.
And then I'm going to spread it all around, just put it flat.
Layer three.
Get our red wigglers in there.
Kevin: So, what are these guys doing?
You're saying that they literally are just going to start consuming...
They are -- They are eating, digesting... Jenn: So, their job... Kevin: ...and then pooping out?
Jenn: Exactly.
So, their job is to eat the organic waste.
Yes, you can dump it on.
Kevin: Okay.
Jenn: So, yeah, their job is to eat the organic waste.
And as they eat it, what comes out on the other side is the castings.
And that is the nutrients that you're going to put in your garden.
So, you know, within two to three months, this has to get started, get cooking, right?
And then it's going to turn into compost.
And when that happens...
In the meantime, you're going to do that same layering on this top bucket, right?
This goes on top.
Kevin: Ohh!
Jenn: The worms are naturally going to come up through the holes that I pre-drilled, and they're going to go to the next layer, through the bedding and get the organic material and do the whole process over and over again.
Kevin: Efficient little critters.
Jenn: I know.
So, then... Kevin: So, when you had multiple buckets, I thought you were going to be mixing, pouring one into the other.
Jenn: No.
Kevin: You're just rotating, where the top one becomes the bottom one and the other one comes up top.
Jenn: Exactly, so everyone's going to do their job.
When they're done, they're all going to migrate to the top.
This should be compost, and then you take that out to your garden, remove any of the tea from the bottom, which you can put on your plants as well, and then just keep the cycle going.
Kevin: And top has got holes punched in it as well.
Jenn: Yes, for extra oxygen.
Kevin: So, the whole thing's gonna get covered up, more air.
Jenn: Exactly.
Kevin: Where do I keep it, that my wife isn't going to kick me out of the house?
[ Both laugh ] Jenn: Underneath your sink.
In any cabinet in the house.
You know, basement.
You want the temperatures to be anywhere from like 59 to 75 degrees.
Because if it's too cold, the worms are going to go dormant.
Kevin: And how many worms do I use?
And where do I get these things?
Jenn: So, for these size buckets I would use half a pound, which is about 500 worms.
For bigger bins, it doesn't matter what bins you use, just as long as you do the same process.
But 500 for this.
You could order them online.
Just look up red wigglers, and it's actually a thing.
Kevin: Anybody can be a farmer.
Jenn: Yep.
Kevin: Mail-order farming.
Jenn: Yep.
Kevin: Alright.
I love it.
Thank you, Jenn.
Jenn: Alright.
It's my gift to you.
Kevin: Yeehaw!
Jenn: For you and your wife.
Kevin: Giddy up, partner.
I don't know, how do farmers talk?
That's a rancher, isn't it?
Oh, my God.
Jenn: That's a ranch.
Got it wrong.
Mauro: Well, I'm on my way to Tulsa, Oklahoma, to help this homeowner with her painting project.
And looking around, I really like the architecture of this city.
And most of Tulsa was designed using this Art Deco style.
Art Deco has geometrical shape, sharp lines, bold colors.
And it's really nice.
Beautiful town.
Homeowner's house is just outside the city, but it's also nice to come to town and visit different architecture styles.
♪♪ ♪♪ [ Doorbell rings ] Danielle: Hi, Mauro.
Mauro: Hi, Dani.
Danielle: Welcome to Tulsa.
Mauro: Thank you.
Nice to meet you.
Danielle: Nice to meet you, as well.
Mauro: Well, this is a beautiful town.
I love the architecture around here.
Danielle: Oh, yeah.
So, like, the downtown center is like the majority Art Deco, 1930s style.
And then, like, you move further from downtown and you, like, kind of see the evolution of Tulsa.
That's, like, my favorite part of it, all the different architecture.
Mauro: That's great.
So, what are we doing with this beautiful door here?
Danielle: Yeah.
So, I moved to Tulsa a year ago.
We bought this house.
It's like a 1960s kind of mid-century element.
This door is, I believe, original.
It has, like, beautiful detailing, but it's a bit weatherworn.
So I'm kind of looking to paint it with a pop of color and make it pop against the brick.
Mauro: Yes, the house, this nice color on the brick and this color that we're going to do for this door is just going to pop this whole door out.
Danielle: I'm excited.
Mauro: Alright, so when I work on old doors like this, I've done a lot of it.
One thing I don't like to do is take them off the hinges.
Danielle: Okay.
Mauro: Because it's so hard to take them off the hinges and then put it back.
So, this is what we're going to do.
We have some prep work to do, fill up some nail holes.
Also, there's some cracks here that we'll have to take care of.
Then we're going to lightly sand and make this house pop.
Danielle: Awesome!
Sounds easy enough.
Mauro: Alright.
Let's get it done.
Danielle: Yep.
Let's go.
Mauro: Okay, cool.
Well, Dani, for every painting project, you start with a good preparation.
Danielle: Okay.
Mauro: Okay?
Drop cloths down.
And because we're keeping all the hardware, we're going to protect them with tape.
But I also like to protect this big piece of glass here.
What I'd like for you to do, get this tape, go right against the trim.
Danielle: Okay.
Mauro: And press it down.
Okay?
Danielle: Okay.
Mauro: We'll take care of that first, and then we protect the glass.
See, when you do things like this, this is one of the most important things before you start any painting project -- protection.
Danielle: What about this, like, caulking right here?
Should I tape over it, or...?
Mauro: When you see the glass, the tape goes only into the glass surface.
Okay, now we're going to cut a bunch of small pieces.
Alright?
Danielle: Okay.
Mauro: Just like that.
And then we go like this.
You put one there.
Danielle: Okay.
I think I can do that.
Mauro: That looks good, Dani.
Danielle: Thank you.
Mauro: How many doors have you painted before?
Danielle: Zero.
[ Both laugh ] Is this your first door?
Mauro: I've done a few, but every door is different.
Every single door is different.
Alright.
Tape is around the frame.
Now we're going to protect the whole piece of glass over here.
Danielle: Okay.
Mauro: Good, and bring it all the way down here.
Now I'm just going to go like this.
Danielle: Great.
Mauro: Alright.
Well, what we're going to do, we're going to use to fill the cracks and the nail holes is a two-part wood filler.
Danielle: Okay.
Mauro: It has the resin and it has the hardener.
We'll mix those two together.
Dries really fast and sets really dry.
Danielle: Awesome.
Mauro: Alright, let's go at an angle like this.
And two fingers right there.
Press right in there.
Danielle: Okay.
Mauro: Okay?
And remove all the excess.
Just like that.
Danielle: Will we just need to do this once?
Or do we need to apply multiple coats?
Mauro: For the small ones, I think the one is good.
Danielle: Okay.
Mauro: You want to try this one here?
Danielle: Yeah.
Mauro: Start right there.
Yeah.
Just trying to press it to go right in there.
That's nice.
Alright, now it's time to do this big guy here.
Danielle: Yeah.
Mauro: See how big this batch is?
Danielle: I do.
Mauro: Alright.
Let's mix it up really well.
Then just go like this.
Alright, just fill in.
Danielle: Okay.
Mauro: We might have to do more than one pass.
Danielle: Okay.
Mauro: All we have to do for now is let this whole thing dry for about 30 minutes.
Danielle: Okay.
Mauro: I'm going to lightly sand.
Danielle: Awesome.
Mauro: Alright.
Now sand is done.
We try to get this profile as best as we can.
Danielle: Okay.
Mauro: Okay.
Might not look perfect, but it will blend in.
Danielle: Okay.
Mauro: Alright.
Alright, a little more detail here.
Danielle: Okay.
Mauro: I think we're good.
Alright.
What do you think?
Danielle: Yeah.
It looks amazing.
You can't even tell there was a piece missing.
Mauro: Right?
Danielle: Yeah.
Mauro: Good.
Now we're going to use that cloth.
Danielle: Okay.
Mauro: Let's get all this dust off the door.
Danielle: Okay.
Mauro: Alright.
And we're going to start at the top.
Yep.
Just like that.
Get this bottom one more time.
Alright.
Nice and clean.
Now it's time to prime.
We're going to use an exterior-grade oil-based primer.
Danielle: Okay.
Mauro: Alright.
♪♪ Danielle: So why is it important to tint the primer?
Mauro: Well, I always like to tint the primer when I get, like, what we call the deep-base colors.
That is the foundation for us to a good coverage.
To me, if I don't prime when I have darker colors, it requires, like, more coats of paint.
Danielle: Okay.
Mauro: Homeowners usually like the color that I tint the primer.
Danielle: No!
[ Both laugh ] That's crazy.
Mauro: Yeah.
Danielle: I don't like this color.
Just F.Y.I.
[ Laughs ] Mauro: Oh, that's good to know.
Mauro: No, but that happens sometimes.
And another factor is this -- this door has never been painted before.
So unless you got this darker stain, it's almost down to the bare wood.
Danielle: Yeah.
Mauro: We need an extra protection for that.
♪♪ Okay.
This is the color we picked out.
Danielle: It's gorgeous.
Mauro: It's gorgeous.
They call this Essex Green.
Danielle: Okay.
Mauro: Okay.
And we're going to use this exterior-grade paint, and we're going to apply the same way as we did with the primer, with a little bit different this time.
Danielle: Okay.
Mauro: Okay.
You're going to roll, and then I'm going to back-brush.
Danielle: Okay.
What's back-brushing?
Mauro: Back-brushing means every time when you do something, like say you spray something and then you want to put some brush marks, you back-brush.
Danielle: Okay.
So it's all about, like, adding some texture back in?
Mauro: Exactly.
That's what we want for this old door.
I think if we add a little bit of a character to it, it will with a back-brush.
Danielle: Okay.
Great.
Mauro: Alright?
See, look how thick.
Danielle: Much thicker than the primer.
Mauro: Alright, should be good there.
Okay, Danielle.
let's go to work.
♪♪ ♪♪ ♪♪ Okay, first coat is dry, and we're ready for the second and final coat.
But this time we're going to do a little differently.
We want to do the rails first -- top rail, bottom rail -- and then we do the middle.
Danielle: Okay.
♪♪ ♪♪ Thank you.
Mauro: You're welcome.
Danielle: It looks beautiful.
Mauro: Oh, let's reveal this door.
Wow.
Danielle: I love it.
Wow.
Mauro: Look at this dark green.
Danielle: It's beautiful.
I like how it brings out the details of the -- the trim of the door now.
Mauro: Absolutely.
With the little sheen on that door and the color, I think it couldn't have a better color to go with what you have in front of the house, those pink brick and this light gray trim.
Amazing.
Everything fits so nice and clean.
Looks beautiful.
Danielle: It just pops.
I can't believe what a coat of paint does.
Thank you so much!
I had so much fun painting the door today, and thanks for coming to Oklahoma.
I hope you come back soon.
Mauro: You're welcome.
If you have any question about your house, I would love to hear about it.
Just keep them coming.
Until next time, I'm Mauro Henrique for "Ask This Old House."
♪♪ ♪♪ Kevin: Next time on "Ask This Old House"... Nathan converts a window to a sliding door, giving a family VIP access to their backyard.
Then, any house hunters out there wondering what deal breakers they should be looking for?
The "Ask This Old House" team gives you their list of pitfalls and potential money traps to look for, so your next dream house doesn't become a nightmare.
All that on "Ask This Old House."


- Home and How To

Hit the road in a classic car for a tour through Great Britain with two antiques experts.


Support for PBS provided by:
Funding for Ask This Old House is provided by The Home Depot, Renewal By Andersen, and ChipDrop.