Playing Games in the Shop
Season 14 Episode 1407 | 26m 47sVideo has Closed Captions
Classic board and card games, including checkers, cribbage and mancala, are made.
Even with digital distractions all around us, classic board and card games have never been more popular. Even better if you can build them yourself. These ideal gift projects include checkers, cribbage, and mancala. It's time to start building.
Problems playing video? | Closed Captioning Feedback
Problems playing video? | Closed Captioning Feedback
Woodsmith Shop is presented by your local public television station.
Playing Games in the Shop
Season 14 Episode 1407 | 26m 47sVideo has Closed Captions
Even with digital distractions all around us, classic board and card games have never been more popular. Even better if you can build them yourself. These ideal gift projects include checkers, cribbage, and mancala. It's time to start building.
Problems playing video? | Closed Captioning Feedback
Where to Watch Woodsmith Shop
Woodsmith Shop is available to stream on pbs.org and the PBS app.
Providing Support for PBS.org
Learn Moreabout PBS online sponsorship[ Power saw whirring ] [ Mid-tempo music plays ] If you've ever been accused of the time that you spend in your shop as just being playing around, then this is the episode of "The Woodsmith Shop" for you.
On today's episode, we're going to build three really cool board games.
Along the way, we're going to learn an interesting routing technique and learn about some clever hardware solutions that make these games work.
All three can be built in a weekend, and it'll be just the perfect thing for a gift.
So I think it's time to start building...and playing.
Announcer: Major funding for "The Woodsmith Shop" has been provided by... Old Masters -- craftsman-quality stains and finishes since 1953.
Additional funding provided by... ♪♪ Titebond wood glues -- the pro's advantage.
And by... Kreg -- from the first cut to the final assembly, providing woodworkers with products that help to simplify woodworking challenges.
Kreg.
And by... [ Up-tempo music plays ] ♪♪ ♪♪ [ Mid-tempo music plays ] ♪♪ ♪♪ In this episode of "The Woodsmith Shop," we've got three projects which are fun to build and also fun to play.
There are three games -- cribbage, mancala, and checkers.
Now, all three of these games share a technique which I think you'll enjoy learning, and the technique is creating accurate, reproducible pockets.
So we've got storage within the cribbage board.
This is the playing surface of the mancala board, and storage as well.
And storage within the checkerboard.
To make these pockets, I'm going to use a router bit called a tray and bowl bit, and we're going to create these sturdy frames to help guide that bit in our router.
Now, one of the great things about creating solid frames like this is that all of these routing operations are then repeatable.
So be thinking Christmas gifts here.
Another interesting technique that you'll learn is using a paper template for laying out the cribbage board, and scoring and staining for this wonderful checkerboard surface.
All of the three boards also share this -- SOSS hinges.
Now, if you haven't used them, they're very interesting.
The knuckles -- each pocket into two tubular pieces which go into the edges of the board.
They're strong, they're solid, and once they're open, they're invisible.
So they're a great hinge to use for a game board.
Now, if you're interested in making any of these three games, you'll find complete plans available at WoodsmithShop.com.
Mancala is a fun game.
The object is for you to get stones from your end of the board to the other end of the board before your opponent does the same.
Our mancala board is going to consist of two halves that fold together and create an attractive, practical box for the stones.
And when you unfold them, there's the mancala board ready to go.
The woodworking challenge that we have with this project is, how do we create those two mirror imaged boards and create all the pockets that are clean, well-executed, and precise?
Well, the way we're going to do that is with a jig.
This jig -- now think about how difficult it would be to create a jig like this out of a single board.
It would be very tough.
So what we've opted to do is use the precision of our table saw and actually create a jig with half-lap joinery and everything very precise and machined.
And that is going to telegraph through when we go to the router table and create a very exact, well-cut, well-executed pocket for our mancala board.
The bit that I'm going to use with this jig is a bowl and tray bit, and as you can see, it's got a large, full-size bearing that'll track very well against our jig.
The material I've selected for our mancala board is mahogany.
And I've cut it so it fits very snugly within the jig.
I don't want it to be loose because if it's loose, that's going to bring about chatter, and we're going to lose some of that precision, which is what we're after.
So with my blanks ready, the template made, and my bowl and tray bit, I'm ready to head over the router table and we'll start cutting pockets.
There are two ways in which we can go about using this jig to route the pockets for our mancala board.
One would be to use the jig in this orientation and use a plunge router, plunging down through and into our workpiece.
Here's the problem with that.
Every time I plunge that router, I'm going to risk hitting my jig with the bit.
Now I want you to look right here.
There's some filler right there.
So it's happened.
Well, one way we can avoid that is to use a router table and use our jig in this orientation.
Now, that large bearing protects our jig from the bit.
What we do have to do, though, is we're going to take our workpiece and we're going to actually plunge down on top of the bit while it's rotating.
And then we'll make our cut.
I'll turn the router table off, then I'll be able to lift the jig and the workpiece off, and there'll be no risk of damaging the jig and we'll get the results we want.
So that's how I'm going to proceed, and I'm ready to start routing now.
[ Whirring ] ♪♪ ♪♪ [ Whirring stops ] ♪♪ Well, after two passes at the router table, I've got the majority of the material removed from these pockets.
But as you can see, they look a little rough.
So what I'm going to do is finish up with a final light pass, and that should give me good, clean edges, very little burning, and make it a lot easier to clean things up and ready for finishing.
♪♪ [ Whirring ] ♪♪ [ Whirring stops ] The two halves of my mancala board have both been routed.
Now is kind of the tough part -- I need to clean up the inside of these cavities.
You know, no matter how careful we are with the router, there's always a few burn marks and a few little irregularities to deal with.
So what to do?
The first option, of course, is just to use sandpaper.
And we can get that into most of these areas, and it'll do a pretty good job.
But there's another little tool you might want to think about, and that is a custom card scraper.
Now, you're probably familiar with the card scrapers that are about 3 by 5 inches.
Well, that steel is very hard and very brittle, and using machinist vise, you can actually snap it into smaller pieces.
So with a smaller piece, a profile can then be ground to the edge and then you can take that to stone and turn a burr like you would normally.
And you'll have a custom tool which will really help you out with these tight corners and getting rid of those burn marks.
So using the card scraper and my sandpaper, I can work through all this.
Now, once my two halves are cleaned up, I'm going to go ahead and relieve some of the edges, do my face sanding, and get things pretty far along.
Our two halves, of course, will be joined together with hinges.
The hinges we are using are special hinges called a SOSS hinge, and they're real problem solvers.
And Logan is going to talk about that later.
So right now, it's up to me to kind of push through, do all the sanding and the scraping necessary, make these look good, and then we'll be ready for hinges and to move on.
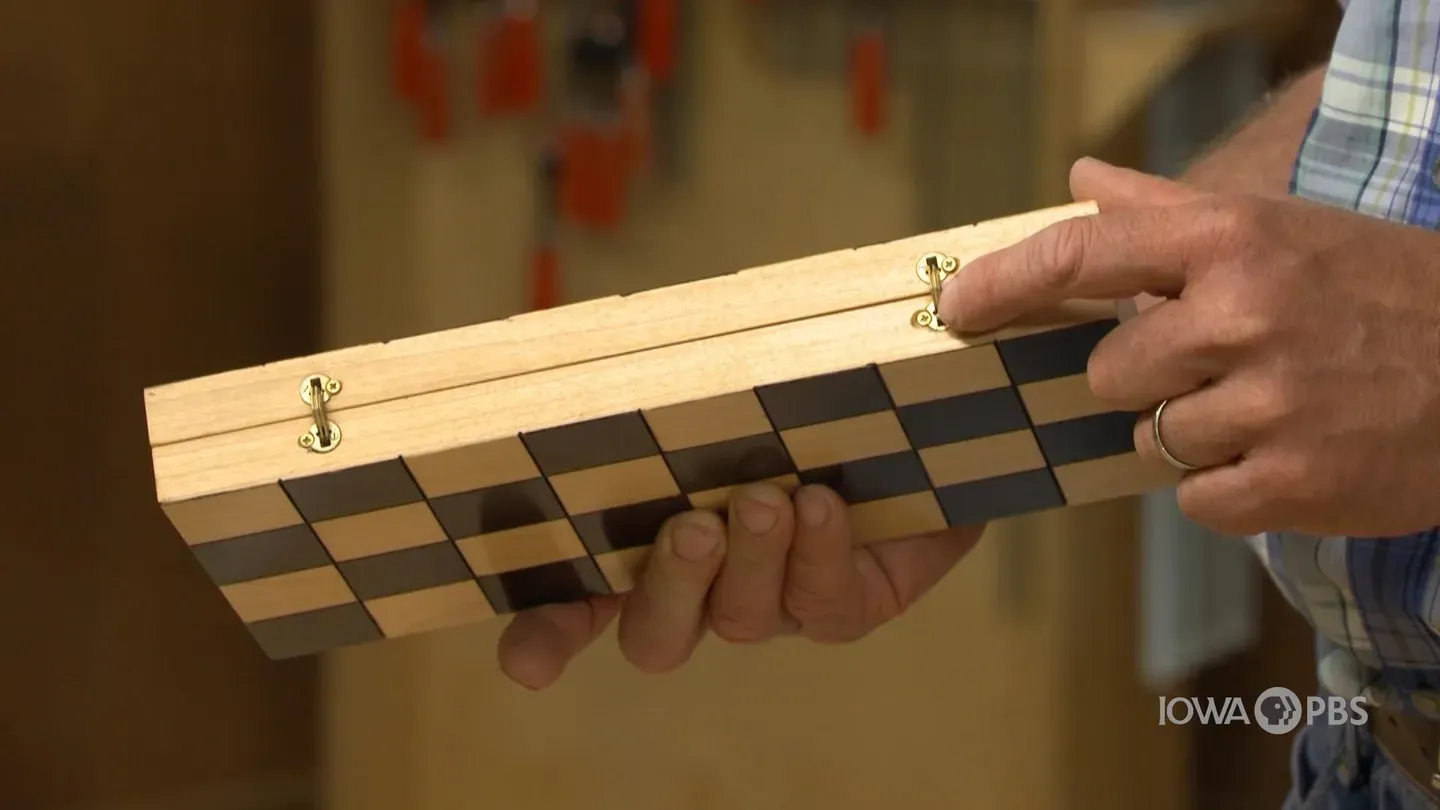
Like the mancala board Chris was working on, the checkerboard that I'm making consists of two halves that are hinged together.
Now like his, eventually the inside of one of my pieces is going to have a large pocket cut into it to hold the checkerboard.
But what I want to take care of first is the feature that defines the checkerboard, and that's creating those squares on the playing surface.
Now, to do that, I'm going to make all the cuts here at the router table.
I don't need much, just a little bit to score each of the lines in between the squares.
And for that, I have a small radius bit here that comes to a real sharp point right in the middle.
And it's set just above the router table to create that small score line.
The real trick, though, is getting all of the squares to be consistent, both along the length of each piece and across its width.
Now, you could spend a lot of time making test cuts and adjusting the router table fence.
But what I'm going to do here instead is to use some spacers.
Right now you can see that I have the bit set up so that it's centered on the length of one of my halves here.
I can make one pass that way.
To make the next set of cuts, I'm going to insert one of these strips of MDF spacers that we've made.
Now, the spacers are all exactly the same width so that I can slip one in between the workpiece and the router table fence.
Now I'll make one cut, turn the piece 180 degrees, and make a second cut, and I've created two lines.
I'll keep adding spacers until I reach the edge of my piece.
Then I can set up the router table and do the same thing along the width.
♪♪ ♪♪ ♪♪ ♪♪ ♪♪ With the squares defined on the checkerboard, the next step gets into the finishing.
What we want to do is create a series of alternating dark and light colored squares for the playing surface.
To do that, I'm going to apply masking tape to the entire surface of both of my halves.
Once that's done, I can take a straightedge and a knife and just run right down those score lines that we made with the router bit.
Then what I want to do is peel up alternating squares to apply some stain to create the dark colored squares.
But you want to be careful here because you have to do it in the right order.
When you're playing checkers, you want the square that's on your left to be the dark colored square.
So that's the first one that we'll peel off.
So once you've finished peeling off every other square, then we can go ahead and apply the stain.
With the tape all peeled off and my squares all protected, I did one other thing, and that's to add a strip of tape around the outside edges just to keep any stain off those sides.
Now I'm going to use a dark colored gel stain here.
I'm using a dark walnut is the color.
And I just want to be able to have good contrast between the dark colored squares and the light colored ones.
I'm going to apply it with a foam brush.
Just brushing it on pretty generously on each of the exposed squares.
Don't really care if I go over onto the tape.
Now, like anytime you're using stain, you want to wipe off the excess.
With gel stain, it gives you a lot of control so you can get the look that you're looking for.
Now, I want to keep these pretty dark, so I don't want to remove a lot of the stain, but I do want it to have a uniform appearance.
So I'm just going to use a soft cotton cloth and start working across all of those squares, rubbing the cloth in the direction of the grain, and then just making sure that I don't have any obvious marks left over from the cloth.
Once you have the stain wiped down, you're going to need to let it dry overnight, then you can peel off the tape and then apply a couple of coats of a clear finish just to protect the stain and the rest of the wood.
From there, it's time to join the two halves together with some hinges.
And Logan's going to talk about that as a part of making the next game.
So the final board game in our set of three is going to be a cribbage board.
And it's one of my favorites because it's one of the games that I remember my father teaching me when I was younger.
So I was really excited to build it.
Now there's a couple of things I like about these board games.
The first is they don't really take much material.
So I always seem to squirrel away kind of special stock like this.
This is just some figured walnut from an off-cut from another project, but it was the perfect length for something like a board game.
The other thing I like is that on a small project, you can experiment with new techniques.
So I don't think we're going to use this walnut today.
Instead, I think we're gonna use some red oak because I have a really cool finishing technique that I think will look really nice on a small project, so we'll try it here.
But the first thing we have to do is head over to the table saw and cut everything to size.
All right.
So I have my parts for the cribbage board cut to size.
That was easy to do at the table saw.
Started by ripping them to width, and then trimming one end square, using that as a reference against a spacer block on the fence to set my length, and then cutting the final end so that my parts are all at final length.
Then the next thing to do is head to the bench and apply a pattern that's going to really give us a guide for drilling all these holes in the cribbage board.
Now, when I print off patterns, I like to print multiples, because I never seem to get the first one right, so I want to have a couple on hand as I'm getting them all lined up and taped together.
And after I have the two halves taped together, went ahead and cut it out and used some contact adhesive to mount it to the board.
And that's what I have here.
Now we're ready to start drilling the holes.
Now, this is probably going to take a while.
There's a couple things we can do to help ourselves.
So the first is I've set my bit height with a stop, and that stops a bit just above the surface.
That way, I'm not making a full stroke to bring the quill of the drill press all the way to the top.
It's a minor thing, but when you're drilling 360-some-odd holes, it'll save you some time.
And I've also set the depth of my bit with the depth stop on the drill press.
The last thing we're going to need is a couple spacers, because as we're drilling these holes, we need to come back and drill the next one in the next row.
So I've made my spacers, and those are just some scrap wood that I planed down the thickness.
And I've actually fine-tuned the fit on these using some painter's tape.
That way, when I'm done with the first set of holes, I can add the spacer, and it positions the cribbage board in the correct spot for the second row.
Once the second row is done, I add the second spacer, and it positions it for the third row.
Now, that works great for the straight lines of holes, which are going to be the first one, second one, and third one.
But then we have these turns.
And on those turns, we're just really going have to eyeball it.
So on those, go careful.
So I'm going to start drilling, and I'll see you guys in a couple hours.
[ Whirring ] ♪♪ ♪♪ ♪♪ ♪♪ ♪♪ [ Blows air ] Okay, there we go.
So all told, that really took about 30 minutes, so it's really not that bad.
Now let's head over to the bench and take a look at the hinges that were going to use to connect the top and the bottom together.
All right, so now that we're done with drilling, we can go ahead and remove the template.
And a sharp card scraper takes care of most of the grunt work.
Then a rag with a little bit of acetone will dissolve any of that contact adhesive that's left on there.
So now we can concentrate on connecting the top and the bottom of our boards together.
The type of hinge that we're going to use on all of our game boards are going to be these guys.
These are little barrel hinges, and they have a really cool action to them.
They fit in a hole in the edge of the board, and they swing out and up.
That way, the boards fold together, but it also allows them to open up and lay flat.
Now to install the hinges, we need to create holes that are perfectly parallel to the faces of the board.
You could do that at the drill press.
However, with the long bit, I find it's kind of hard to get everything aligned perfectly.
So instead, I like to use a 10-millimeter router bit in the router table.
So let's go ahead and get the router table out, and we'll get it set up.
All right, so drilling the holes for our hinges is a little bit tedious, and there's going to be some stop and go, but it's not near as bad as drilling the holes for the pegs.
So let's look at my setup that I have here.
I have my 10-millimeter bit installed in the router, and I've set that to where it is the height of one of the barrels of the hinge.
And to the fence I've clamped a tall auxiliary fence that has a cleat, and this is super important that the auxiliary fence is square and the cleat is square as well.
What we're going to do is we're going to lift our cribbage board side above the bit, turn it on, then we're going to plunge it down, registering it off the cleat and that tall auxiliary fence.
Once we reach the full depth, we're going to shut the router table off and let the bit stop.
Now, there are a couple of important things to know as you do this.
The first is the dimension of the bit, which is going to designate the position of our hole, to the bottom of the board is going to be extremely critical.
That's going to allow the two halves to close fully without hitting each other.
The next... is that we want to mark our two pieces of the board, and we'll mark those with the triangle just so we know what way faces out.
So this is our outside.
The back goes against the tall auxiliary fence.
when we make our holes.
So we're going to create the holes on the left-hand side first, then I'll flip this fence over, and we'll create the holes in the right-hand side.
[ Whirring ] ♪♪ [ Whirring stops ] ♪♪ [ Tightens ] All right, back here at the bench, we can go ahead and install our hinges.
And these guys just drop right in, then there is the world's tiniest little set screw in there, and you just tighten that down, and it causes the end of the hinge to flare out, and it holds it nice and tight.
[ Tightens ] So now that those are installed, you can see it opens up great.
It closes nicely.
And I have a little bit of flushing up on the ends to do to get everything even.
Now, the plans do call for rounding the corners, but I don't really mind the square look.
And I think the finish that I'm going to add is going to soften those corners a little bit.
So let's go ahead and remove these hinges.
All right.
Now we're ready to go ahead and start finishing.
But first, we got to clean up anything flammable, and I have to grab a couple things.
All right, so the finishing technique that I'm going to use on this cribbage board is a traditional Japanese weather preservation technique, and that's using fire to really scorch the surface.
Now, the Japanese use this to weatherproof some timbers, but I find, especially on small projects, it works really well because it gives a really rich black color and it adds some texture, and I really love texture on small projects.
So the process is really simple.
I'm going to simply use a torch, and I'm going to scorch the surface.
And we're going to burn it till it's very, very deeply charred.
What we're looking for is we're looking for the surface to start crackling red.
And when it does that, you know you've gone far enough.
Once that entire surface has reached that point, I'm going to come back with a wire brush and brush the surface just to remove all that loose ash and soot.
And then while the surface is still hot -- and it will be hot still, so don't touch it if you can help it, or use gloves -- I'm going to come back with a wax and oil blend.
And I'm going to rub that onto the surface with a paper towel, and the heat's going to really soak that into the wood fibers.
Once everything is cool and I'm happy with the finish, I'll go and hit it with some spray lacquer and maybe even some gilding cream.
So now all we have left to do is reinstall the hinges.
And for these, I'm going to use the screws.
But with these barrel hinges, you can just as easily epoxy them in place for a little bit more permanent connection.
And there we have it.
Now, if you choose to do this burning technique on your project, don't be surprised if you cause a little bit of cupping initially.
We're obviously super heating the wood, and it's going to evaporate any moisture that is living with -- inside that wood.
And it can cause some bowing.
But if you let it sit for a couple days, most of the time it'll flatten itself right back out.
But once the hinges are installed, she's ready for your first game of cribbage.
One of the best parts of these games, in addition to the time that you spend on building them, is being able to enjoy using them, playing with friends and loved ones.
I hope you enjoyed today's episode of "The Woodsmith Shop" and also learned something about what you can do on your router table to make the games.
Don't forget, the plans for all three games, the jigs, and the techniques are at our website, WoodsmithShop.com.
It's also the place that you can find other great woodworking projects to build, more videos, and stuff that you can do in your shop to keep you busy until we meet right back here in "The Woodsmith Shop."
♪♪ ♪♪ ♪♪ Phil: If you'd like to get more video tips and techniques, sign up for the free weekly Woodsmith eTip.
Every week, you'll receive an e-mail with a video tip to get more out of your table saw, router table, and more.
Sign up at WoodsmithShop.com.
Everything in today's show comes from the newly expanded Woodsmith Guild Edition, with shop projects, plans, tips, and techniques.
To get a free preview issue of the Woodsmith Guild Edition and a free "Woodsmith" book, go to WoodsmithShop.com.
In addition, past seasons of "The Woodsmith Shop" are available on DVD.
Or you can watch them online from your computer, tablet, or mobile device.
For more information, go to WoodsmithShop.com.
Announcer: Major funding for "The Woodsmith Shop" has been provided by... Old Masters -- craftsman-quality stains and finishes since 1953.
Additional funding provided by... ♪♪ Titebond wood glues -- the pro's advantage.
And by... Kreg -- from the first cut to the final assembly, providing woodworkers with products that help to simplify woodworking challenges.
Kreg.
And by... [ Up-tempo music plays ] ♪♪ ♪♪


- Home and How To

Hit the road in a classic car for a tour through Great Britain with two antiques experts.


 New Episode


Support for PBS provided by:
Woodsmith Shop is presented by your local public television station.