Simple Shop Storage
Season 13 Episode 1303 | 26m 47sVideo has Closed Captions
This storage shelf is great for a workshop, a garage or any place you keep things.
This simple storage shelf is great for a workshop, a garage, or any other place where you want to keep things close by - yet out of the way. This wall-mounted station will ensure that all your cordless drills are fully charged and ready to go at a moment's notice.
Problems playing video? | Closed Captioning Feedback
Problems playing video? | Closed Captioning Feedback
Woodsmith Shop is presented by your local public television station.
Simple Shop Storage
Season 13 Episode 1303 | 26m 47sVideo has Closed Captions
This simple storage shelf is great for a workshop, a garage, or any other place where you want to keep things close by - yet out of the way. This wall-mounted station will ensure that all your cordless drills are fully charged and ready to go at a moment's notice.
Problems playing video? | Closed Captioning Feedback
Where to Watch Woodsmith Shop
Woodsmith Shop is available to stream on pbs.org and the PBS app.
Providing Support for PBS.org
Learn Moreabout PBS online sponsorship[drill whirring] [♪] It all starts with a single cordless drill.
Throw in a couple of batteries and the charger, you need a way to be able to keep these items under control, but it usually doesn't stop there, does it?
You'll end up with an impact driver, maybe a smaller drill for lighter duty tasks, and then come the sanders, the cordless jigsaws, and the battery powered nailers, and what you have is a storage crisis on your hands.
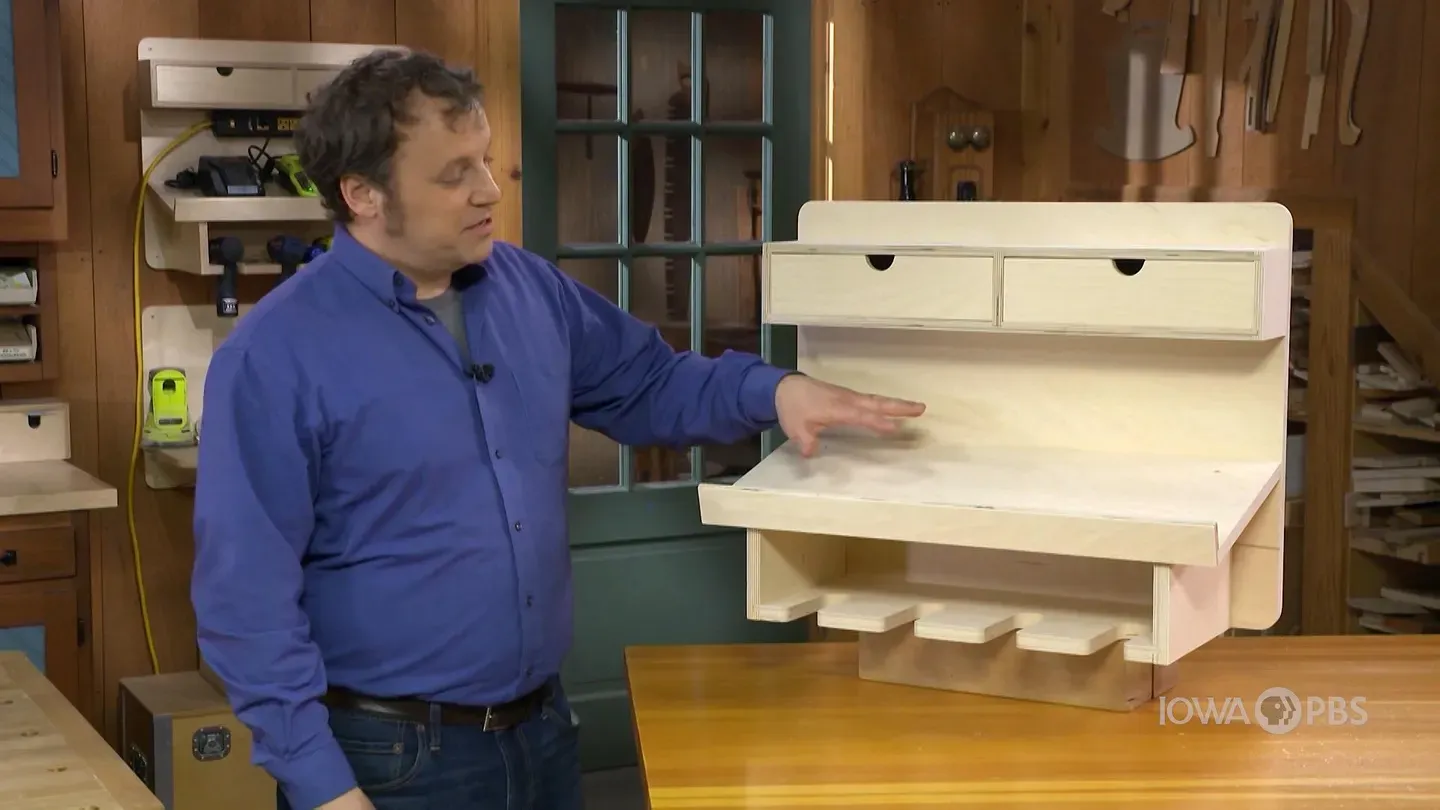
What you can do to tame it, is to build a charging station.
This one has a platform for holding your chargers, a section down below for the drills, and a couple of drawers up top for all the extras.
But first, we're going to build this wall-mounted utility shelf.
Put it near your bench and it keeps all your tools and supplies close at hand without cluttering up your bench top, but frankly, this piece would be just as handy in the basement or the garage, where it can store all kinds of stuff.
Two great storage solutions to cut the clutter, today on the Woodsmith Shop .
ANNOUNCER 1: Major funding for the Woodsmith Shop has been provided by... ANNOUNCER 2: Old Masters, craftsmen quality stains and finishes since 1953.
ANNOUNCER 1: Additional funding provided by... ANNOUNCER 2: Titebond wood glues, the pro's advantage.
ANNOUNCER 1: And by... ANNOUNCER 2: Kreg, from the first cut to the final assembly, providing woodworkers with products that help to simplify woodworking challenges.
Kreg.
ANNOUNCER 1: And by... [♪] You know, Chris, if there is one common theme we hear about build shops, it's they want more storage in them.
And this project offers plenty of just that.
More storage.
That's right, and if there's something I really like about this shelf, it's that it creates a home for all those little odds and ends that don't really have a place in your shop.
You know, we have shelves here for sheets of sandpaper, and then we have these trays down here and these little plastic bins are great.
They're inexpensive, and they're a perfect storage solution for all those little odds and ends that you kind of collect as you're working on a project.
Also, this is an easy to build project.
We're using simple dadoes, clear pine lumber that's a breeze to work with.
Screw it together.
Very quick, very fast.
Exactly.
And you have a couple of options here too.
You could substitute out these plastic trays for some drawers, and the plans even call for installing a fluorescent or an LED light on the bottom side.
And speaking of plans, if you would like a free set, they're available at our website, WoodsmithShop.com.
CHRIS FITCH: Well, Logan, I think it's time to spray a few coats of lacquer on this project.
The starting point for building this utility shelf is cutting the main case pieces to size, and I've already done that.
I have the two sides and then the three shelves that you're going to need.
Now what you could do, is go right from here and assemble those with screws, but I think there are some good advantages in taking the time to cut joinery, like I'm going to do here at the table saw.
By using some rabbets and dadoes, you not only increase the glue surface on the project pieces, making the whole assembly stronger, those dadoes and rabbets will help register the parts, so they're going to stay in their proper alignment while you get everything together.
And the starting point is to cut some rabbets on that back edges of the sides.
These rabbets accept the back panel you'll add later on.
To do this, you'll recess a dado blade in an auxiliary fence that's attached to the table saw's rip fence.
I like to use a push pad to make sure that the dadoes are a consistent depth.
Especially if the pieces have a little bit of cuff to them.
[whirring] Like I said, the dadoes that I cut on all these pieces, are just to register them, keep them in alignment while you assemble the project.
The lion's share of the strength comes from the glue and the screws that you're going to use to hold the parts together.
Now, the key thing about the screw holes, is that you want them perfectly centered on the dadoes.
Now in the past, I've tried measuring down from the outside of the pieces to get those marked and lined up.
It's a lot of measuring and marking, and things can easily go wrong.
Don't ask me how I know.
So, what I've done instead, is started drilling the holes from inside the dadoes.
What I can do is take a square and mark the inset of the screw locations right inside the dadoes.
Now I'll take my drill and the pilot bit, and I'll just eyeball the center of the dado.
With a narrow dado like this, you're going to get really close to the middle of it.
Drill all the way through.
Make sure you don't drill into the bench top.
Now I know that all the screw holes are going to be in the right location.
To complete the work, I'll just flip it over and drill the countersinks.
Next, the front corners of each side are rounded off with a jigsaw.
Then I'll use a file to remove the blade marks and even out the curve.
Then finish up with a sanding block.
I fit the main part of the case together in order to measure the final size that I need for my dividers.
You don't want to go by the plans here, you want to go by the actual piece.
Then you'll... can size those for a nice, slip fit into the dadoes.
The dividers for the upper part of the case are a little different.
They have a series of dadoes cut in them, just like I did earlier at the table saw, only these are narrower and sized for quarter-inch hardboard, and they'll fit in the same way.
When the dividers are finished, you're ready to begin assembly.
In order to get at all the screw holes easily, though, it's important to follow a certain order.
First, apply glue to the dadoes in the upper and middle shelves and sandwich the large dividers in between.
I added the small dividers and the lower shelf next.
Finally, sandwich the entire assembly between the two sides.
The final pieces to the puzzle are to add a pair of back rails and a back panel to the shelf.
Now the back rails provide something substantial when you attach the shelf to the wall.
They're just pieces of pine, and on each end, I cut a rabbet that will interlock with the rabbet on the sides.
There's this whole long rabbet on the inside edge to wrap over the top shelf, or in the case of the bottom rail, the bottom shelf.
You can just set it in place like that.
But first what I want to do is put a little bead of glue on there.
Then I can drive my screws.
And rather than waiting for the glue to dry with clamps, and I keep moving things along by using a pin nailer to hold the pieces in place.
Now the back panel can be sized to fit that opening.
It's a piece of hardboard, and then to attach this to the case, I've drawn in some lines that correspond with the dividers and the middle shelf, so that when I tack it in with the nailer, I know that the nails are going to go right into the shelves and the dividers, and not just hanging out into space.
Once that's taken care of, I can flip it up and insert the dividers that will hold on to small items or even sheets of sandpaper.
As handy as this shelf is, you're going to probably want to build one or two more and put them up in other parts of your house or garage.
You know, it seems like every woodworking shop has at least one cordless drill.
LOGAN WITTMER: That's right.
And you know what goes with cordless drills?
It's a tangle of chargers usually.
PHIL HUBER: And the extra batteries.
And if it's like my shop, you'll have the battery in one spot, the charger buried under a bunch of other stuff, and the drill, who knows where it is.
Maybe even in the house.
Exactly.
And that's how my shop was, at least until I built a charging station that was similar to this one.
I built it a few years ago, before we designed this one.
But what I really like about it, is it creates a home for the charger, the drill, and the batteries.
And it doesn't take up a lot of space either.
So, you can have everything in one spot without sucking up a lot of wall space for it.
I also like the drawer up on top for extra driver bits and some of the other accessories that you just need to have on hand.
Maybe even a screwdriver too.
Exactly.
And the other thing I like, is the plans include an auxiliary shelf.
And that creates a home for all those other tools that these manufacturers come out with that are cordless, such as a circular saw or a jigsaw, and it's a great addition to house all your cordless items in one spot in your shop.
And keep everything neat and organized too.
The organizer and the shelf here are all built out of three-quarter inch and half inch Baltic birch plywood.
It's a great way to make large panels quickly and easily.
If you'd like a free set of plans for the charging station and the auxiliary shelf, they're at our website, WoodsmithShop.com Now I think it's time to see how Chris puts this together.
To begin construction of the cordless tool charging station, I'm going to start with the back.
I have a piece of Baltic birch plywood here cut to 20 by 25 inches.
My tasks are, one, to lay out and cut a soft radius on each of the corners.
To cut the radiuses on my back, for this cordless drill charging station, I'm going to use a cordless jigsaw.
And two, to lay out and drill countersunk holes, which will be used to screw on the drawer unit and the charging platform and tool rack that's underneath it.
When drilling the holes, do your best to keep the drill bit vertical, and try and be consistent on the countersink.
With the back completed, it's time to move on to the lower portion of our tool charging station.
And that lower portion consists of a tool rack, on which your cordless power tools will sit, two ends, a top platform for the chargers, and a lip on the front of that platform, so the chargers don't fall off onto the floor.
I'm going to start first by making my two ends, and the first task I have for that is to cut a groove on the inside, lower face of each of those end pieces.
That's part of the joinery that will join it to the lower tool rack.
So, I've got my table saw set up, and I'm ready to go ahead and mill a groove on the inside face of each of these end pieces.
I've got a quarter-inch dado set set-up in the table saw.
It's a half-inch high and a half-inch from the fence.
[whirring] I've completed a couple more operations in the construction of our charging tool station.
First off, on the ends, I've made this angled cut over on the bandsaw.
With that done, I'm able to move on to the construction of the tool rack.
The first step in the tool rack, was to cut this rabbet on either end.
And carefully fit that by creating a tenon to our end pieces.
With that done, I then laid out for these slots, which are going to hold our cordless tools.
And I cut out these slots by first drilling an inch-and-a-half hole at the root of each slot.
I then went to the bandsaw and removed all the waste.
From there, a trip to the drill press, a sanding drum, and I gently smooth all of these contours.
So with my tool rack and my ends complete, I'm then able to dry assemble them.
With that dry assembled, I can then move to the construction of the platform on which the tool chargers sit.
By dry assembling everything first, I can accurately transfer where the dadoes that need to be cut on the bottom of the tool platform are going to lie.
These dadoes then house the top of my end pieces.
Two other steps I need to complete for the platform.
One, I'll make a 75-degree cut on the back of the platform to bring it to the correct width, and I'm going to drill a couple of countersunk holes for screws.
Well, I'm almost ready to glue up the lower portion of our tool charging station.
One last task though.
I've got the platform here, and I need to drill some holes to screw it onto the ends.
But rather than drilling from the top, I'm going to drill from the bottom using these dado slots to accurately and reliably position my screw holes.
Once I've pierced from the bottom, I'll flip the piece over and re-drill from the top, adding the countersinks.
Well, with our parts all cut out, it's time to glue up.
First thing I'm going to do is add a little bit of glue to this groove on the end.
Add that to our tool rack.
I'll glue up the other end.
Now, eventually I'm going to put a clamp on this and pull things a little tight, but before I do that, I'm going to go ahead and put my platform on here.
Otherwise, the clamps kind of tend to tow my two sides in.
So, I'll get the glue bottle again and put a little glue on the top of these end pieces.
And I'm going to reach for that platform, and we'll go ahead and get this on.
With the screws in place, I can add my clamps now.
One more piece to add, and that's the lip that's going to keep our battery chargers from sliding off.
The lip has been made from a piece of half-inch plywood.
I've cut a rabbet on the lower edge, which will mate with the front of our platform, and then I've used a round over bit to give the top a nice, soft, rounded over edge.
Add a little glue.
Get your clamps, and we'll be all set.
All right.
Everything's glued up, so I'm going to wait for the glue to dry, and then I can attach the lower unit of our charging station on to the back.
And when I'm done with that, it's time to move onto the drawer unit.
The glue is dry on the tool rack and platform.
So now, it's time to attach it to the back.
I'm going to go ahead and add two clamps to keep things in position as I screw it together.
And with that, we are ready to start building the drawer unit up top.
The storage unit, which mounts on the top of our charging station, is very simple.
It consists of a shelf and two drawers.
The shelf has a top, a bottom, two ends, and a divider.
The joinery is very similar to what you've already seen.
We have the grooves cut in the top and bottom of our ends, and a tongue formed on the ends of our top and the bottom.
A simple dado houses the divider.
The drawers are equally simple.
They have rabbet joints, and an eighth-inch perimeter groove cut on the interior holds an eighth-inch Masonite bottom.
Once all that's together, we'll attach the shelf to the back in the same way that we attached the bottom, with four screws.
And with that on, we're ready to sand our piece, apply finish, hang it on the wall, and clear all those chargers from your work bench.
So now that our charging station and our wall shelf are all finished, let's talk about actually applying a finish to them.
And just because these are shop projects doesn't mean that you should leave them unfinished.
Now, of course, that is an option, and that's up to you, but in my experience, having a unfinished project in your shop, it's going to start looking dingy after a while.
So there's really two finishes that I like to reach for.
The first is a painted finish.
With a good quality paint and a good quality primer, your shop project is going to look great and it's going to serve you for years.
But with something like this charging station or the wall shelf that are hung up on the wall, they tend to collect the ambient dust that kind of floats around in our shop.
And a painted finish really shows the dust and then it'll look dingy pretty quickly.
So this is why I like to reach for a clear finish, and the clear finish I like to use is a lacquer.
And generally it's a pre-catalyzed lacquer.
Now for a project that's a little bit bigger than this, I'll be spraying that with a HVLP gun.
But this is pretty small, and it will work really well, just grabbing a simple rattle can with a pre-cat lacquer in it.
And I like to use a pre-cat lacquer, just because the catalyzing agent has been included in the can.
So when it dries, it's going to be a nice, durable finish and it's going to last for a very long time.
When applying a finish, make sure you follow the manufacturer's recommended guidelines.
And especially when spraying, spray with good ventilation.
Outside is preferable if weather permits.
And make sure to protect yourself by wearing a respirator.
What we're aiming for when we spray is to build up multiple light coats and get a nice smooth finish.
Start and finish your spray pass a few inches off the work piece and make sure each pass overlaps the previous.
There's a couple of things about lacquer that I really like as a finish.
The first, is it dries quickly.
A spray lacquer like this will usually dry within about 30 minutes, and that means within a couple hours, you can have your final coat on your project and it's ready to be put to use.
Second thing I like is, it cleans up very easily.
Lacquer thinner will clean up any over spray and even repair little blemishes you get on your project.
And lastly, I like that it's a hard protective finish.
It's tough and it's hard to scratch, so it's going to last for years in your shop.
And all these combined means that after you're done spraying your project, it's ready to be put to use in your shop and it's going to serve you for a long time.
Recently, my dog got up on the counter and was able to get a hold of our plastic cutting board and chew it up.
But rather than throw it away, I'm going to bring it in the shop, and I'm going to use the plastic.
Now this type of plastic makes great parts for my jigs and fixtures, like runners and fences, and it's strong, low friction, and it doesn't expand and contract like wood does.
And the best part is, I can use my woodworking tools to machine it pretty easily.
So I'm going to start on the table saw here and cut it up into a sled runner.
I'm going to start by cutting both ends off this cutting board.
Then I'll rip a narrow piece that I'll use for my sled runner.
As you can see, cutting it on the table saw might give you a rough, kind of melted edge.
That's easily peeled off or sanded away, but you can even run this through the planer and it will give you a glass smooth edge.
Now I've fit this runner to fit perfectly in the miter slot, and you can see it runs smoothly, so I'm ready to take this wooden slide off my jig and replace it with the plastic one and it's going to run a lot better for a long time.
So if you have an extra piece of cutting board or plastic, save it for your jigs in your shop.
I like building shop projects in between some of my larger, more demanding projects.
It's a nice way to wind down and spend some quality time in the shop, and end up with something that's practical.
And I'll be able to use it right on the next project.
Now the plans for both of these projects featured in today's episode, featured a few extras.
They're all at our website, WoodsmithShop.com.
You can use the plans as a jumping off point to modify either of these projects to suit your needs.
And you'll have them done in plenty of time to catch us right here again in the Woodsmith Shop .
[♪] If you'd like to get more video tips and techniques, sign up for the free, weekly Woodsmith eTip.
Every week, you'll receive an email with a video tip to get more out of your table saw, router table, and more.
Sign up at WoodsmithShop.com.
Everything in today's show comes from the newly expanded Woodsmith Guild Edition, with shop projects, plans, tips, and techniques.
To get a free preview issue of the Woodsmith Guild Edition and a free Woodsmith book, go to WoodsmithShop.com.
In addition, past seasons of the Woodsmith Shop are available on DVD or you can watch them online from your computer, tablet, or mobile device.
For more information, go to WoodsmithShop.com.
ANNOUNCER 1: Major funding for the Woodsmith Shop has been provided by... ANNOUNCER 2: Old Masters, craftsmen quality stains and finishes since 1953.
ANNOUNCER 1: Additional funding provided by... ANNOUNCER 2: Titebond wood glues, the pro's advantage.
ANNOUNCER 1: And by... ANNOUNCER 2: Kreg, from the first cut to the final assembly, providing wood workers with products that help to simplify woodworking challenges.
Kreg.
ANNOUNCER 1: And by... [♪]


- Home and How To

Hit the road in a classic car for a tour through Great Britain with two antiques experts.


 New Episode


Support for PBS provided by:
Woodsmith Shop is presented by your local public television station.