Time for Clocks
Season 16 Episode 1612 | 26m 45sVideo has Closed Captions
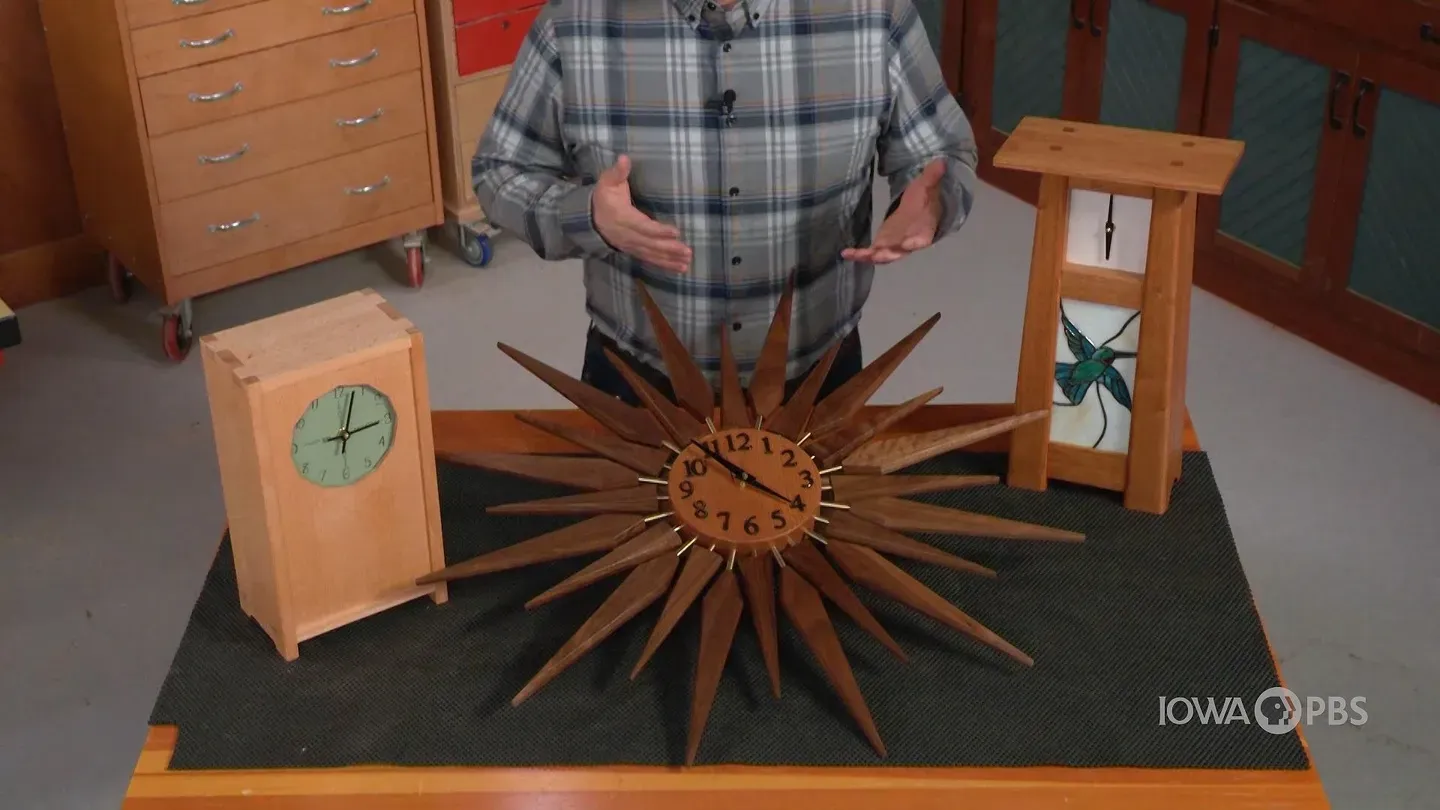
Building a clock offers great lessons for learning woodworking on a small scale.
Building a clock offers great lessons for learning woodworking on a small scale. The team creates three designs so you're sure to find one you like.
Problems playing video? | Closed Captioning Feedback
Problems playing video? | Closed Captioning Feedback
Woodsmith Shop is presented by your local public television station.
Time for Clocks
Season 16 Episode 1612 | 26m 45sVideo has Closed Captions
Building a clock offers great lessons for learning woodworking on a small scale. The team creates three designs so you're sure to find one you like.
Problems playing video? | Closed Captioning Feedback
Where to Watch Woodsmith Shop
Woodsmith Shop is available to stream on pbs.org and the PBS app.
Providing Support for PBS.org
Learn Moreabout PBS online sponsorship[ Power saw whirring ] [ Mid-tempo music plays ] Welcome back to "The Woodsmith Shop."
You know, small projects offer a great way to focus on some specific woodworking skills, whether it's joinery, details, or using up some special pieces of wood.
On today's episode, we're looking at three great small projects.
Some clocks.
All of them offer great opportunities to customize the clock and the look to match your specific style.
And I think you're going to enjoy what each one of these clocks has to offer.
If you'd like to see plans for them, they're at our website... Announcer: Major funding for "The Woodsmith Shop" has been provided by... Old Masters -- offering wood stains and finishes for the woodworking enthusiast and professional.
And by... Kreg -- from the first cut to the final assembly, providing woodworkers with products that help to simplify woodworking challenges.
Kreg.
Additional funding provided by... Titebond Wood Glues -- the pro's advantage.
And by... ♪♪ ♪♪ ♪♪ ♪♪ So the clock I decided to build today is this Craftsman-style clock and there's a couple of things that I like about it.
First, it's a nice, clean esthetic, and it features a handmade tile inset to the front.
The second thing I like is the construction is super simple.
But I am going to make a couple of changes to this design.
Instead of using one of those tiles, my friend Mary has made this nice piece of stained glass that we're going to inset.
Now, obviously the stained glass is a little bit bigger than the tile is, so it's going to require a little bit of modification to it.
But, overall, the construction is pretty much the same, just with a couple of dimensions changed.
We're going to start by making this face frame.
It's these two uprights and then the three horizontal pieces.
And even though we are modifying this design a little bit, every step is pretty much identical to the original.
That's going to start by making the mortises over at the drill press.
I'm going to use a Forstner bit to drill those out and that's going to leave the mortises with rounded edges and a little bit of waste in them.
And back here at the bench, I'm going to go ahead and clean those up with a chisel and square everything up.
Then the connection between those uprights and the sides is in the form of the rabbet.
I'm going to make that over at the table saw with a dado blade.
I keep a nice, even pressure over the blade and we'll get a clean rabbet that's going to give us a good, tight joint, once we glue it up.
After the rabbet's formed, we can go ahead and address the shape.
Now, if you notice, on this clock, the sides are sloped a little bit.
To create that slope, we have two options.
The plans call for cutting the slope on the uprights with the sled at the table saw, and that works great.
Or what I'm going to do is freehand it at the band saw.
I'm going to mark a line, cut as close to the line as I can.
Then, back here at the bench, I'll clean it up with a hand plane and get right down to the line.
So, now that we have the uprights done, we can go ahead and turn our attention to the rails that connect them.
These rails are graduated in size.
The wide sits at the bottom, the narrow sits at the top.
And these mate into the mortises we drilled at the drill press.
To cut the tenons on the end of the rails, I did that at the table saw with the dado blade.
Couple of tips here.
These are pretty small parts, so, I found that some adhesive-backed sandpaper applied to an auxiliary miter fence really helps.
Just mindful of where your hands are, sneak up on the cut, and get a good, tight fit into those mortises.
Then, back here at the bench, the final thing to do, before we glue everything together, is to round over some of these edges.
The uprights get a little bit bigger round over than the rails do and the rails only have round overs on the inside edges.
What I mean by that is the lower rail has a square bottom edge and the top rail has a square top edge, so, we have round overs on the inside faces.
With those done, it's time to go ahead and assemble it.
♪♪ ♪♪ ♪♪ Okay.
So, now that the glue has cured on our face frame, we only have a couple of parts to take care of to have the case of our clock done.
The first is a pair of sides.
These guys are just cut to size.
And then the top and bottom are beveled to match the angle of the face frame on the clock.
Then there is a little bit of a detail on the bottom side, in the form of a circular notch.
I just held these two sides together with some double-sided tape, then cut that at the bands.
I cleaned it up with the drum strainer in the drill press.
Then the final part to take care of is the top.
The top is a little bit thicker... ...than what the plans say, but I've beveled the edges and I've beveled them to lighten the look, but still leave some of that meat up top.
So, now, we can go ahead and glue the sides on.
♪♪ Okay.
There you go.
Once that glue cures on the sides, the top gets installed with screws and hidden with in-grain plugs.
Then the simple matter of sanding it, applying a finish, installing the stained glass, and then picking a face.
So here we are.
After a couple coats of spray lacquer, the clock's finished.
So let's go ahead and recap what I changed from the original.
The original's a little bit shorter and it featured that handmade tile.
I stretched everything out a little bit to accommodate a piece of stained glass that my friend Mary made.
And, for this clock, I went ahead used quartersawn cherry.
I think the really nice, straight grain lends well to the size and shape of this clock.
One of the other things I changed was the face.
The original face was a curly maple face.
But to match the esthetics of the stained glass, I went ahead and used a piece of aluminum that I painted white.
One of the other things I changed was, to accent that stained glass, I added a set of lights on the inside.
Those lights are on a timer.
That way, you can program them so they'll turn on in the evening and shut back off in the morning.
It adds a really nice glow in the nighttime hours.
And, overall, I'm extremely happy with how it turned out.
The clock that I'm choosing to build is a Stickley-style clock and what I really like about it is that the square, rectangular shape of it really shows off the material.
Now, Stickley, arts and crafts -- immediately, you know that the original clock was made from quartersawn white oak.
But I can't leave well enough alone, so I'm choosing to make my version of that clock out of a different material.
I'm using European beech.
It's got a lighter color than white oak does and you can still get those ray flecks.
At least, you can on the quartersawn faces.
Now, on the original version of this clock, the upper corners were assembled with dovetails and the bottom of the clock was actually let in with a through mortise-and-tenon joint.
It looks really cool, but I'm going to keep that through mortise-and-tenon look and go with it at the top as well and turn it into a variable-spaced finger joint.
And, to do that, we'll turn to one of my favorite router jigs.
Alright.
The jig that I'm going to use is one we featured on the TV show a couple of seasons ago.
The reason that I like it, "A," it's shop-built; "B," these plywood fingers on the jig, you can cut to any size that you want, allowing you to create any kind of layout in any arrangement.
So, I have it set up for the sides on one side of the jig, and the top and bottom will get routed on the opposite side.
What's nice here is, by setting out the keys in this arrangement, I've already set up for its mating side on the other side of the jig, so you know that the joints are going to go together the way that they should.
What I've done here is I'm going to start with the two sides.
So, I've put them together and arranged them the way that I want them and then on the back edge, I marked a triangle.
This indicates two things -- this is the back edge, and the triangle is pointing towards the top of the project.
So, what I want to do is make sure to keep those reference edges while I'm using the jig.
So I'm going to put the back edge up against the stop on the jig and clamp it in place right underneath the keys.
Now, I've set a pattern bit in my router here and the bearing on the pattern bit is going to trace the profile of the keys while I rout out the sockets.
In this case, there's going to be two sockets on the side pieces.
Alright.
I've turned the jig around, now, to do the opposite joint.
So, what I have here is one of the top and bottom pieces clamped to the jig.
You'll see, turned around.
Now, my reference fence is on the left-hand side.
I want to make sure that I have the back edge of my part clamped against that edge and then again tight up here.
And you can see now that I'm going to make three different sockets in this particular piece.
You'll also have to remember to rout the same pattern on both ends of the workpiece before moving on to the next one.
Alright.
The finger joints take care of the joinery at the top of the clock.
Now, where the bottom joins the sides, we need to cut a pair of through mortises.
Now, I used the same fingers from my jig to create a template that I can use and attach to the case side with double-sided tape.
So, I cut out where those through mortises are going to be and then, with this assembly, I went over to the drill press and used a Forstner bit to drill out as much of the waste as possible.
Now, back here at the bench, I'm going to use a plunge router and a pattern bit and I can plunge right down into those holes that I drilled and then remove most of the remaining waste.
Alright.
The routing with the pattern bit leaves rounded-sided through mortises in my workpiece, but I'm going to leave the template attached to the top side here for one other purpose.
I'm going to clamp it down again.
Those flat square sides of the template now help to register the back of a chisel, so I can use that in conjunction with a mallet... [ Hammering ] [ Hammering ] ...and work my way around these two through mortises to square them up.
Alright.
We've taken care of the visible joinery on this clock case.
Now, we need to take care of some more invisible or hidden joinery, and that's a set of grooves.
One is going to be routed towards the front of the case pieces, to hold our front panel; and then another one at the back, to hold a removable back panel, so you can get at the innards of the clock.
I'm going to do that here at the router table.
The way we have it set up for the top and bottom, things are going to be pretty easy.
I can just rout the groove from end to end on the pieces.
But I don't want that groove visible on the top edge of the side pieces, so, that means we're going to have to stop the groove.
So, I've marked the start and end locations of the grooves on my workpieces and then I've also taken some time to mark the leading edge and trailing edge of the router bit on the fence.
That way, I can just lower the workpiece over the spinning bit, making sure my lines line up, and then rout to the opposite end and then lift off the piece and know that the groove is going to be in exactly the right spot.
Now, the location of the grooves varies just a little on the front and back, but otherwise, the process is the same.
Let's talk about another change to the plan that I'm making with my version of this clock.
On the original plan, the front of the clock is a door.
You can open it up and gain access to the clock movement from there.
However, I wanted to go with a different look and still show off the beauty of the wood, so, I'm using just a thinner panel that will be housed in grooves in the clock case.
So, I glued up a panel of the quartersawn beech here and, on the front side, I attached a paper pattern, using some spray adhesive.
That's going to give me the pattern for the shape of the cutout for the clock face.
Now, to remove most of this waste, I'm going to be using a large Forstner bit and then can plow away a lot of that.
Then I'll head back over to the bench and clean things up.
To create our 12-sided opening for the clock face, I'm going to use a jigsaw and go out and cut as close to the individual points here as I can.
Then I'll run the jigsaw around the outside, connecting the dots, so to speak.
What we can do now is glue up the clock case.
I'm not going to glue the front panel in place, just because I don't want to have to deal with the extra squeeze-out that's possible.
So, I'm going to start by fitting that into one of the grooves.
I'm going to liquid hide glue on the through tenons on the bottom... ...and then fit that into place.
Chances are it's going to need a little persuasion.
I'll do the same thing at the top.
Here, you just want to make sure that you get the parts oriented the right way and you don't have your top piece turned around.
Alright.
As necessary, you can apply clamps to keep the joints together.
Otherwise, if they fit pretty snug, just make sure the case is square, then you just got to wait for it to dry.
Once the clamps came off, I spent some time sanding, making sure I had nice, smooth surfaces for the finish.
And here I used a gel polyurethane.
I like that I can build up even coats and it gives me a nice satin look to it.
Now, this clock thrives on geometric square shapes.
So, when you're sanding and smoothing, I want to keep those crisp edges, just softening them a little bit with some sandpaper, so they're not too sharp.
But then you can see I have the rectangular overall shape and then the joinery on the sides and the top, punctuating it, along with the through tenons for the bottom of the clock as well.
And I really feel like this quartersawn beech softens the look of Craftsman-style.
Now, what you didn't see is that I added a solid wood back panel, so I can just pull out this pin... ...slide the back out, and now you can see the clock movement.
It's one of those quartz movements.
This one is set to work with the atomic clock, so it automatically, throughout the day, resets or recalibrates the time, so I know that it's right on.
Now, for the clock face, I have that as just a piece of plywood that I painted a light green color and then had a local artist hand-letter the numbers and some extra artwork on the front.
I think it adds a little style to it and really accentuates the fact that this is a handmade item.
Again, if you want to see plans for this clock or any of the other ones, they're at our website, WoodsmithShop.com.
Well, Logan and Phil have made some beautiful mantel clocks, but I feel the need to be a little bit different.
So, for my clock, I've chosen this beautiful mid-century modern sunburst clock.
I think they're really cool-looking.
Now, there's a couple components to these.
First, there's the center, which is just a solid wood disc, and this is what this piece of cherry is here for.
Next, we have rays in two different sizes.
Here are my blanks.
And the rays are attached to the center disc using some brass rod.
So, there's a number of different steps that I need to go through to begin.
For the round center, the first thing I'm going to do is create a cavity for this quartz movement.
Now, we happen to have, in our shop, this monster-sized Forstner bit that's just the right size for quartz movements.
So, I'm going to go ahead and bore that out.
After I've got a recess for the movement, I'll bore a clearance hole for the stem.
Then I'll go to the band saw and cut the circular shape out.
Next up, with the center of our clock, what I need to do is drill holes all around the outside for brass pins, which will hold the rays for our sunburst.
So, to do this, I've made a super simple jig out of a block of MDF, a 5/16th steel rod, and I've put a paper template on the face of my clock and transferred the lines to the edge.
Now, I've got my drill bit set to drill 3/4 inches deep and, after I get one hole done, I simply rotate my block and keep working my way through until I have 24 holes, evenly spaced all the way around my clock face.
♪♪ ♪♪ Alright.
We're finished up with our clock face.
It is time to move on to the walnut rays that will surround it.
So, as you can see, I have short blanks and long blanks here for the rays.
The first thing we need to do is we need to drill a hole in the end of each one of these blanks, since it's going to be slipped onto a brass rod that will go into the holes in the face.
To make sure that the holes are consistent and accurate, I've made a couple simple jigs.
So here's one for the short blanks and, as you can see, it's just going to be upright like this.
I'm going to clamp it to the fence at my drill press and my blanks will slip right in here.
I can clamp it and drill precisely in the middle.
Got the same jig all set up for the tall blanks as well.
So, once we're done with that and have all the holes drilled, then we'll head to the table saw and it'll be time to start cutting the shapes of each one of the rays.
With the holes drilled in the blanks for the rays, it's now time to cut them to their final shape.
So, the short ones are cut into a long triangle.
The longer rays are also a long triangle... ...but then about 1 5/8 inches from the base, they're clipped back, so there's actually four cuts on these.
I'm going to go ahead and start out with the smaller of the rays.
And I have a sled made here -- a simple jig and a Destaco clamp -- which will help me keep everything accurate and be really safe about handling these small parts.
So, I'm going to go ahead and cut one side of each of these small triangles and then I'll reset my jig, cut the second side, and then move on to the longer rays.
♪♪ ♪♪ ♪♪ Well, the last step in making the rays for our sunburst pattern is to put a facet around the primary edges of each of these shapes.
Now, of course, for this triangle, it's the two main sides.
For this shape, I want to go on all four of these sides, but not the end.
So, at the router table, I've got a 60° bit set up and it's just a simple matter of being careful upon our entry and exit along these ends and they should all turn out fine.
Well, we finished up both sets of our rays.
And, since then, what I've done is cut some brass tubing 5 6/8 inches in diameter to a 2-inch length for these smaller rays, and to 3-inch length for the larger rays.
So, what now?
Well, what I'm going to do is put a drop of CA glue into each hole, and then I will just gently tap them into place, alternating as I go.
I'll work my way around and, hopefully, it'll look nice.
Well, there we go.
Now, this clock is ready to go to the finish room.
I'll put a couple coats of lacquer on it and, when that's dry, I can install the movement, the numbers, the hands, and this mid-century wonder will be ready to go.
Now, if you do a quick Google search, you're going to find there's all sorts of really cool, different designs -- different woods, different materials -- all sorts of different looks for this type of clock.
What I love about it is that it's got some size, but it's really pretty simple to make.
All the different sunburst rays that come out are walnut and there's just two different designs, two shapes, all on a brass tube.
The center of my clock is a simple disc bored out in the back for quartz movement.
So, it goes together pretty easy, but it's a blast to make and it's a blast to assemble and see it all come together.
So, if you want a fun, exciting clock, take a look at mid-century modern sunburst designs.
One of the best parts of the small projects, like the three clocks shown on today's episode, is that, once you get your machine set up, you can easily make one or several of these projects and they make great gifts and offer great ways to customize the project to the specific person you're giving it to or to match your own style.
If you'd like to build one of these clocks, or all three, the plans are at our website...
It's also the place for more great woodworking tips, project ideas, plans, videos, and more.
And then we'll see you right back here in the Woodsmith Shop.
♪♪ ♪♪ ♪♪ If you'd like to get more video tips and techniques, sign up for the free weekly Woodsmith eTip.
Every week, you'll receive an e-mail with a video tip to get more out of your table saw, router table, and more.
Sign up at WoodsmithShop.com.
Everything in today's show comes from the newly expanded Woodsmith Guild Edition with shop projects, plans, tips, and techniques.
To get a free preview issue of the Woodsmith Guild Edition and a free Woodsmith book, go to WoodsmithShop.com.
In addition, past seasons of "The Woodsmith Shop" are available on DVD, or you can watch them online from your computer, tablet, or mobile device.
For more information, go to WoodsmithShop.com.
Announcer: Major funding for "The Woodsmith Shop" has been provided by... Old Masters -- offering wood stains and finishes for the woodworking enthusiast and professional.
And by... Kreg -- from the first cut to the final assembly, providing woodworkers with products that help to simplify woodworking challenges.
Kreg.
Additional funding provided by... Titebond Wood Glues -- the pro's advantage.
And by... ♪♪ ♪♪


- Home and How To

Hit the road in a classic car for a tour through Great Britain with two antiques experts.


 New Episode


Support for PBS provided by:
Woodsmith Shop is presented by your local public television station.