Wall Cabinet
Season 13 Episode 1302 | 26m 47sVideo has Closed Captions
Store and display your treasures in a cabinet that breaks the mold of traditional storage.
Store and display your favorite treasures in a cabinet that breaks the mold of traditional storage.
Problems playing video? | Closed Captioning Feedback
Problems playing video? | Closed Captioning Feedback
Woodsmith Shop is presented by your local public television station.
Wall Cabinet
Season 13 Episode 1302 | 26m 47sVideo has Closed Captions
Store and display your favorite treasures in a cabinet that breaks the mold of traditional storage.
Problems playing video? | Closed Captioning Feedback
Where to Watch Woodsmith Shop
Woodsmith Shop is available to stream on pbs.org and the PBS app.
Providing Support for PBS.org
Learn Moreabout PBS online sponsorship[loud whirring of drill] [♪] I'm often asked what makes a good first woodworking project, and right at the top of my list is building a wall cabinet.
So on today's episode of the Woodsmith Shop, that's just what we'll do.
There's plenty of woodworking education in here.
There's exposed joinery, decorative plugs that you'll add, glass doors, and whether it's your first woodworking project or your hundredth, there's something for you to learn, and what you'll end up with is a great-looking piece with some practical storage.
It's time to start building.
ANNOUNCER 1: Major funding for the Woodsmith Shop has been provided by: ANNOUNCER 2: Old Masters.
Craftsman-quality stains and finishes since 1953.
ANNOUNCER 1: Additional funding provided by: ANNOUNCER 2: Titebond wood glues, the pro's advantage.
ANNOUNCER 1: And by... ANNOUNCER 2: Kreg.
From the first cut to the final assembly, providing woodworkers with products that help to simplify woodworking challenges.
Kreg.
ANNOUNCER 1: And by... [♪] [drilling] [♪] You know, Chris, when Phil said he wanted to build this on the show, I was pretty excited because this tool cabinet has hung in our magazine shop for quite a while.
It's been hanging above one of our designer's benches, and every time I walk through, it catches my eye and I think, "I want to build that."
It is a beautiful tool cabinet.
Well, you know, it's not just a tool cabinet.
This would look great in any room in a house.
It could hold knick-knacks, collectibles, books.
It's a great cabinet.
Exactly, and I think probably one of the first things that I really noticed about it is the unique choice of material because it's not a material that we use very often, and that's ambrosia maple.
A small standalone project like this is a great opportunity to use unusual and different woods.
You know, and as you're looking at the cabinet itself, you notice the material, but then you start noticing other details.
It has some unique joinery, the doors are pinned together.
There's just these tiny little details all over it that make it a really fun piece.
CHRIS FITCH: It's a fun piece to build, but don't worry about it taking too long.
This is a pretty easy project to do.
Yeah, you'd probably get it together in a weekend.
Uh-hm, I think so.
Well, Logan, I think we're all ready to build.
Exactly, and since I'm starting with the case, so we'll head over to the bench and I'll show you how.
Often, details are what set a simple project apart from an extraordinary one, and this wall shelf is no different.
Let me show you the few details that really jumped out at me.
The first is the joint that used to connect the top and bottom to the sides.
And in this case, it's a set of through tenons.
It's a great-looking joint and it's strong, too.
But to increase strength a little bit, we've cut a dado in the side that accepts both the top and bottom.
Next, the sides have a nice, gentle curve along the top and bottom edge.
It adds a nice detail and it breaks up the monotony of straight lines.
Finally, the entire case is scattered with contrasting pins.
These lock the joints together and add a great detail.
To speed up the building process, I went ahead and cut most of the joinery for the case of our wall cabinet.
Let me show you the steps I took to do that.
So I started off by cutting everything into finished width and length.
I didn't cut the curve on the sides, however, and there is a reason for that, and I'll tell you that a little bit later.
The first thing I wanted to tackle is to cut the tenons on the ends of the top and the bottom.
Now, this is easy to do over at the table saw.
I first loaded up the dado blade and then I used the minor gauge with a tall auxiliary rip fence.
I can clamp the stop block for that to define the width of the tenons.
After cutting the tenons on each end of the top and the bottom, I then can remove that stop block and nibble away all the waste.
And while we're at the table saw, this is a good opportunity to cut the dados in the side panels, and here's where leaving the ends of the side panels square is going to help you.
That's because you can use the rip fence to set the position of the dado and then make the cut with the side panels using the minor gauge with a long fence on it.
Then the last thing to take care of is to cut the notches that are going to accept the tenons.
And that's easy to do by grabbing one of the top or bottom panels and standing it on edge.
Then you can raise the dado blade height to match the tenon.
Then it's a simple matter of flipping the side panels on edge and cutting out those notches.
And that leaves us at a point where we can almost do a dry assembly.
The only thing we want to take care of before we do that is to cut a couple grooves.
There's going to be a groove along the back edge of the top and bottom and on the back edge of the side panels.
And in the plans, this groove is going to hold the plywood back.
But I think this is a good opportunity to add another detail to our project.
What I'm going to do is I'm going to house a shiplap solid wood back in these grooves.
Now, these grooves are pretty easy to cut over at the router table.
The groove that's in the top and bottom is simply cut through both ends.
However, on the side panels, it's stopped.
But it's stopped in the dados, so those provide you a great location to start and stop your groove.
All you have to do is simply lower the side panel over the running bit, make your rout, and stop in the other dado.
Now, with this dry assembly, there's a few things I'm really looking at.
The first is I'm going to check out the joinery, and I want to see how tight that is and make sure it fits together well.
I'd learned over the years that if a join is too tight going together in a dry assembly, when you put glue on it, you're asking for bad things to happen.
A little persuasion is okay, but you don't want to be fighting it.
The next thing I'm looking at is I want to see how this inside groove for the back is sitting.
I want to make sure it lines up all the way around.
That way, when we get glue on this, and we start inserting our back, we don't run into any problems.
There is one other thing I want to take care of while we have this together, and that is to mark the inside edge of each tenon.
That's because we're going to chamfer it.
So now that I have those marked and I'm happy with how all my joints are sitting, I'm going to take this apart and cut those chamfers on the inside edges.
When I'm cutting the chamfers on the ends of these tenons, it's really beneficial to have a dedicated paring chisel, and that's a chisel that's a little bit longer, and that gives you a little bit more control on your angle, and keeping everything nice and straight.
And in addition, with the end grain, having an angle on your chisel bevel that's pretty shallow, like a 20-degree, 25-degree, will really help sever those end-grain fibers.
And no matter what wood you're working with, you'll want to take a couple of light passes.
That avoids blowing out that back edge.
There we go.
It's nice and clean, and you want to avoid going down below the pencil line we just made because the pencil line is the surface of the side, and if you go below that, your chamfer is going to end underneath the surface of the side panel.
Once I get all the insides of this tenon chamfered, I can head over to the table saw and we'll start cutting the rabbets for the shiplap back.
Before we start cutting any of the joinery on this shiplap back, let's talk about the anatomy of a shiplap.
Basically, a shiplap consists of a series of narrow boards that has a rabbet cut on each edge, and they're on opposite faces.
What this does is it creates an interlock where those two boards meet up.
Now, this back is going to be a story of rabbets because each joint is going to be rabbeted to the next board, but we also need a rabbet all the way around the perimeter, and that one is slightly different sized.
So what I'm going to do is, I'm going to lay these boards all out and these are going to make up my back... and I'm going to mark the outside edge because I don't want to cut those while I'm cutting the shiplap joints.
I want to reset the fence and then cut those.
I'll mark the ends that I'm going to leave up.
So, cutting the shiplap is pretty simple.
I'm going to set up the dado blade in the table saw and use an auxiliary rip fence and bury that, and then it's a simple matter of cutting one of the rabbets, flipping it over... and cutting the other.
And I want to do that for the inside doors.
Then I can go ahead and reset the fence and cut the rabbets along the two outer edges... and then grab the miter gauge and cut the rabbets along the top and bottom of each board.
Once I get over to the bench, I'm going to grab a block plane quick and I'm going to run a chamfer along the inside edge where each of the shiplap joints meet up.
Now there's a particular order you really have to take with this to get all that shiplap in in the right order.
And that's going to start by assembling one of the sides with the bottom.
And I might as well mention, I did go ahead and round the ends of the sides with the band saw.
It's a quick little trick, and then I just sanded them nice and smooth.
So, when I'm assembling this, glue, honestly, in this joint, is not terribly necessary because we're going to pin these, but I'm going to add a little bit just to give us a little extra holding power.
Then we can slip that joint together.
All right.
Now is when we want to start inserting our back.
It starts with the first panel.
I'm going to slide that into the rabbet or the groove on the bottom, and the groove on the side, and get that nice and seated.
Then it's just a matter of working down and inserting the slats.
All right, let's stand this up, and be careful of that shiplap so it doesn't fall out... and now we can put the top on.
So let's get a little glue in here.
And the real trick here is going to be getting that back to stay in place and get it into that groove, which takes a little wiggling.
[hammering] I'm going to throw a spacer under here so those tenons have a little room.
Okay.
All right.
Now let's glue the opposite side on.
[♪] So now that I have a couple clamps on here holding everything nice and tight, we can go ahead and pin these joints together, and that's pretty simple.
Simply mark the center of each tenon, and then I'm going to drill a hole.
[drilling] With that hole in there, we can now glue in a dowel, and these are walnut.
They're going to give it a really nice contrast to the finished cabinet.
I'll spin that to spread the glue and we'll let that dry.
And once they're all dry, go ahead and use a flush trim saw to trim those down.
Then we grab that same paring chisel we used earlier and start zipping them off.
A sanding block will finish that up.
It's clear from the work that Logan did, that the bulk of your effort on this project is going to take place on the case.
So I'm here with a brief interlude to talk about building the two doors that will enclose the front of the wall cabinet.
And they pick up a few of the details that you'll find in the main case.
One of those is that the case shows off its joinery.
Well, here the doors do so as well, but in a more restrained way.
The doors are built using half-lap joints so you'll be able to see that joinery when the doors are open.
There's another detail on the door pieces, though, that's easy to overlook, and that's a rabbet that's cut on the inside edge of all those parts that will hold the glass panel.
Now after the doors are assembled, I'm going to add some decorative re-enforcing pins just like the ones on the front of the case.
The starting point, of course, is cutting the pieces to size, and when you're working with half laps, you have an advantage here.
Because the stiles and rails completely overlap each other, you can cut those pieces to the full length and width that you need for the door size.
There's no accounting for the door joinery that you'll have to take into, and then the reason we're here at the table saw is that we can set up and cut those half laps.
The height of the blade is set to half the thickness of the door parts.
The rip fence is used to set the length of the half laps, and I guide the parts using the miter gauge.
Half laps are cut on the back faces of the stiles... and the front faces of the rails.
You'll finish the doors by cutting rabbets on the inside edge of each of the door parts.
You can see an auxiliary fence clamped to my rip fence that allows me to bury the dado blade to control the width of the cut.
It's easy to get carried away when it comes to assembling a half-lap frame like these doors, but there are really only a few things that you need to consider and take into account while you're doing so.
The first of them is to get a good amount of glue on the joint faces, so I'm just going to use a brush and spread glue and do that on all four.
With glue on all the joint faces, you know you're going to get a good bond.
Now what you want to focus on is assembling the pieces so that the joints are tight.
And as I bring the pieces in, what I want to do is pull the rail down so that it's tight up against the shoulders on the underside of the stiles.
And the way that you're using these half laps is that the joint actually squares itself as you pull things together.
So I'll bring those together this way and down here, and next I'm going to apply a clamp across the joint and apply just enough pressure to close the gaps on the front shoulders here.
And since these are the face of the doors, they're the most visible.
We'll do the same thing down at the bottom of the door.
And the last thing that I'm going to do is slide my support pieces in a little bit, and I'm going to use smaller clamps and squeeze them right onto the joint faces.
This is going to give you the best and strongest glue joint.
Now it's just a matter of waiting for the glue to dry.
Adding a pair of plugs in each corner of the door completes the work on the door.
I set the fence on the drill press to make sure they were consistently spaced.
All that's left now is to glue short dowels into the holes, and you can trim them flush, and the doors are ready to be installed in the cabinet.
With construction of the doors and cabinet done, it's time for us to move on and fit the doors and add hinges.
So I've been working a little bit on the doors already.
I've been using this number 5 jack plane and carefully taking a little bit off the edges and trying to achieve about 1/16 of an inch reveal around the outside of my doors.
And I've been pinning the doors in place temporarily just using some simple wedges.
So with that done, it's now time to think about mortising the hinges.
And I've got a neat technique to show you how to make that fast and accurate.
I'm gonna use a special bit, and this is a hinge-mortising bit.
As you can see, it has a top bearing, and it has a fairly shallow cutter, and this wouldn't need to be any deeper than that because we're only cutting shallow mortises for hinges.
This bit works in conjunction with a simple shop-built jig.
This simple jig consists of a piece of Masonite and then a solid-wood stop.
The Masonite has a slot cut into it, and I did this using a dado blade on the table saw.
The width of this slot represents the height of the hinge leaf.
The stop that's glued on the back is set at a distance that represents how far the hinge is going to be inset onto the door or the cabinet.
In other words, the width of the leaf itself.
So, my next step then, I'm gonna pull the door, mark the hinge location, and we'll go ahead and rout and mortise.
[♪] With my jig in place, I'm all ready to start routing my hinge mortises.
Now, one thing this router will not do is it won't reach into the corners, so I'm going to need to use a chisel and clean those out after I'm done with the router.
[♪] With the hinge mortises cut into the doors, our next step is going to be to transfer their locations from the doors to the carcass.
So you'll see I've gone ahead and mounted the doors back in the carcass using the wedges.
And now I'm going to take a sharp knife and what I want to do is make a mark at the top of the hinge mortise and at the bottom... and that accurately transfers that location.
So with that done, I'll make marks on the other side of the cabinet and then I'll be ready to grab the router, the jig, and start cutting mortises into the cabinet itself.
For our project, we've selected high-quality brass hinges, and they come with brass screws.
You know, sometimes people have a lot of problems handling brass screws, having them break.
So I want to talk a little bit about that.
One thing to observe is that a wood screw is conical in shape, so it's tapered, and in order to not have trouble with this brass screw, we need to use two pilot bits, two different sizes.
The first size will be for our threads.
The second drill bit is going to be sized to the smooth shank right below the head, and by doing that, we're not going to overstress the screw and break it.
Now the manufacturer of our hinges sent also a set of steel wood screws, and this is a great tip.
For your initial handling of the doors, for your initial fitting of them, use a set of steel screws, and then only when you're ready to hang the doors for the last time, use the soft brass screws that come with your hinges.
So I'm going to go ahead and fit all of my hinges onto the doors.
I'll then fit the hinges and doors to the cabinet, and I wanna give the doors a final check to make sure they fit, and do any corrections I need to.
With the cabinet thoroughly sanded, it's time to apply finish.
I'm going to use a wiping varnish, and I'm going to apply three coats of it.
A wiping varnish is easy to apply, has a nice tactile feel, and is a great choice for this project.
With finish applied to the cabinet, it's now time to add glass to the doors.
Now this cabinet's gonna hang in a workshop.
So, I've opted for plastic for safety on the doors.
In order to install the glass or plastic into the doors, what I've done is I've clamped a board at the edge of my workbench and that's gonna give me a place to tap the brads into and to work the door towards.
I've put stop around my recess, and I'm using simple butt joints here.
In order to install the brad, the first thing I'm going to do is, I'm gonna take an awl and I want to mark the location of each brad, and I'm going to do that so that my drill bit won't wander in the holes when I go to predrill.
I'm going to drill all the way through the stop material and just a little bit into the frame itself.
With that done, I'm gonna insert a brad into the hole and I'm going to use a nailset and a small hammer and send it home.
By predrilling for these nails, we eliminate the possibility of splitting the stop and we're really just relying on the head itself to cinch the stop down and secure the glass.
Our tool cabinet is finished, it's ready to go to the shop and ready to be put to work.
I've found that I've collected quite a few band saw blades over the years, but finding a place to store them all has been a problem.
Well, Bob Stanley from Van Wert, Ohio, has the perfect solution.
He just took a scrap piece of 2x2 that he found in his shop and drilled a series of half-inch holes down the side.
Next, he notched on the top of those holes.
It creates the perfect slot for holding band saw blades.
So now with this mounted right next to my band saw, it's perfectly convenient to grab my blades when I need 'em.
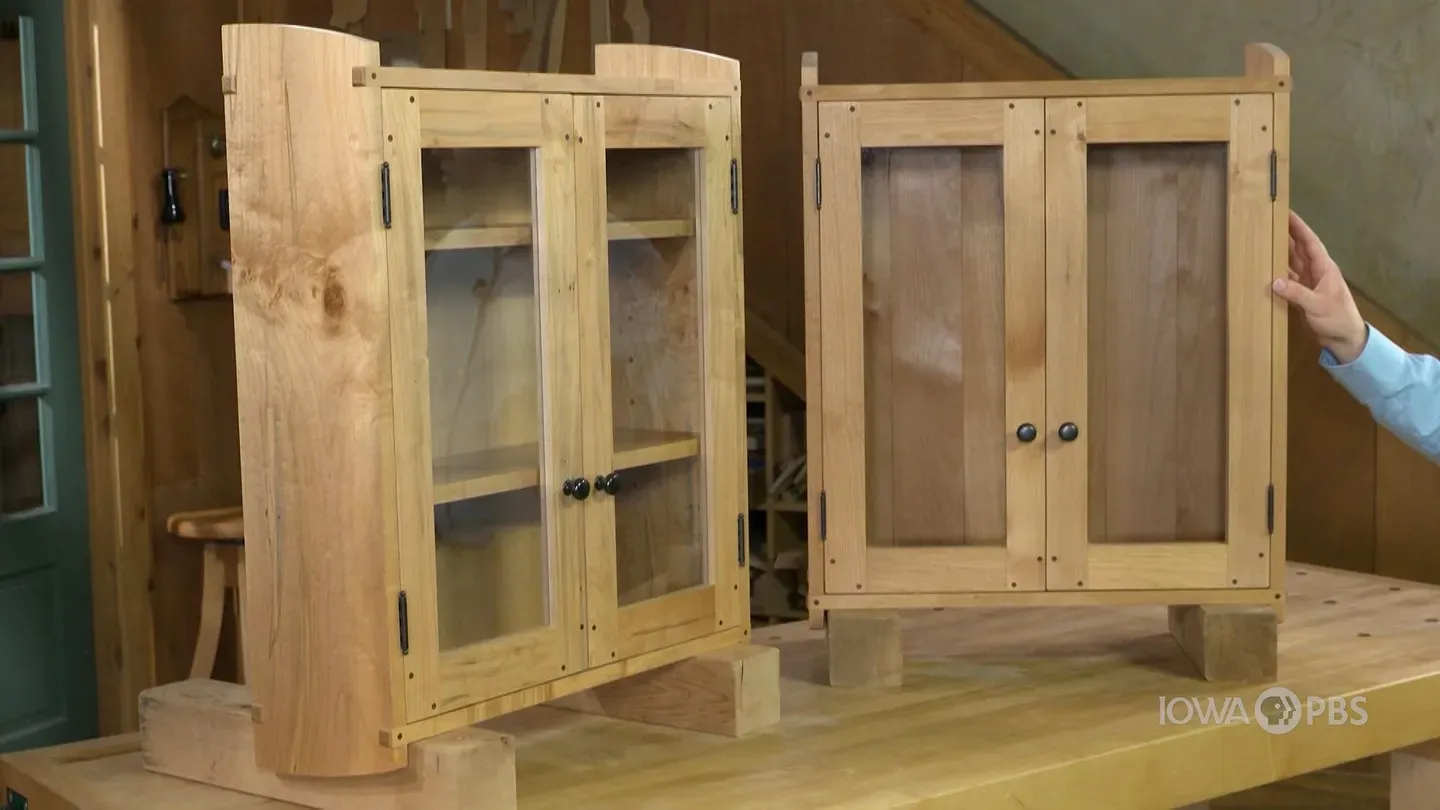
We built the original version of our wall cabinet out of ambrosia maple.
It gets its name from the unique coloring that it has, and that comes from a combination of a beetle infestation and some fungal spores.
Sounds pretty attractive, right?
Well, in today's episode, we built our version out of alder, and the reason for that, well, frankly, we couldn't find any ambrosia maple locally, but we also wanted to show you how a simple change like just changing up the material can have a dramatic outcome on the finished piece.
If you'd like to build your own cabinet and add a few of your own changes, the plans are at our website WoodsmithShop.com.
There's enough there to keep you busy in your workshop until we're back here with the Woodsmith Shop.
NARRATOR: If you'd like to get more video tips and techniques, sign up for the free weekly Woodsmith eTips.
Every week, you'll receive an email with a video tip to get more out of your table saw, router table, and more.
Sign up at WoodsmithShop.com.
Everything in today's show comes from the newly expanded Woodsmith Guild Edition with shop projects, plans, tips, and techniques.
To get a free preview issue of the Woodsmith Guild Edition and a free Woodsmith book, go to WoodsmithShop.com.
In addition, past seasons of the Woodsmith Shop are available on DVD, or you can watch them online from your computer, tablet, or mobile device.
For more information, go to WoodsmithShop.com.
ANNOUNCER 1: Major funding for the Woodsmith Shop has been provided by: ANNOUNCER 2: Old Masters.
Craftsman-quality stains and finishes since 1953.
ANNOUNCER 1: Additional funding provided by: ANNOUNCER 2: Titebond wood glues, the pro's advantage.
ANNOUNCER 1: And by... ANNOUNCER 2: Kreg.
From the first cut to the final assembly, providing woodworkers with products that help to simplify woodworking challenges.
Kreg.
ANNOUNCER 1: And by... [♪]


- Home and How To

Hit the road in a classic car for a tour through Great Britain with two antiques experts.


 New Episode


Support for PBS provided by:
Woodsmith Shop is presented by your local public television station.