Virginia Home Grown
Value-Added Products
Season 21 Episode 1 | 56m 30sVideo has Closed Captions
Discover unique value-added products created by Virginia farmers.
Meet farmers taking what they grow to the next level by creating value-added products. At Wandering Cow Farm, Peggy Singlemann learns about raising sheep for wool. Keith Nevison visits Tonoloway Farm and tastes tree syrups including a unique black walnut variety. Randy Battle and Jen Naylor share gardening tips you can use at home. Engage with us on Facebook. VHG 2101 March 2021.
Problems playing video? | Closed Captioning Feedback
Problems playing video? | Closed Captioning Feedback
Virginia Home Grown is a local public television program presented by VPM
Virginia Home Grown
Value-Added Products
Season 21 Episode 1 | 56m 30sVideo has Closed Captions
Meet farmers taking what they grow to the next level by creating value-added products. At Wandering Cow Farm, Peggy Singlemann learns about raising sheep for wool. Keith Nevison visits Tonoloway Farm and tastes tree syrups including a unique black walnut variety. Randy Battle and Jen Naylor share gardening tips you can use at home. Engage with us on Facebook. VHG 2101 March 2021.
Problems playing video? | Closed Captioning Feedback
How to Watch Virginia Home Grown
Virginia Home Grown is available to stream on pbs.org and the free PBS App, available on iPhone, Apple TV, Android TV, Android smartphones, Amazon Fire TV, Amazon Fire Tablet, Roku, Samsung Smart TV, and Vizio.
Providing Support for PBS.org
Learn Moreabout PBS online sponsorship>>When you have livestock, you're really tied to those animals.
Whereas we can go away for a weekend.
We don't have to ask our friends to take care of the trees, they do just fine without us.
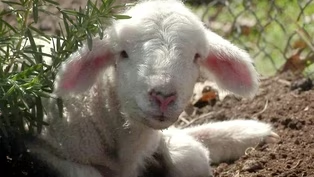
(sheep bleating) >>I have one ewe, she's about 13 years old.
Her wool is not as long as it used to be, and it's not as fine as it used to be but she's living her life out nicely.
>>Hi, I'm Peggy Singlemann, host of Virginia Home Grown.
And in the first half of our show, we'll be visiting a small family owned farm with unique products that are offered at local farmers' markets, with a personal touch.
>>And I'm Keith Nevison.
In the second half of the show, we'll be visiting a forest farm in beautiful Highland County, Virginia to talk syrup.
As always we invite your questions via Facebook and email.
Welcome to Virginia Home Grown.
>>Production funding for Virginia Home Grown is made possible by- (upbeat music) >>Hi, I'm Peggy Singlemann.
Welcome to a new season of Virginia Home Grown.
A new growing season is starting to something positive on many levels.
Today, we are taking a closer look at value added products.
These are great for farmers because they expand the market audience and are creative and eye-catching at those markets.
Many can be produced outside the growing season creating year round sales opportunities.
In the second half of the show, my co-host Keith Nevison will visit Tonoloway farm in Highland County to learn what it takes to produce tree syrups, including a unique black walnut syrup.
We will also be checking in with Randy Battle and Jen Naylor to bring you tips to improve your gardening skills.
Remember to send in your questions through Facebook or email to ask our guests about growing value added products or other gardening questions you may have on your mind.
Now let's take a look at my visit to Wandering Cow Farm in Hanover, to learn more about soap and wool products.
(sheep bleating) Mary, this is so fun.
>>Thank you.
>>Being surrounded by sheep and lambs.
It's a great way to start a day.
But I wanted to ask you, you've got all these sheep and you've got goats and you have horses, but where's the cow, my friend?
>>Unfortunately, the cow was a little bit too wandering and too destructive.
So he went to a different home.
>>Well then how did you switch over to sheep and goats and such?
>>Okay.
So in the beginning, we were actually primarily a dairy goat farm.
And as my kids grew up, they became 4H-ers.
And we started with chickens and dairy goats and horses.
And then my son wanted sheep and we started sheep.
And then we progressed on to cows and we- they were showy animals.
>>Uh huh.
>>Yeah.
That's fantastic.
And how many different breeds of sheep do you have?
>>Okay, so we have some influence of Rambouillet, mostly Merino, Icelandic and some Romney and Border Leicester but mostly Merino.
>>Interesting.
And I know Merino wool.
So you're basically keeping these sheep for the wool now?
>>That's exactly what we're breeding for, quality of wool.
And how do you do that?
>>Okay, so what we did was we influenced different rams.
Like we have a Cormo ram and he's been influencing our herd now.
This is his third breeding.
So it's two years influence of Cormo wool on our product.
>>So you get this long wool that's very soft?
>>Long wool that's very soft and very fine.
>>But what else would influence the wool?
Does diet or- >>Diet definitely influences the wool?
Do you ever get wool that breaks, it's called wool break.
It's from poor nutrition and poor health.
>>Interesting.
Just like human hair.
>>Just like human hair.
>>That's very interesting.
>>And then, all- you know, you- there's a lot to maintaining, parasite control is huge.
Making sure they have plenty of protein without going too far, you know, they're ruminants.
So it's forage.
>>Exactly.
>>It's all about forage.
>>Giving them a good solid, balanced diet will give you that beautiful wool that you're looking for.
>>Yes.
>>So how often do you shear the sheep?
>>We shear once a year.
I like to go a little bit later than most people, because- >>It's hot here.
>>It's hot here.
(laughs) But I like to go around April.
So some- a lot of farmers are shearing in January.
That's all too early for me.
So- and I lamb later too.
I lamb in April so I don't have to worry.
I mean, we have some on the ground now but you don't have to worry about the heat lamps in the, you know, the cold night, wet night, things like that.
>>Well, I noticed there's a few lambs running around, and one of them is very black but I don't see any black parents.
Here he is.
>>Okay.
So that's called natural color.
>>Uh huh.
>>Okay, any other color but white is considered natural color.
This is his mom.
>>Uh huh.
>>And his father is white.
So this comes from her genes.
He will lighten up and get browner.
He's not a true black.
>>Okay.
>>But he'll be dark.
>>Okay.
>>So she started out completely black.
>>Uh huh.
Too.
>>And I see how Brown she is now, it's interesting.
>>And if you open up her wool, I don't know if she'll let me.
>>Nope.
>>You can see that it- the top is sun bleached.
>>Okay.
>>So she's more like her legs, underneath.
>>I see.
>>Yeah.
>>That rich, deep black- >>That rich, deep- yeah.
Coffee brown.
>>That's beautiful.
Yes.
That's gorgeous.
Well tell me, once you've shortened the wool, you know, what are the steps?
I see you've got some there.
>>Okay, so I do have some raw wool here.
Well, it's- the first step is easy because it's called skirting the wall and you lay out your wool.
You take off the head and belly wool and then you take off any organic matter.
Take out- pick out any organic matter that's in the wool.
>>Okay.
>>You lose about 50% of the wool in that.
>>Okay.
>>And then we take the head and belly wool, we actually use it for mulch.
>>In your garden.
>>So nothing goes to waste.
>>That is fantastic.
>>Yes.
>>Now when does it last typically as a mulch?
A year.
>>Over a year.
>>Okay.
>>So if I've mulch in the fall, it's like peat moss in the spring.
Interesting.
That's great.
That's great.
So you've picked the wool clean?
>>You pick the wool clean, then it gets washed and then it- and we send it to a small spinnery.
If you had only one or two sheep, you could easily process the whole thing and spin it into yarn or make it into a roving yourself.
>>I'm amazed by all the colors in the wool.
>>Isn't it.
>>You've got white.
You have tan.
You have gray.
>>And this is like the lanolin.
Yellow is the lanolin.
>>Gone is my thinking that sheep are white and that's all- (laughs) >>Oh no, not at all.
>>But I also know that you do dye the wool.
>>I do dye the wool.
>>And you use a lot of natural plants to do so.
>>I do use a lot of natural plants.
And I colorfast with either natural tannins like vinegar and things like that.
>>So everything is natural and it's a big reel.
>>Yes.
>>Good cycle.
>>Good cycle.
>>Well, this is fun learning about sheep but you also raise goats?
>>Yes, we do.
>>Let's talk about those.
>>Okay, let's go see the goats.
(sheep bleating) We started out with 4H and dairy goats and showing and milking and making cheese.
And when my daughter who had psoriasis and eczema- >>Yes.
>>I couldn't get any relief for her from commercial or even a prescription products.
I started making goat's milk soap.
>>Interesting.
>>And then went on to lotions and other things as well.
>>Well, I'm fascinated because we have some of the soap here.
You have two, and I have two.
And somebody is very interested in them.
>>You're not going to like it.
Get down.
>>But I've got coffee here.
You use quite a number of products to make the soaps.
>>We do.
We like to use a lot of different products.
We do use a lot of goats milk and it, you know, there's a lot of enzymes and proteins and fats and goat's milk, which really makes for a nice product.
>>Does the diet of the goat affect the milk to the point where it's affecting the soap?
>>It not only- Yes.
You need a good diet.
You need a good, healthy diet.
In different breeds of goat, there's more butter fat in like a Nigerian dwarf or a nubian goat, right.
But the quality and quantity of milk from your Alpine or your oberhasli- that's an Alpine.
>>Thank you.
(laughs) >>And, you know, so different types of goats can change the quality of the milk.
>>So the consistency and the amount of fat in the milk, I would imagine would affect- >>Yes you have to adjust your recipe.
>>Yes.
I would imagine that.
Typically how much goat milk do you use for- >>We use about 30 ounces of goat's milk.
>>So this is very rich.
Very rich.
Yeah.
Not- I mean, this is our recipe and it works for us.
>>So it's your recipe and makes it individual.
That's fantastic.
(sheep bleating) Mary, I also noticed that you have some gardens here.
And so what plants do you use in the soap?
>>We grow mint, and we make mint tea.
And we use the mint tea for the soaps and we have lavender and we have calendula and there are several different plants we use to make our soaps too.
>>Oh I bet you the fragrance is really enjoyable too.
>>Oh, it is wonderful.
>>Well, what a great way.
Again, that full circle of using everything here on the farm.
And to know that it's right here made in Hanover County.
I thank you.
I thank you for what you and your family are doing for our community.
And I thank you for having us out today to share it with everyone.
>>Well, thank you for coming out on this beautiful spring day.
>>That was a beautiful spring day and we had so much fun.
And those lambs were just so darling.
Mary, I just- that was such a great joy to be there.
It was just so uplifting.
And I thank you.
>>Well, I- Thank you for coming and thank you for having us.
>>Certainly.
But before we get started, I wanna remind everybody to please, you know, send in your gardening questions via Facebook or send them in via email so we can answer them later on in the show.
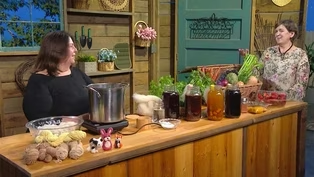
Well Mary, we've got so much here to start with.
You know, I love and I've always been fascinated by natural plant dyes.
And when you and I talked about coming on the show and sharing what you do, I had no idea we'd be bringing a full picnic, as well as half of the grocery store.
So please explain to us about this wonderful array of opportunity here.
>>Well, actually plant dyes are- you can use your scrap vegetables, like your onion skins and your old berries that are overripe.
You mash them, your carrots.
We make all our natural dyes out of vegetables.
>>Interesting.
>>Yes.
>>So what color do you get from onions?
>>Onion would be yellow.
>>Okay.
>>And also this dye is made with onion and carrot and some turmeric.
>>And it's a rich yellow.
>>It's a rich yellow.
>>Wonderful.
>>And it comes right.
It's just- if you take your time creating the dye.
>>It's gorgeous.
What a beautiful yellow.
>>And if I were to add some red cabbage, I could turn that orange.
>>Interesting.
>>Yeah.
>>So some of the other things that create colors here you know, we've got celery.
Is that green?
>>The celery leaves, yes.
>>Okay.
And how about the fennel?
>>Fennel France.
>>But the butternut squash.
>>Okay.
So if you cut the butternut squash, you're gonna use the membrane in the seed and it is a rich orange.
>>Lovely.
>>Yes.
>>I would expect the cabbage to be red.
>>It is red and it is very deep red.
>>It is?
>>Yes.
This has red cabbage and Berry and red onion skin.
>>Oh, look at that.
That's gorgeous.
>>Yes.
>>That's a lovely color.
And I know from personal experience when my very middle-aged daughter now was very young she ended up with pink all over her clothes when we went strawberry picking.
So we've got pink from strawberries.
>>You do.
Yes.
>>But the coffee and the tea.
>>Okay.
So the coffee and the tea are- they're very easy to dye with because they have their own tangents.
>>Okay.
>>So coffee is a beautiful, it can be as deep as you want it to be.
And it turns into a beautiful tan and brown.
>>Oh, that's beautiful.
>>Yeah.
>>I would expect it to be darker.
>>It could be darker if I made the coffee darker, and the longer I let the wool stay in the coffee, it'll get darker.
>>Interesting.
Yeah, of course.
And we all know black walnuts.
>>Yes.
>>Because all very dark.
>>Very dark.
Yeah.
The hulls.
>>But the herbs kind of throw me, do they have different colors?
>>They do.
All- herbs have different colors, mostly a lot are green in the leaves and it's how you prepare them, you know, you have to use, take your time making your dye bath so that you get- you extract as much pigment from them as you can.
>>So you get as deep of a color as possible color.
>>As deep of a color, yeah.
>>Interesting.
Well, that's very interesting.
Well speaking of the dye bath, what is that process and how long does it take, you know.
What are the steps to changing this to the dyes in the jar.
>>Okay.
So there's five easy steps to natural dying.
>>Okay.
>>Okay.
So you first wanna take- I chose roving.
This is the stage of wool before it spun into yarn.
>>Okay.
>>So I- you wanna put your roving in a cool bath so that it absorbs all the water.
You use a mordant, which I normally use white vinegar, but you can use alum or salt.
Those are all non-toxic >>And what will they do?
They absorb wool water?
>>What they do is they help the pigment adhere to the wool.
>>Okay.
So a binder?
>>Right.
So you would use like a cup of white vinegar to a gallon of water and submerge your water, your wool overnight.
And the platelets in the wool in the fibers will loosen up.
>>Interesting.
>>And after you're done with that, you squeeze your excess water out and you take your roving or your yarn or your cloth, and you put it into- I'm putting it into a prepared dye bath.
>>And what's in that pot?
>>Okay.
So what is in this pot is water, about a gallon of water.
I put my vegetables in, my- I put some Rose pedals and some Camilia flowers and some red cabbage and some berries and cherries.
>>Interesting.
>>Yeah.
And I- you bring it to a rapid boil for about 45 minutes until you extract most of your color.
>>Most of the pigments.
>>And then you turn it down and let it simmer for several hours and really make that rich.
It can in the ones with the turmeric smell wonderful.
>>Oh, wonderful.
>>And so you let this simmer for about two hours or longer.
I've let it simmer overnight if I wanted a really dark color.
>>So it just keeps pulling out more and more the pick ends?
>>It just keeps pulling and pulling.
And it's your decision when you're ready to.
You wanna make sure that your wool is free flowing so that you get no blotchiness and it's a very even colored.
>>Okay.
>>And when you're done- you can see it's already starting.
>>Yes.
Oh my gracious.
>>Yeah.
>>So beautiful color.
>>Yeah.
Pull that back up one more time, I wanna see it again.
Wow.
The way it's just grabbing in on that color.
>>It's just grabbing in and it's absorbing it and it's attaching all the pigment to all the fibers.
>>Wonderful.
So we've boiled and boiled and what's our next step?
>>We boil and boil.
>>Okay.
So after we're done, and we decide, then we wanna color fast.
>>Right.
>>So I take my wool and I pour it right into the sink.
So the thing you have to be very careful about not to felt the wool.
So as long as the wool in the dye bath are the same color to start with, you can raise the temperature.
>>Okay.
>>Then when you bring it over to the color fasting stage, you wanna make sure the wool and the water you're using to wash your wool are the same level.
>>Okay.
>>Because wool felts when it's shocked from hot to cold or too agitated.
>>Interesting.
>>So you wanna be somewhat gentle.
>>Yes.
>>So basically when I put it into the sink and I use the natural soap, we wash the wall, not agitating it, basically just rinsing it out and getting all the color that's excess, that's gonna bleed out.
And then you basically take it out to dry in the sunlight.
>>Nice.
>>You can dry inside, but just make sure there's enough free flowing air so that all the fibers dry.
>>Interesting.
So they dry evenly too and you didn't have any wet mats.
>>You don't have any wet mats and you don't have anything like, you know, fungus or mold or anything.
>>Interesting.
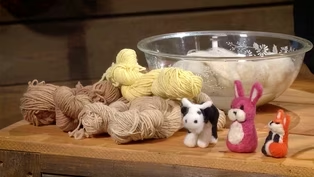
So from there, you then- >>You've got your products over here.
Yes.
>>Okay, so we make felted animals and these are all dyed by us.
And then our wool, this is actually- we dyed it with a little bit of extra wine, red wine, that was left in the back of the cabinet and no one was gonna drink.
>>Right.
>>So that was only about two cups of red wine.
This is coffee.
>>Interesting.
>>Yeah, and this is several different types of things like Marigold leaves and red- yellow onion skins, and things like that.
>>What a beautiful yellow color.
>>Yeah.
>>Oh, they're so beautiful.
And I love the vibrant colors on your felted animals, such a joy.
Mary, this is so interesting to know that we can take fruits and vegetables from the grocery store.
We can take products that are in our cabinets and even in our gardens and even our herbs and with some simple steps, you know, we too can create some dye and learn to play with it and learn to I'll say mix and match and see what we enjoy.
And it's solved an interest of mine.
You kind of a curiosity I should call it, of mine.
And I just thank you so much for bringing all of this here to share with us.
>>Oh, you're very welcome.
And thank you for having us.
>>Oh, absolutely.
>>And now we're going to go to- with Randy Battle and we're going to be learning about planting herbs and dill.
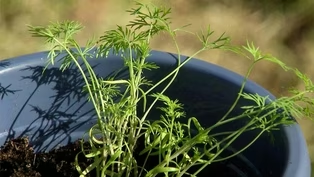
(upbeat music) >>Today I wanna share with you how you can grow your own herbs in your home, porch, deck, patio or apartment.
All you need are a few things: seeds, soil, light and water.
So today we're gonna plant some dill seeds.
Dill is a very versatile product you guys, I love it on my salmon.
I love pickling cucumbers with it.
You can use it for a variety of different things.
And what I'm gonna do is take some seed starting mix put it in some cells.
You can use a smaller container, whatever you have make it work.
And take your finger, make small indention you guys.
You don't have to bury it super deep.
It's not rocket science.
Keep it simple.
Take your seeds.
Dill seeds are very small.
So what I like to do, is I like to put two in each sale.
That way, if one doesn't germinate, we have a backup plan.
Some I'm gently just gonna pop two seeds, maybe three, in each container, save the remaining seeds for next year.
And you gently wanna cover them up.
Not too much.
And there you have it.
You've just planted your dill.
And you wanna sit these in a sunny window seal.
If you're growing in a grow room you might wanna use a grow light, whatever you have, but they need as much light as possible for at least six to eight hours per day.
Now in a few weeks, what you're going to get, voila, we have dill you guys.
Now, this is the size where you wanna transplant them into a larger container.
And that's what we're gonna do right now.
All you need to do, pick your container, get you some good potting soil, not the soil from in the yard because it contains pests and things that you don't want in your home.
You don't want fungus gnats flying all around.
So all I'm gonna do is take one of my cells, gently pop it out from the bottom.
Just try to be careful you guys not to damage the root ball.
And it's not root bound, but as you can see, we have a good root system.
And we'll just gently wanna put it in our potting soil just like so.
And you've transplanted your dill.
Now you can put Rosemary, thyme, basil, whatever you'd like you guys.
These herbs are so versatile.
You can make spaghetti sauces.
You can make salsa, whatever you like.
Just remember, don't forget to label, and live, love, laugh, grow stuff and eat it.
>>Randy, thank you for that wonderful tip.
I personally love growing dill cause I love it, that I can use the foliage from the moment it's basically germinated onto the end of its life cycle.
But right now I wanna share with you that on Facebook, we have our co-host Keith Nevison, and the team, they're there answering your gardening questions.
So we're happy to have our former host back as well with Pat's Plant Pick after each show, join Pat McCafferty on Facebook to see what he will share each month.
Mary, what a wonderful segment.
And we've got some wonderful questions here for you.
One of them, the first one is, why is goat's milk a good ingredient for soap?
>>Well, goat's milk has extra fats and a lot of enzymes and proteins and it just so rich for your skin.
>>It's a great moisturizer?
>>It is a wonderful moisturizer.
>>It's not something you find, you know, commonly found out in the marketplace and so it must be pretty special.
(laughs) >>It is.
It is very special.
>>Another question regards to the dye are, are some natural dyes more color fast than others?
>>Yes.
Some are more color fast.
You can get dye from almost anything that grows, but there are some that give you much richer more vibrant dyes than others.
So if you feel like you're worried about it washing out, use extra vinegar or extra morton to help that color adhere to your wool.
>>Interesting.
So will soaking it any longer help or- >>It does.
The longer you do it.
There's some times I even dye things a second time, because I didn't feel it came out strong enough.
Did you have to change the water temperature to do that?
>>Oh yeah.
No.
I would start a whole new dye bath and begin again.
>>Okay.
You can't reuse what you've already had.
>>You could reuse it, but I think you have already sucked a lot of the pigment out.
>>Okay.
>>So you wanna start again, so you have fresh pigment and in a fresh opportunity.
>>I think people have to think of pigment a molecule.
>>Right.
>>And it goes from the liquid to whatever fabric or, you know, item you've put in there.
>>In a commercial dye, the water actually ends up clear- >>Oh really.
>>Because you're taking all the extra- Yeah.
>>That's interesting.
That's very- I didn't realize that.
>>Yeah.
>>Okay.
Another question is, can your dyes be used in other ways, for example, ink for watercolors or to dye cotton fabric which can be sewn into clothing, quilts, etc.
This is Allan.
And she's curious about this.
>>Okay.
You- any natural fiber will work this way.
So cotton, yes.
You know, silk, you know, any natural fiber.
Yes.
>>But the polyesters, the- >>Well, I don't really work with polyester, but I think you probably would have to use a synthetic dye to get it to work.
And yet you could paint with watercolor.
You could paint with your dyes.
You'd have to really concentrate them.
>>Yes.
>>So let it cook down till it's very concentrated.
>>And not put a lot of water on that brush.
(laughs) >>No.
>>That would be a challenge too.
And the another question from Corey is, do you have to wash care for plant-based dyes differently than conventional dyes?
>>You shouldn't have to.
You shouldn't have to.
Of course, you know, you're always being careful with natural fibers.
You know, you don't want- they can't stand up to the harsh, you know, detergents and stuff that polyester or synthetics would.
So- but you shouldn't change anything with the dye.
>>Gotcha.
I noticed- well, you said that you like to dry whatever you've died out in the sun, does the UV rays break down these dyes?
>>I actually feel they brighten them.
>>Oh really?
>>Yeah.
But I mean, I'm a big fan of natural sunlight.
>>Yes I am too actually, it does the world good.
I've got a gardening question here, Mary, then maybe you can provide an answer for it.
Some- as it from a new gardener.
And what are some of the pros of gardening?
What are some of the positive things of gardening that we could share with this new gardener?
>>I think gardening is good for the soul.
>>Yes.
>>Getting your hands dirty, making things grow, nurturing.
I just think it's- and then having your finished product, beautiful flowers or vegetables to feed your family.
It's just good fo the soul.
>>It's a good connection.
>>Yeah.
>>I think some of us who have gardened a long time forget that part of it.
But I also think in the past year it's been renewed in our spirits.
It's a wonderful thing to pass on to your children and grandchildren and- >>Absolutely.
>>Good memories.
>>And it's good to spend time with them and to show them how the importance of being outdoors- >>Yes.
>>And to produce.
>>And care for things.
>>Yes.
So we have another question here.
It's concerning the freezes that are coming up, and I don't know if in Hanover you're gonna be get them usually get pockets of freezes.
>>Yeah.
>>Yes.
>>We are.
>>And the question is, do we need to cover hydrangeas, daffodils and dailies for the upcoming freezes on this- the nights this weekend?
>>The tender perennials you gotta be careful of, not hydrangeas or daffodils.
But if you put any annuals or tender perennials, you might want to.
>>Absolutely.
And another good rule of thumb is if a plant has broken bud- >>Yes.
>>Then you've got such tender new leaves there, it'd be smart to cover it with a sheet or something, not plastic, just a sheet or even a big box.
>>Yeah.
>>Some of these boxes that come with products in them that we've had shipped to us are of good size and they're perfect for putting over a plant.
So daffodils, no.
You don't have to worry about them freezing.
Neither are other tulips, but daylilies definitely.
Those are very frost tender as you mentioned, as you absolutely mentioned.
And you know, it's hard.
I guess we as gardeners, we have beautiful days, we jump the gun, we get things growing and going.
And the next thing you know, a frost will come and everybody has to remember our last frost date in central Virginia is in the middle of April.
>>Middle of April.
>>And it's hard.
It's hard, but hold fast and you'll make it.
Another question is, as a new gardener, what are the ingredients started- required to start and maintain a successful garden?
>>Lots of mulch.
(laughs) Lots of molds.
>>I would say to start with good quality sheers, you know, clippers, some gloves to protect your hands, good quality spade, and trout, and also a nice mat for your knees so that you protect your knees as you're kneeling, and also a fine quality water hose as well.
>>And a nice piece of graph paper that you can sketch out what you wanna do.
>>Yes, absolutely.
Keep track of things.
Always keep track of things.
I also think that the final thing is to remember, don't give up.
>>Yeah.
>>You're going to kill things.
So don't give up.
>>And if it's not working, it can be replaced.
>>Yes.
I've killed many plants, three or four times before I went, okay.
So, well Mary, this has been great.
But it's time to jump on now to see Keith- what Keith has done out in Highland County and he's in Tonoloway Farm, and we're gonna be continuing looking at those value added products.
>>So Christoph, can you tell us a little bit about your operation here?
We're in a black walnut orchard.
So can you describe what's happening?
What we're seeing right now?
>>Yes, we're standing here in our black walnut grove or sugarbush as they call it.
These are all native trees that were here long before we arrived at Tonoloway Farm.
What you're seeing behind us is roughly a thousand trees that are tapped for the harvest of their their sap, which we boil down into black walnut syrup.
>>That's fantastic.
How did you come across the name Tonoloway?
Can you tell me a little bit more about that?
>>Yeah, so Tonoloway actually refers to the limestone.
So for our first couple of years, this is about the only crop that we had, where these Tonoloway limestone pieces.
Tonoloway is a geological formation.
It's what gives the karst topography that all the caves and the steep terrain of Highland County is attributable to the karst topography.
The particular formation that we're standing on right now it's called the Tonoloway formation.
And so we decided to name the farm after what's below our feet.
>>And so when you first came here, I understand that you are raising different animals before you came across the whole food forest operation.
Can you tell me a little bit more about that?
>>Yeah that's right.
We started off raising fine wool sheep and pastured turkeys, which actually went very well but it took us a while to learn that steep wooded slopes are not the ideal place for raising livestock and really what it really comes down to is that this farm and this mountain side wants to be forest.
And so after several years of observing, we're just letting this land be exactly what it wants to be.
>>So black walnut is very unique to make syrup (indistinct) but I understand it's not new.
Can you tell me a little bit more about the history of walnut syrup making here in Highland County?
>>That's right.
I mean, in throughout this region, the central Appalachians, the indigenous populations, and in this area, the Shawnee were using tree syrup as their sweetener.
And so in the older time than with the pioneers as well, they weren't picky about making pure 100% maple syrup.
They would tap any tree that ran and that includes black walnuts, sycamore, birch, and maple of course.
And so we learned here with this abundance of walnut trees that we have on the mountain side that we could tap them.
And we started off with one tree our first year and then we tasted it and it's so rare to taste something you've never tasted before.
I was 36 years old the first time I tasted black walnut syrup and we got excited about that.
And while there's a sugar making tradition, a maple syrup tradition in Highland County, we realized that we've got a lot of black Walnut trees and that they can be tapped just the same as maple trees.
And so really what we're doing is we're bringing back a very old tradition and making something that's totally unique and a completely Appalachian flavor.
>>And understand that you're also using the trees for lumber and for nut production and for mushrooms.
Can you tell us a little bit more about some of the other things that you do here?
>>Yeah, so we have more than Walnut trees up here.
And like you said, we're- for lumber, we've actually harvested some of the trees for- to build our new workshop as our businesses growing where we're using the forest itself to help build.
And we have mushrooms, shittake mushrooms that are growing on oak logs.
And we've also planted a chestnut orchard.
So hopefully in five to seven years, we're gonna have our first harvest of chestnuts.
>>That's fantastic.
Well, the saps really running today.
So how about we go over to the sugar shed and check things out?
>>Sounds great.
>>So Christoph, we've moved over to the sugar shed where the magic happens.
Can you tell us how it goes from the tree to the bottle?
>>Yeah, absolutely.
So you saw that we tapped over a thousand walnut trees up on that hillside.
And one of the reasons you have to tap so many of them is that it takes roughly seven times as many walnut trees to get the same amount of sap compared with maple trees.
Maple trees are very generous with their sap.
The walnut just gives us a trickle.
And so we tap a huge quantity of trees just to get a harvestable amount of sap.
And we haul that sap in, we pump it up to this tank, we've got a steel tank that's above our heads here.
And then it gravity feeds down into that big flat evaporator pan that you saw.
That's got a wood-fire underneath it.
And the wood-fire causes the sap to boil.
And over the course of 20, 24 hours, sometimes days on end we boil and as the steam rises up, it concentrates the sap.
And it takes about 70 gallons of sap to give us one gallon of finished walnut syrup.
>>That's remarkable.
Wow.
>>And so speaking of finishing, this is walnut syrup that is in what we call the finishing pan.
It's still over wood-fire, but it's a much more controlled environment where we can go and get just exactly the sugar content that we're looking for.
So if you want, and you can have a taste of it right off the pan.
>>I would love to.
>>All right.
There you go.
>>Thanks.
Wow.
It's delicious and really unique.
It's got quite a strong flavor.
>>Yeah, exactly.
Now see, walnut syrup has a very strong flavor profile, which means that a little goes a long way.
You can use it right as an ingredient on, say a drizzled on yogurt, or as a glaze.
Frankly I don't put it on my pancakes because it's such a strong flavor, but what we do that's wonderful is we blend it with maple syrup.
>>And I understand that you're also doing some research with Virginia Tech.
Can you talk a little bit more about what's happening with them?
>>Yeah, exactly.
So we're working with Virginia Tech and a number of other research partners to try to understand the science behind walnuts syrup.
Even though this has been done for centuries, we can say we don't quite understand exactly the mechanisms behind the flow of sap from walnut trees.
It's not well understood the way maple trees are- have been studied.
And the other thing we're really looking into is the pectin.
Walnut sap contains pectin, same thing that you put into jam or jelly to make it thick, except we don't want our sap to be thick.
We want it to turn into a nice, smooth syrup.
And to try and understand how we can remove the pectin through filtering or other processes is the nut that we're trying to crack and we're happy to be working with some research organizations to study that.
>>That's fantastic.
And I also understand you do hickory syrup as well.
Can you talk a little bit more about how you process that, it's done a little differently than walnut and maple syrup, correct?
>>Yeah, exactly.
So hickory trees, if you were to tap a hickory tree, you wouldn't get any sweet sap from it.
It's a hard, dense tree and it doesn't produce sap the same way.
Now, what we do in order to get the taste of the hickory trees, we harvest the bark from the shagbark hickory tree, we clean it and then we roast it until it gets real smoky.
And then we grind it and mix it with pure spring water in order to make basically a hickory extract, and that sweetened with organic cane sugar.
And that gives us just another unique taste of these Appalachian hardwood forests.
And so, you know, the combination of hickory syrup and maple syrup and walnut syrup, and then blending different combinations of them is something we're really excited about.
>>Well Christoph, thanks so much.
It's been a lovely day out here.
So tasty.
I wish you all the success going forward.
Thanks so much.
>>Well thank you for coming.
It's a pleasure having you here, and for folks who don't get the chance to get it right hot off the pan, we do offer it for sale at the farmer's markets.
We invite visitors to come to the farm and get their syrup right here in person.
And we also offer it for sale through our website.
>>Fantastic.
Thank you.
>>Thanks for coming.
>>Well Christoph, that was fascinating.
I thank you for making the trip here to be on the show, to share with us even more information on creating different syrups.
But before we get started, I wanted to reach out to everybody and remind them to please send in your gardening questions via Facebook or email.
We've got a team there to help answer them, as well as to be able to use them on this show.
So we look forward to hearing from you.
Christoph, you've got some pretty interesting supplies right here, and it's interesting to see what you've brought and that you are tapping so many different types of trees, but here we have a very unique maple, not our typical sugar maple, correct?
>>Yeah, that's exactly right.
This is a red maple, which grows throughout Virginia and you can also tap a red maple tree just like a sugar maple.
You won't get quite as much sugar from it.
The percentage is a little bit lower, but you can tap it, boil it down and make syrup just the same as sugar maple.
>>But these grow more throughout Virginia where sugar maples are really up in the mountainous areas.
(indistinct chattering) Yes.
Yes.
And that's why we are- we do have the most Southern sugar maple forest I'll say, not forest, but syrup production here in Virginia, just a little bragging point.
>>That's exactly right.
>>Tiny tidbit of information.
But the actual tapping of the tree, would you tap a tree this size?
>>This tree is a little small.
This is my travel sized tree that I brought with us today.
Normally in the woods, you wouldn't have anything that's smaller than 10 inches diameter, and you get a lot more saffron, something a bit bigger, a 15, 18, inches diameter is a great tree to tap.
>>How far apart do you put the taps on a tree?
>>So you would only put one tap on a smaller tree, a tree larger than 18 inches, you could put two taps in.
And then when you get to the really large trees, 30 inches or larger then you might start considering three taps.
And they need to be- basically if you are tapping them in the same season, you want them to be on different sides of the tree so that you're not extracting that precious resource from the same spot in the tree.
>>Okay.
And then do you- the next year, do you rotate it or do you go to a different tree or- >>Yes, the tap does leave a little bit of scar tissue.
Just like if we were to have a little cut, there would be a scar the next year same thing happens to the tree.
And so you wanna avoid that scarred area and go at least six inches over and a foot up basically trying to avoid that area.
So you're tapping into fresh sap wood.
>>Excellent.
So you don't have to girdling the tree accidentally.
>>That's exactly right.
Because the most important thing to us is to not over tap the trees, we want them to be healthy for years and years to come.
>>That's your resource.
>>Exactly.
>>Yes.
So how do you tap a tree?
>>Well, what we do is pretty much something you can do with tools you may have at home.
We're gonna take a power drill and the size of the bit corresponds to the size of the tap that we're using.
And we're gonna find a spot in the tree that hasn't been tapped yet before.
Like I said, a few inches over and up, and in this case we're gonna find a spot right here.
It looks pretty good.
And then we're gonna drill a hole in about between an inch and a quarter and an inch and a half into the tree.
There we go.
And then we take this tap.
Now this is made just for sugaring as they call it.
This is a tap, it's meant to go into the tree.
This is actually one of the experimental taps that we're working with.
Inserted by hand, and then just a few gentle taps until it's snug.
>>Okay.
>>There we go.
And if this were a tree in the woods, we would probably start to see the first little drops coming out.
>>Immediately.
>>Exactly.
>>Well, when do you know when to put the taps in in the winter time?
>>It's a great question.
We just finished our sugaring season and up in Highland County, we are looking for the time of year when basically winter is breaking.
When we have nice cold temperatures at night, it goes below freezing at night and then above freezing in the daytime.
And it's that freeze thaw cycle that really contributes to the sap flow, the sap movement.
And it's a relatively short window, typically about six weeks in late winter early spring.
This year, it was even shorter.
About three and a half weeks was our sugaring season.
So it's the weather and the forest itself that determines that time of year.
>>What signals that it stopped?
>>The trees themselves tell us that they're done.
Now, there are a number of factors.
First of all, the first sap of the season is gonna give us really light colored syrup with the really mild flavor.
As temperatures warm up, you're getting more nutrients pushed through the sap.
'Cause the trees are trying to put leaves out very soon.
They're preparing their buds.
And so that's gonna create a darker, more rich flavored syrup.
We reach a certain point when it gets so dark, there's an overbearing flavor, it just doesn't taste good.
And at the same time, the sap flow is gonna slow down as well.
Basically the tree is healing that little tap hole that we made and it's telling us it's time to stop.
>>Yes.
It's doing COVID.
But anyway- (giggles) Compartmentalization anyway.
The other question I had is, how many miles of tubing do you have at Tonoloway farm?
>>Yeah, that's a great question.
In the old days, they would use buckets on each tree, right.
And you would haul the buckets in.
We have over 1,600 taps and not we don't have the labor to carry all those buckets.
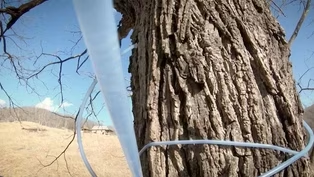
So we use this tubing, which has made for transporting the sap.
Small tubes connect to bigger tubes, the bigger tubes flow downhill and that all goes to our collection tanks.
And so that's sort of a more let's say labor efficient way of harvesting sap.
And to answer your question, I would estimate we have at least five maybe five and a half miles of tubing in our forests.
>>Interesting.
How do you clean all that tubing?
>>It's a great question.
Because as spring comes, it warms up, you get a little bit of bacterial growth in the tubing which is not something that you want in your syrup.
And so we flush them with clean water every spring to make sure that we get in all the gunk out and then we closed them up so that nothing can get into the lines during the off season.
>>Excellent.
Excellent.
Well, speaking of sap, what did you bring for us?
>>Well, what we're doing is, we're gonna demonstrate how we check to make sure we've made syrup.
Because essentially to get from here to finish syrup there's a lot in between.
We boil it over wood-fire in a big pan, two foot by six foot pan.
And you can imagine the amount of firewood that goes into boiling that for literally days on end.
But as the steam rises up, we go from 70 gallons of sap to give us one gallon of syrup.
>>That's amazing.
>>That's the ratio for the black walnut trees, with maple trees it's a little bit better.
But all of that depends on the sugar concentration coming out of the tap.
>>Yeah.
So more water you've got to boil it longer.
>>Exactly.
But then the question, how do we know when we're done?
We're looking for the sugar percentage, it's a term called bricks.
We're looking for 67 bricks.
That's the sweet spot.
Pardon my pond, to tell us that we've got finished syrup.
And what we can do is actually check that by looking at the density of the syrup.
To check the density, we use something called a hydrometer and we're gonna float that in our syrup.
And you can see these red lines that corresponds to a specific density of syrup.
Normally this would be calibrated at well over 200 degrees.
We don't wanna have that on the table here.
And so you can see that it's floating a little high.
>>Yes.
>>If this was at 200 degrees, that red line would be right flush with the syrup, and that's how we know we finished it.
>>Absolutely perfect.
Wonderful.
So I'm very eager to taste all of this syrup because as you know, I mentioned earlier, back in my younger years, I used to tap and boil and create our own syrups when we lived up in New York.
And so I'm kind of a kind of (indistinct) so show me Christoph.
(laughs) >>Absolutely.
I'm happy to share.
Now what we have- to begin with, this is classic maple syrup.
It's got a nice Amber color.
And I mean, a lot of people don't even know that we can make maple syrup in Virginia.
And so this is a real treat to be able to share this flavor.
And these are all from trees, tapped in Highland County, and yeah, I'd invite you to have a taste first of the classic maple syrup.
>>Yes.
Wonderful.
Delicious.
>>I hope it compares well to what you've tried before.
>>It does.
>>Now to get a little bit more interesting- >>Yes.
>>We- as you know, we tap black walnut trees and that's fairly unusual, but it's also a very old tradition, and it takes roughly seven times as many trees to get the same amount of syrup- >>That intrigues me, yes.
>>And seven times as much work to produce it, which is why I'm tired.
It's been a long season and this gives us this wonderful syrup.
This is maple syrup mixed with black walnut syrup.
And I'll have you try that before we get to the pure stuff.
>>Well, we've got a minute left there so.
I like that combination, yes.
>>A little more complexity.
>>A little more complexity, yes.
Not so sweet.
>>Exactly.
And now last but not least, I'd like you to try the pure black walnut syrup, which is sort of a precious commodity.
>>Oh, that's delicious.
I'm a black walnut fan now, but boy the after taste on the tongue, I highly recommend this everybody.
This is delicious.
So where can I- I wanna say where can I get this?
(laughs) I'm sure at your farm, you have an all person options.
>>We sell it at the farm, we go to farmer's markets in Stanton, Alexandria and Richmond starting this year.
And we also have it available through our website online.
We mail all over the U.S, we sent syrup to Hawaii a few weeks ago.
>>I like the blend and I liked the black walnut.
The maple is equally as good.
So thank you.
Christoph, this has been fascinating.
I thank you for giving insight into actually a product that's produced here in Virginia that we've kind of all can think we can just go and put it onto the shelf.
So thank you.
>>Thank you so much.
>>And now we're going to get ready to answer your questions.
But first we have a tip from Jen, on how to make eye watering, wild onions into mouthwatering.
So keep your eye out on Facebook for the recipe.
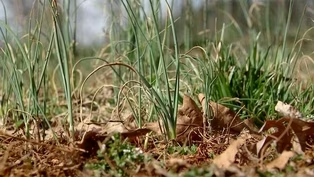
(upbeat music) >>We are gonna be harvesting wild onions today.
They are everywhere in March.
They are fresh, local and they are just absolutely fantastic.
You can just go ahead and take the scissors out and you can snip the right at the- at closest to the ground as possible, just like this.
And you can just take the husks off and you can smell it.
Just smell of the onions.
It is same family as Allium and it looks just like chives and you can sprinkle it on different kinds of dishes or I like to go out and harvest the whole plant, including the bulbs, it's sweeter.
I'd love putting in the soups because the whole plant just gives a just wonderful flavor.
And also the bulb is packed with nutrients, just like onions or garlic.
So I encourage to go and use the whole plant.
Now in a hard clay soil it's gonna be hard to dig everything out because wild onions they really go in too deep into the ground and roots.
So what I do is just take one of these and just dig deep and pull it out.
And there they are, voila.
They're just beautiful, and they smell just absolutely exquisite.
So I'm gonna be using these for miso soup today, get out there and pick out your own, because they're available everywhere and take it home and use it as if they're normal regular chives or onions or garlic.
It adds so much flavor to your dish.
And it is nutrient packed vegetable that you can find everywhere.
Get some fresh air, go outside and harvest them wild onions and go home and cook, cook, cook.
>>Jen, I love how you always make us look for things in a different perspective that's out in our garden and in our yards.
And actually that recipe for miso soup will be on Facebook.
So watch you again to remind yourselves.
Yeah, if you have any questions please send them in on Facebook, Keith and the team is there waiting for them as well as we'd love to offer them here in the studio.
So we have an awesome Facebook page and we always look for ways to produce and actually present very timely information.
So check back regularly and remember again to look for parts plant pick after the show and this month he'll be showcasing air plants.
So I'd like to start with some questions.
>>Perfect.
>>First one is, how much sap do the trees produce in a day?
>>It's a really good question and it's really variable.
Depends on a few things.
Depends on the specific species of tree.
The sugar maple of course, is notorious for producing a good quantity of very sweet sap.
So you might get upwards of a court or even more out of a sugar maple tree in a single day.
The red maples would probably give you an equal amount of sap but it's gonna have a little bit less sugar in it, something like a black walnut tree.
Some of the trees might give us numbers that are close to a sugar maple, but the majority give us just a trickle.
And that's why it takes so many more trees and so much more work to make black walnuts here.
(laughs) >>I was gonna say, that was delicious.
It's worth every single drop of it.
So thank you.
Slow growth.
Black walnut trees do grow notoriously slow.
So how old does it black walnut tree need to be before you can start tapping it?
And how did you find the trees that you need for the- your production run?
>>So it's two part question.
The black walnut trees do grow relatively slow.
All they do- they grow a little bit faster than a sugar maple actually, what's key is the sapwood, the outer layer of that tree, the outer rings that are alive that have the sap flowing through them.
And that's determined primarily by the diameter of the tree.
And so we're looking for trees that are at least 10 inches but preferably 18 or more.
And they're gonna have a thick enough sapwood layer that you can tap and actually get something from them.
>>Interesting.
So did you just happen upon the property or were you fortunate to find them- >>Well, truth be told we fell in love with the place for its its physical beauty.
We weren't out looking for black walnut trees.
And in fact, when we started we knew that there was a tradition of making maple syrup in our county.
And we started looking, counting the trees, okay we've got a maple here and a maple there but we have all these darn black walnut trees, if only they were maple trees.
(laughs) And it was only a couple of years later that we finally learned that actually the old tradition was of tapping all the trees that produce sweet sap.
And then we realized we had a very unique resource, having a mountain side that's just full of black walnut trees.
>>What a gift.
>>Indeed.
>>What a wonderful gift.
So what's the relationship between soil nutrients and the sweetness of the syrup and, you know, does place influence taste?
>>Like a fine wine or a coffee?
Yeah, that's a great question.
>>Terra firma.
(laughs) >>Exactly.
I would say soil nutrients are key to the health of the trees themselves, right.
You wanna have a balanced ecology in order to have a healthy forest, healthy forest have healthy trees.
Now I can't say specifically that you can taste the soil nutrients in the syrup, but what I do know is that as the ecology is balanced, as the trees have the nutrients they need they're more likely to produce sweet sap.
And in fact, the sweetness of the syrup and sweetness of the sap varies from year to year.
But we find that it's mostly related to the preceding summer.
If we had a really sunny year, lots of sunlight, lots of chlorophyll, the trees got their share.
They converted that sunlight into sugar, and the next year they'll run sweet.
There been summers that were really rainy, very overcast.
>>I was gonna ask, does the rainy season affect it?
>>Yeah, you'll get watery sap the next year.
>>So you don't want a wet, oh, nice wet summer.
>>We want sunshine.
(laughs) >>You want happy sunshine.
And a decent rain to keep the trees healthy, but not too much.
That's right.
Ah, things that you can't control in farming, you know.
(laughs) Blend ratio for the syrup.
How do you determine the mix for maple and walnut and (indistinct) It is super delicious.
Yes.
>>It's another good question.
We really essentially start with a very light maple syrup because we don't want the maple to have- to dominate the flavor.
And then we begin adding black walnut syrup until we begin to taste the black walnut complexity coming through.
So it varies by batch.
The walnut has a very strong flavor.
And so we add it little by little, ends up being between I would say a third or a quarter black walnut to the rest maple.
Sometimes as much as a 10th of black walnut to the rest maple.
It just depends on the strength of each batch.
>>Right.
So it's basically from season to season, the ratio could change depending on the I'll say density of the syrup.
>>Exactly.
And that's a little bit of the kitchen art that we do and our blending it to try and get that flavor balance.
>>What's your secret recipe?
(laughs) You can't give that away.
What's the shelf life of maple syrup created at the farm.
>>So maple syrup, if it is bottled at the right temperature and that temperature is above 190 Fahrenheit, so we're talking at a very high temperature, in a properly sealed bottle it will last almost indefinitely.
I've heard of stories of people cleaning out the attic of an old family farmhouse and finding syrup that was 50, 60 years old and they opened it and it was good as- fresh as new.
>>Brave people.
>>Indeed.
(laughs) So it will last a long time.
Now once you crack that seal, of course it's exposed to the air.
You ought to keep it refrigerated to keep it fresh.
>>That's fantastic.
Well, real quick I'm asking one question is, pull leaves in the yard, we'd let the leaves in the fall to support insect growth in our suburban yard.
And now spring has sprung and I have a ton of whole leaves.
What should I do with them now?
I would suggest you run your lawnmower over them as best you can, break them up and push them back into the soil.
And to learn more about gardening, this month, the month of April in our community, we have some festivals coming up.
We have Maymont Herbs Galore and More on April 24th and on the same day on April 24th, Monte Cello center for historic plants spring sale.
I want you to check out both Maymont and Monte Cello's websites for more information on those plant sales.
Next month, our show is all about public lands and public gardens.
And we will visit a natural area preserve in Stafford and a Woodland garden in Lexington.
What can we learn from comparing these natural and designed ecosystems?
In the studio, we will talk about unique natives and also some of the invasive species posing a threat to our environment.
So we will see you then.
And as I wanna say goodbye- Christoph, I truly appreciate you coming out here from Highland County to share your expertise and educate us more on the syrups that are in the shelves and in our stores and the uniqueness of buying them from farmers such as you as a value produced product.
But I also want everyone to remember that gardening is for everyone and we are all growing and learning together.
And I thank you for watching.
>>Production funding for Virginia Home Grown is made possible by- (upbeat music)
Video has Closed Captions
Clip: S21 Ep1 | 8m 26s | Learn how to easily create your own plant-based dye. (8m 26s)

Video has Closed Captions
Clip: S21 Ep1 | 9m 2s | Learn how tree sap becomes syrup. (9m 2s)
Video has Closed Captions
Clip: S21 Ep1 | 2m 21s | Tips for starting herbs and potting up to larger containers. (2m 21s)
Video has Closed Captions
Clip: S21 Ep1 | 7m 30s | Discover unique Appalachian tree syrups. (7m 30s)
VHG Clippings: Value-Added Products
Video has Closed Captions
Clip: S21 Ep1 | 26m 46s | Discover unique value-added products created by Virginia farmers. (26m 46s)
Video has Closed Captions
Clip: S21 Ep1 | 7m 42s | Learn about raising sheep for wool and goats for milk. (7m 42s)
Video has Closed Captions
Clip: S21 Ep1 | 2m 3s | Many people think this is a weed but really it is a tasty ingredient. (2m 3s)
Providing Support for PBS.org
Learn Moreabout PBS online sponsorship

- Home and How To

Hit the road in a classic car for a tour through Great Britain with two antiques experts.


Support for PBS provided by:
Virginia Home Grown is a local public television program presented by VPM